
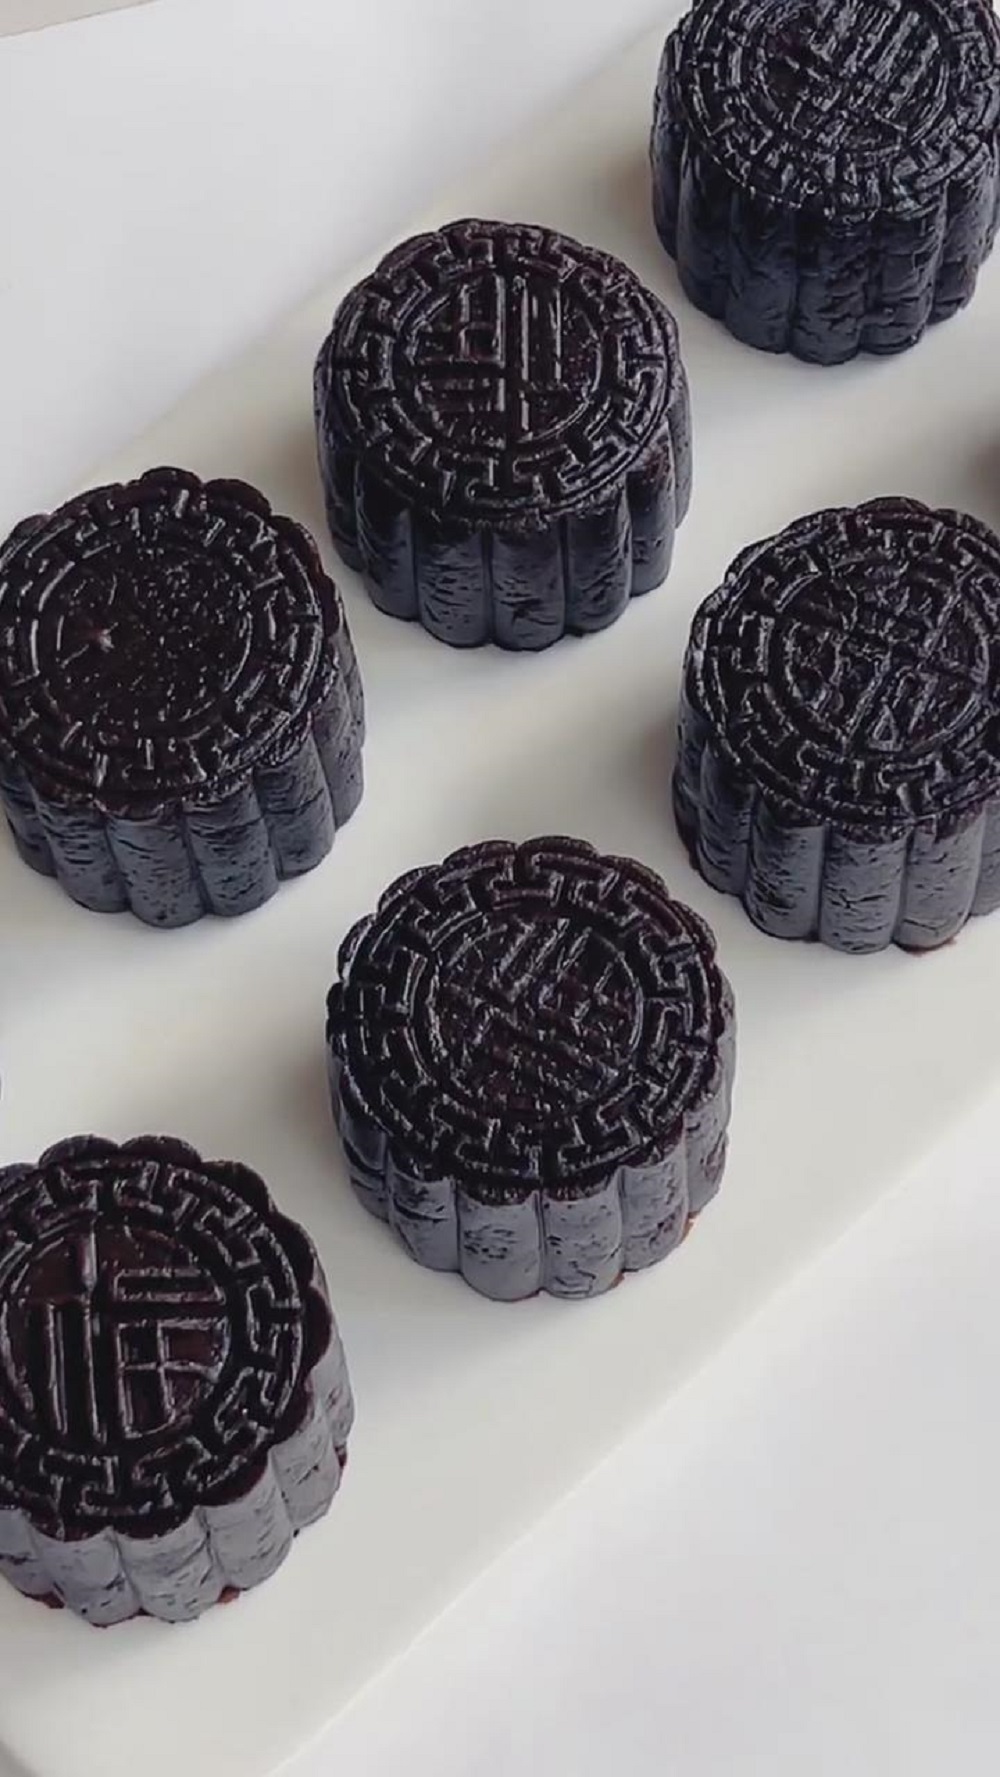
I’ve been craving something a bit different for mooncakes, and this Oreo cheesecake version is a game-changer! The creamy cheesecake filling paired with the crunchy, chocolatey Oreo crust is a match made in dessert heaven. The best part? They’re easy to make and perfect for any occasion. If you love cheesecake and mooncakes, you’re going to fall in love with these. Let’s dive into the recipe!
Why You‘ll Love This Recipe
I decided to get creative with mooncakes and turned them into something extra special with an Oreo cheesecake twist. These mooncakes combine a creamy, smooth cheesecake filling with the rich, chocolatey crunch of Oreos. Plus, they’re so simple to make! You won’t need to bake them, just a bit of chilling and shaping, and they’re good to go. Perfect for anyone who loves Oreo or cheesecake—or both!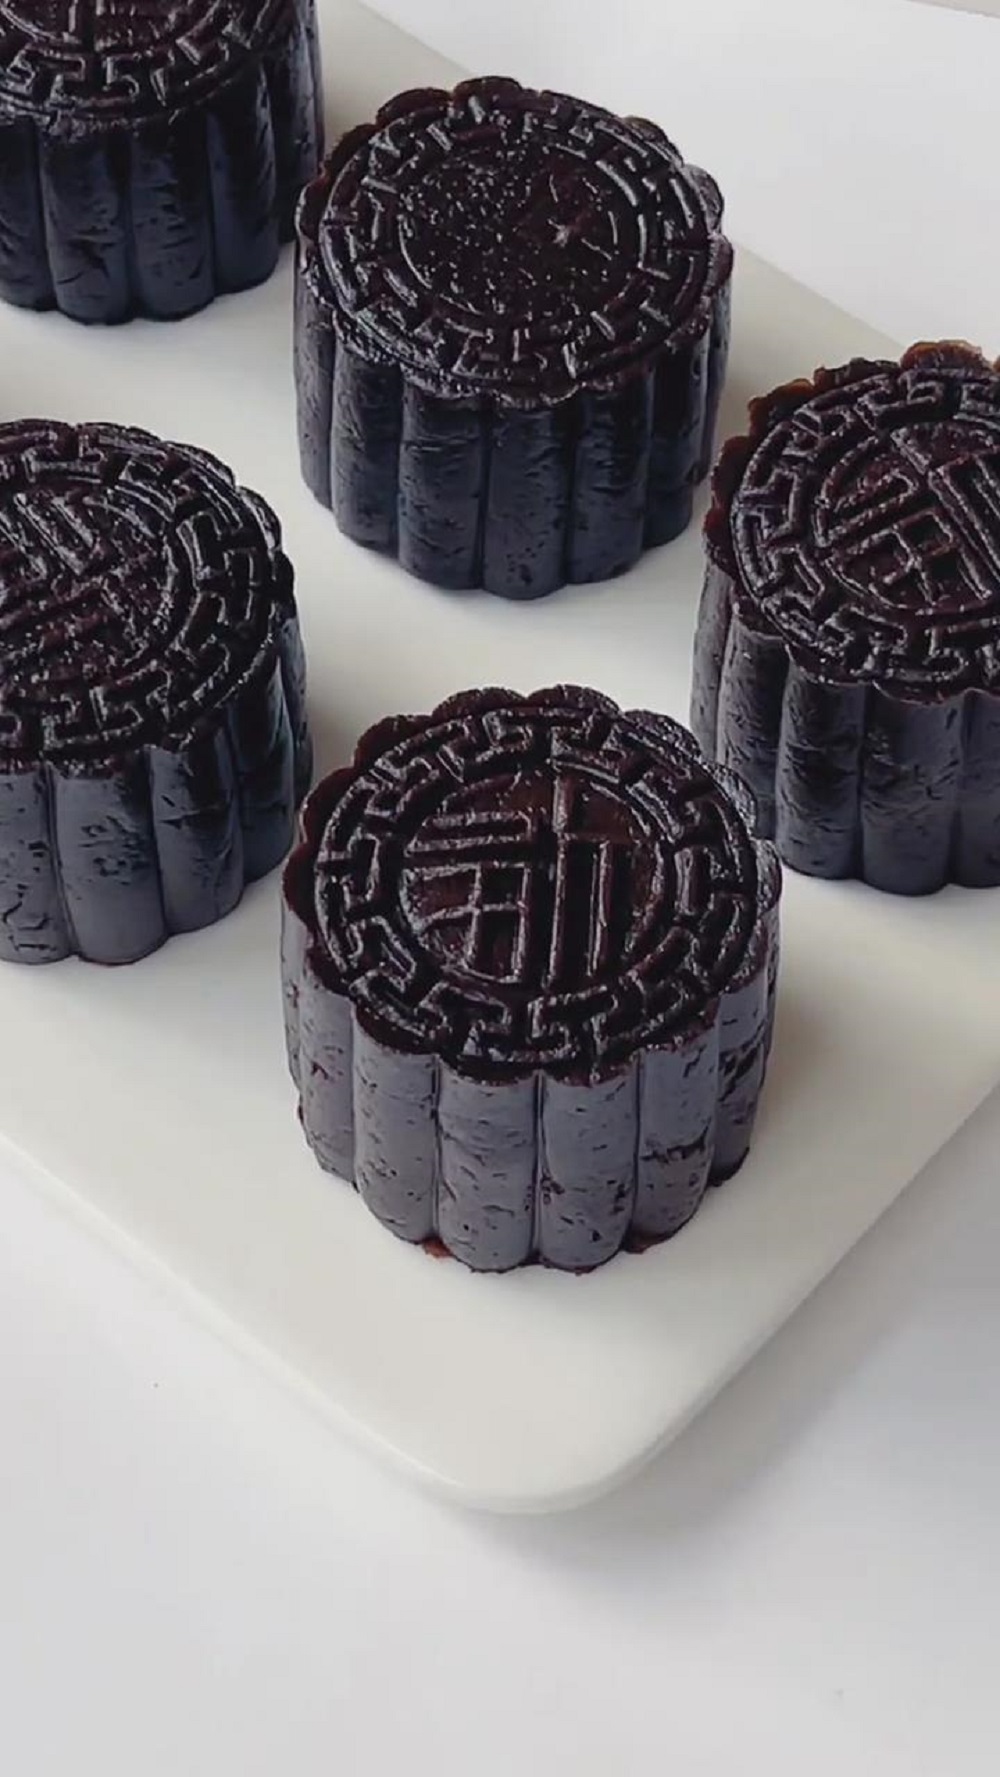
Successful Tips:
Oreo Texture Tips
To get the perfect Oreo crust for the outer layer, I recommend breaking the Oreos into smaller pieces with a rolling pin or food processor, but don’t crush them into powder. You want some texture for that crunch.
Cheesecake Filling Tips
When softening the cream cheese, make sure it’s at room temperature. This helps create a smooth, lump-free filling. The Oreo crumbs add a delightful contrast to the creamy filling, making each bite irresistibly good.
Freezing Tips
When you freeze the filling, be sure it’s firm enough so that it won’t melt when wrapped in the outer layer. It’ll make the molding process much easier. If you prefer a less sweet filling, you can reduce the sugar slightly.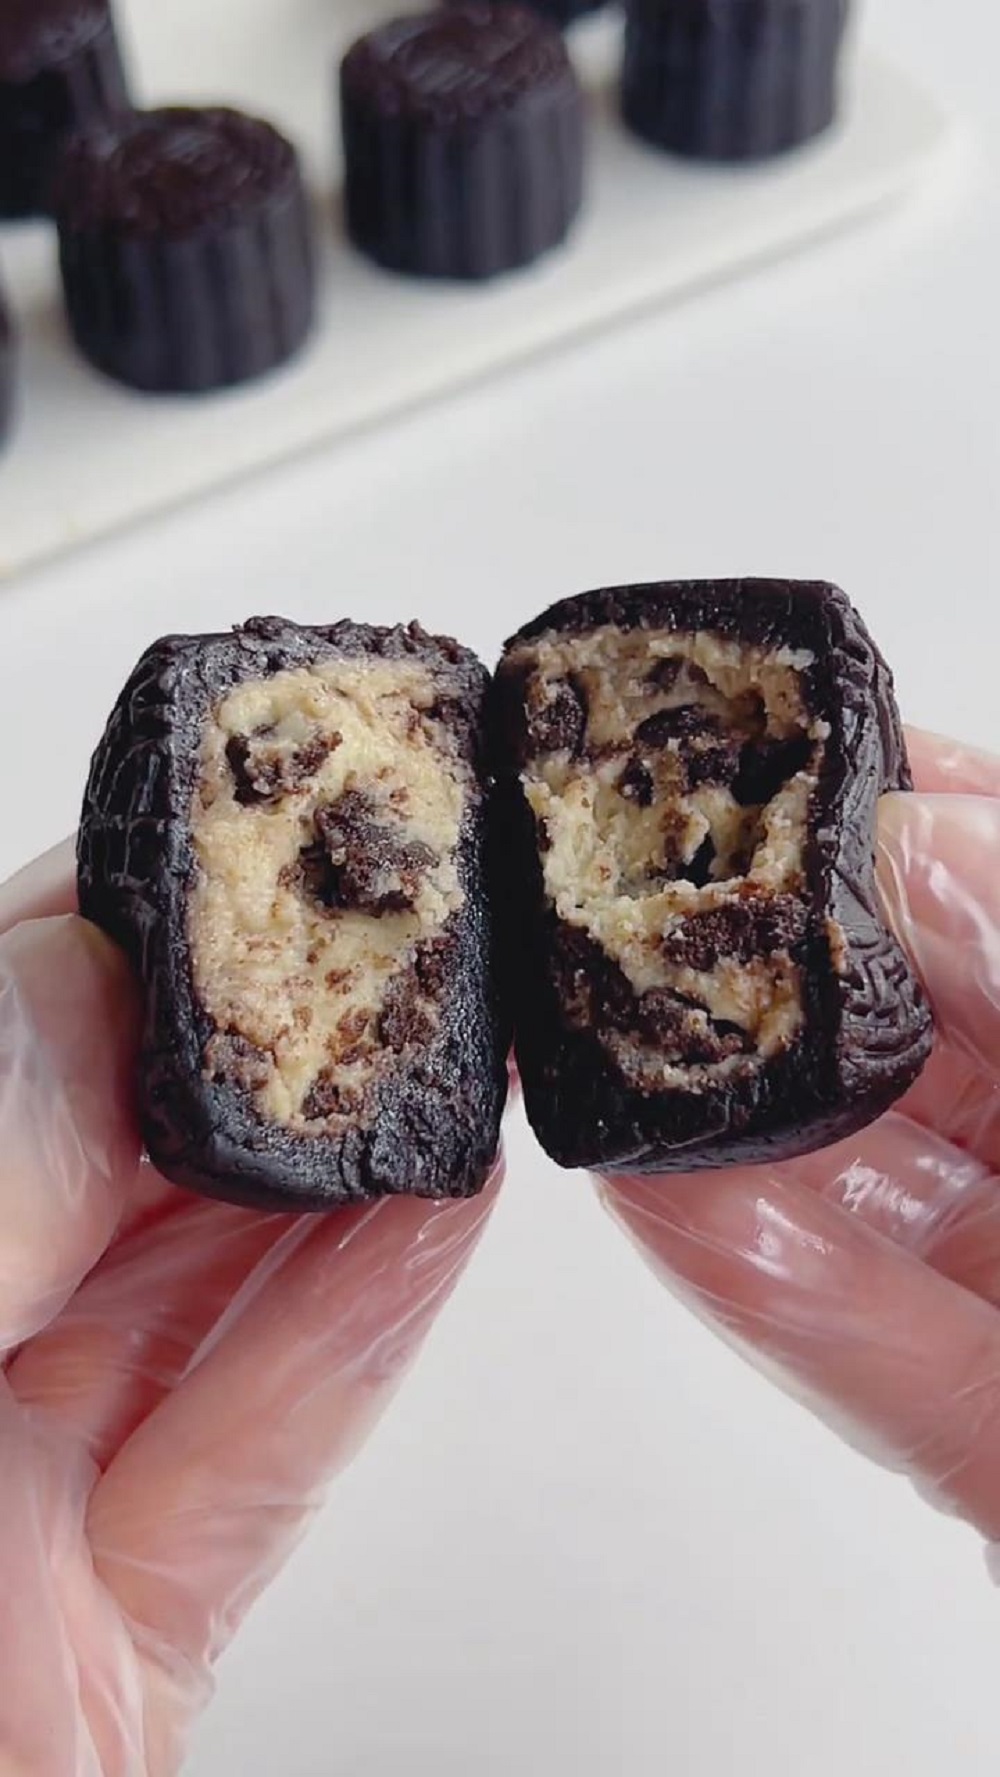
Ingredients:
For the Cheesecake Filling:
- 180g cream cheese (softened at room temperature)
- 15g granulated sugar
- 50g Oreo crumbs
For the Mooncake Crust:
- 180g Oreo crumbs
- 70g whole milk (or as needed)
Instructions:
Prepare the Cheesecake Filling (Key: Smooth and creamy)
Start by softening the 180g of cream cheese. Let it sit at room temperature for about 10-15 minutes so it’s easier to mix.
In a mixing bowl, combine the cream cheese with 15g of sugar. Use a spoon or hand mixer to blend them together until smooth and creamy—this will create a soft, silky filling.
Add 50g of crushed Oreo crumbs into the mixture and stir gently to combine. This will add a slight crunch to the filling.
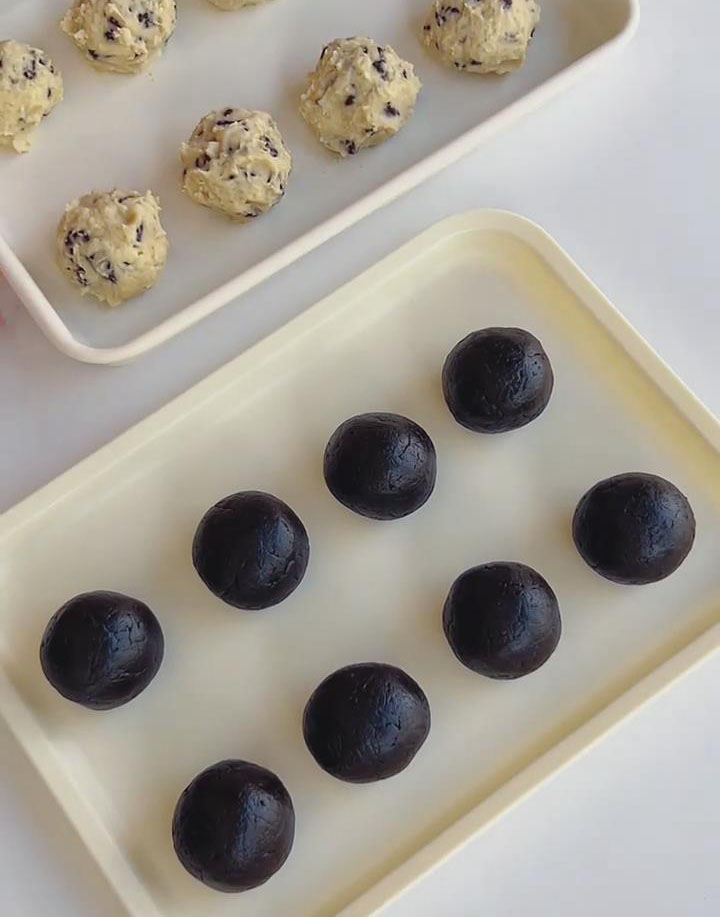
Shape the mixture into 20g portions. Roll them into balls and place them on a tray. Cover with plastic wrap and freeze for at least 30 minutes, until the filling is firm enough to handle.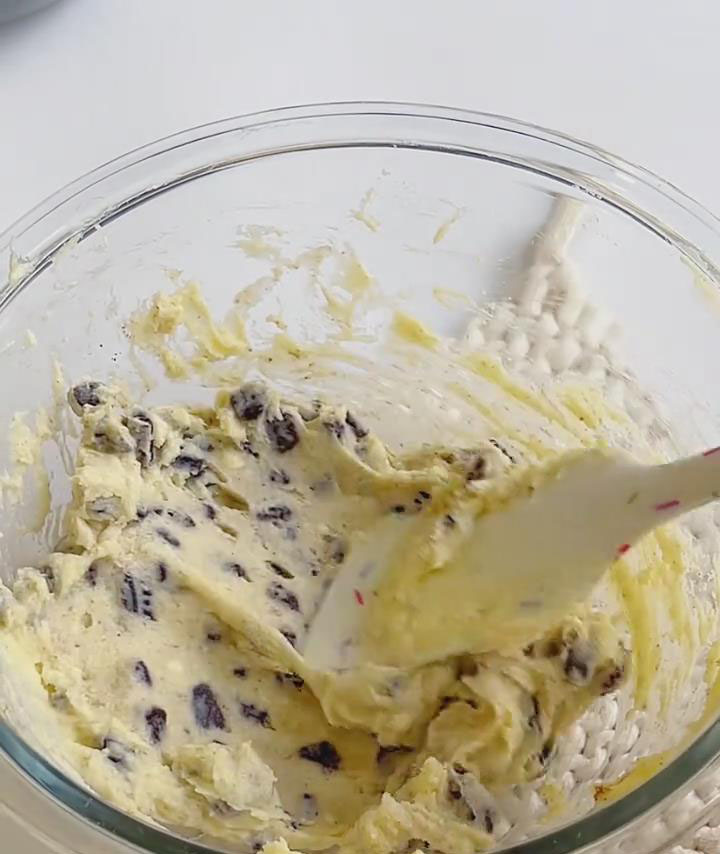
Prepare the Oreo Mooncake Crust (Key: Right consistency)
In a separate bowl, place the 180g of Oreo crumbs. If the crumbs are too large, you can crush them a little more using a rolling pin.
Add 70g of milk to the crumbs. Mix the ingredients with your hands or a spoon until it forms a dough-like consistency. The dough should be soft but not too sticky—if it’s too wet, add a little more Oreo crumbs; if it’s too dry, add a splash more milk.
Divide the dough into 40g portions, rolling each portion into a ball.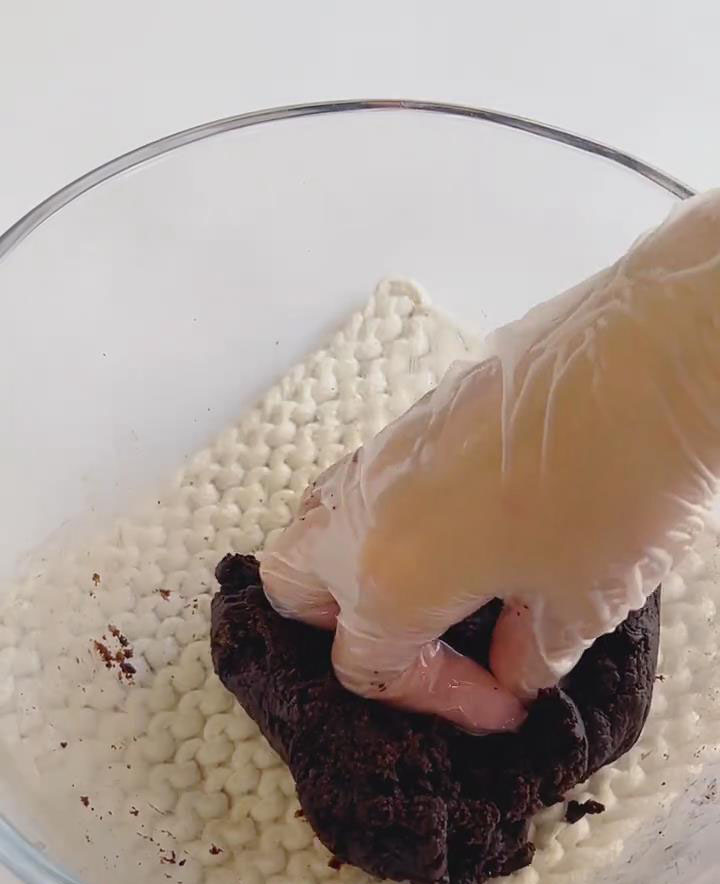
Assemble the Mooncakes (Key: Neat and tight packaging)
Remove the cheesecake filling from the freezer. It should be firm and easy to handle.
Take one of the 40g balls of Oreo dough and gently press it flat into a circle, making the center thicker and the edges thinner.
Place a 20g ball of the cheesecake filling in the center of the dough circle. Carefully fold the edges of the dough over the filling, pinching and sealing tightly to form a ball again. Make sure the filling is fully enclosed.
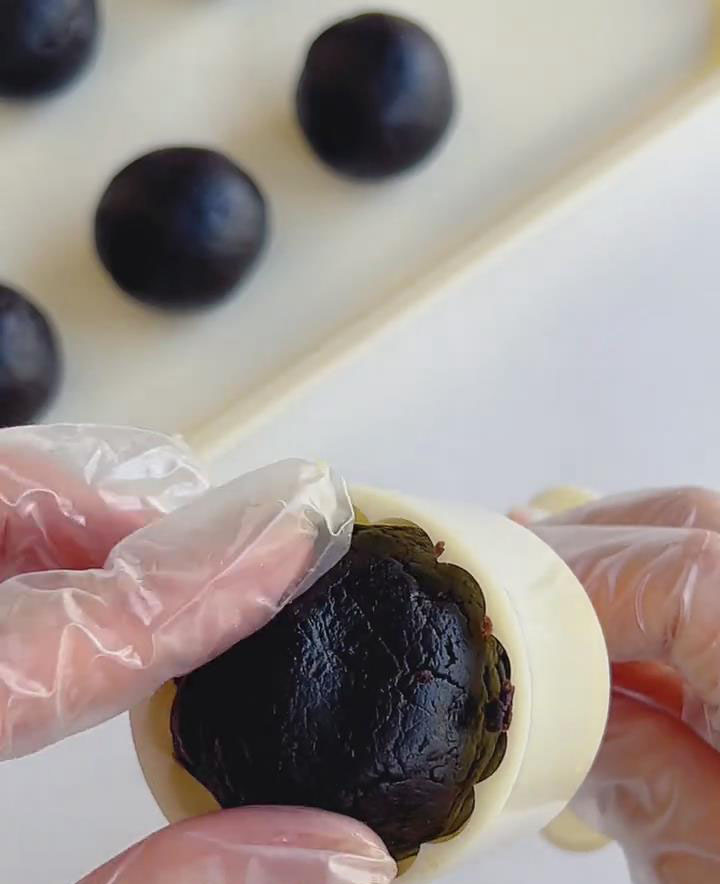
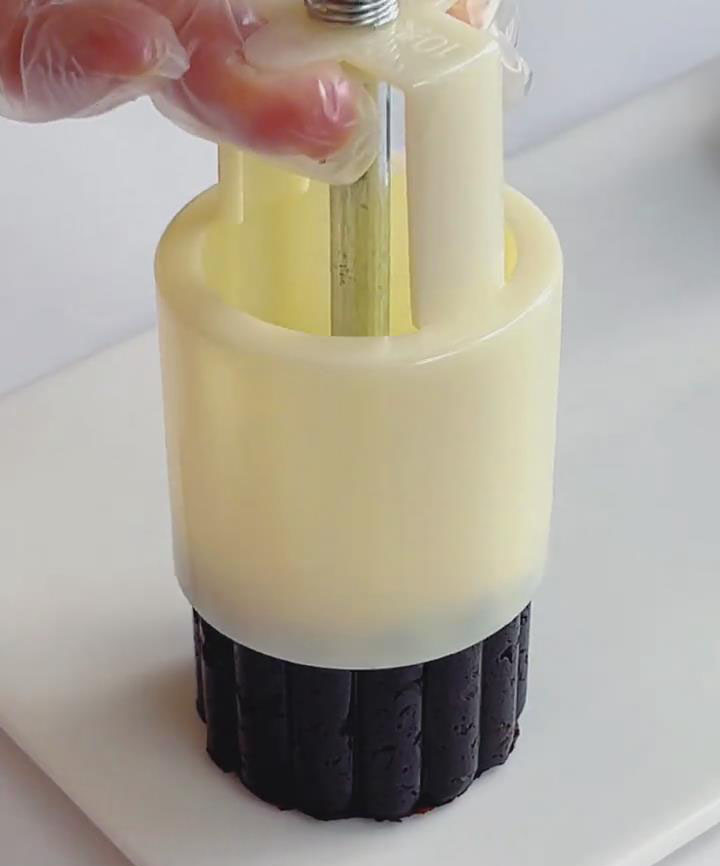
Lightly dust the inside of the mooncake mold with some extra Oreo crumbs to prevent sticking. Place the filled dough ball into the mold and gently press it down to shape it.
Release the mooncake from the mold and place it on a tray. Repeat with the remaining dough and filling.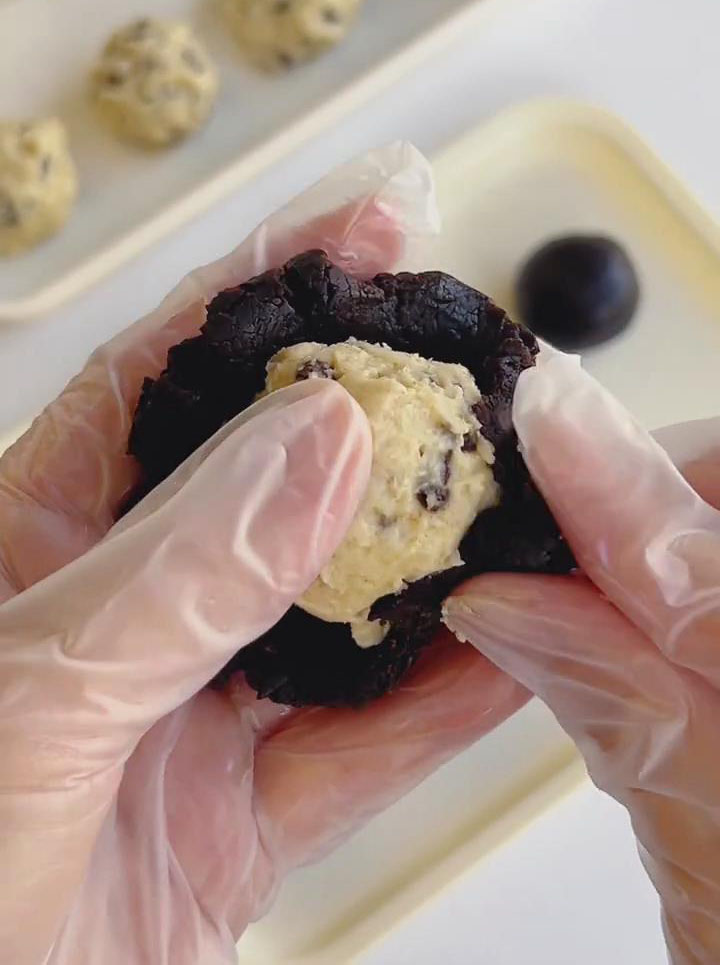
Freeze and Set (Key: Proper chilling)
Once all the mooncakes are shaped, cover them with plastic wrap and freeze them for at least 2 hours, or until firm.
After freezing, the mooncakes will be ready to serve!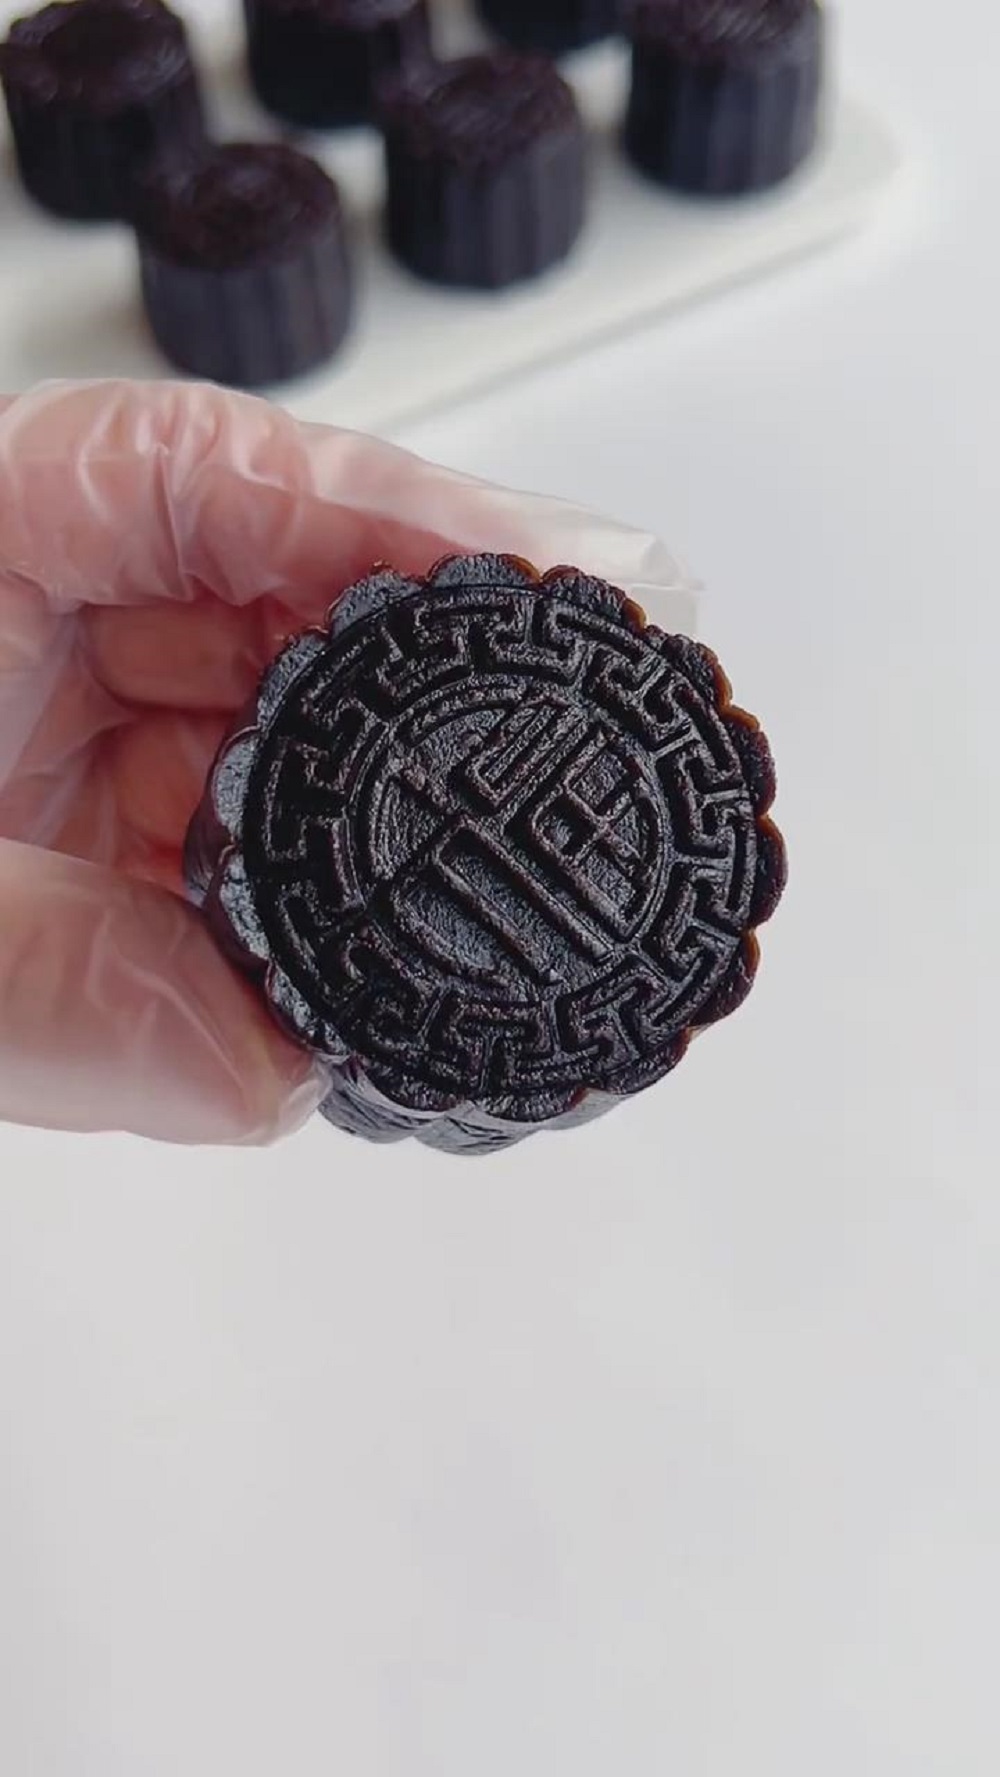
Storage & Serving:
Storage:
Store the completed Oreo cheesecake mooncakes in an airtight container in the fridge. They will keep well for up to 3-4 days. If you want to store them for longer, you can freeze them. Just make sure to let them thaw at room temperature for a few minutes before serving.
Serving:
No need to heat these mooncakes; they are best enjoyed straight from the fridge. Their flavor is perfectly balanced, with the rich, creamy cheesecake filling and the crunchy Oreo crust. It’s a fun and sweet twist on traditional mooncakes!
Frequently Asked Questions:
Can I use other cookies instead of Oreos?
Yes! If you don’t have Oreos, you can use any chocolate cookie or even graham crackers for a different flavor.
Can I make these ahead of time?
Absolutely! These mooncakes can be made ahead and stored in the freezer. Just take them out 10-15 minutes before serving so they soften a bit.
How can I adjust the sweetness?
If you prefer a less sweet filling, you can reduce the sugar in the cheesecake filling or use a sugar substitute.

Oreo Cheesecake Mooncakes – A Sweet and Creamy Delight!
Ingredients
For the Cheesecake Filling:
- 180 g cream cheese softened at room temperature
- 15 g granulated sugar
- 50 g Oreo crumbs
For the Mooncake Crust:
- 180 g Oreo crumbs
- 70 g whole milk or as needed
Instructions
Prepare the Cheesecake Filling (Key: Smooth and creamy)
- Start by softening the 180g of cream cheese. Let it sit at room temperature for about 10-15 minutes so it's easier to mix.
- In a mixing bowl, combine the cream cheese with 15g of sugar. Use a spoon or hand mixer to blend them together until smooth and creamy—this will create a soft, silky filling.
- Add 50g of crushed Oreo crumbs into the mixture and stir gently to combine. This will add a slight crunch to the filling.
- Shape the mixture into 20g portions. Roll them into balls and place them on a tray. Cover with plastic wrap and freeze for at least 30 minutes, until the filling is firm enough to handle.
Prepare the Oreo Mooncake Crust (Key: Right consistency)
- In a separate bowl, place the 180g of Oreo crumbs. If the crumbs are too large, you can crush them a little more using a rolling pin.
- Add 70g of milk to the crumbs. Mix the ingredients with your hands or a spoon until it forms a dough-like consistency. The dough should be soft but not too sticky—if it's too wet, add a little more Oreo crumbs; if it's too dry, add a splash more milk.
- Divide the dough into 40g portions, rolling each portion into a ball.
Assemble the Mooncakes (Key: Neat and tight packaging)
- Remove the cheesecake filling from the freezer. It should be firm and easy to handle.
- Take one of the 40g balls of Oreo dough and gently press it flat into a circle, making the center thicker and the edges thinner.
- Place a 20g ball of the cheesecake filling in the center of the dough circle. Carefully fold the edges of the dough over the filling, pinching and sealing tightly to form a ball again. Make sure the filling is fully enclosed.
- Lightly dust the inside of the mooncake mold with some extra Oreo crumbs to prevent sticking. Place the filled dough ball into the mold and gently press it down to shape it.
- Release the mooncake from the mold and place it on a tray. Repeat with the remaining dough and filling.
Freeze and Set (Key: Proper chilling)
- Once all the mooncakes are shaped, cover them with plastic wrap and freeze them for at least 2 hours, or until firm.
- After freezing, the mooncakes will be ready to serve!
Leave a Reply