
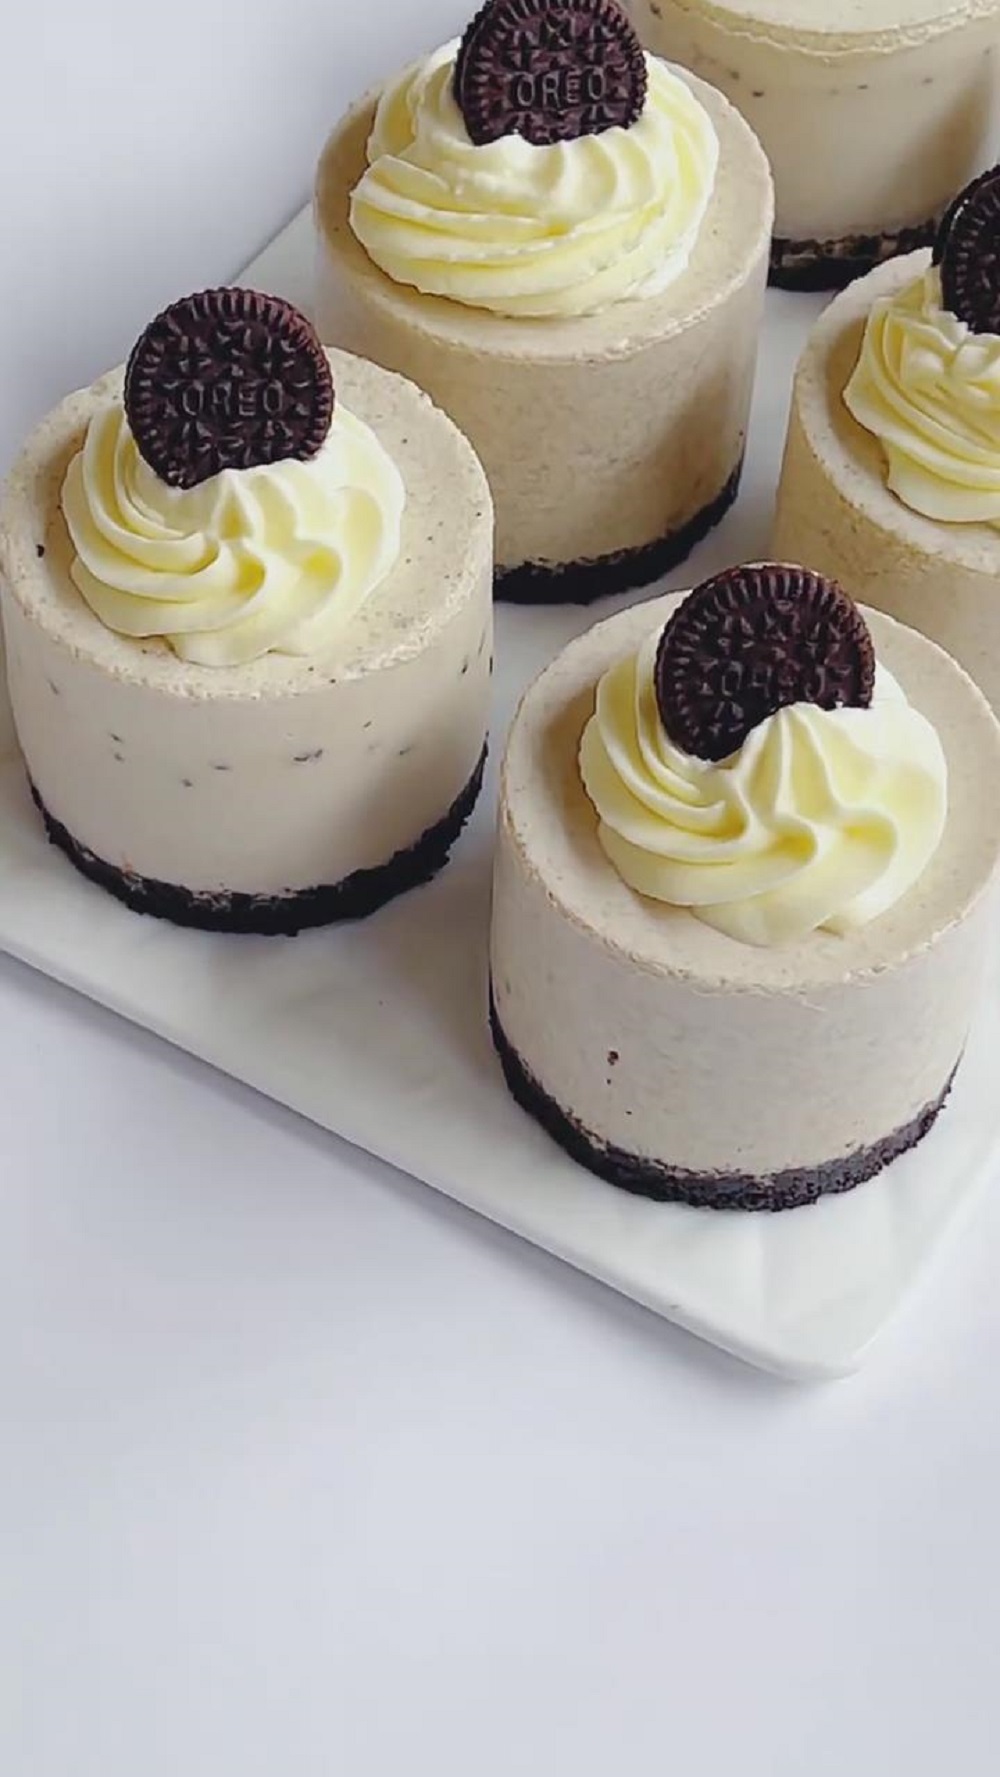
I love making no-bake desserts, and this Oreo Mousse Cake Cup is one of my easiest go-to recipes. It’s rich, creamy, and perfectly balanced with crunchy Oreos. Best of all—it’s nearly foolproof, even for beginners!
A Dessert I Keep Coming Back To
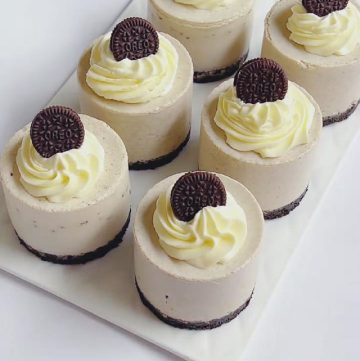
I’m always drawn to desserts that look elegant but don’t take hours in the kitchen, and this Oreo mousse fits that perfectly. The combination of a buttery Oreo crust, a soft mousse layer, and a light decoration makes it ideal for afternoon tea, family gatherings, or even as a quick make-ahead dessert for holidays.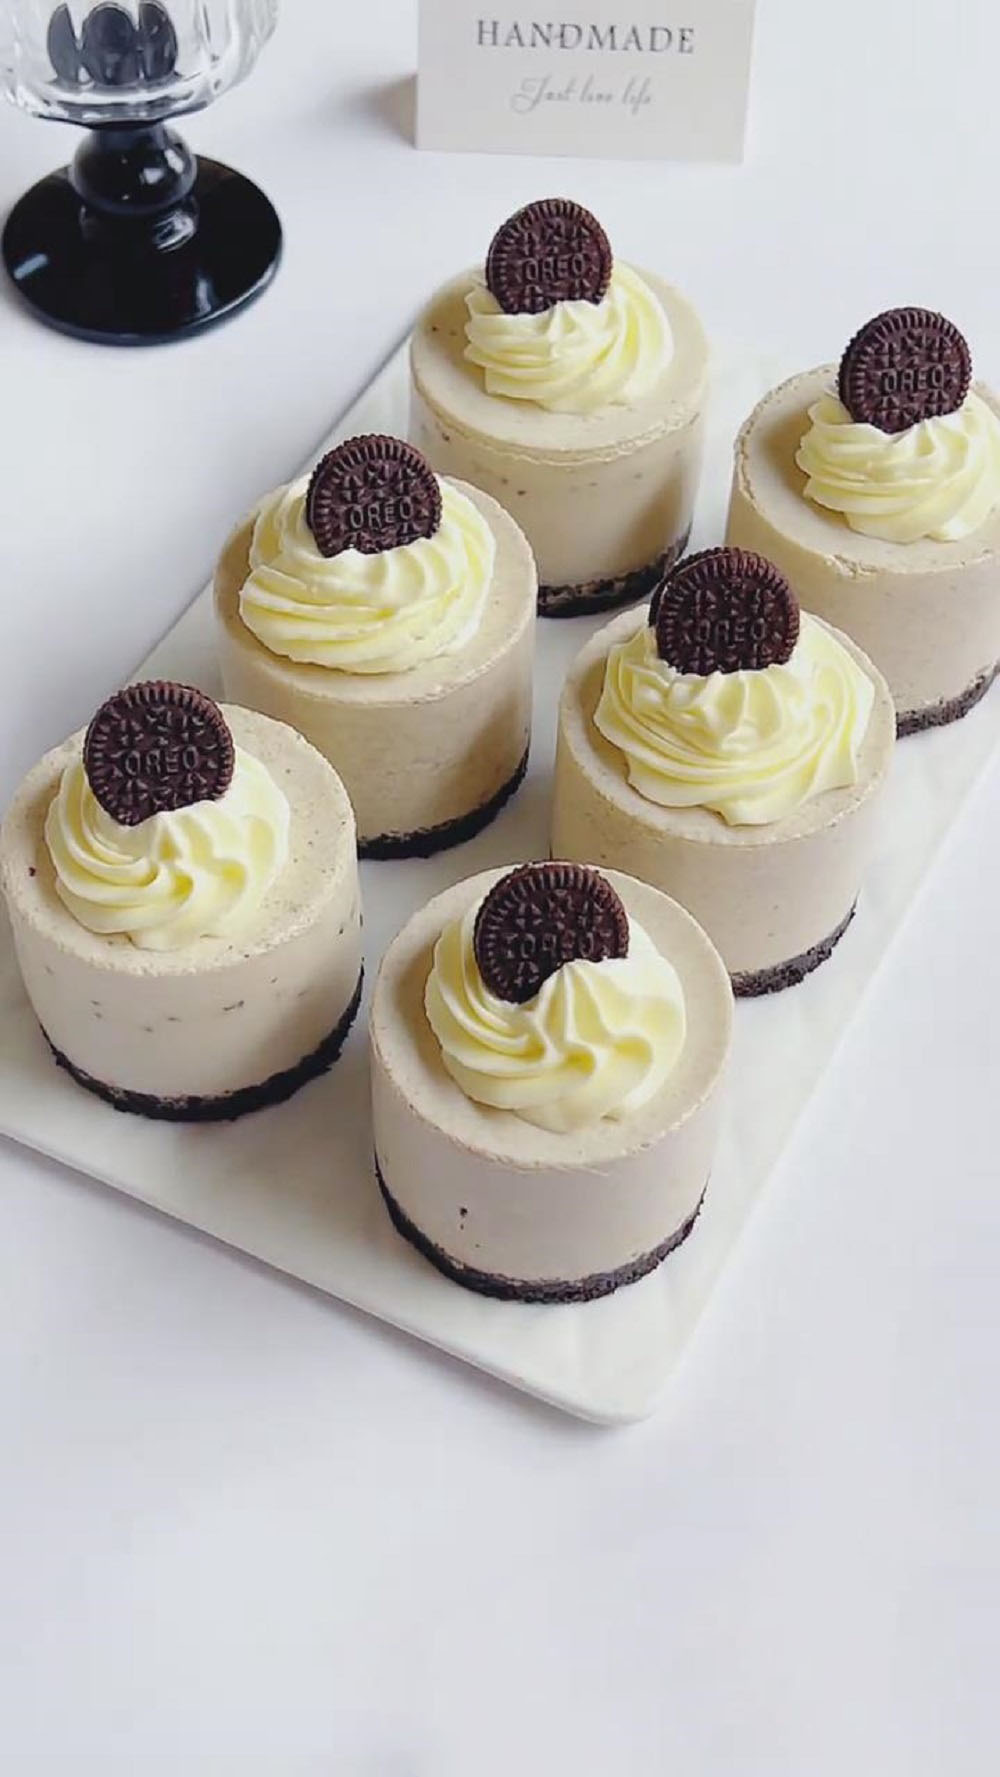
Why You‘ll Love This Recipe
- No oven required – just mix, chill, and let it set.
- Beginner-friendly – simple steps with clear results.
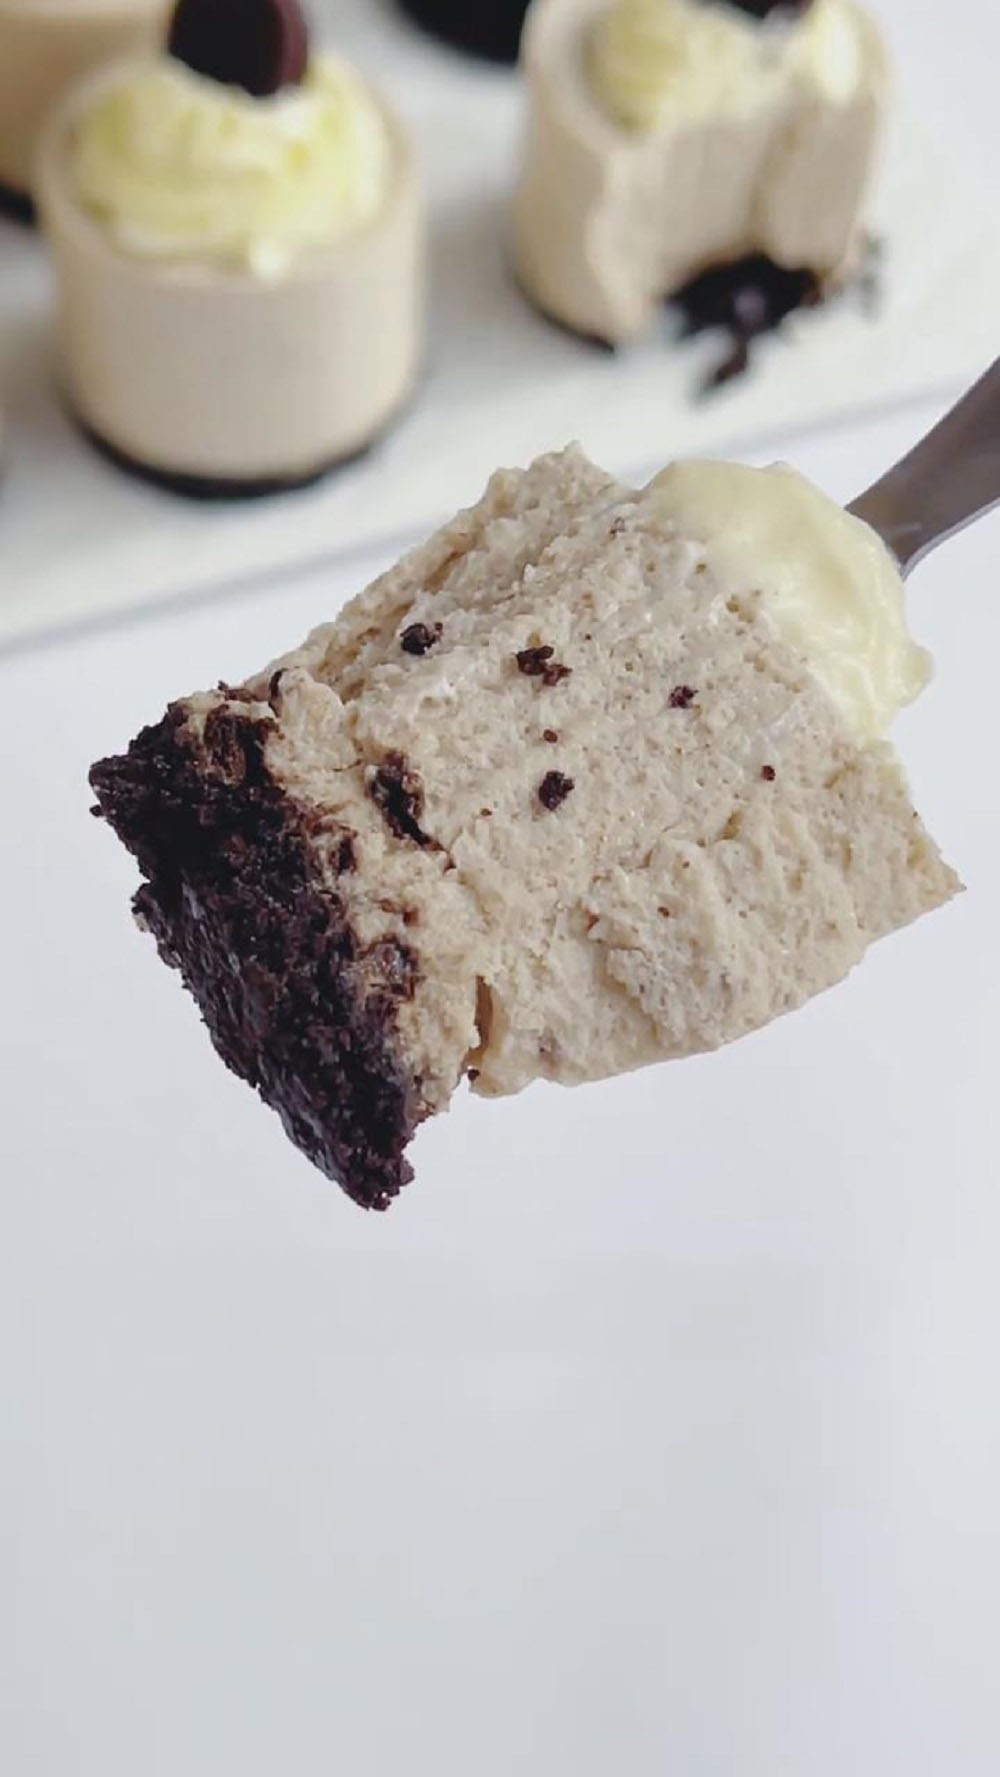
- Perfect texture balance – crunchy cookie base + fluffy mousse.
- Customizable – add extra Oreos, cocoa powder, or whipped cream to make it your own.
Ingredients
Cookie Base
- 80g Oreo crumbs (remove filling; crush with rolling pin, keep some coarse bits for texture. If Oreo crumbs are unavailable, remove filling from regular Oreos and use.)
- 40g unsalted butter (melt gently over water bath or microwave for 10 seconds; let cool to warm before using to avoid burning crumbs)
Mousse Layer
- 250g heavy cream (35%+ fat, chilled for easier whipping)
- 15g granulated sugar (adjust to taste; can increase to 20g, as Oreos are already sweet)
- 60g hot milk (about 60–70℃, comfortably warm; for dissolving gelatin)
- 5g gelatin sheets (soak in ice water for 10 minutes, squeeze dry before use; if using gelatin powder, mix 5g powder with 15g cold water and let bloom)
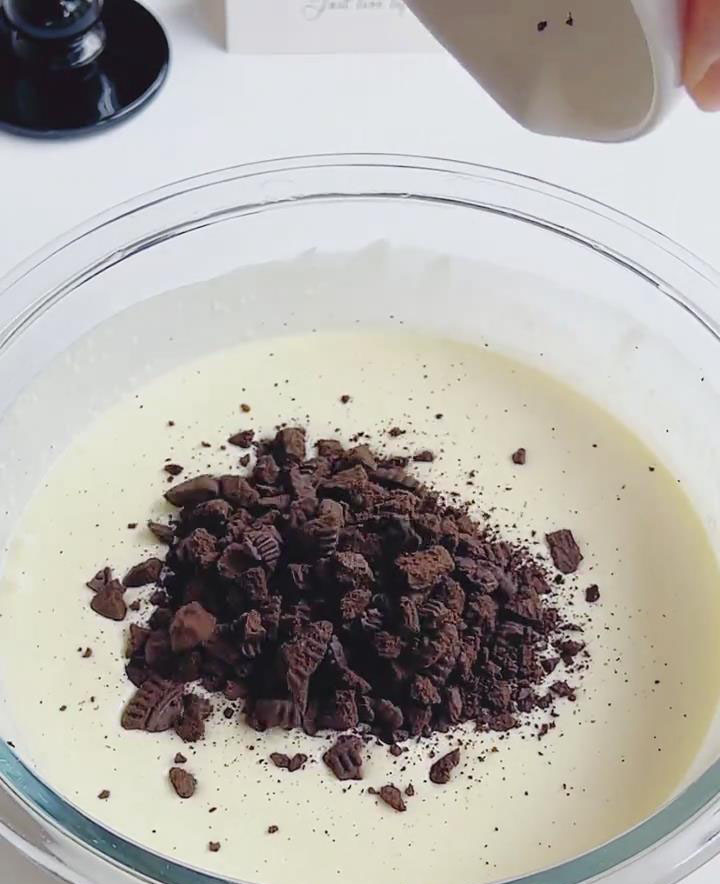
- 40g Oreo crumbs (extra; chunky or in small bits for mousse texture)
Decoration Layer
- 50g heavy cream (optional; for topping, whip with 5g sugar until stiff peaks form)
- 6–8 mini Oreos (or broken pieces of regular Oreos)
- cocoa powder, a little (optional; sift lightly on top for decoration
Instructions
Step 1: Make the Cookie Base (Key: Firmly Pressed & Set)
In a bowl, mix 80g Oreo crumbs with 40g melted butter until all crumbs are evenly coated. The mixture should hold together when pressed.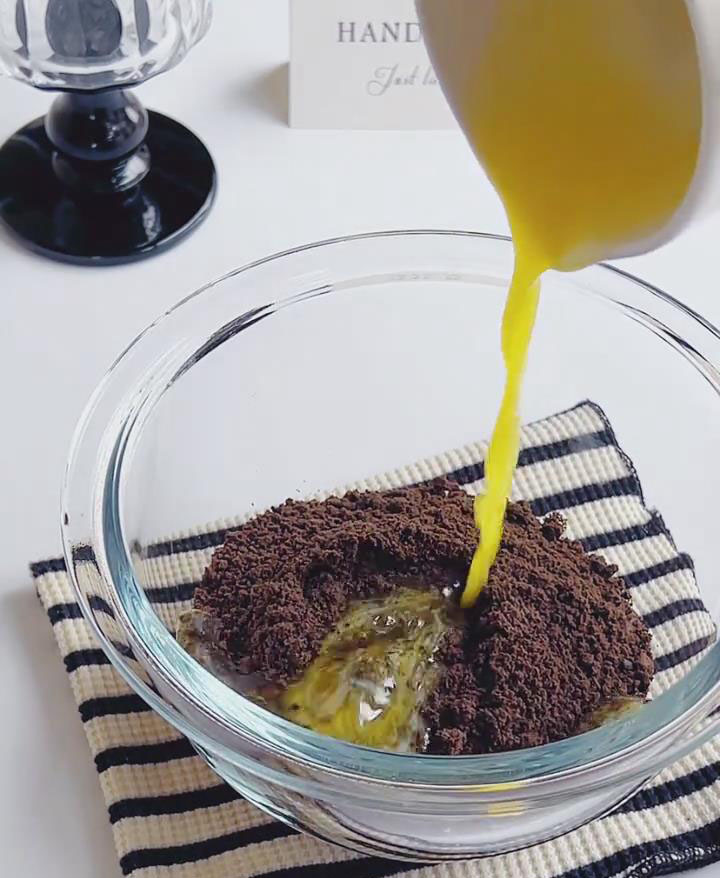
Transfer into molds or cups.Use the back of a spoon or rolling pin to press it down firmly and evenly (about 0.5 cm thick). Refrigerate for 10 minutes to set.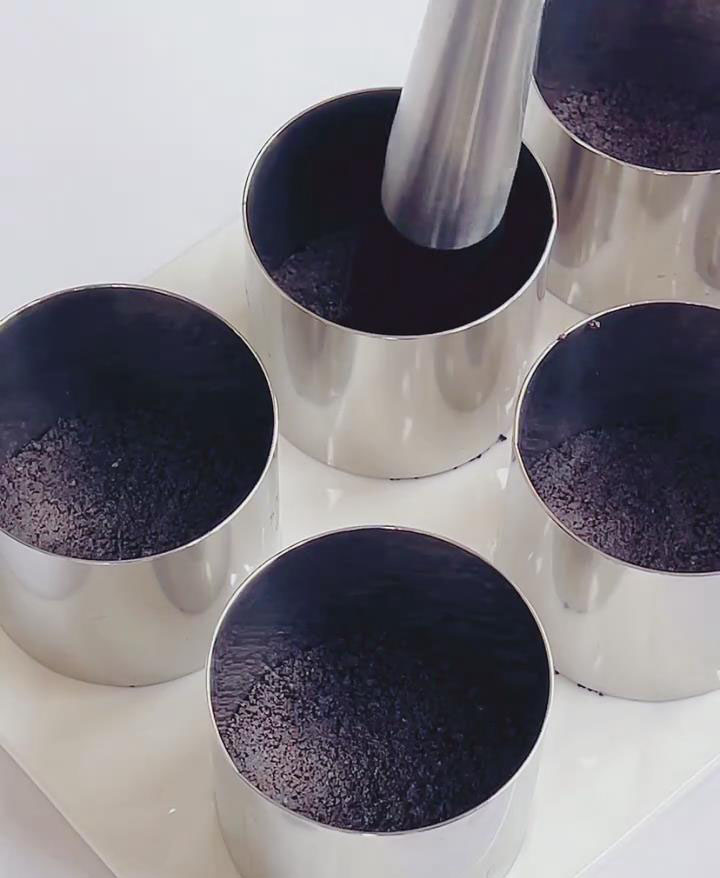
Step 2: Make the Oreo Mousse (Core: Smooth, No Air Bubbles)
Whip the cream – In a clean, dry bowl, whip 250g chilled heavy cream with 15g sugar until stiff peaks form (cream should hold straight peaks). Do not under-whip.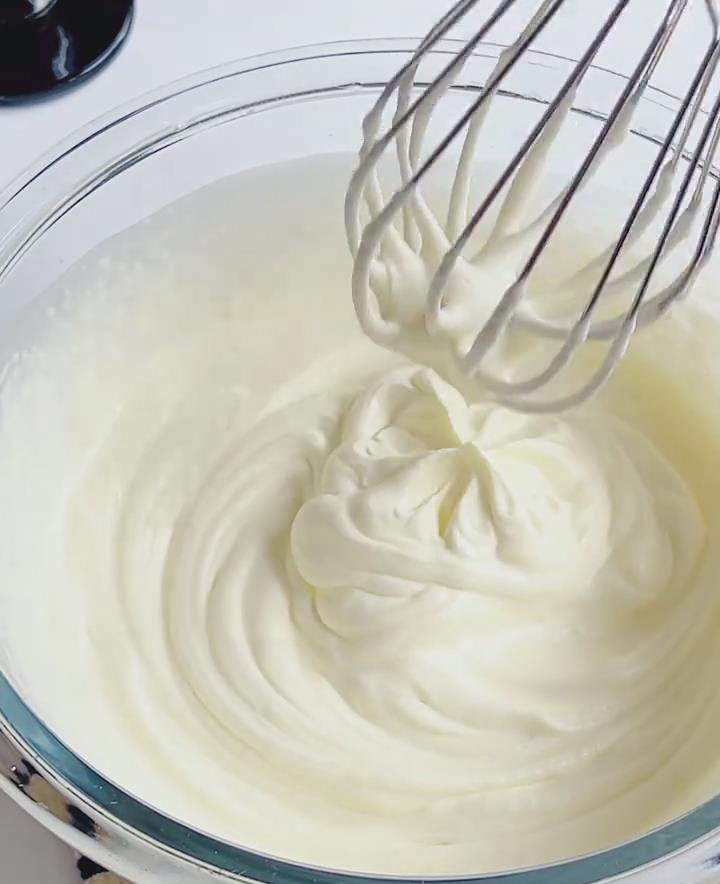
Dissolve gelatin – Add softened 5g gelatin sheets into 60g hot milk. Stir until fully melted and smooth. Let cool to 30–40℃ before using (too hot will melt whipped cream).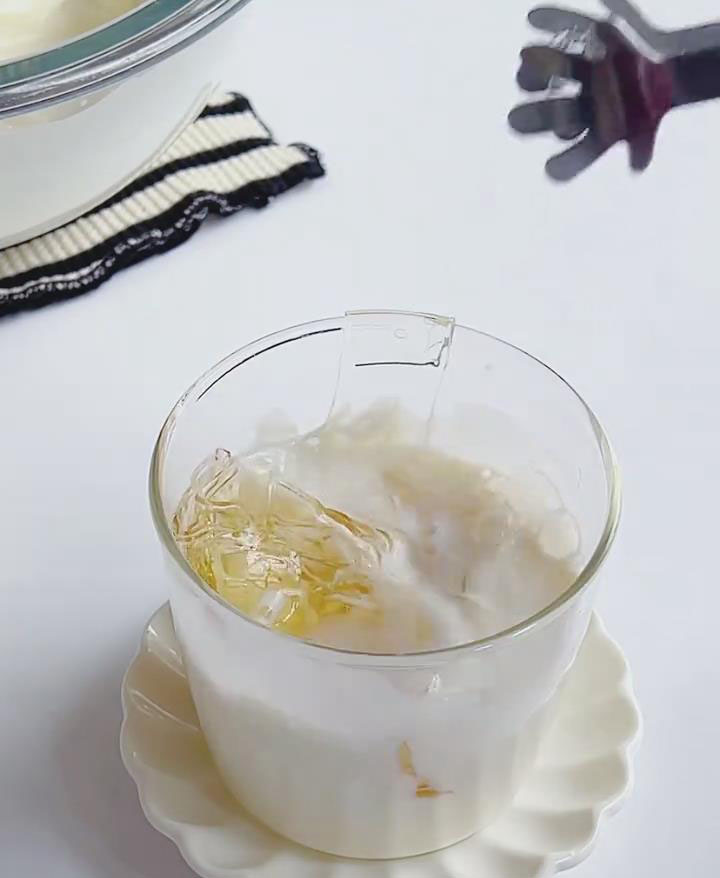
Combine mousse mixture – Slowly fold the warm gelatin-milk mixture into the whipped cream until fully blended. Stir in 40g Oreo crumbs gently (do not overmix to prevent deflating the cream).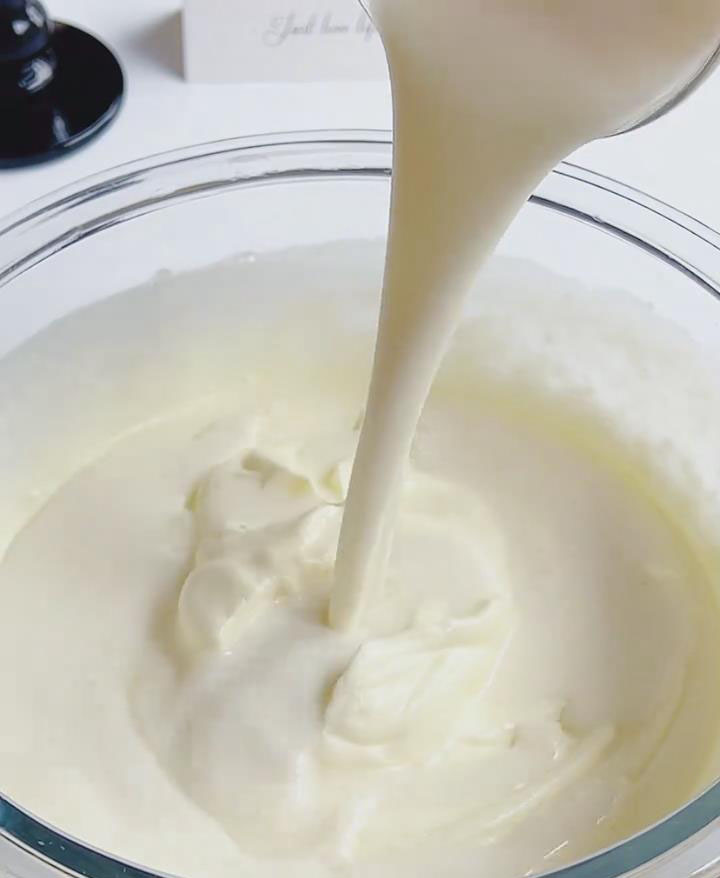
Step 3: Assemble & Chill
Pour mousse mixture into prepared molds with cookie bases, filling about 90% full.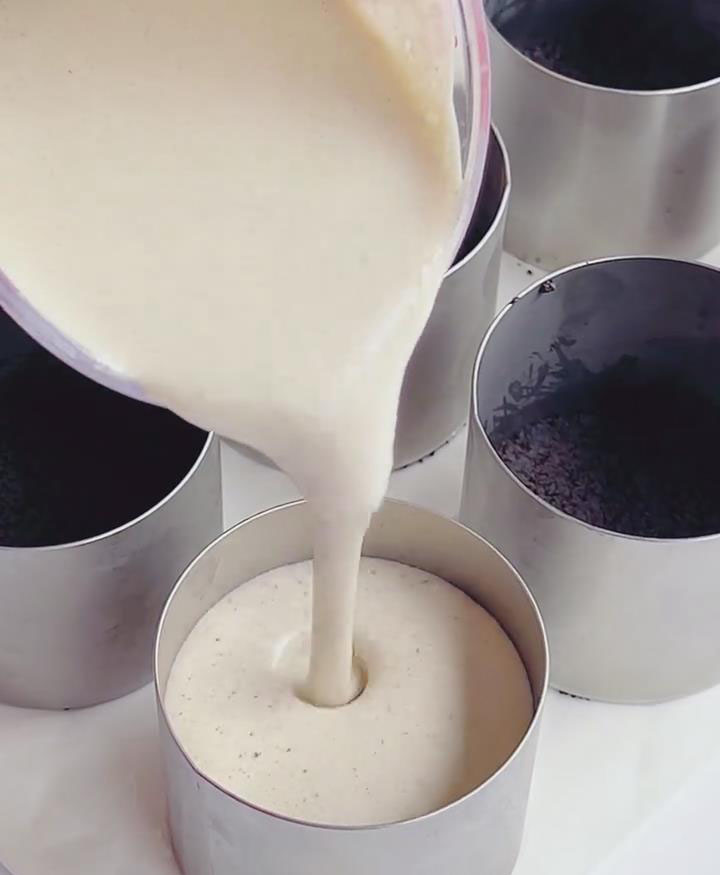
Chill in the fridge for at least 4 hours (or overnight) until firm. The surface should not indent when lightly pressed.
Step 4: Unmold & Decorate
Unmold by wrapping the outside with a warm towel for 10–15 seconds (or use a hairdryer on low warm setting around edges). Gently push up if using loose-bottom molds.
(Optional) Whip 50g cream with 5g sugar until stiff and pipe onto the cups.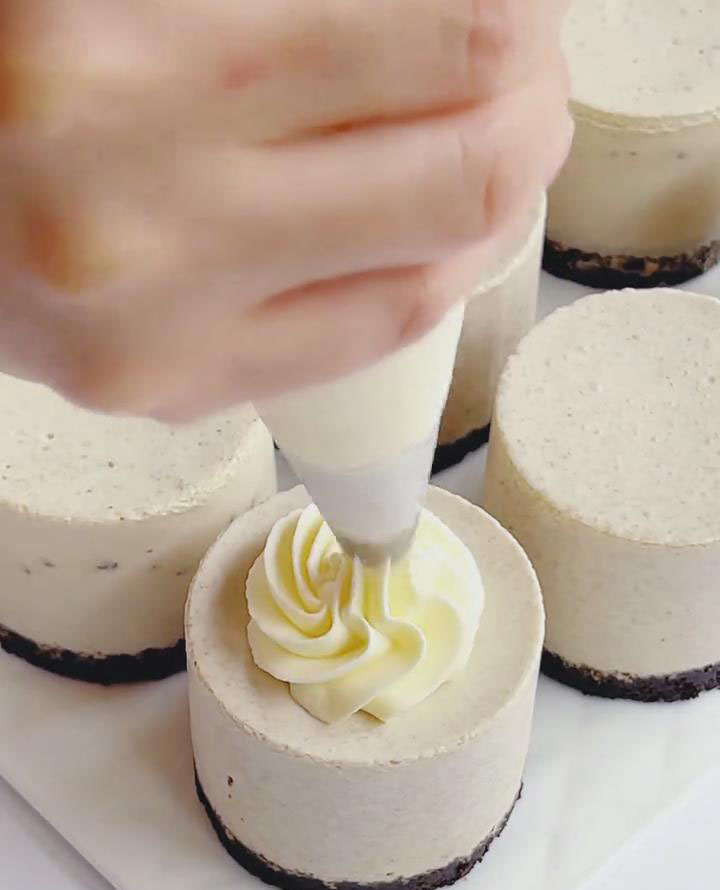
Decorate with mini Oreos and a dusting of cocoa powder. Serve chilled.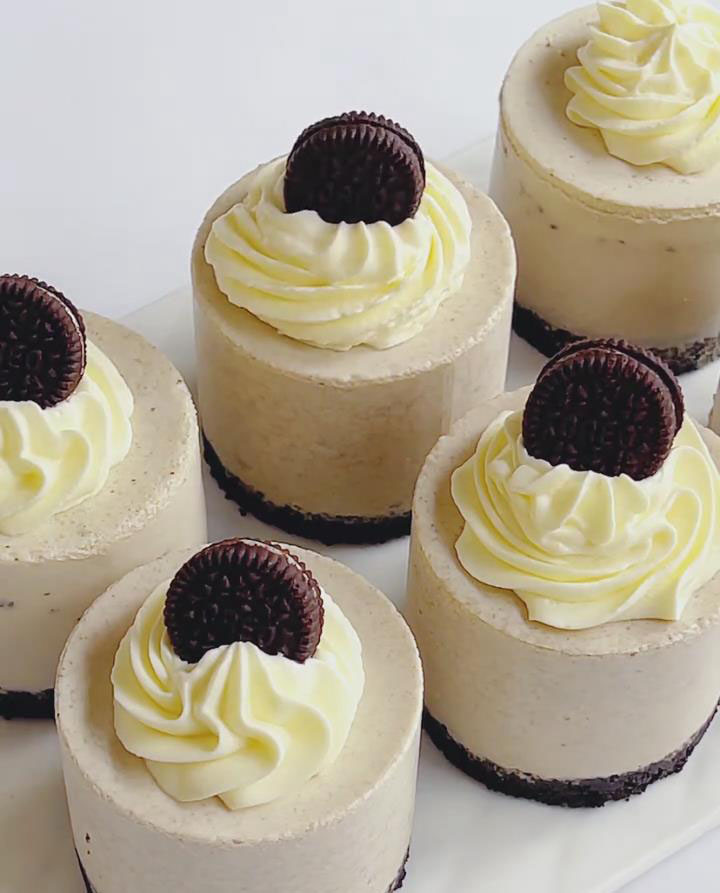
Frequently Asked Questions
Can I use gelatin powder instead of sheets?
Yes! Use 5g gelatin powder mixed with 15g cold water, let it bloom, then dissolve in the hot milk as described.
How long do these mousse cups last?
They can be kept in the fridge for up to 2 days in an airtight container. For best texture, enjoy within 24 hours.
Can I make this without gelatin?
The mousse won’t set as firmly, but you can still make a softer, creamy version by skipping gelatin—just be sure to keep it well chilled.
Can I use different cookies instead of Oreos?
Yes! Digestive biscuits, graham crackers, or chocolate wafers all work as substitutes for the base.
Oreo Cheesecake Mousse Cups
Ingredients
Cookie Base
- 80 g Oreo crumbs remove filling; crush with rolling pin, keep some coarse bits for texture. If Oreo crumbs are unavailable, remove filling from regular Oreos and use.
- 40 g unsalted butter melt gently over water bath or microwave for 10 seconds; let cool to warm before using to avoid burning crumbs
Mousse Layer
- 250 g heavy cream 35%+ fat, chilled for easier whipping
- 15 g granulated sugar adjust to taste; can increase to 20g, as Oreos are already sweet
- 60 g hot milk about 60–70℃, comfortably warm; for dissolving gelatin
- 5 g gelatin sheets soak in ice water for 10 minutes, squeeze dry before use; if using gelatin powder, mix 5g powder with 15g cold water and let bloom
- 40 g Oreo crumbs extra; chunky or in small bits for mousse texture
Decoration Layer
- 50 g heavy cream optional; for topping, whip with 5g sugar until stiff peaks form
- 6 –8 mini Oreos or broken pieces of regular Oreos
- cocoa powder a little (optional; sift lightly on top for decoration
Instructions
Step 1: Make the Cookie Base (Key: Firmly Pressed & Set)
- In a bowl, mix 80g Oreo crumbs with 40g melted butter until all crumbs are evenly coated. The mixture should hold together when pressed.
- Transfer into molds or cups.Use the back of a spoon or rolling pin to press it down firmly and evenly (about 0.5 cm thick). Refrigerate for 10 minutes to set.
Step 2: Make the Oreo Mousse (Core: Smooth, No Air Bubbles)
- Whip the cream – In a clean, dry bowl, whip 250g chilled heavy cream with 15g sugar until stiff peaks form (cream should hold straight peaks). Do not under-whip.
- Dissolve gelatin – Add softened 5g gelatin sheets into 60g hot milk. Stir until fully melted and smooth. Let cool to 30–40℃ before using (too hot will melt whipped cream).
- Combine mousse mixture – Slowly fold the warm gelatin-milk mixture into the whipped cream until fully blended. Stir in 40g Oreo crumbs gently (do not overmix to prevent deflating the cream).
Step 3: Assemble & Chill
- Pour mousse mixture into prepared molds with cookie bases, filling about 90% full.
- Chill in the fridge for at least 4 hours (or overnight) until firm. The surface should not indent when lightly pressed.
Step 4: Unmold & Decorate
- Unmold by wrapping the outside with a warm towel for 10–15 seconds (or use a hairdryer on low warm setting around edges). Gently push up if using loose-bottom molds.
- (Optional) Whip 50g cream with 5g sugar until stiff and pipe onto the cups.
- Decorate with mini Oreos and a dusting of cocoa powder. Serve chilled.
Leave a Reply