
This Taro Rice Cake is quite different from the traditional Chinese Taro Cake (Woo Tau Goh) you often see at dim sum restaurants.
While Woo Tau Goh is savory and dense, this version feels much more elevated — softer, creamier, and layered with flavor.
It may look complicated at first glance, but it’s actually very simple to make. I’ll admit, it takes a bit of time, but it’s absolutely worth it once you take that first bite.
For the filling, I used pork floss, a common ingredient in Chinese cuisine that adds a savory contrast to the sweet taro paste. If you don’t have it, you can skip it — the cake will still taste wonderful.
What is Taro?
Taro is a starchy root vegetable widely used across Asian cuisines. It has a light purple hue and a naturally sweet, nutty flavor that becomes soft and creamy when cooked.
To prepare it, simply peel and cut it into chunks, then steam until tender. Don’t forget to pour out any excess water from the steaming plate before mashing — this ensures a smooth and non-watery taro paste.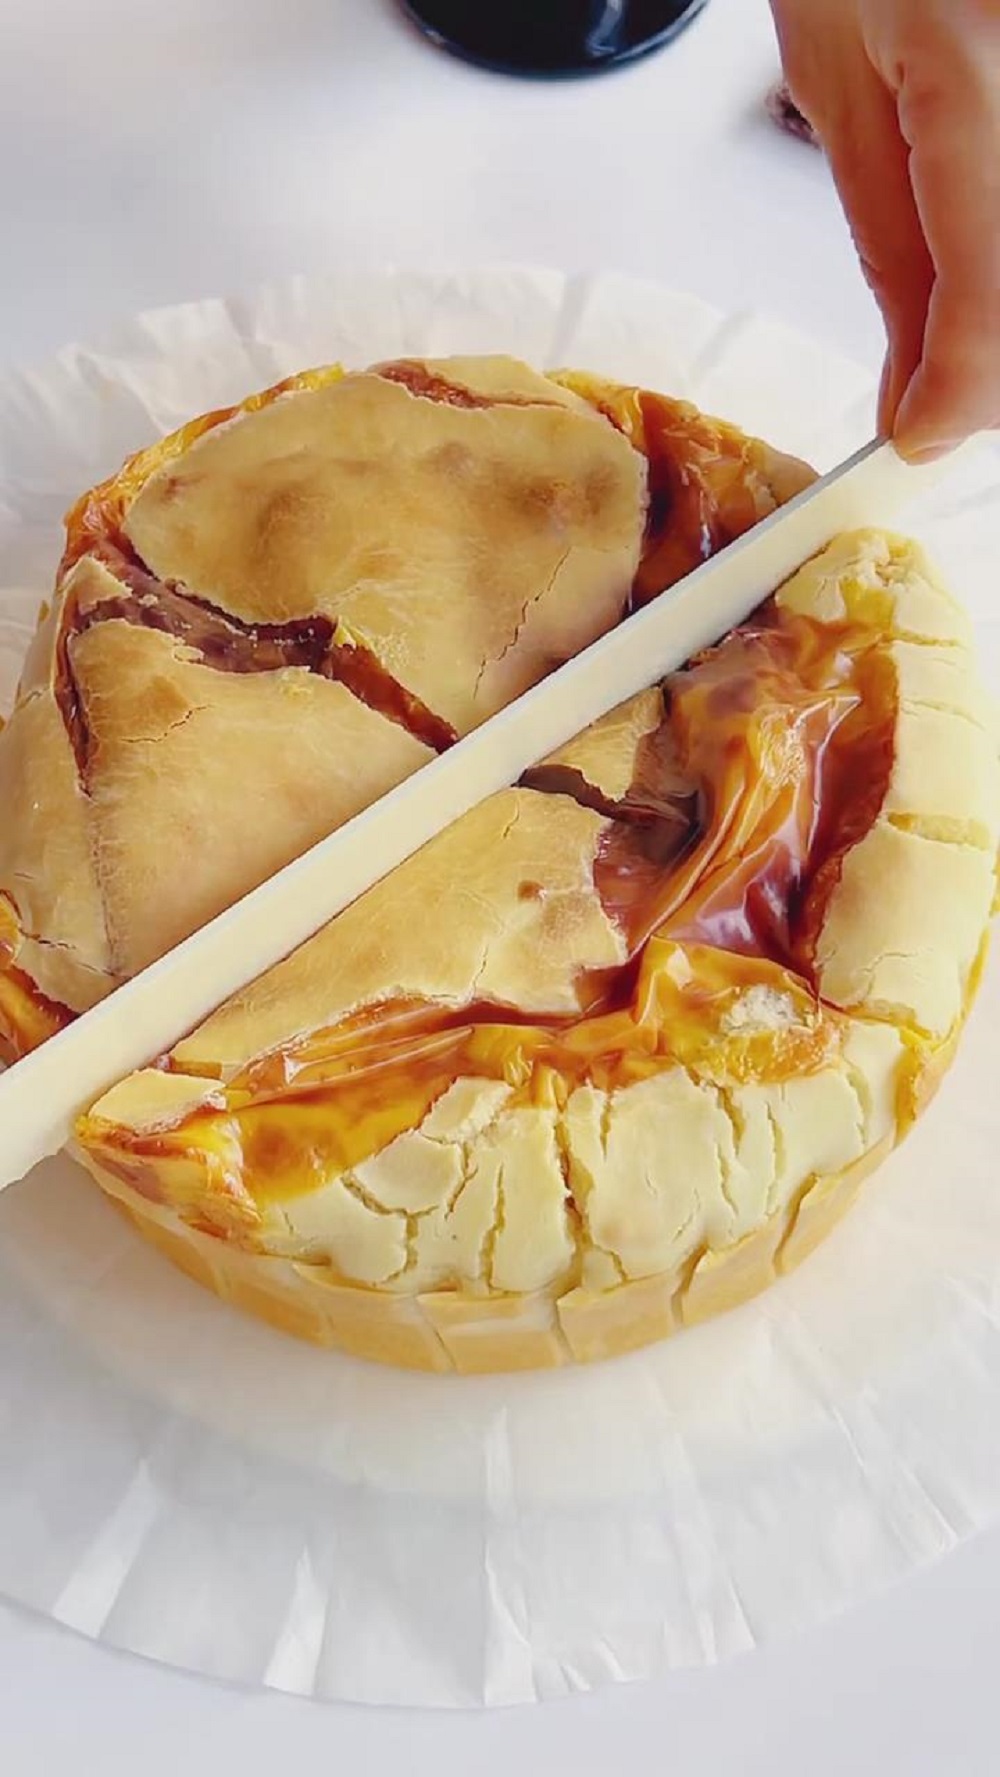
Why You‘ll Love This Recipe
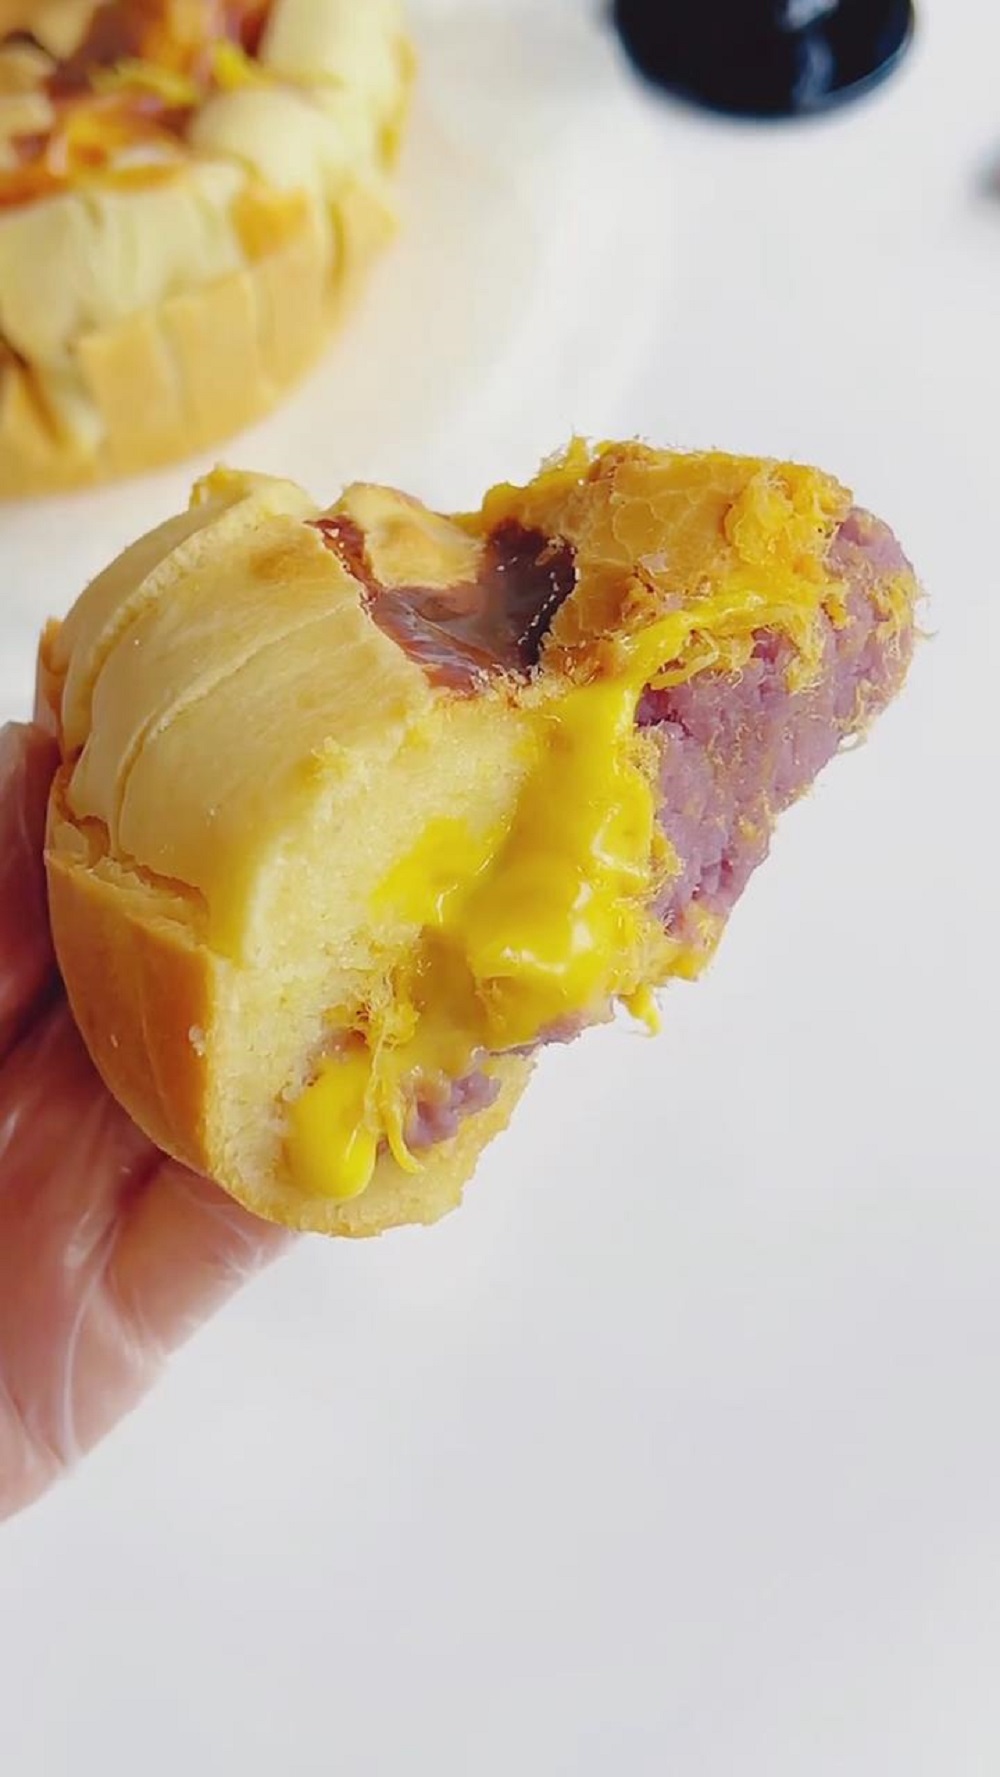
- Sweet and savory harmony – The smooth taro paste and pork floss combination gives an irresistible flavor balance that’s both comforting and indulgent.
- Perfect texture – Crispy on the outside and soft, chewy, and stretchy on the inside — this rice cake has everything you want in one bite.
- Visually stunning – With its golden crust and beautiful purple taro layer, it’s a treat for both your eyes and your taste buds.
- Easier than you think – Though it looks impressive, this dessert takes about 1.5 hours total (including baking time).
Ingredients and Substitutions
- Taro – Steam peeled taro chunks until soft and fluffy. It’s the heart of this recipe, bringing a naturally sweet and earthy aroma. Choose fresh taro with light purple veins for the best flavor and texture.
- Granulated sugar – We use just enough to enhance the natural sweetness of the taro and the rice cake without making it overly sweet. You can adjust the amount in the taro paste to your personal taste.
- Purple sweet potato powder – Adds a lovely lavender hue to the taro paste. It’s optional but makes the filling more visually appealing.
- Butter – Gives the taro filling a silky smooth texture and a hint of creamy aroma. Use softened butter for easy blending.
- Heavy cream – Keeps the taro paste moist and creamy. I recommend using cream with at least 30% fat for a luxurious texture.
- Condensed milk – Deepens the flavor and adds richness. Don’t substitute it with milk — it won’t give the same creamy sweetness.
- Egg – Helps the rice cake batter bind together while adding lightness and structure.
- Milk – Provides a soft and tender texture. You can substitute with water if needed, though the flavor will be lighter.
- Corn oil – Keeps the outer crust crisp and light. Avoid butter here as it can make the cake heavier.
- Glutinous rice flour – The secret to the rice cake’s soft, chewy, and elastic texture. Choose finely milled rice flour for the smoothest result.
- Baking powder – Ensures the cake rises just enough for a soft and fluffy bite. Don’t skip this — it keeps the cake from becoming dense.
- Pork floss – Adds a salty and savory contrast to the sweet taro paste. Use plain pork floss rather than flavored varieties.
- Cheese slices – Provide the molten, gooey center. I recommend using regular cheese slices that melt easily for that perfect cheese pull.
How to Make Taro Rice Cake
Step 1: Make the Taro Filling
Peel and steam the taro for about 25 minutes until soft. Place it in a large mixing bowl, then add the granulated sugar, purple sweet potato powder, softened butter, heavy cream, and condensed milk.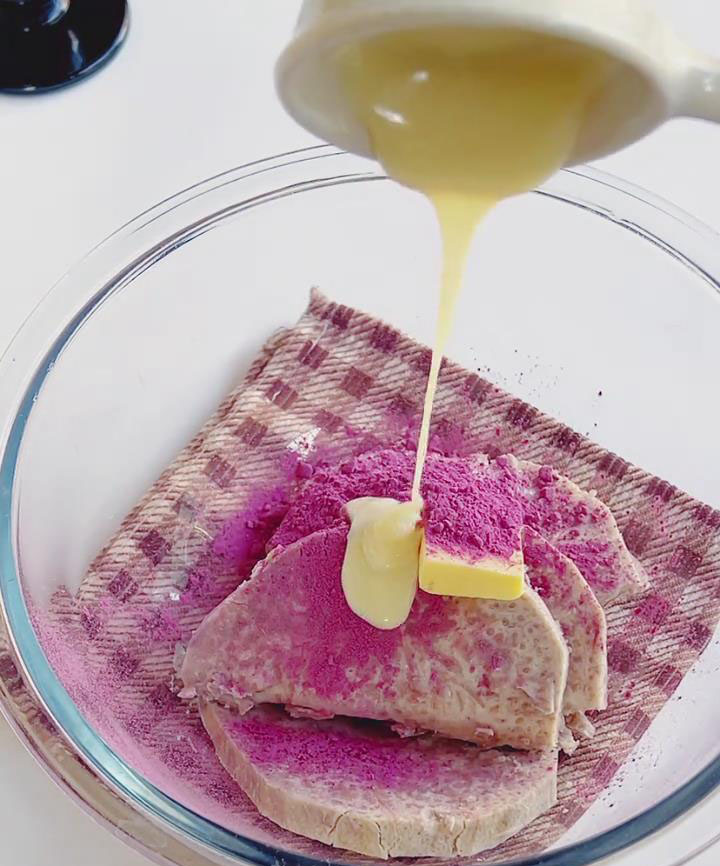
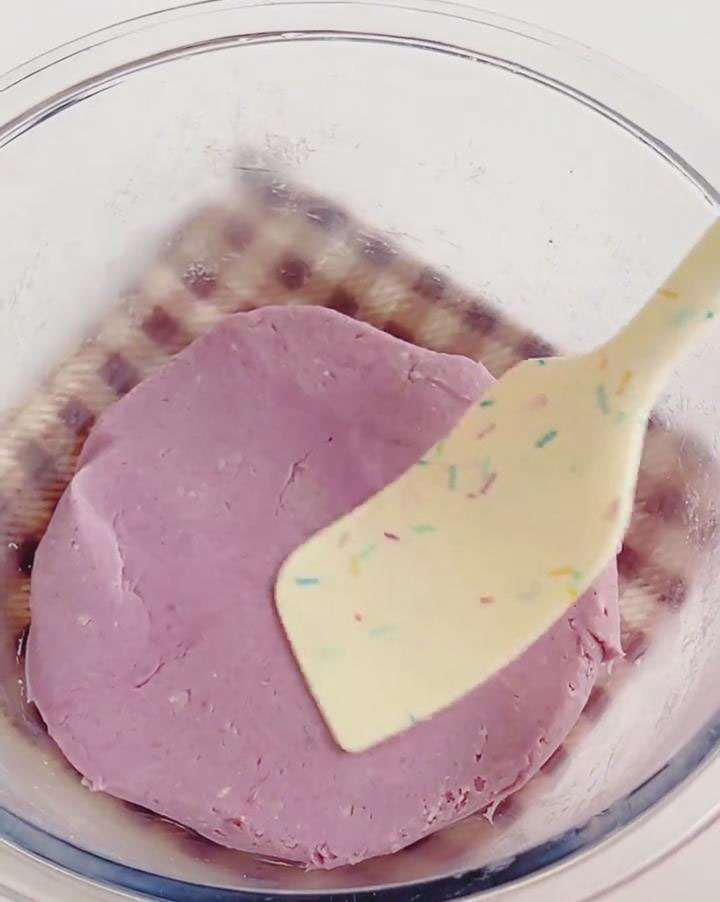
Mash with a spoon or smasher until smooth and lump-free. Use a silicone spatula to mix until the taro paste becomes glossy and uniform.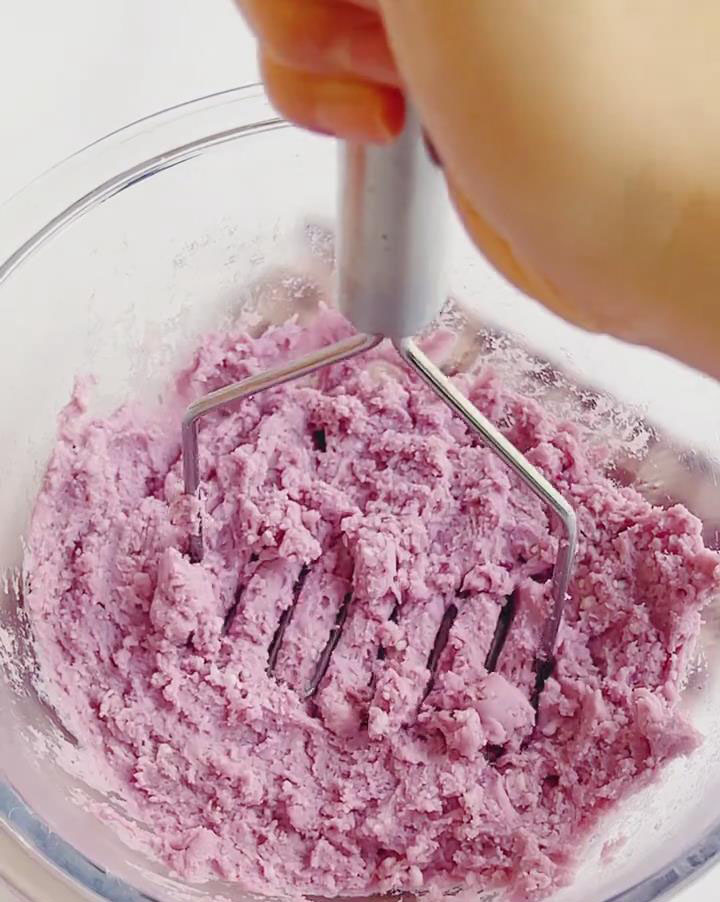
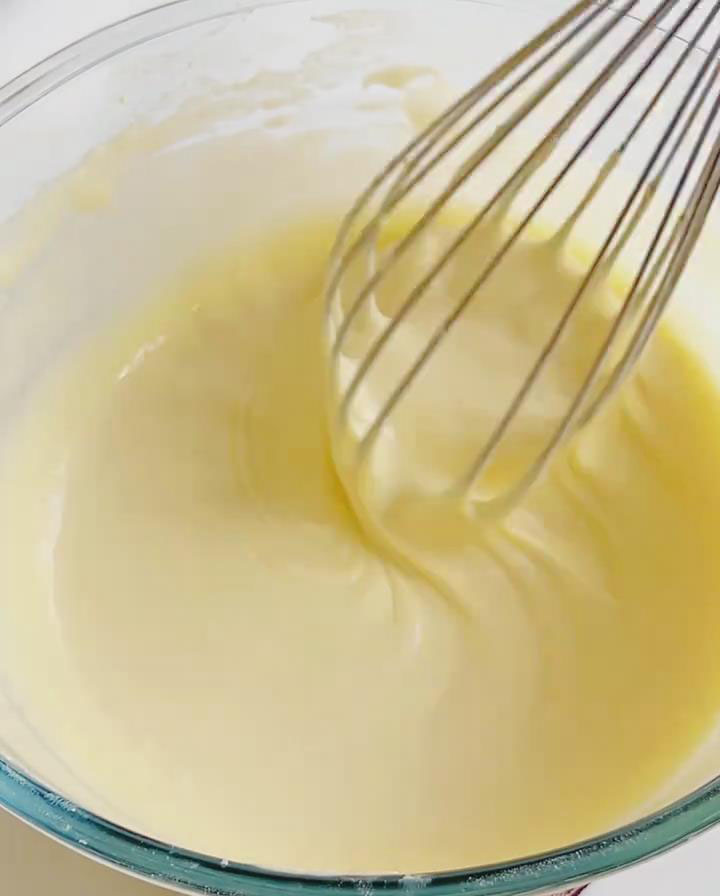
 Step 2: Prepare the Rice Cake Batter
Take a large mixing bowl and crack in the egg. Add the granulated sugar, then pour in the milk and corn oil. Continue whisking until the mixture is fully combined and smooth with no separation.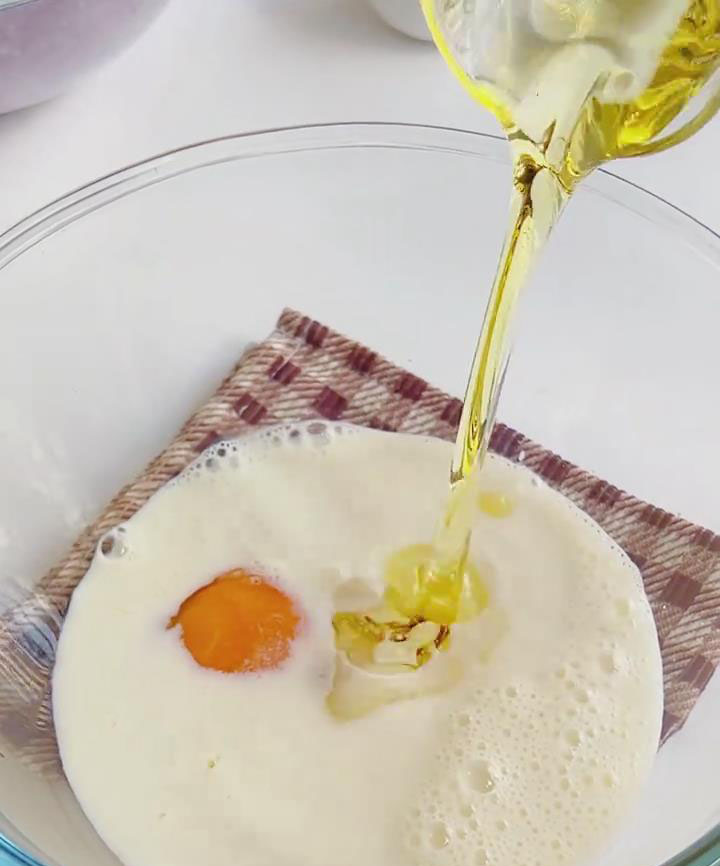
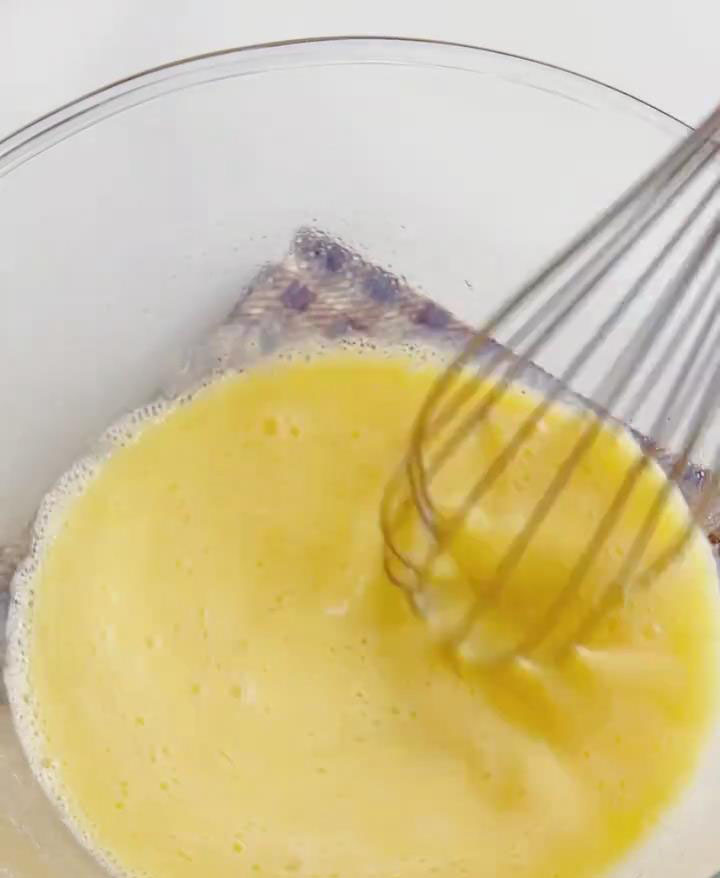
Add the glutinous rice flour and baking powder, whisking gently (avoid circular stirring) until there are no dry patches or lumps. The batter should be thick yet pourable.
Step 3: Assemble the Layers
Line or grease your baking pan (round or square both work well). Pour in half the batter and gently shake the pan to spread it evenly.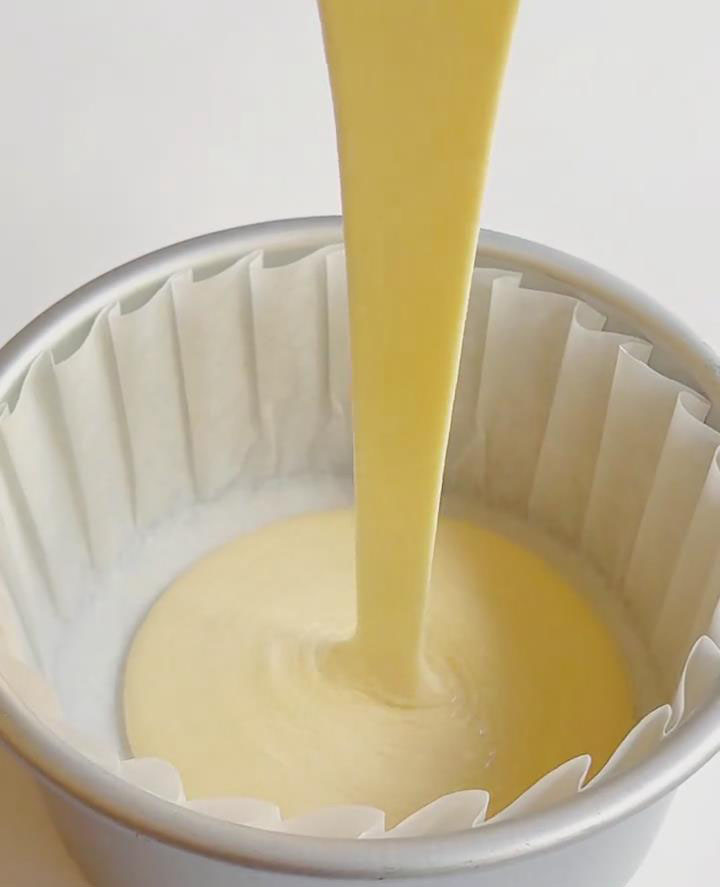
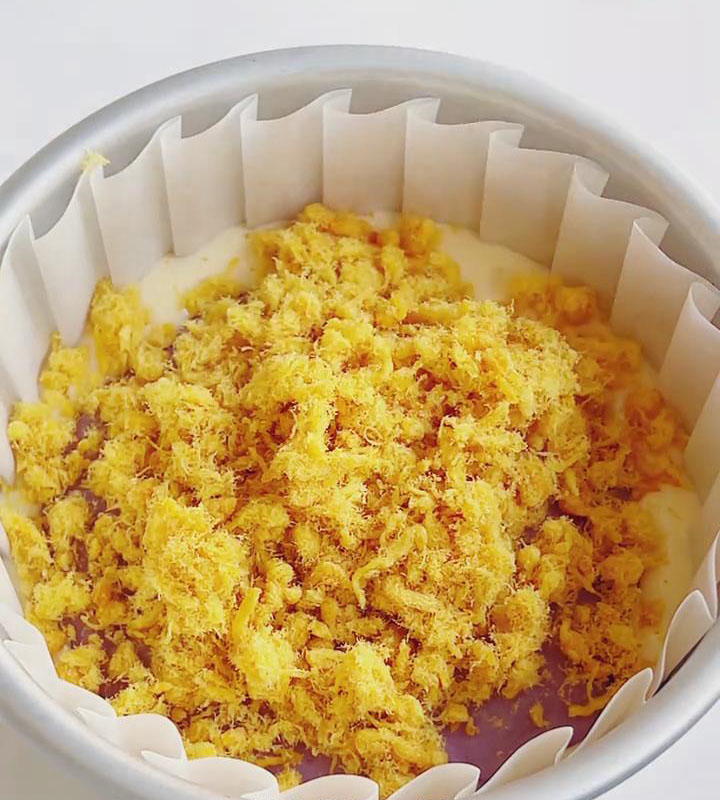
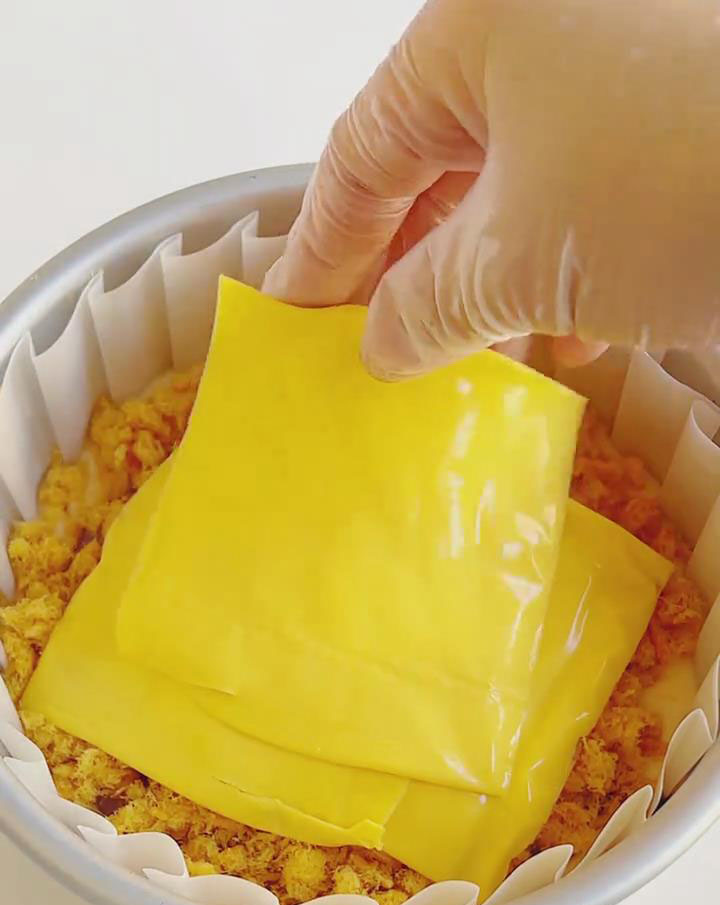
Layer on the taro filling, then sprinkle a generous amount of pork floss. Place the cheese slices on top (trim if needed to fit the mold).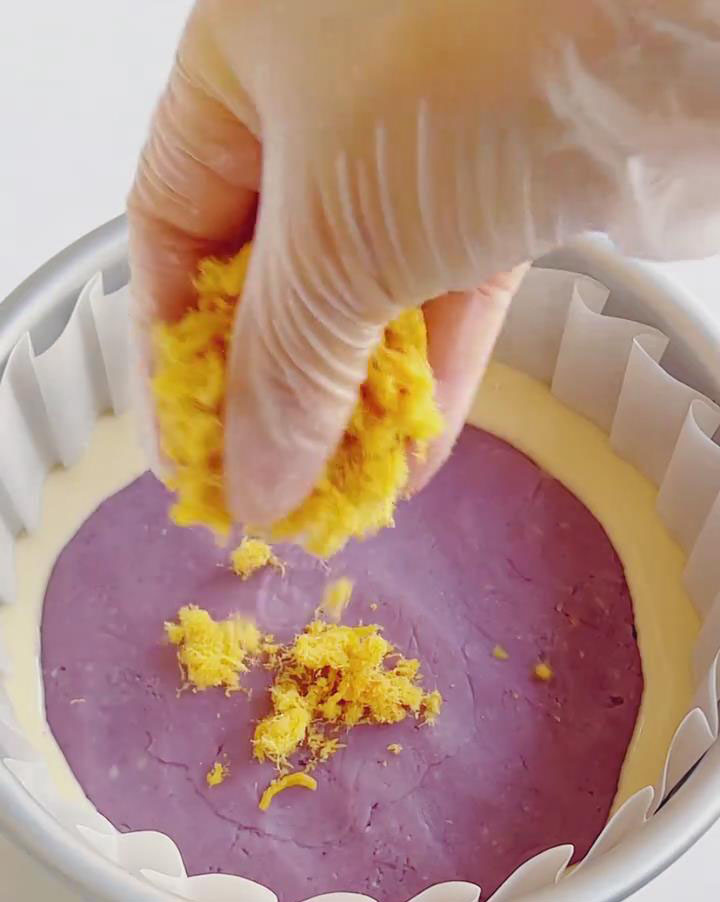
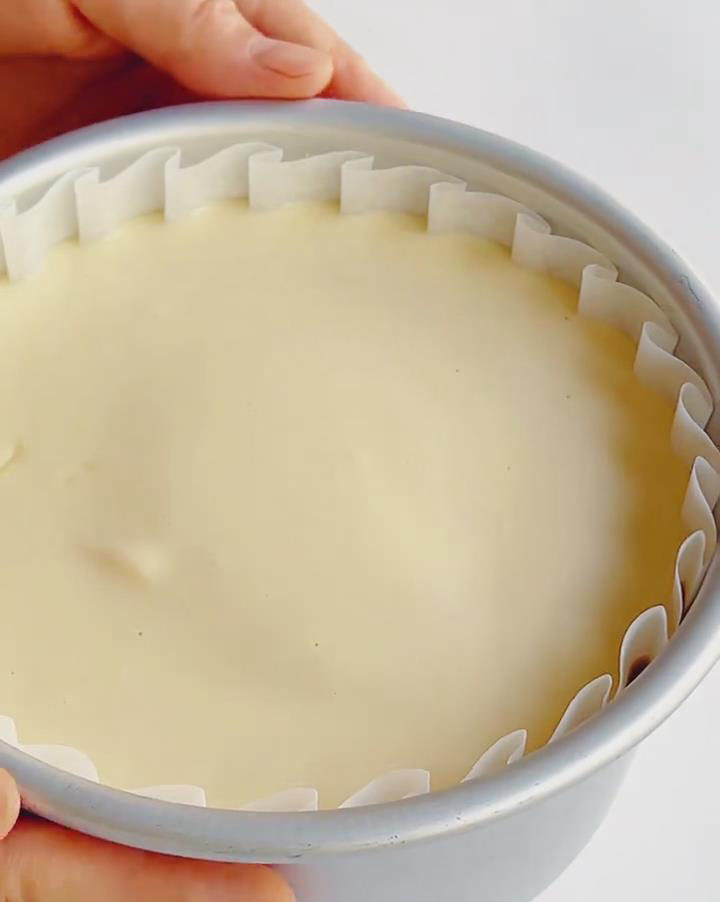
Pour in the remaining batter, fully covering the filling. Tap the pan lightly to release any air bubbles.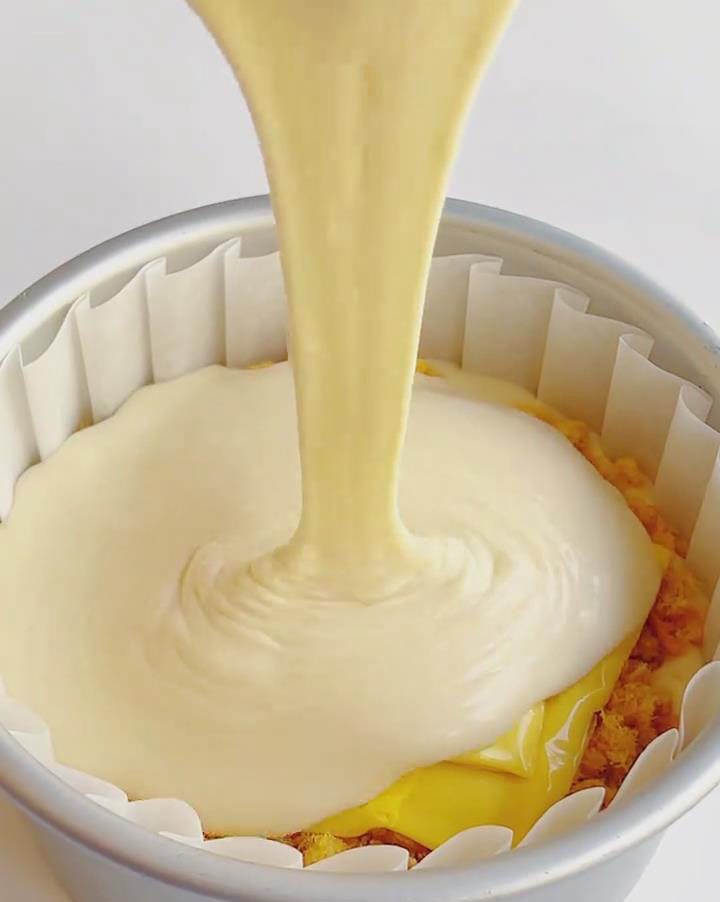
 Step 4: Bake the Rice Cake
Preheat the oven to 180°C (356°F) for 15 minutes.
Bake in the middle rack for 40 minutes or until the top is golden brown and slightly springy when touched.
If needed, extend baking time by 5–10 minutes depending on your oven. Be careful not to overbake — the rice cake should stay soft and chewy inside.
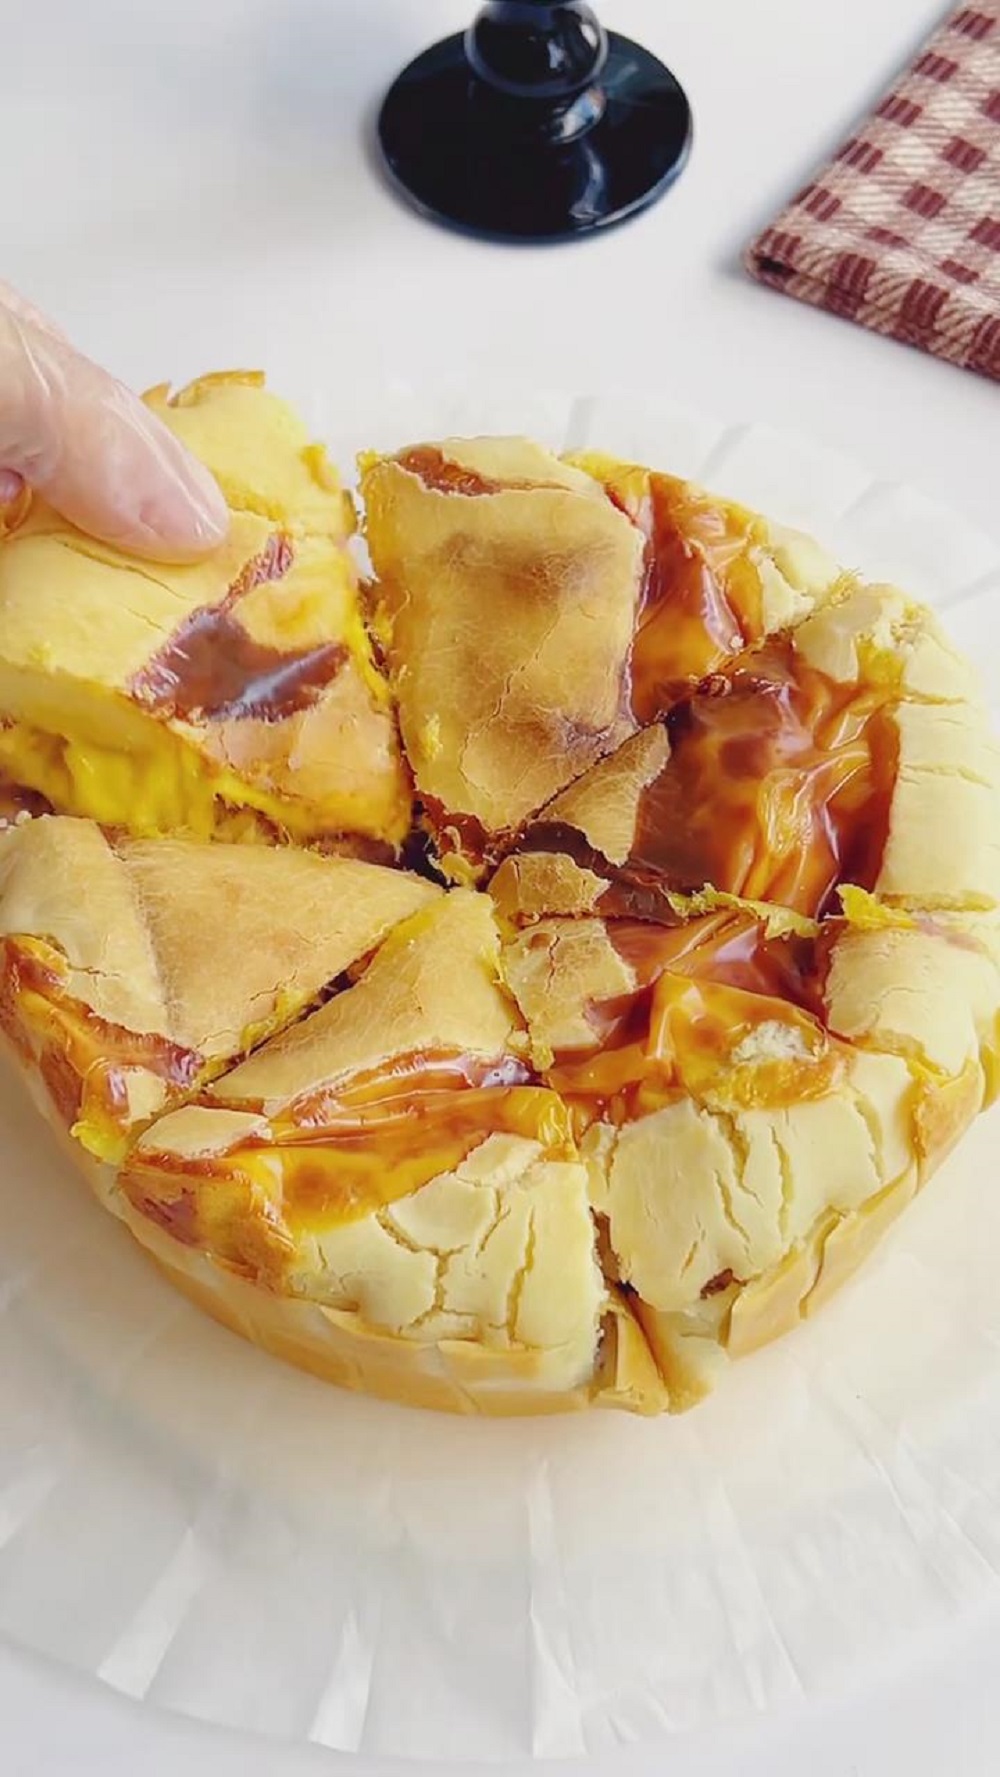
Step 5: Cool and Serve
Remove the rice cake from the oven and place it on a cooling rack for about 5 minutes. This helps maintain its crisp crust while allowing the inside to settle.
Once slightly cooled, demold and cut into squares. Enjoy warm for the best flavor and that irresistible cheese pull.
Tips & Tricks
Use freshly steamed taro. It blends more smoothly and enhances the flavor of the filling.
Don‘t skip the baking powder. It keeps the rice cake light and prevents it from becoming dense.
Eat it warm. That’s when the cheese is melty, the taro is creamy, and the crust is perfectly crisp.
Line your baking pan. Oil or parchment paper will help you remove the cake easily without sticking.
Frequently Asked Questions
Can I make this rice cake ahead of time?
Yes! You can prepare and bake it in advance, then store it in an airtight container in the fridge for up to 2 days. Reheat it in the oven or air fryer before serving to bring back the crispy texture.
Can I skip the pork floss or cheese?
You can — but the sweet and savory combination is what makes this dessert stand out. Without them, it’ll still taste good but less dynamic.
Can I use water instead of milk?
Yes, water works in a pinch, though milk gives the batter a richer, more tender finish.

Baked Taro Rice Cake | Asian-Inspired Dessert You’ll Love
Ingredients
Taro Paste Filling
- 200 g cooked taro
- 10 g granulated sugar
- 3 g purple sweet potato powder optional
- 5 g butter
- 40 g heavy cream
- 10 g condensed milk
Rice Cake Batter
- 1 egg
- 30 g granulated sugar
- 180 g milk
- 40 g corn oil
- 200 g glutinous rice flour
- 5 g baking powder
Filling Layers
- Pork floss as needed
- 3 cheese slices
Instructions
Step 1: Make the Taro Filling
- Peel and steam the taro for about 25 minutes until soft. Place it in a large mixing bowl, then add the granulated sugar, purple sweet potato powder, softened butter, heavy cream, and condensed milk.
- Mash with a spoon or smasher until smooth and lump-free. Use a silicone spatula to mix until the taro paste becomes glossy and uniform.
Step 2: Prepare the Rice Cake Batter
- Take a large mixing bowl and crack in the egg. Add the granulated sugar, then pour in the milk and corn oil. Continue whisking until the mixture is fully combined and smooth with no separation.
- Add the glutinous rice flour and baking powder, whisking gently (avoid circular stirring) until there are no dry patches or lumps. The batter should be thick yet pourable.
Step 3: Assemble the Layers
- Line or grease your baking pan (round or square both work well). Pour in half the batter and gently shake the pan to spread it evenly.
- Layer on the taro filling, then sprinkle a generous amount of pork floss. Place the cheese slices on top (trim if needed to fit the mold).
- Pour in the remaining batter, fully covering the filling. Tap the pan lightly to release any air bubbles.
Step 4: Bake the Rice Cake
- Preheat the oven to 180°C (356°F) for 15 minutes.
- Bake in the middle rack for 40 minutes or until the top is golden brown and slightly springy when touched.
- If needed, extend baking time by 5–10 minutes depending on your oven. Be careful not to overbake — the rice cake should stay soft and chewy inside.
Step 5: Cool and Serve
- Remove the rice cake from the oven and place it on a cooling rack for about 5 minutes. This helps maintain its crisp crust while allowing the inside to settle.
- Once slightly cooled, demold and cut into squares. Enjoy warm for the best flavor and that irresistible cheese pull.
Leave a Reply