
This classic no-bake tiramisu is ultra-creamy, rich, and ridiculously easy to make — no oven needed! Uses a safe heated-egg method for peace of mind while keeping the traditional silky texture. Perfect for beginners, summer days, or anyone who loves effortless desserts. Save this for your next gathering!
Easy No-Bake Tiramisu You’ll Want to Make Again and Again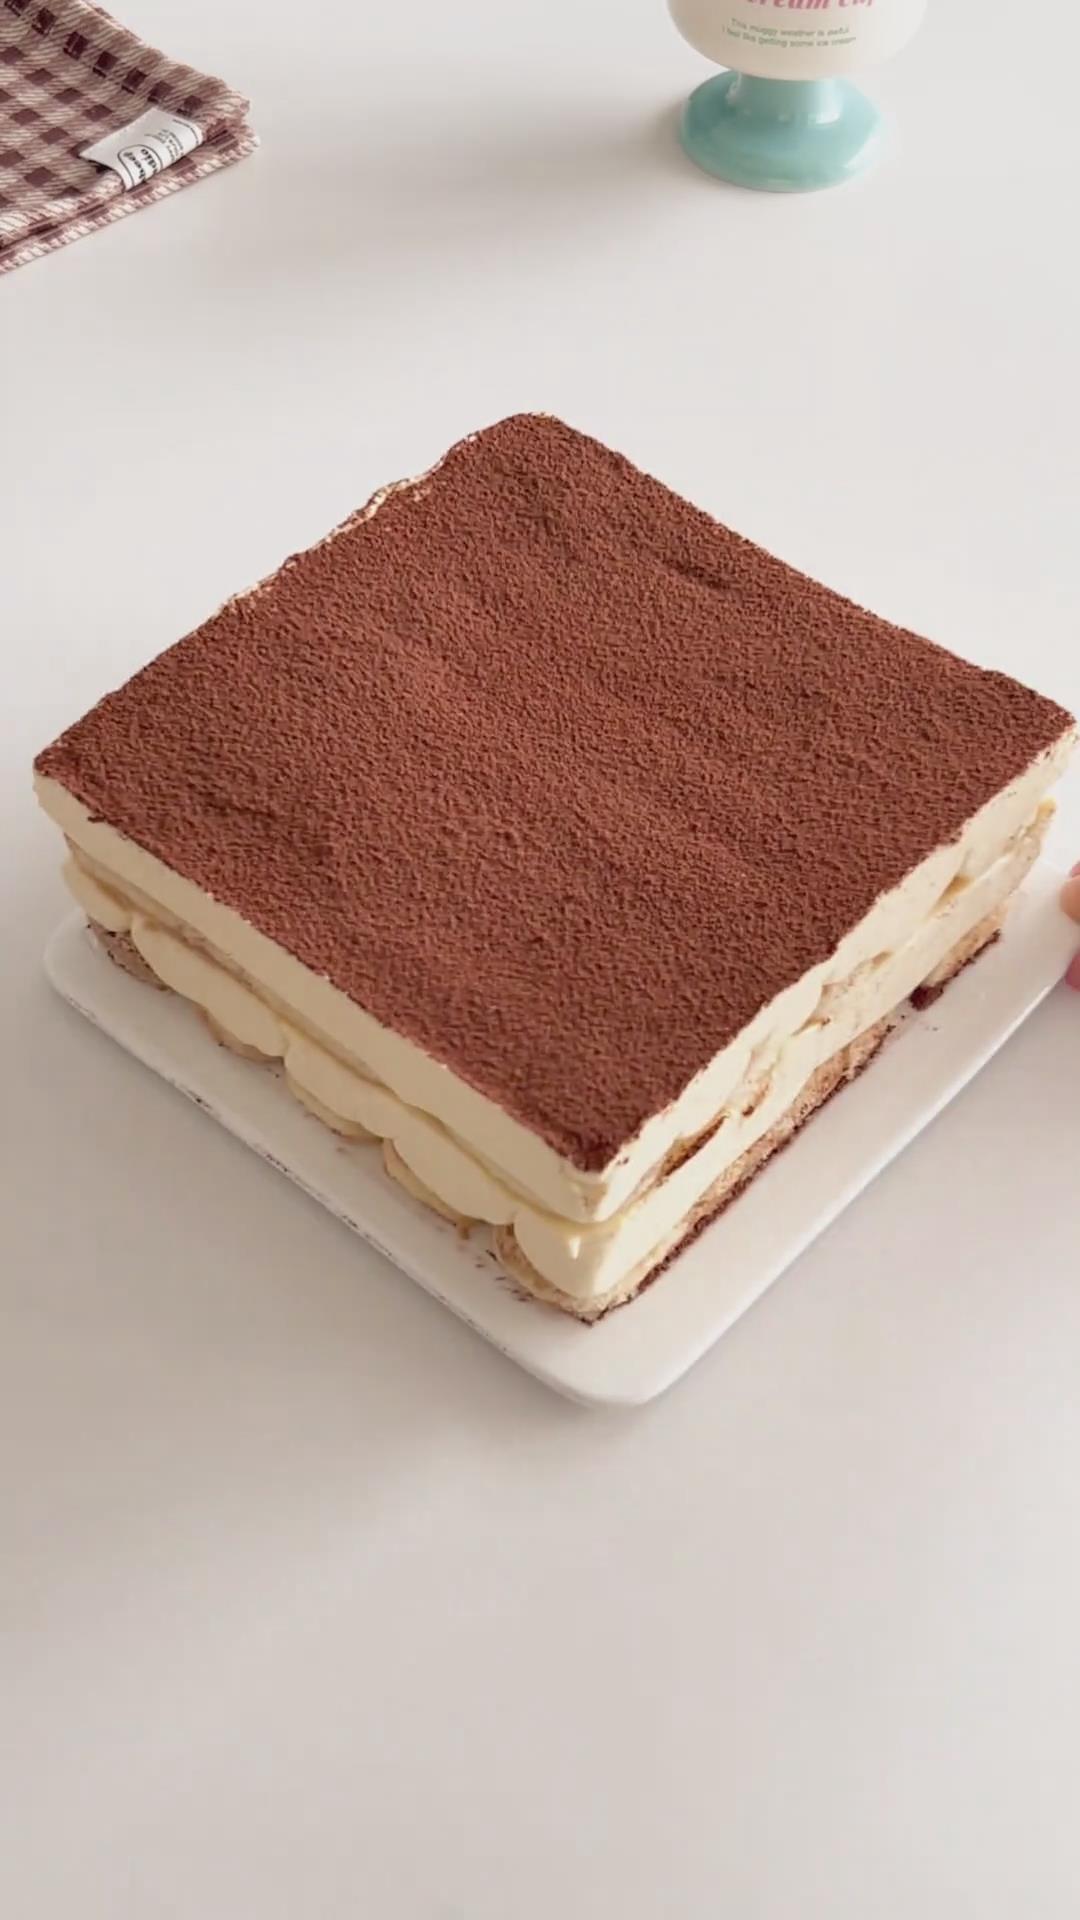
Tiramisu is absolutely one of my favorite desserts, and the best part is it’s completely no-bake!
If you’re like me and love no-bake desserts, you can’t miss this one.
Whether it’s a scorching summer day when you don’t want to turn on the oven, or you’re a beginner baker worried about complicated steps, this dessert is easy to master.
I know many people are concerned about the raw eggs in traditional recipes, often feeling uneasy about eating them.
That’s why I’ve specifically adapted the method: by gently heating the egg mixture over simmering water until it becomes thick and smooth.
This step perfectly addresses safety concerns while preserving the signature dense, creamy texture of tiramisu, so you can enjoy it without any worries!
Ingredients and Substitutions
- Egg Yolks – You’ll only need the yolks for this recipe to add incredible richness, body, and a velvety texture to the cream. We gently heat them over simmering water (a bain-marie) to cook them safely without scrambling. Save the egg whites for another recipe like a pavlova or meringues.
- Mascarpone Cheese – This soft, rich, and mildly tangy Italian cheese is non-negotiable for authentic tiramisu. It must be softened at room temperature for at least 1-2 hours before using; otherwise, it will remain lumpy and won’t blend smoothly into the cream.
- Marsala Wine – A touch of Marsala wine (or a coffee liqueur like Kahlúa) adds a wonderful depth of flavor and authentic character. For an alcohol-free version, you can omit it or replace it with an extra 10g of espresso concentrate.
- Gelatin Sheets – I prefer using sheet gelatin for its clean taste and ease of use. It must be softened in cold water only. This is our secret for a tiramisu that sets firmly enough to slice neatly but remains lusciously soft to eat.
- Ladyfingers (Savoiardi) – Use the hard, crunchy, long Italian ladyfinger biscuits. They are designed to be dipped; their structure allows them to absorb just the right amount of coffee syrup without disintegrating. If you like, take a look at my guide for making homemade ladyfingers.
How to Make Classic No-Bake Tiramisu
1. Prepare the Components
Place the 7g of gelatin sheets in a small bowl of cold water to soak for at least 5 minutes.
Take the 250g of mascarpone cheese out of the refrigerator to soften on the counter.
2. Create the Egg Yolk Base
Fill a medium saucepan with about 1 inch (2.5 cm) of water and bring it to a gentle simmer over medium-low heat.
In a large heatproof bowl that fits snugly over the saucepan (without touching the water), whisk together the 3 egg yolks and 20g of the fine sugar.
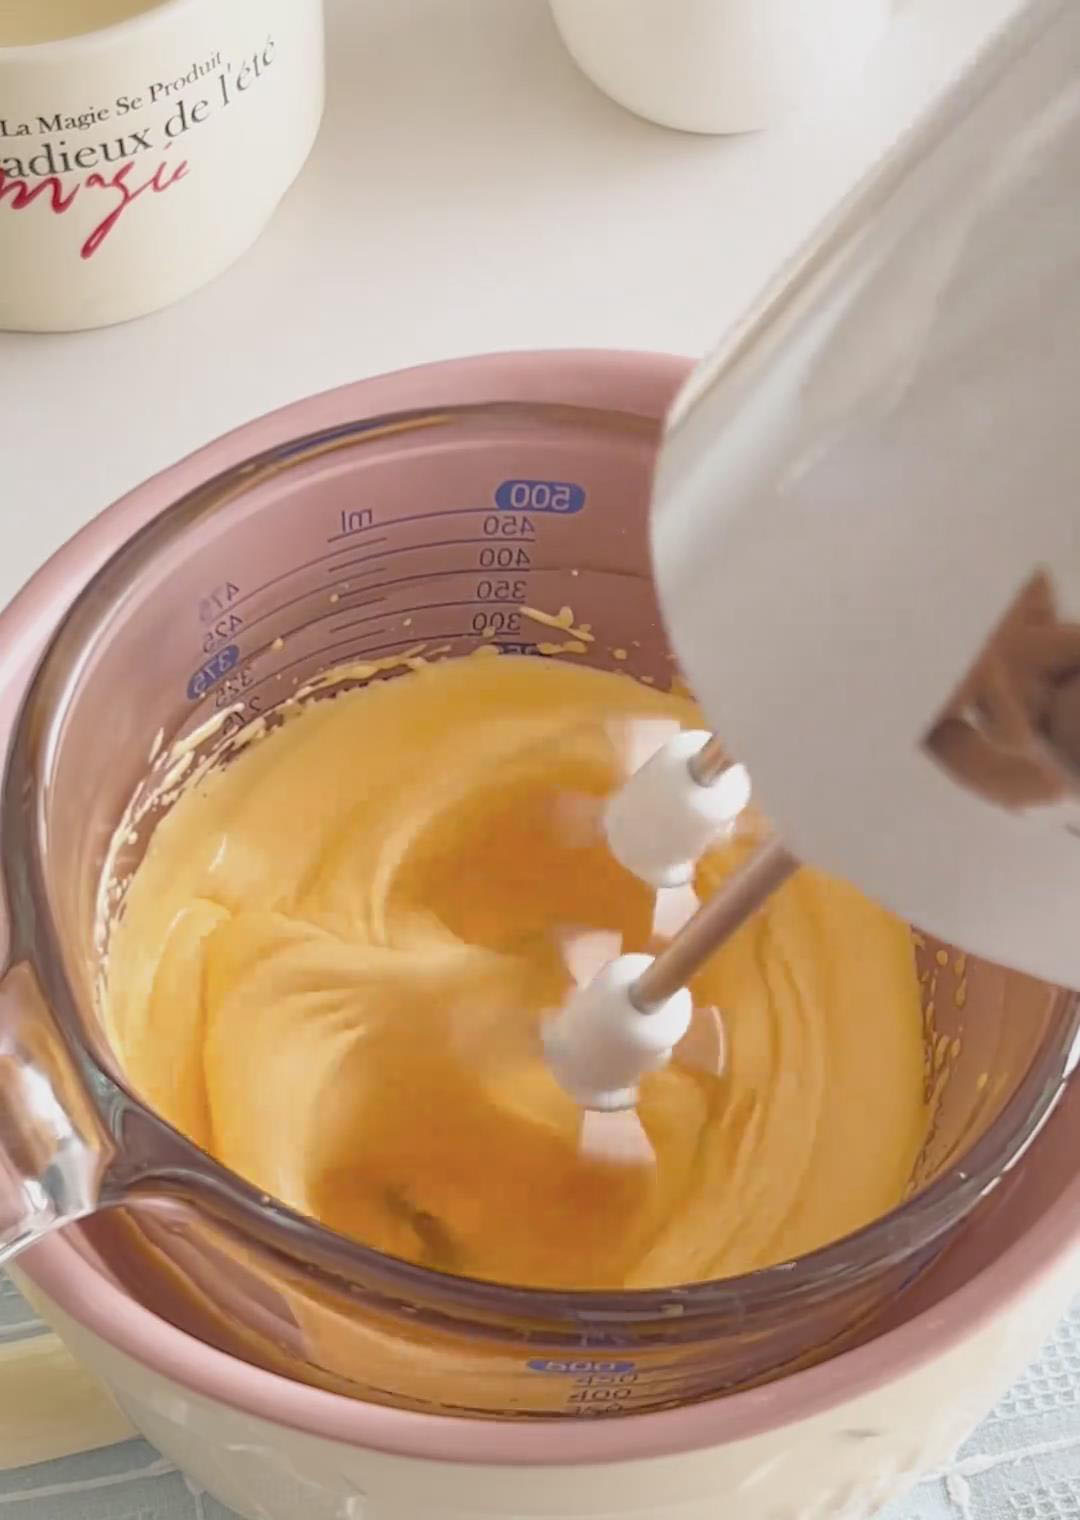
Place the bowl over the simmering water to create a double boiler. Whisk the mixture constantly and vigorously for about 3-5 minutes, until it becomes pale, thick, fluffy, and doubled in volume, and the sugar has dissolved (it should feel warm to the touch and leave ribbons when you lift the whisk).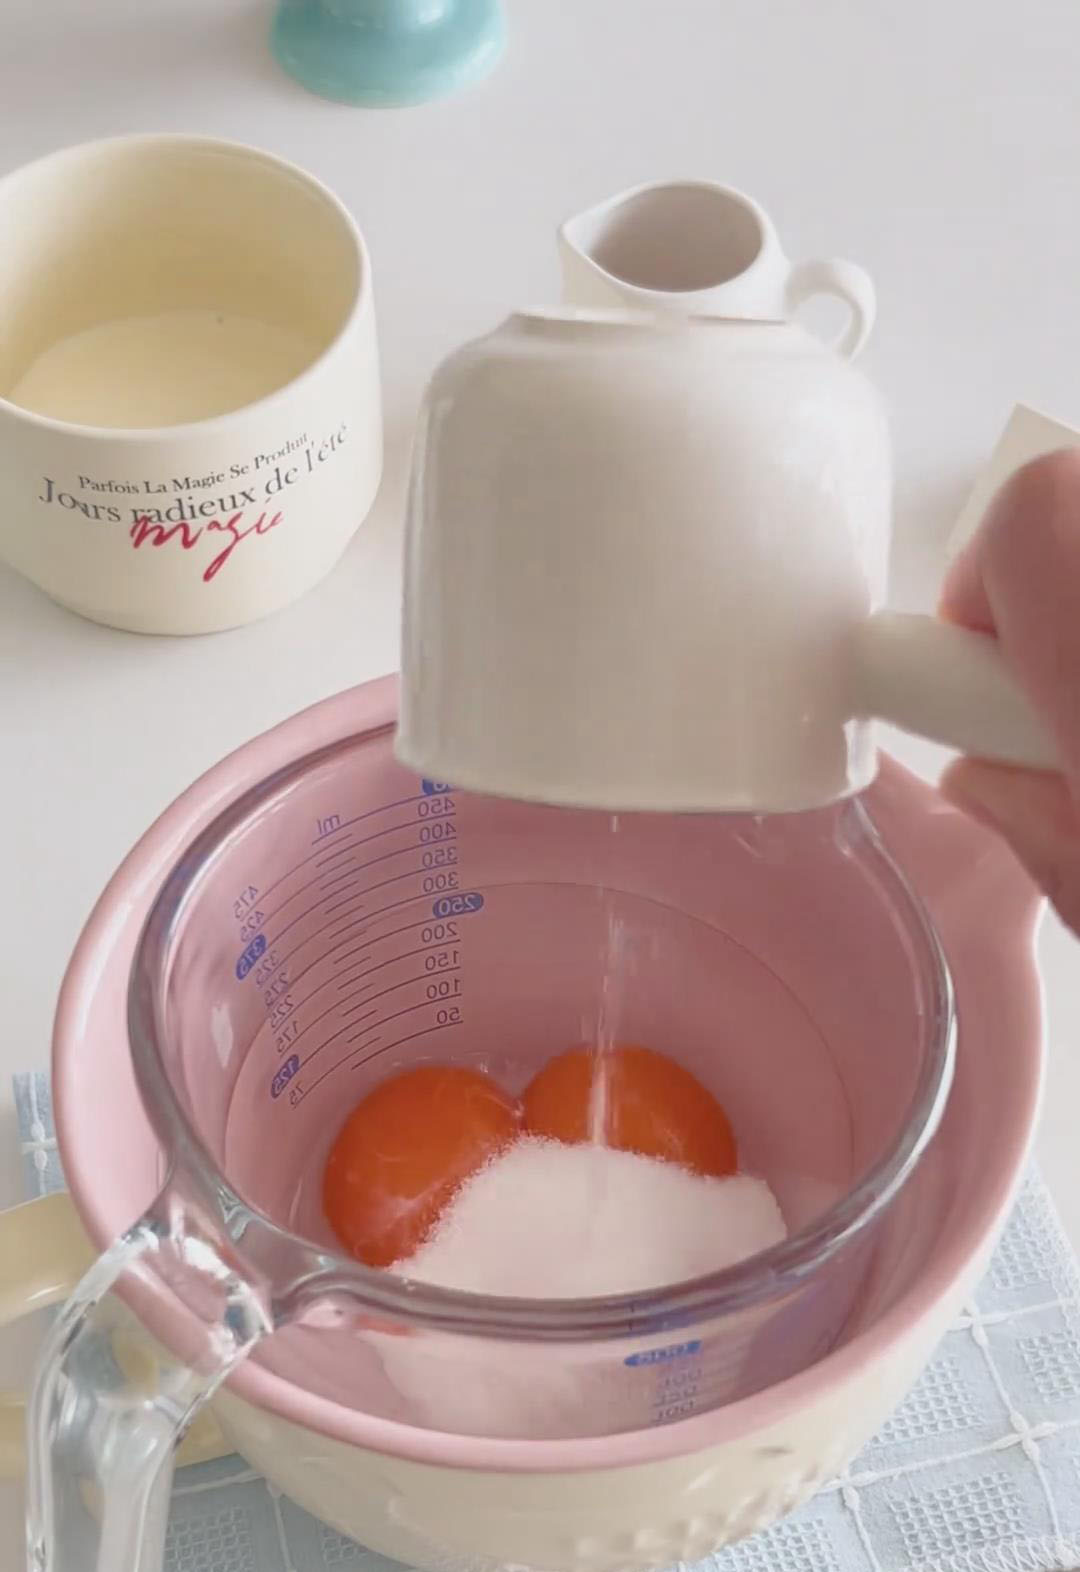
Remove the bowl from the heat.
Whisk in the 5g of Marsala wine (if using). Set the bowl aside and let the mixture cool to room temperature.
3. Prepare the Gelatin and Mascarpone
In a small saucepan, heat 50g of the whipping cream over low heat until it is just warm and small bubbles form at the edges (do not boil). Remove from heat.
Squeeze all excess water from the softened gelatin sheets.
Add them to the warm cream and whisk vigorously until the gelatin is completely dissolved.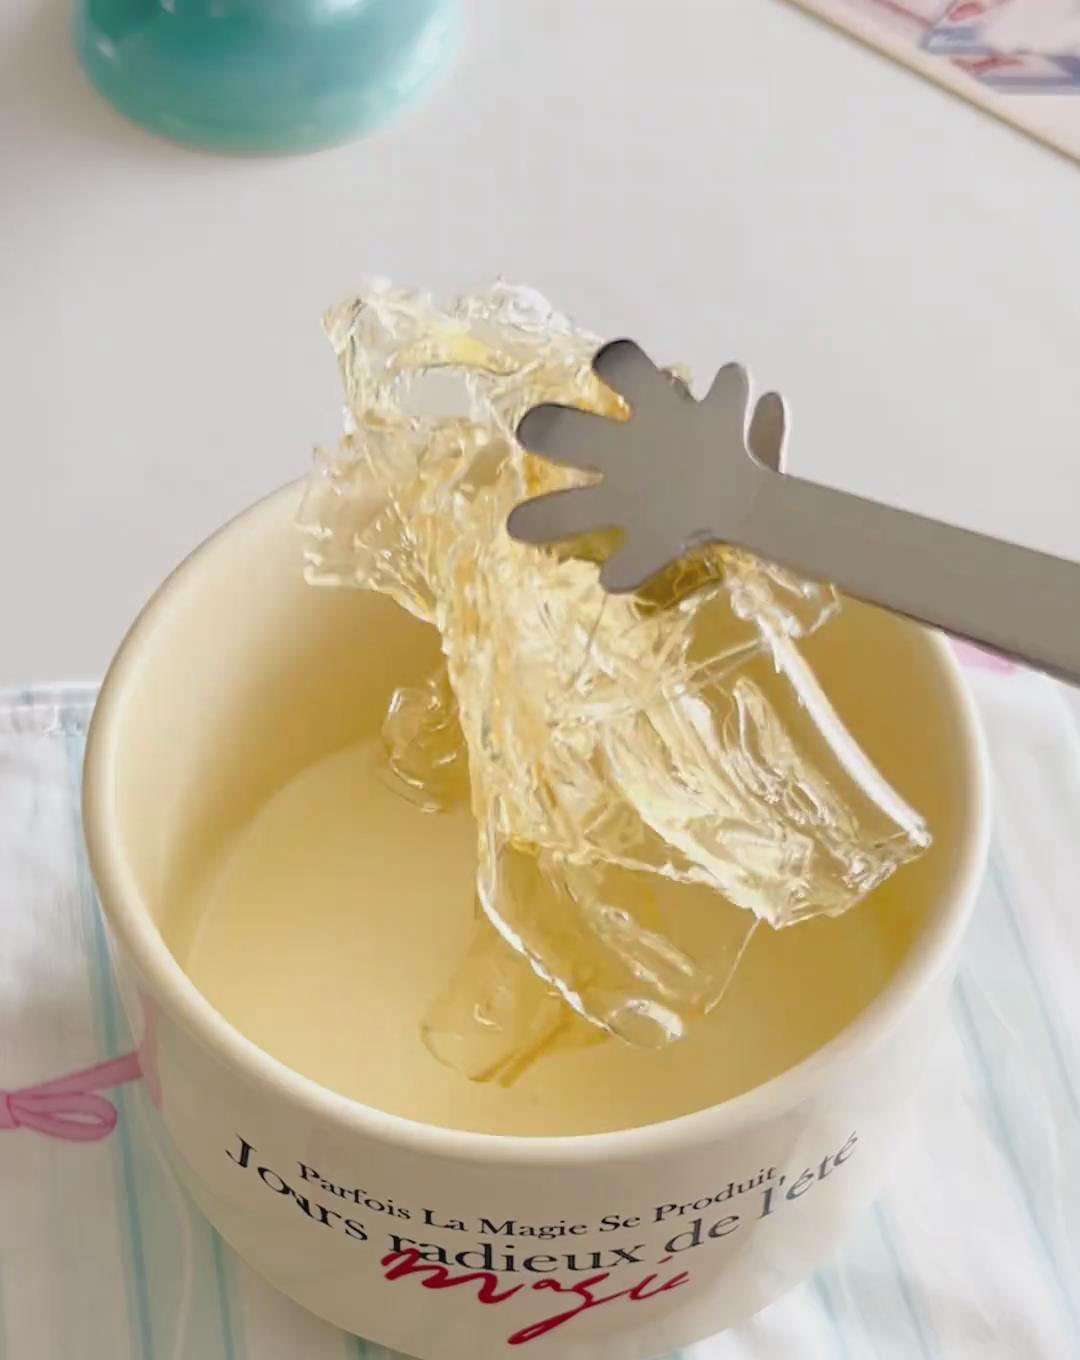
Set this mixture aside to cool until it is just barely warm to the touch (but not setting).
While it cools, place the softened mascarpone cheese in a large mixing bowl. Use a spatula to stir it vigorously until it is completely smooth and creamy.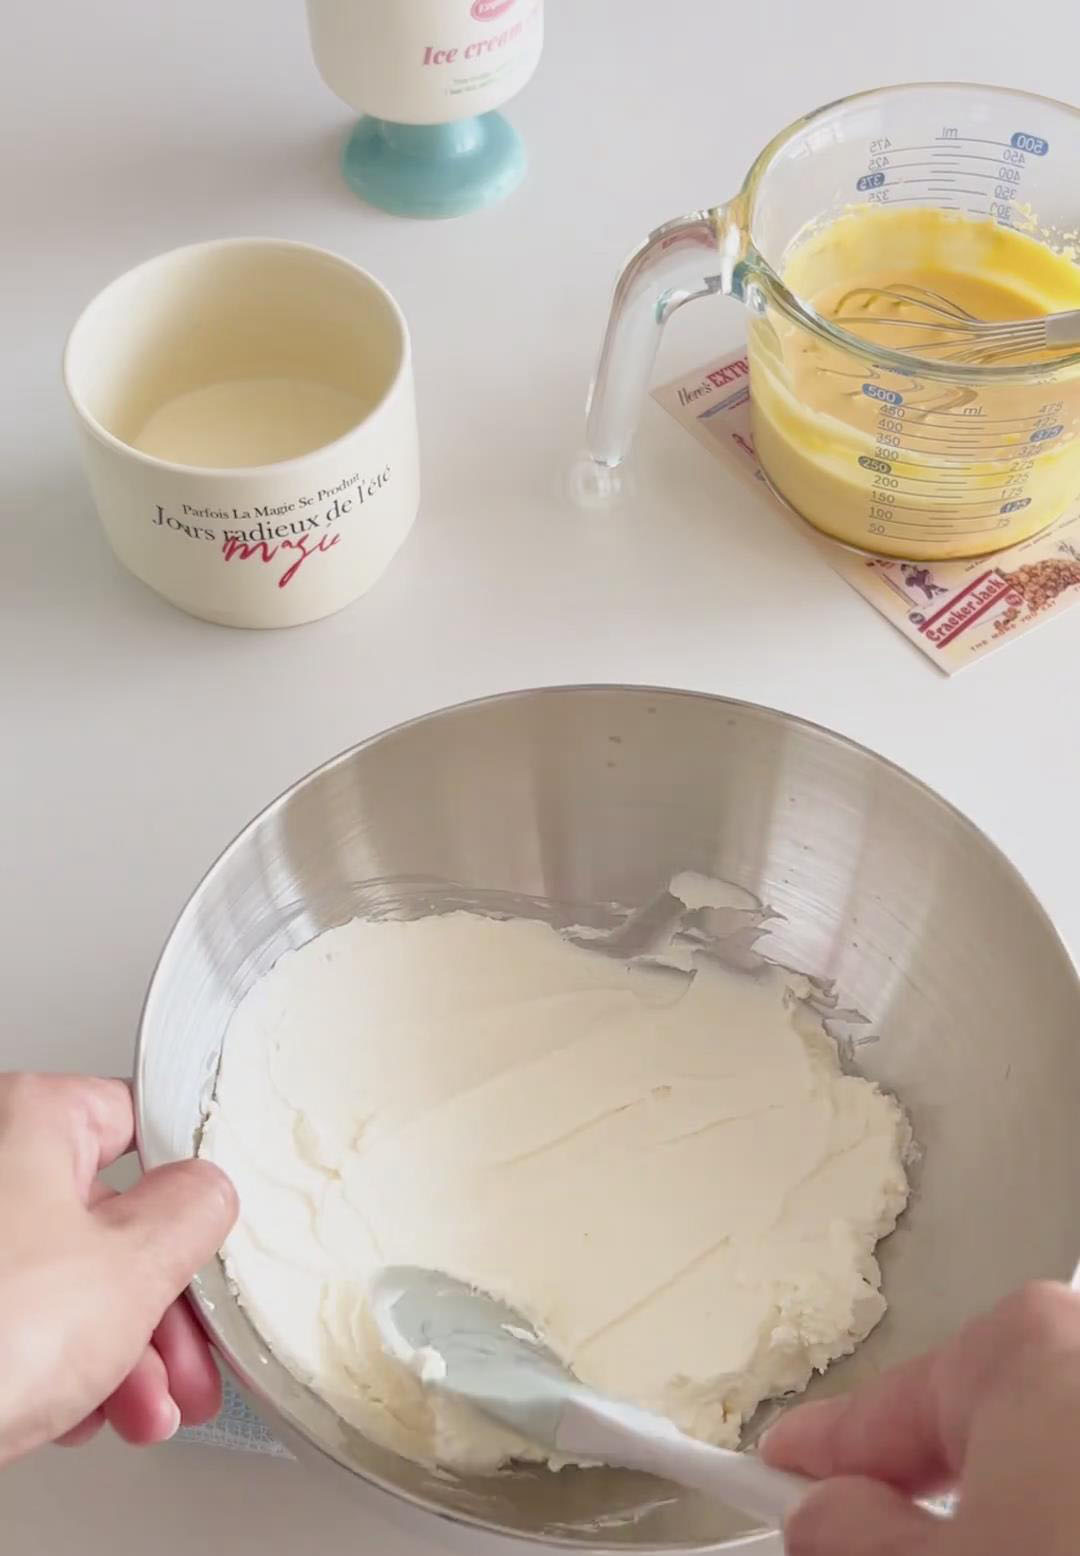
4. Build and Finish the Mascarpone Cream
Pour the cooled, room-temperature egg yolk mixture into the bowl with the smoothed mascarpone.
Use the spatula to fold and stir until they are completely combined into a homogeneous, lump-free paste.
Pour the slightly warm gelatin-cream mixture into the mascarpone-egg mixture. Whisk or fold until fully incorporated.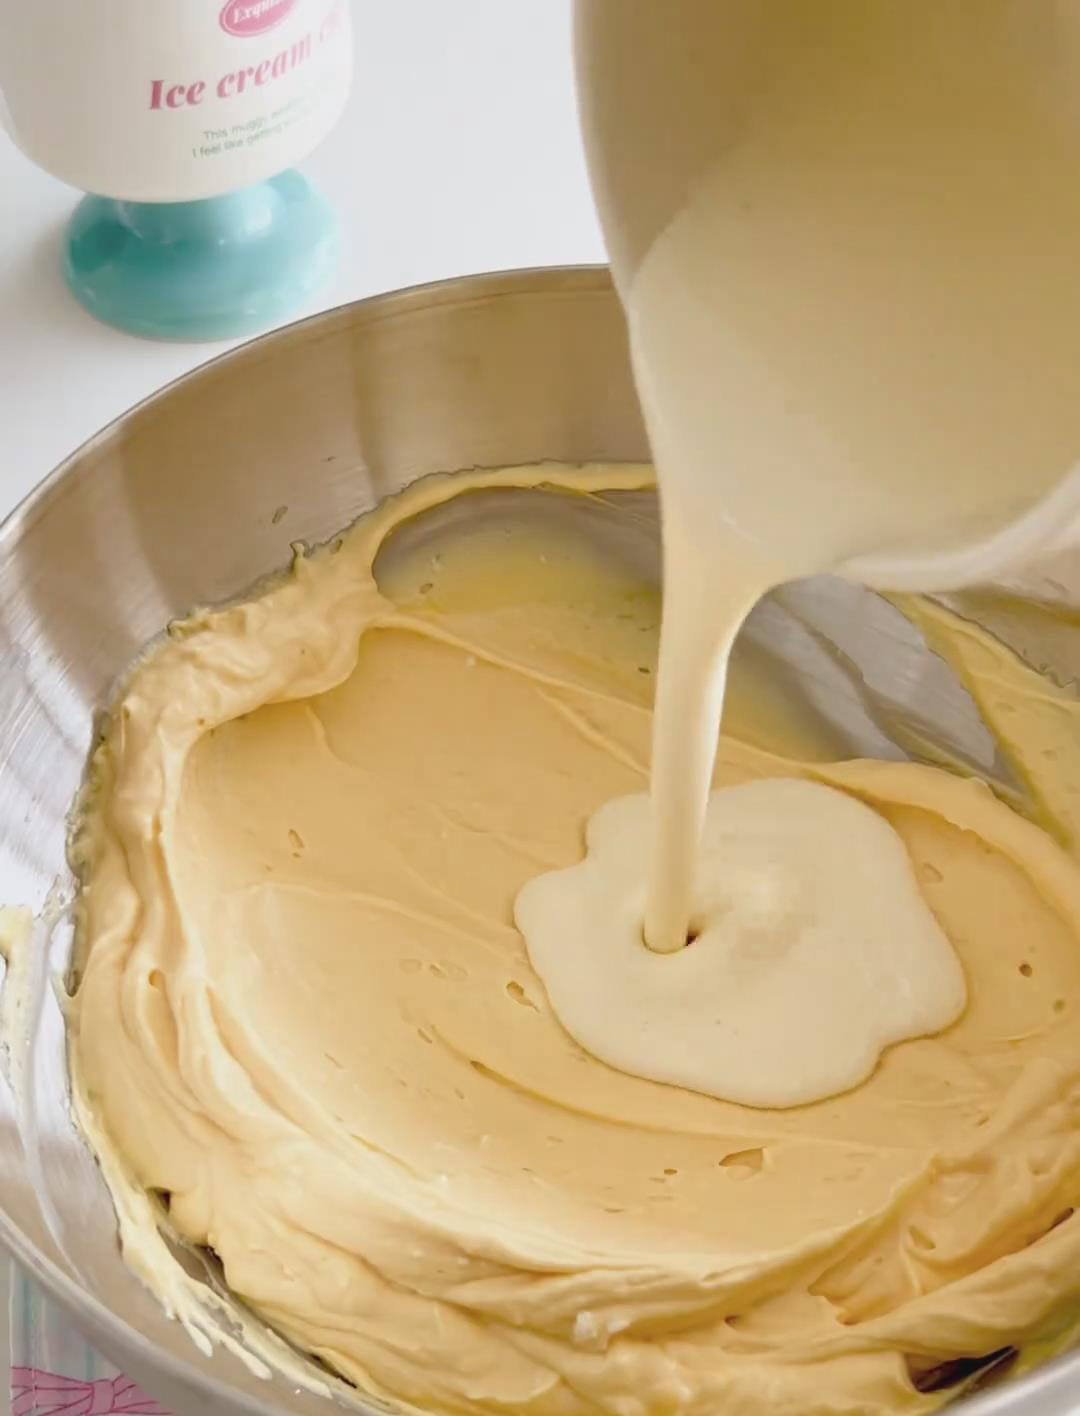
In a separate chilled bowl, combine the remaining 250g of cold whipping cream and the remaining 15g of sugar.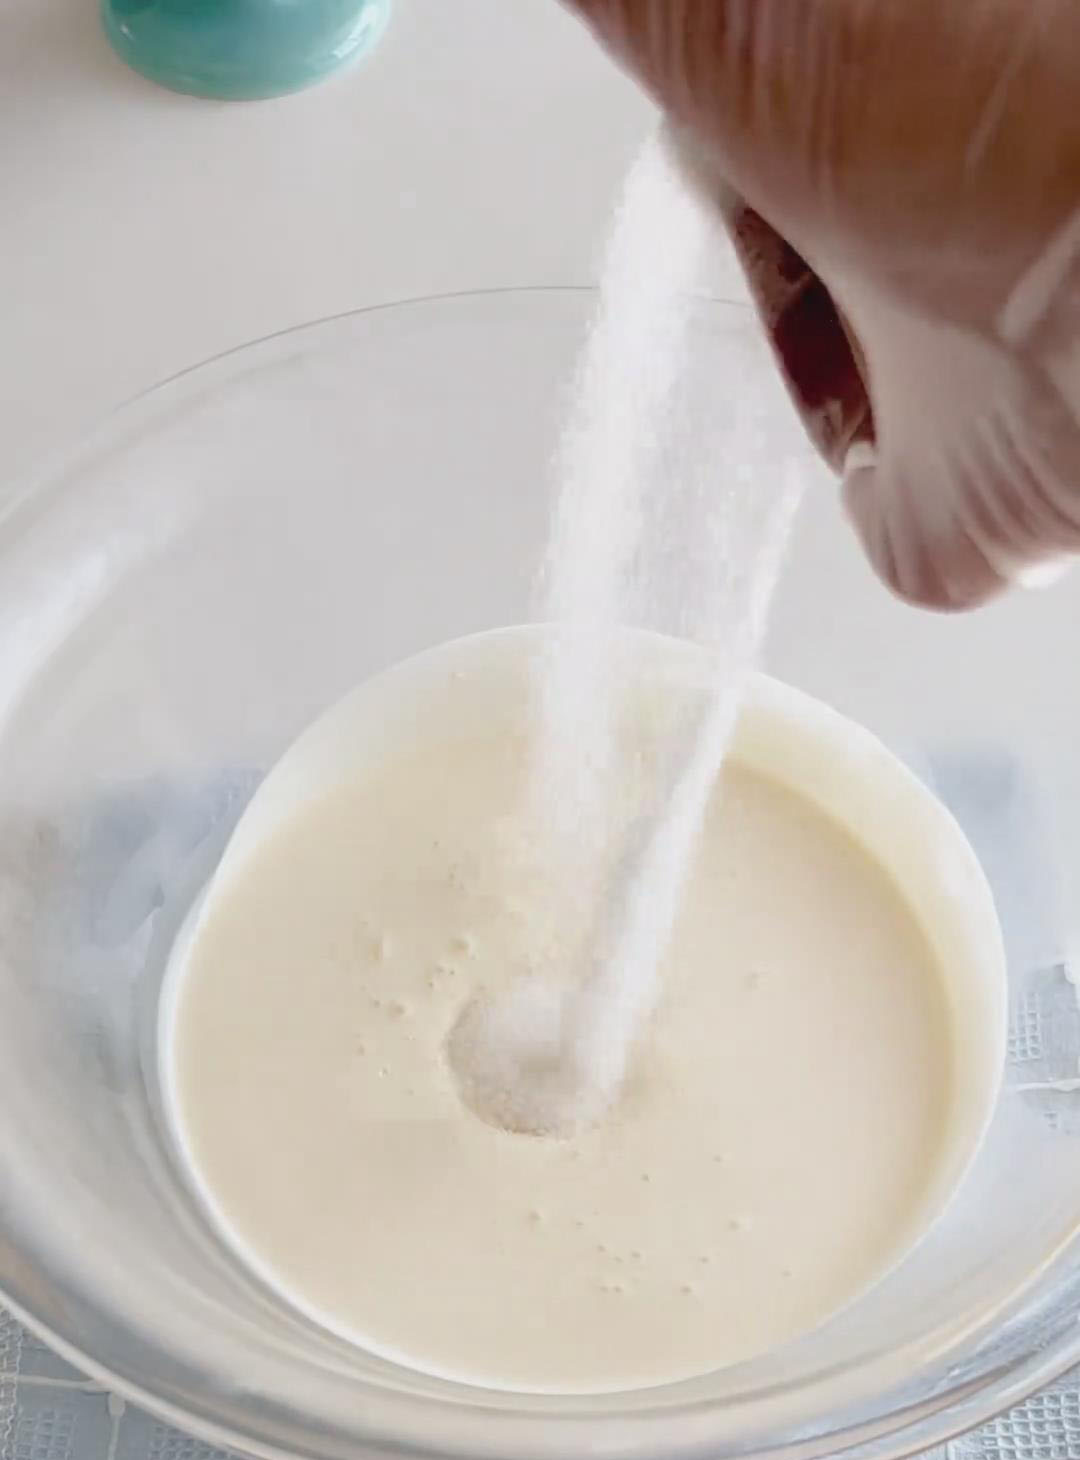
Whip with an electric mixer on medium speed until it reaches medium peaks—the cream should be thick and hold its shape but still be smooth and silky, not grainy or stiff.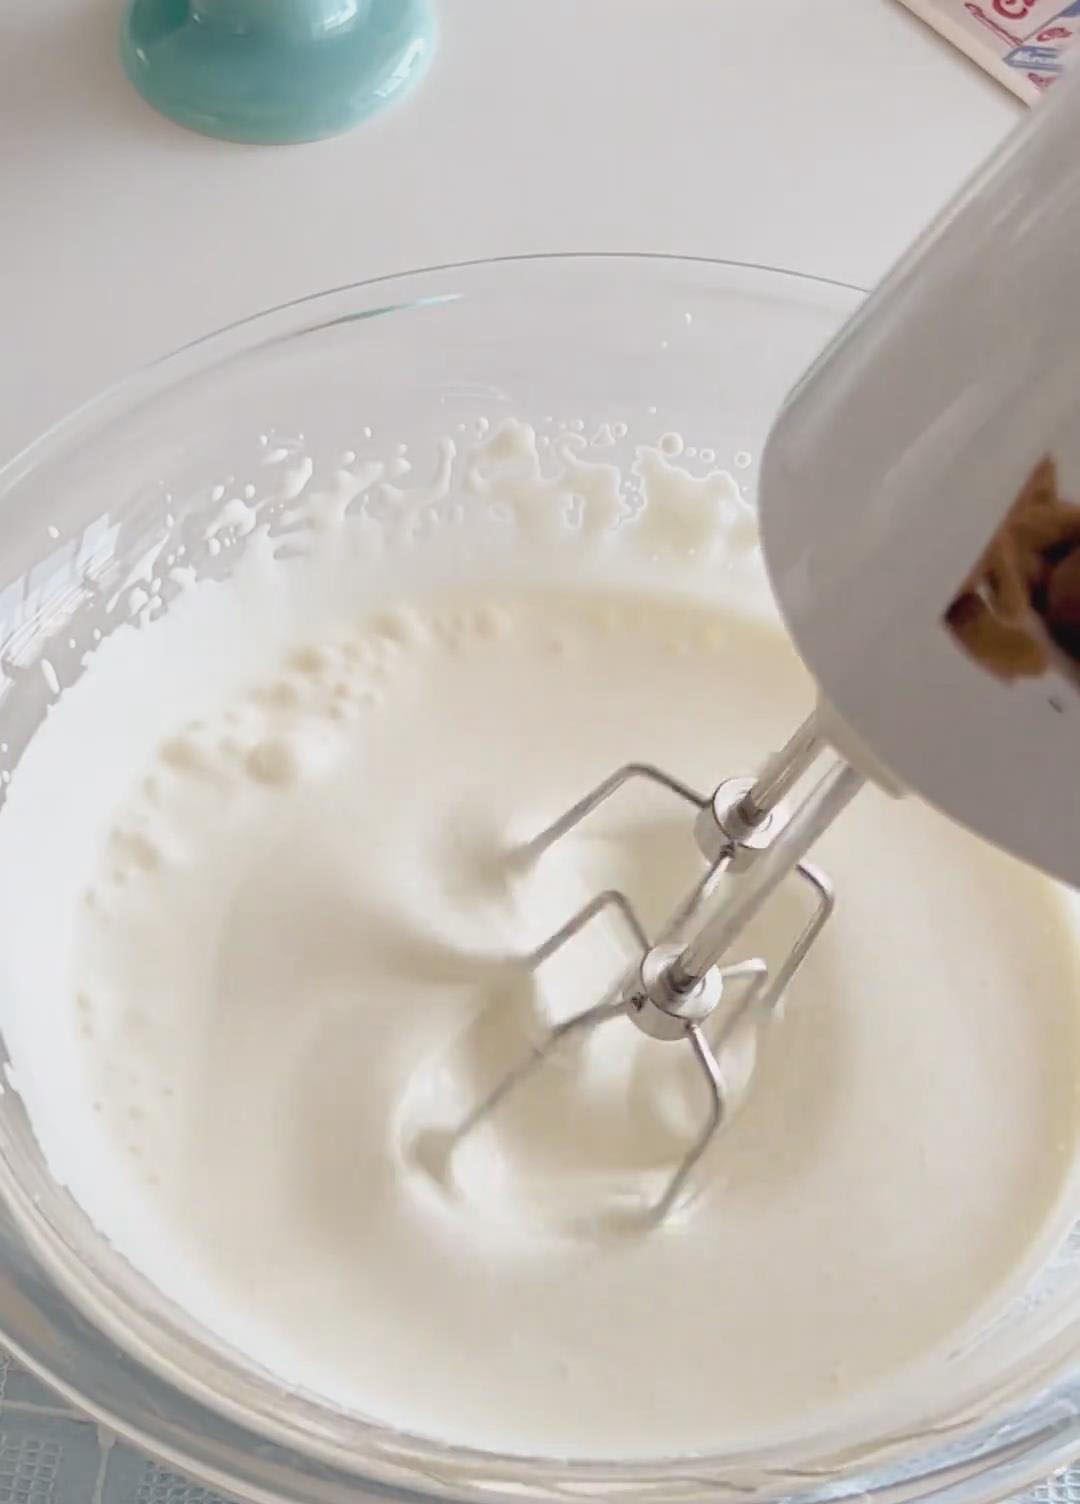
Pour the whipped cream into the mascarpone–egg yolk mixture and use an electric mixer on low speed to gently fold and combine until fully blended into a smooth, silky cream.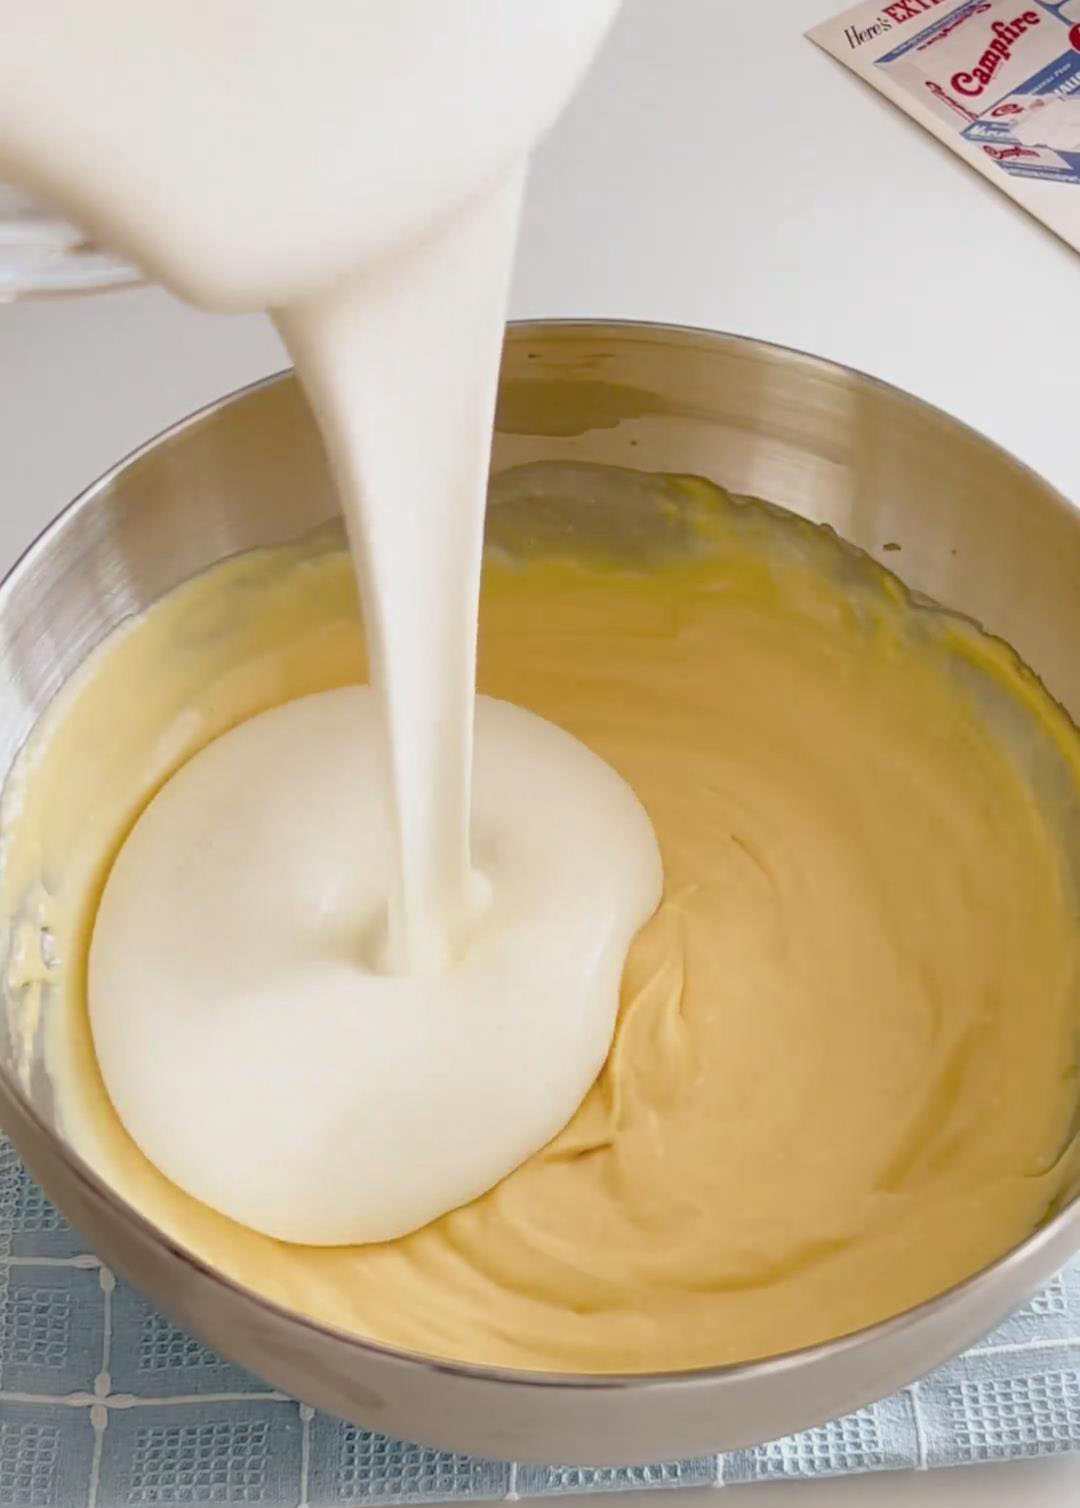

5. Make the Coffee Syrup
In a shallow bowl or baking dish wide enough to dip a ladyfinger, combine the 150g of warm water and 10g of powdered sugar. Stir until the sugar dissolves completely. Stir in the 15g of cooled espresso and 15g of coffee liqueur. Set aside to cool completely.
6. Assemble the Tiramisu
Quickly dip each ladyfinger into the cooled coffee syrup. Submerge it for just 1-2 seconds per side—enough to coat it but not so long that it becomes soggy and falls apart. Let any excess drip off.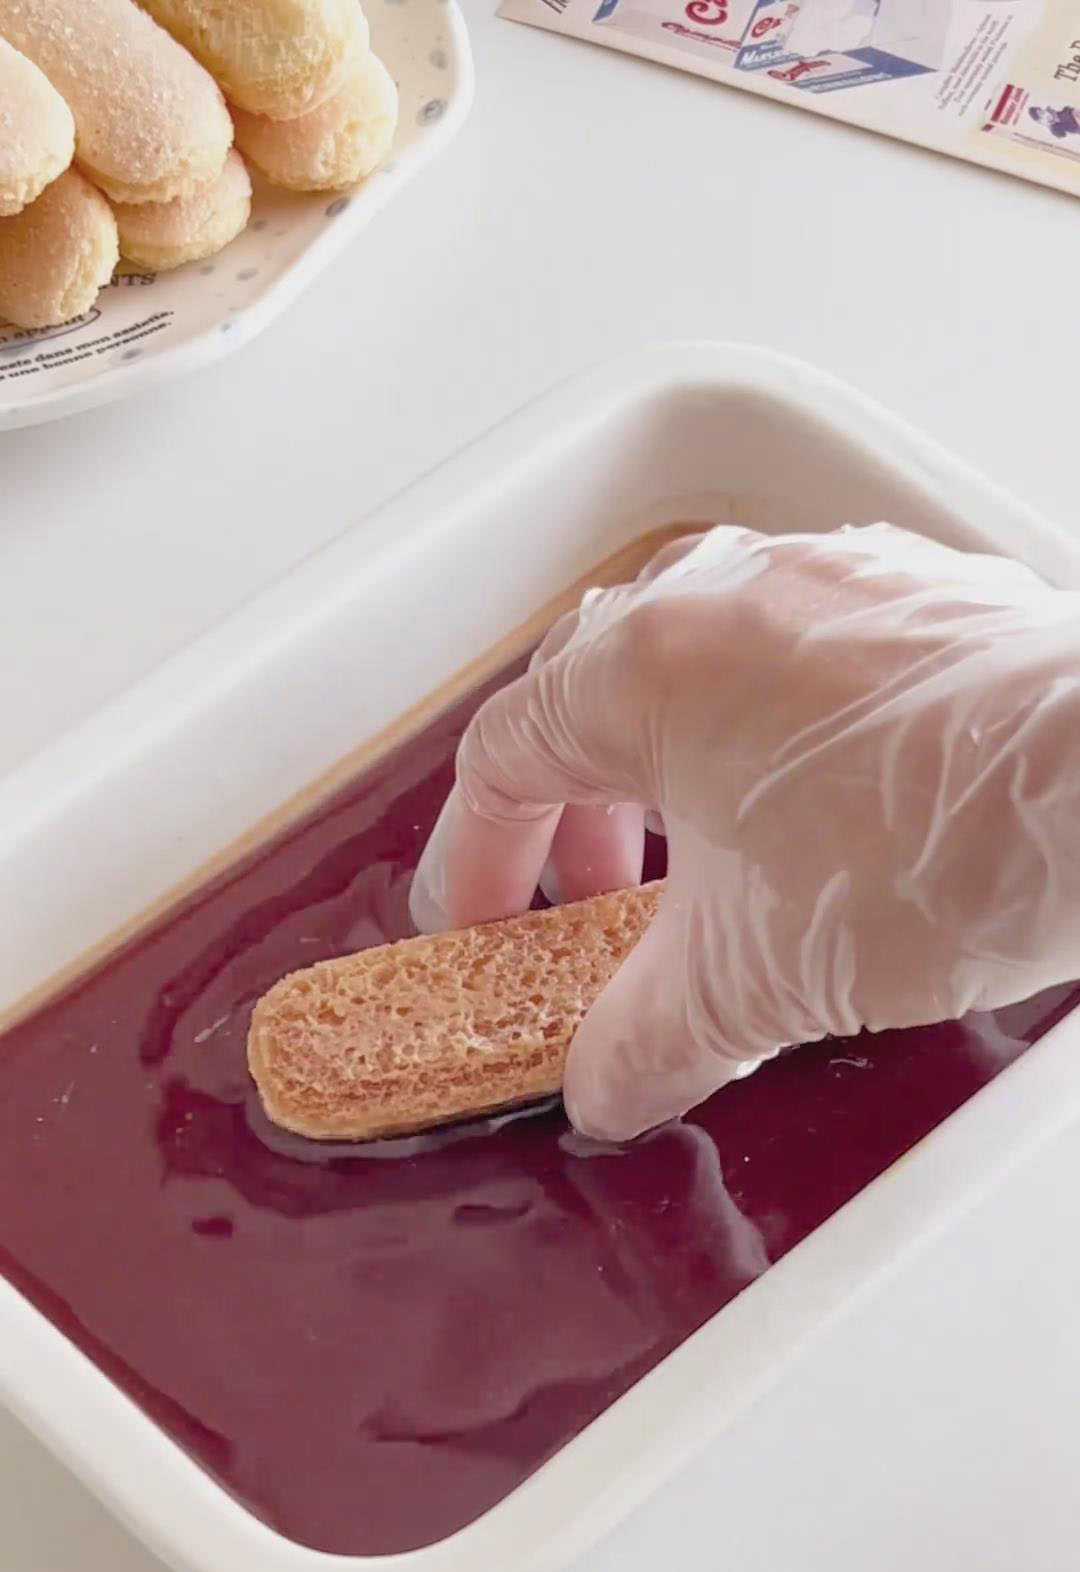
Arrange a single, snug layer of dipped ladyfingers in the bottom of a 6-inch mold.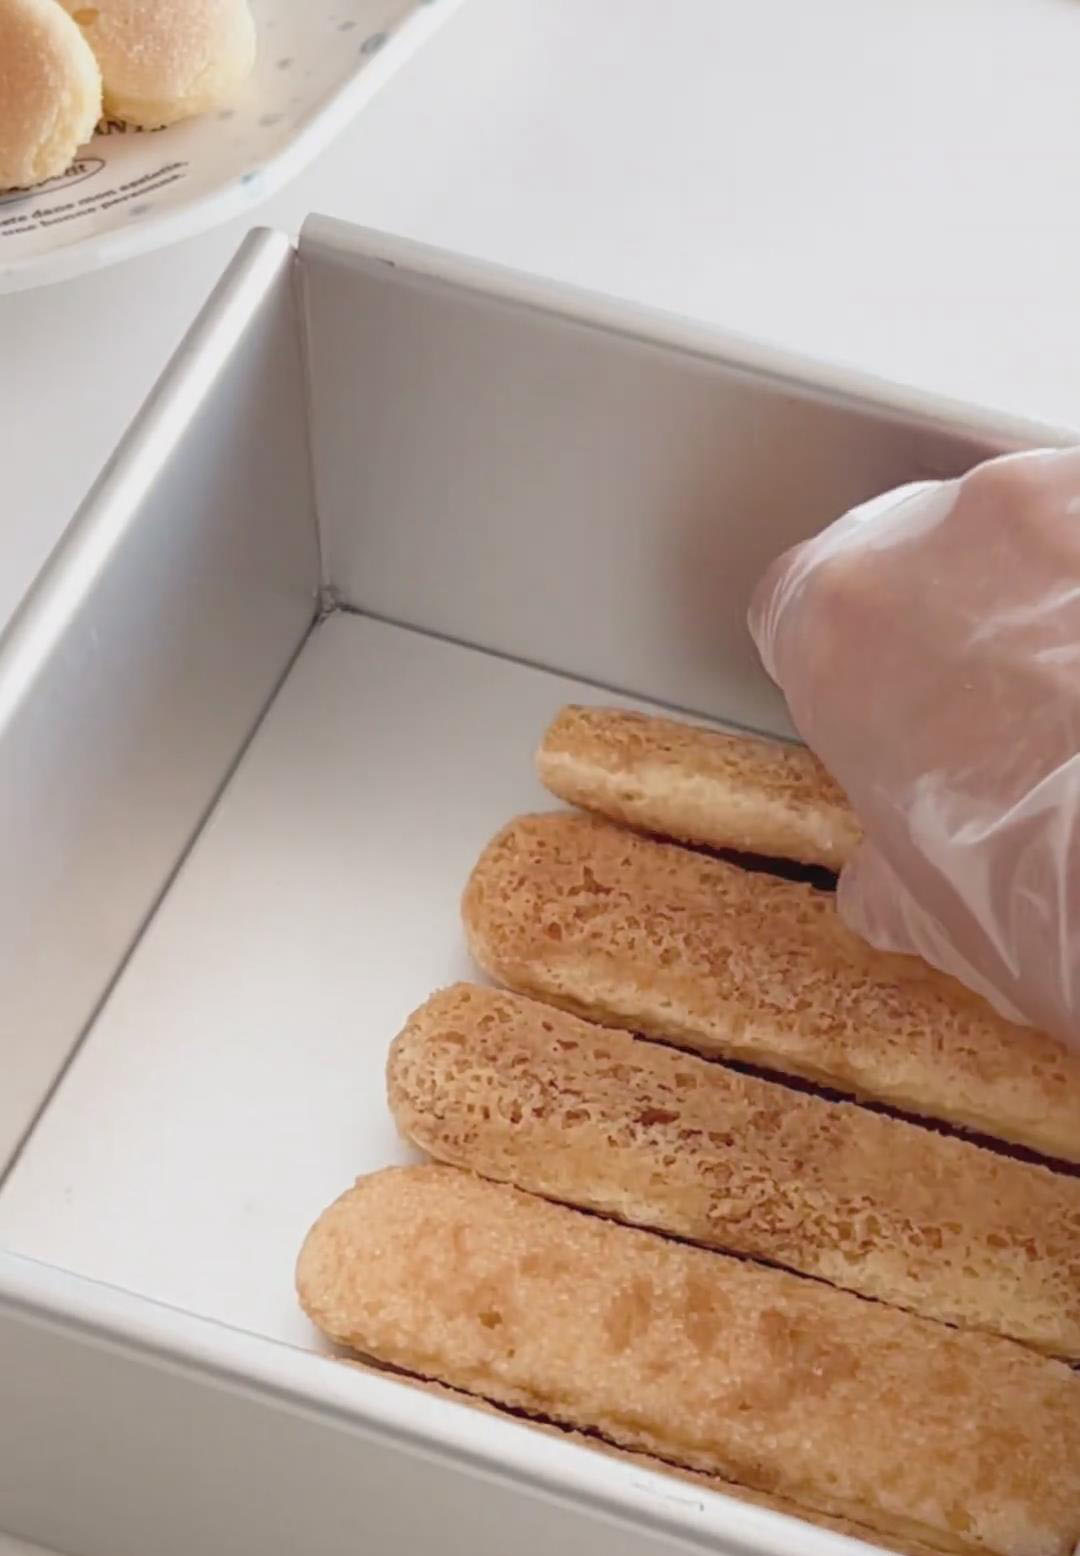
Spread or gently spoon half of the mascarpone cream evenly over the ladyfinger layer.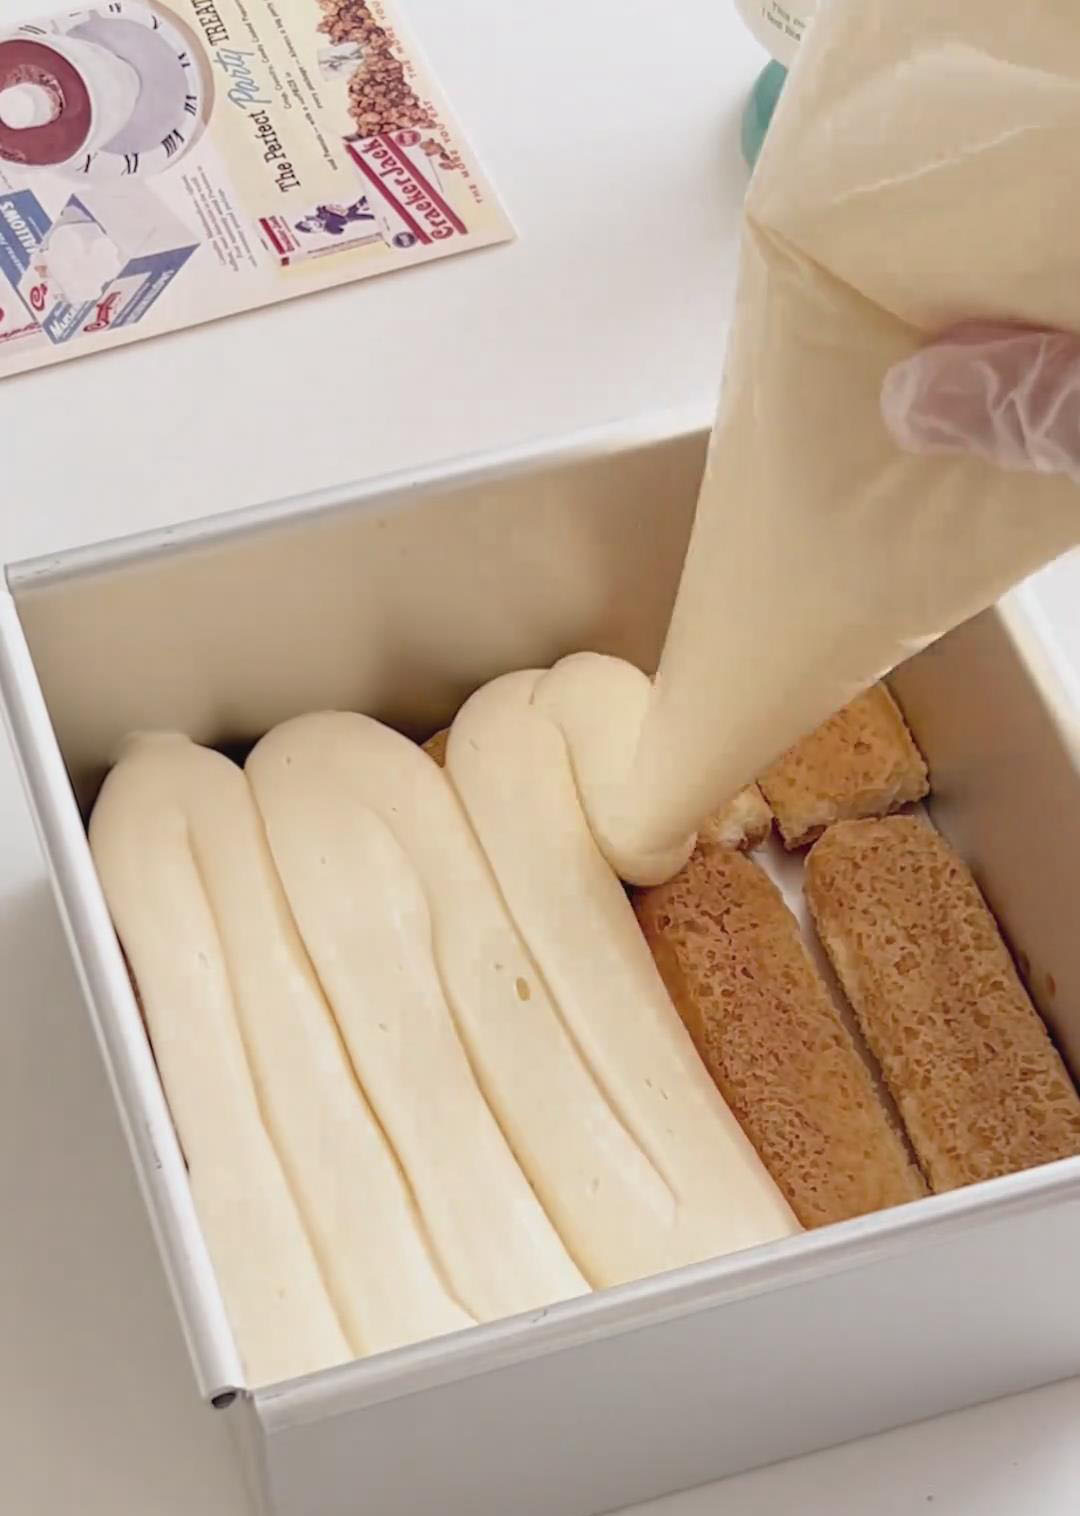
Create a second layer of coffee-dipped ladyfingers on top of the cream.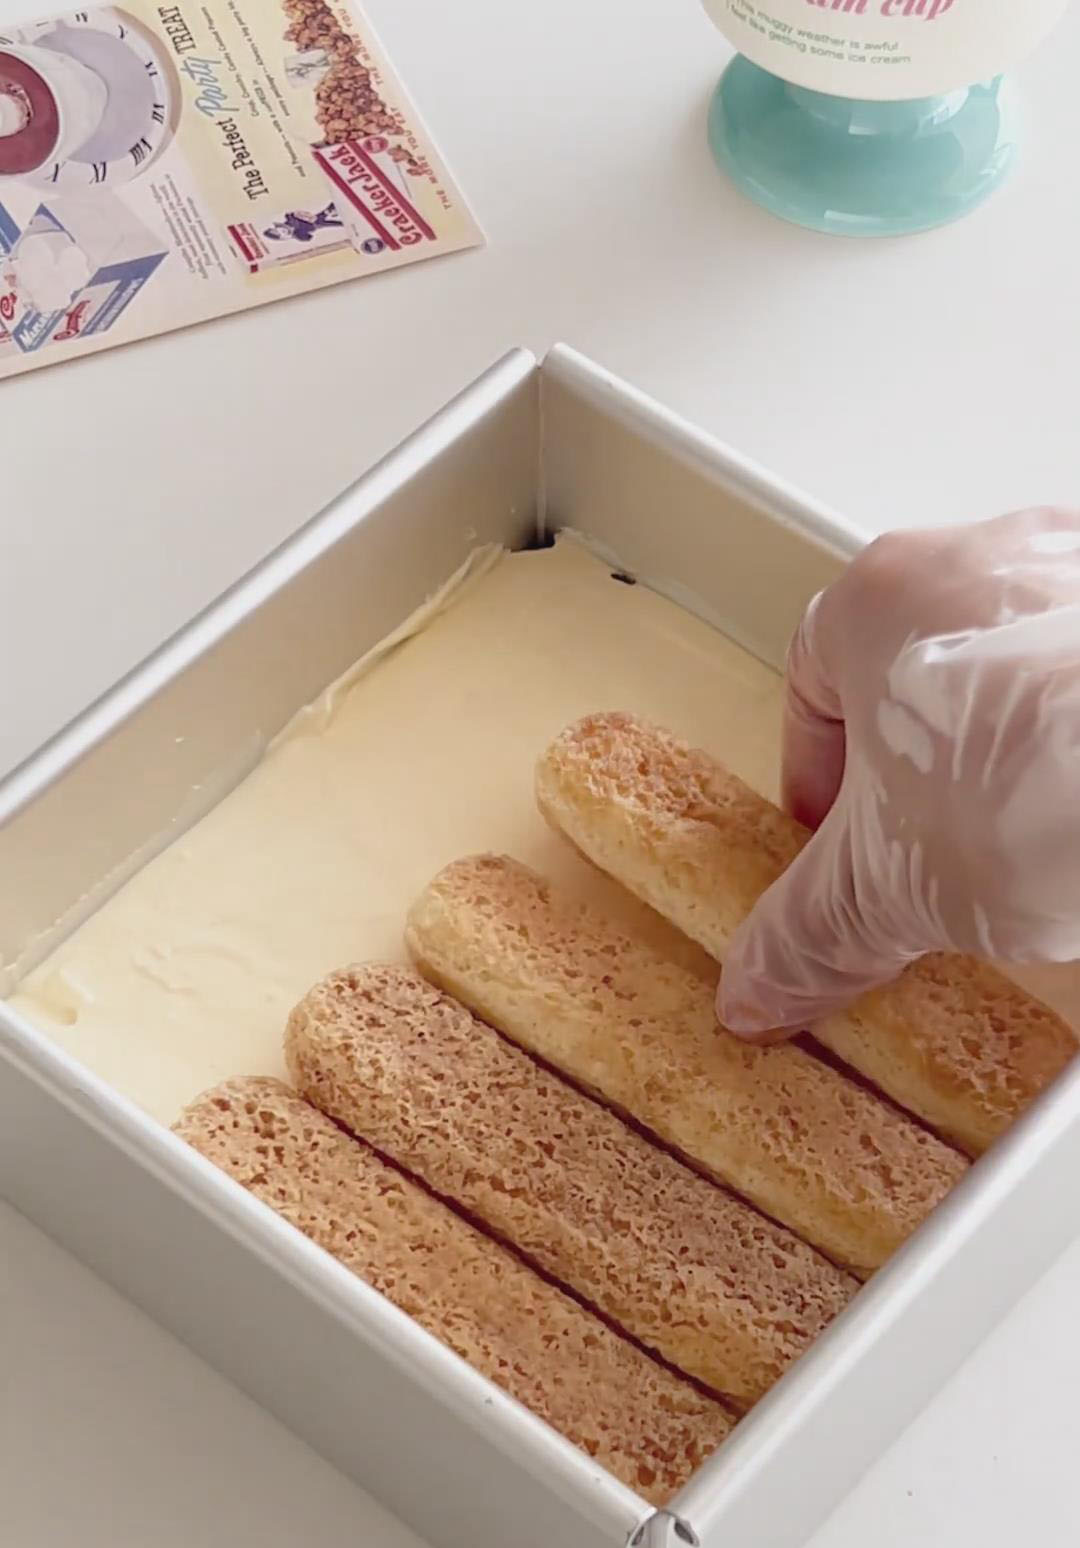
Spread the remaining mascarpone cream over the top, smoothing it into an even layer.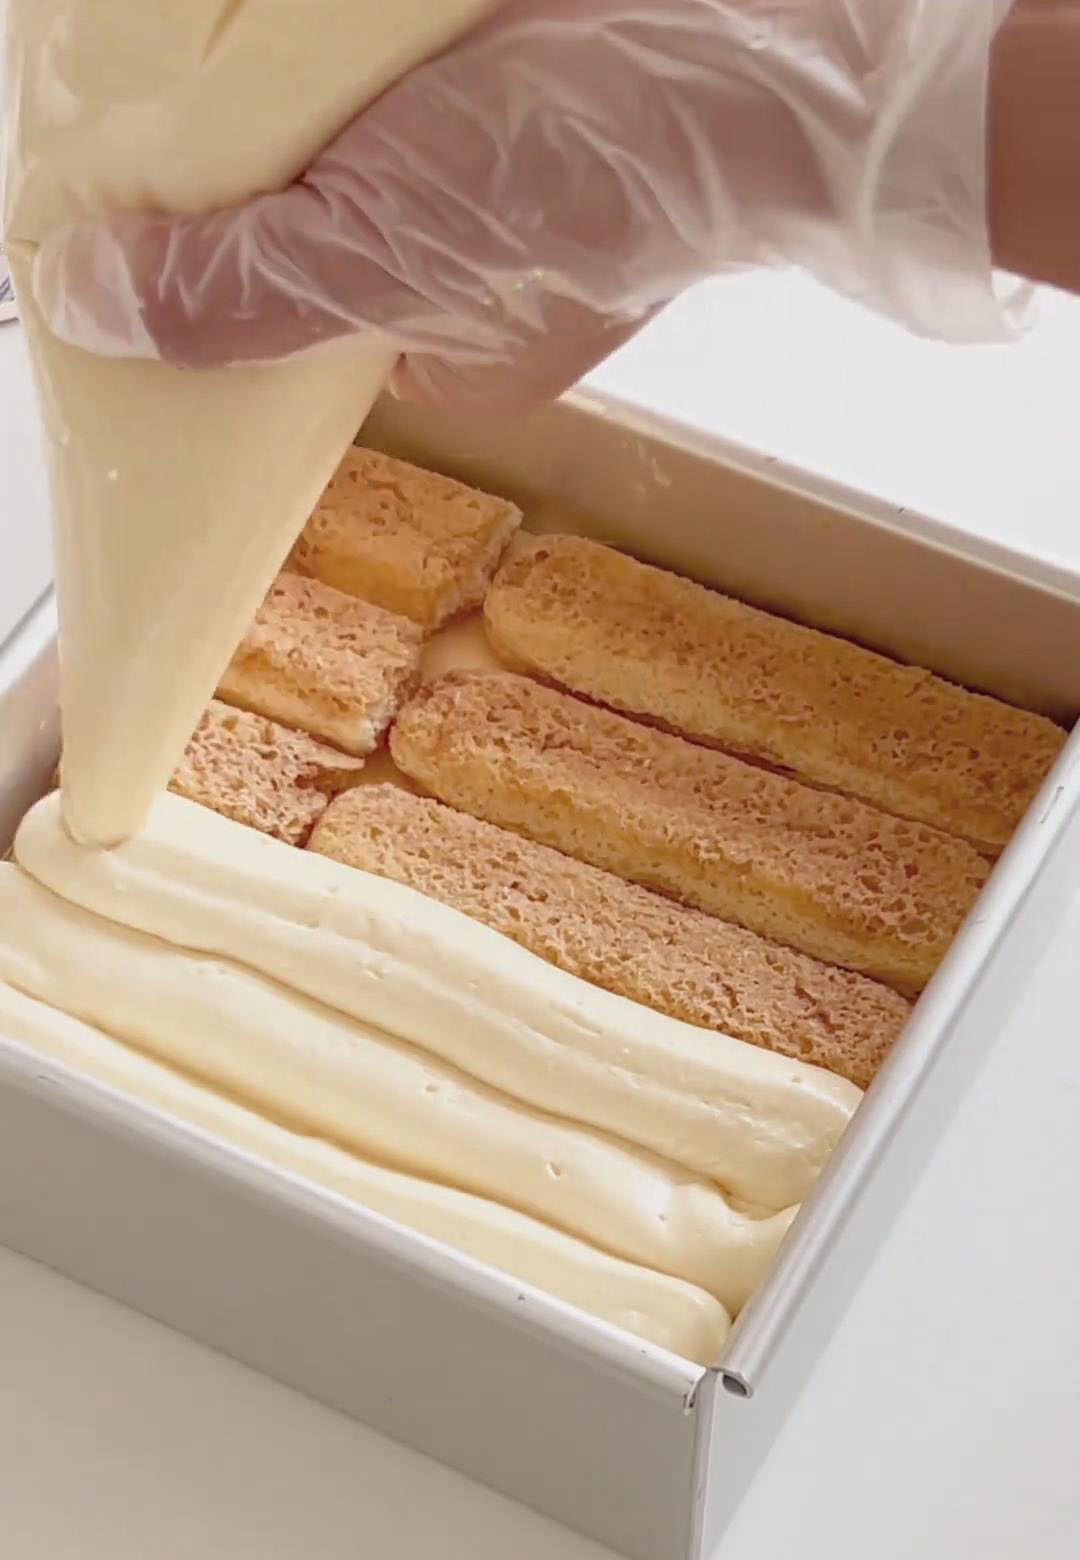

7. Chill and Serve
Cover the dish with plastic wrap. Refrigerate for at least 4 hours, but preferably overnight (8-12 hours).
To release cleanly, warm the sides of the mold with a hairdryer for 30 seconds or wrap with a warm towel for 1 minute.
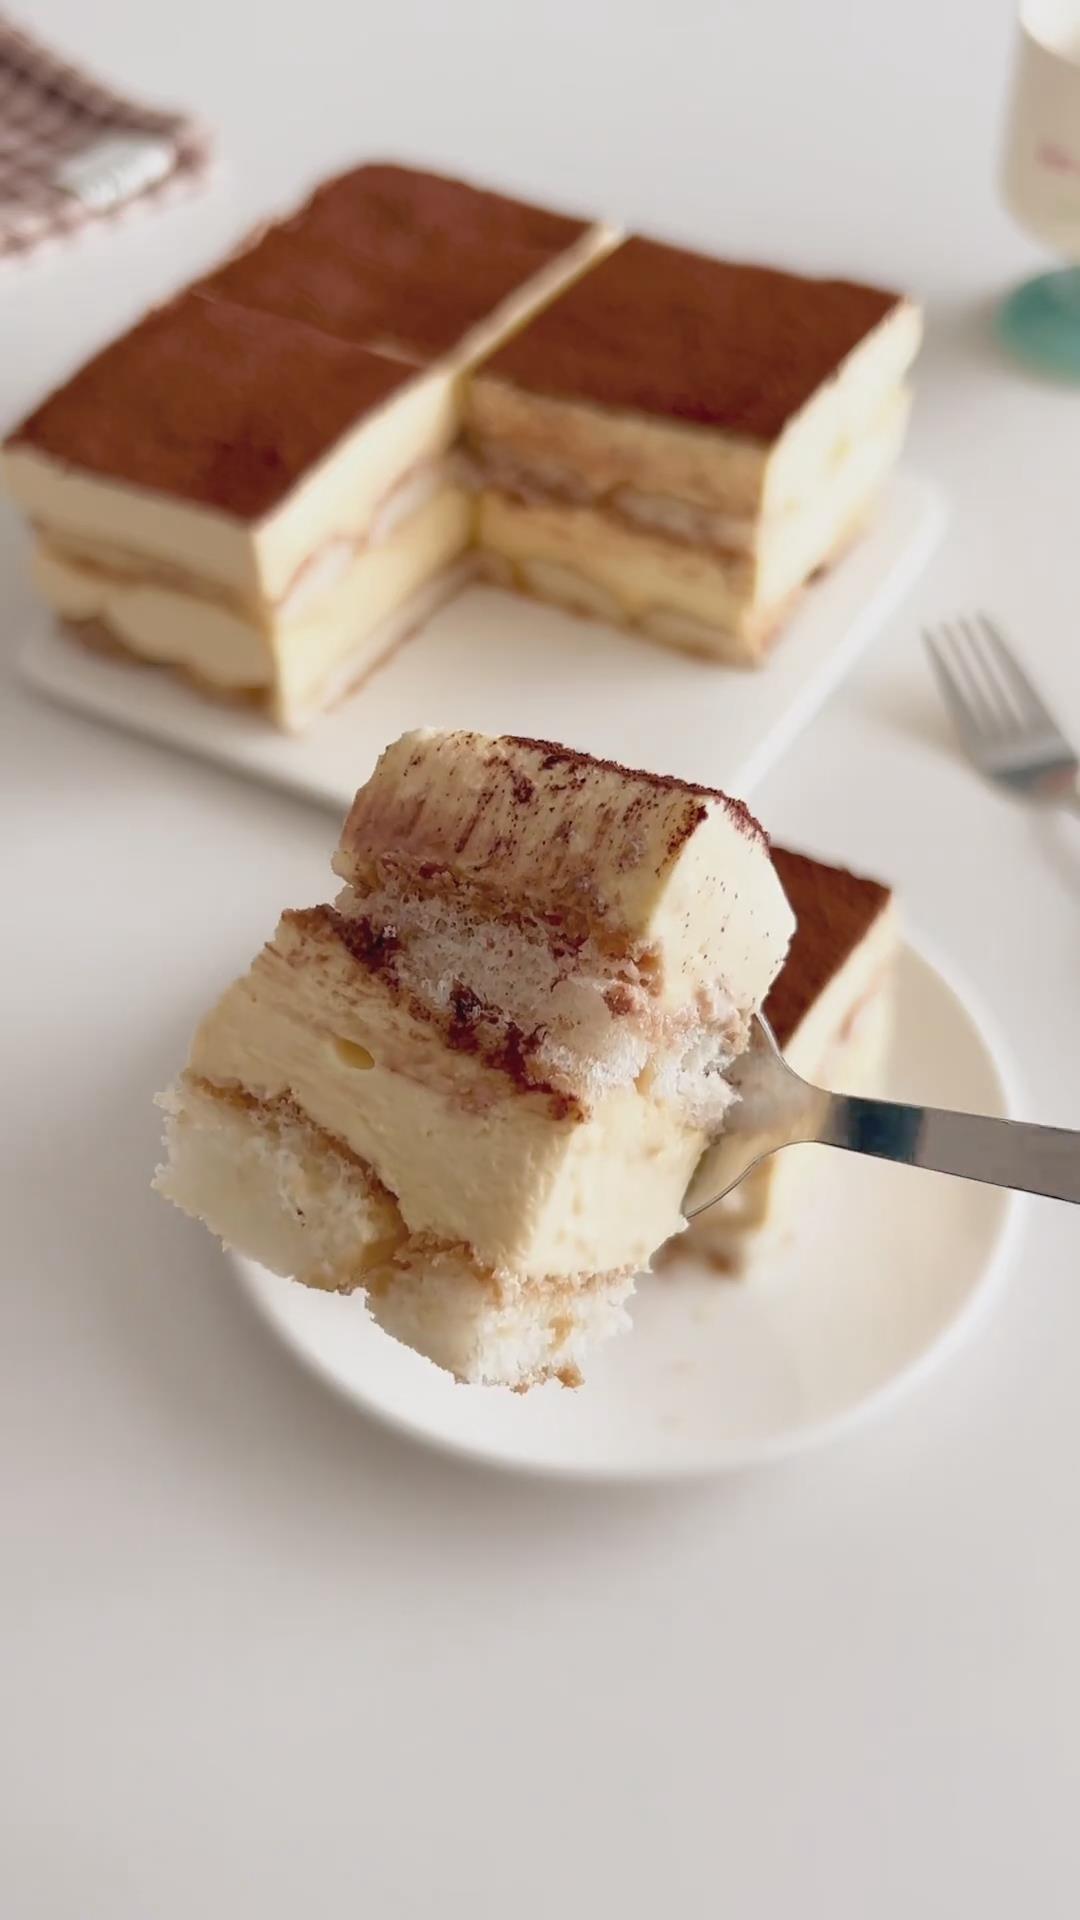
Remove the base and transfer to a serving plate.
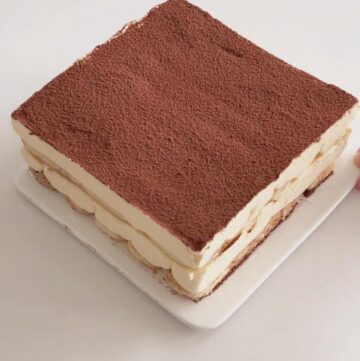
Dust generously with cocoa powder. Slice and serve.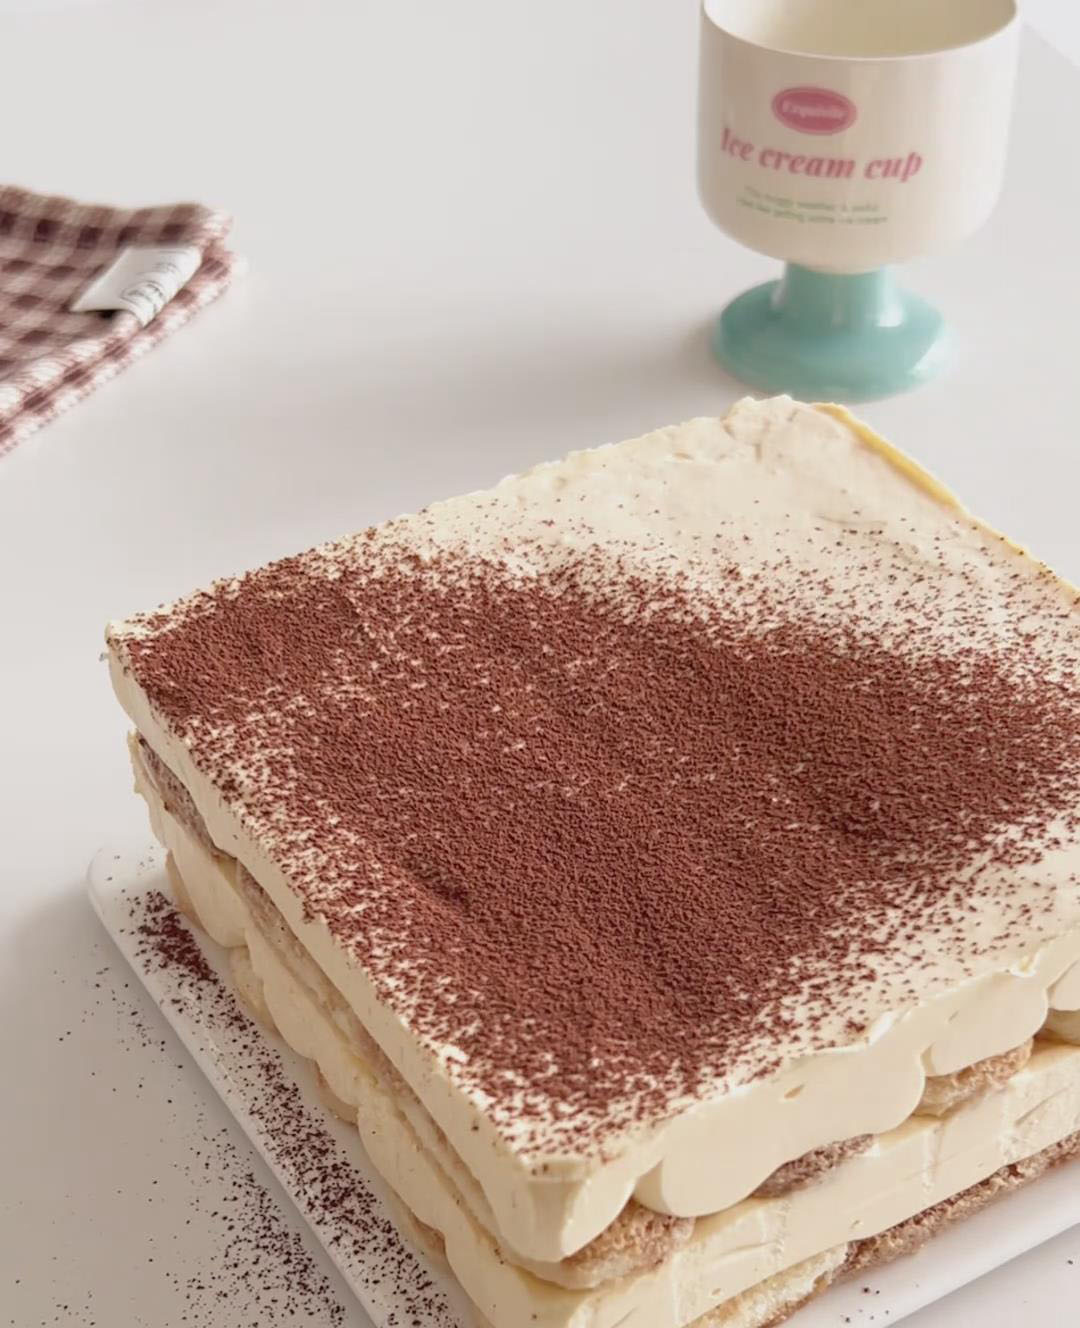
Tips & Tricks
- Soften the mascarpone completely. This is the most critical step for a smooth cream. Cold, firm mascarpone will leave tiny lumps no matter how much you mix.
- Don’t over-whip the cream. Stop whipping when the cream holds medium peaks. Over-whipped cream becomes grainy and can make the final texture of the tiramisu less smooth.
- Dip, don’t soak the ladyfingers. A quick 1-2 second dip is all that’s needed. They will continue to absorb moisture from the cream as they chill, softening to the perfect texture. Soaked ladyfingers will make the dessert wet and mushy.
- Chill the coffee syrup. Dipping with warm syrup will start to melt the cream and make the ladyfingers too soft too quickly. Ensure it’s completely cool.
- Patience is key. The overnight chill is not a suggestion—it’s a requirement. It transforms the separate components into a unified, perfect dessert.
Frequently Asked Questions
Can I make this without alcohol?
Absolutely. Simply omit the Marsala wine from the cream and replace the coffee liqueur in the syrup with an equal amount of strong espresso or even a teaspoon of vanilla extract for depth.
Can I use powdered gelatin instead of sheets?
Yes. Use 2 ¼ teaspoons (one 7g packet) of unflavored powdered gelatin. “Bloom” it by sprinkling it over 3 tablespoons of cold water in a small bowl. Let it sit for 5 minutes until it becomes a solid gel. Then, dissolve it in the 50g of warm cream as directed.
Why is my tiramisu soupy or not setting?
This usually happens if: 1) The gelatin wasn’t fully dissolved before adding it, 2) The cream was over-whipped and later separated, 3) The ladyfingers were soaked for too long, releasing too much liquid, or 4) It wasn’t chilled for long enough. Ensure you follow each step precisely and chill overnight.
How far in advance can I make it?
This tiramisu is perfect for making ahead. You can assemble it 2-3 days in advance. Keep it covered in the refrigerator. Dust with cocoa powder only within an hour or two of serving to prevent it from getting damp.
Are the raw eggs safe?
The egg yolks are gently cooked over simmering water (a bain-marie) to a temperature that pasteurizes them, making them safe to consume while keeping them smooth. This step is essential for both safety and the proper texture of the cream.
More Tiramisu Variations You’ll Love
- Easy Lemon Tiramisu
- No-Bake Oreo Tiramisu
- Easy Strawberry Tiramisu
- Blueberry Tiramisu Recipe
- Mango Tiramisu Recipe
- Easy Tiramisu Cookies Recipe
- Matcha Tiramisu Egg Tarts Recipe
- The Best Tiramisu Basque Cake
The BEST No-Bake Tiramisu (Beginner Friendly!)
Ingredients
For the Mascarpone Cream
- 3 large egg yolks room temperature
- 35 g fine granulated sugar divided
- 5 g Marsala wine or coffee liqueur optional
- 250 g mascarpone cheese room temperature
- 7 g gelatin sheets
- 300 g whipping cream 30-36% fat, divided
For the Coffee Syrup
- 150 g warm water approx. 40°C / 104°F
- 10 g powdered sugar or fine granulated sugar
- 15 g strong espresso or very strong brewed coffee cooled
- 15 g coffee liqueur e.g., Kahlúa or additional espresso
For Assembly
- 24-30 Italian ladyfingers savoiardi
- Unsweetened cocoa powder for dusting
Instructions
Prepare the Components
- Place the 7g of gelatin sheets in a small bowl of cold water to soak for at least 5 minutes.
- Take the 250g of mascarpone cheese out of the refrigerator to soften on the counter.
Create the Egg Yolk Base
- Fill a medium saucepan with about 1 inch (2.5 cm) of water and bring it to a gentle simmer over medium-low heat.
- In a large heatproof bowl that fits snugly over the saucepan (without touching the water), whisk together the 3 egg yolks and 20g of the fine sugar.
- Place the bowl over the simmering water to create a double boiler. Whisk the mixture constantly and vigorously for about 3-5 minutes, until it becomes pale, thick, fluffy, and doubled in volume, and the sugar has dissolved (it should feel warm to the touch and leave ribbons when you lift the whisk).
- Remove the bowl from the heat.
- Whisk in the 5g of Marsala wine (if using). Set the bowl aside and let the mixture cool to room temperature.
Prepare the Gelatin and Mascarpone
- In a small saucepan, heat 50g of the whipping cream over low heat until it is just warm and small bubbles form at the edges (do not boil). Remove from heat.
- Squeeze all excess water from the softened gelatin sheets.
- Add them to the warm cream and whisk vigorously until the gelatin is completely dissolved.
- Set this mixture aside to cool until it is just barely warm to the touch (but not setting).
- While it cools, place the softened mascarpone cheese in a large mixing bowl. Use a spatula to stir it vigorously until it is completely smooth and creamy.
Build and Finish the Mascarpone Cream
- Pour the cooled, room-temperature egg yolk mixture into the bowl with the smoothed mascarpone.
- Use the spatula to fold and stir until they are completely combined into a homogeneous, lump-free paste.
- Pour the slightly warm gelatin-cream mixture into the mascarpone-egg mixture. Whisk or fold until fully incorporated.
- In a separate chilled bowl, combine the remaining 250g of cold whipping cream and the remaining 15g of sugar.
- Whip with an electric mixer on medium speed until it reaches medium peaks—the cream should be thick and hold its shape but still be smooth and silky, not grainy or stiff.
- Pour the whipped cream into the mascarpone–egg yolk mixture and use an electric mixer on low speed to gently fold and combine until fully blended into a smooth, silky cream.
Make the Coffee Syrup
- In a shallow bowl or baking dish wide enough to dip a ladyfinger, combine the 150g of warm water and 10g of powdered sugar. Stir until the sugar dissolves completely. Stir in the 15g of cooled espresso and 15g of coffee liqueur. Set aside to cool completely.
Assemble the Tiramisu
- Quickly dip each ladyfinger into the cooled coffee syrup. Submerge it for just 1-2 seconds per side—enough to coat it but not so long that it becomes soggy and falls apart. Let any excess drip off.
- Arrange a single, snug layer of dipped ladyfingers in the bottom of a 6-inch mold.
- Spread or gently spoon half of the mascarpone cream evenly over the ladyfinger layer.
- Create a second layer of coffee-dipped ladyfingers on top of the cream.
- Spread the remaining mascarpone cream over the top, smoothing it into an even layer.
Chill and Serve
- Cover the dish with plastic wrap. Refrigerate for at least 4 hours, but preferably overnight (8-12 hours).
- To release cleanly, warm the sides of the mold with a hairdryer for 30 seconds or wrap with a warm towel for 1 minute.
- Remove the base and transfer to a serving plate.
- Dust generously with cocoa powder. Slice and serve.
Leave a Reply