
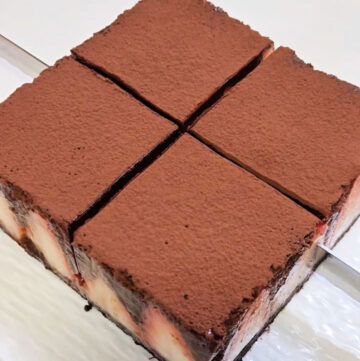
Strawberry Chocolate Dessert Bars Strawberry Chocolate Dessert Bars A no-bake, melt-in-your-mouth strawberry chocolate dessert bar
These strawberry chocolate dessert bars are a treat for both the eyes and the taste buds. A crisp Oreo cookie base meets a silky, rich chocolate lava filling, all complemented by juicy, fresh strawberries. Each bite delivers a satisfying crunch, creamy chocolate, and fruity freshness—like a little slice of indulgence without the need for an oven.
Even though the layers seem decadent, the process is simple and methodical. With just a few ingredients and some patience for chilling, you’ll create a dessert that’s impressive, elegant, and perfect for afternoon tea, dessert platters, or any special occasion.

Why you’ll love this recipe
- No-bake and beginner-friendly: no complicated baking skills required.
- Layers of texture and flavour: crisp Oreo base, silky chocolate lava, and fresh strawberries.
- Stunning presentation: perfect for gatherings or gifting.
- Flexible preparation: can be made ahead and stored in the fridge overnight.
Ingredients and Substitutions
- Oreo crumbs – I recommend removing the cream first and crushing the cookies finely to get a crisp, stable base. You can substitute with digestive biscuits if Oreos aren’t available.
- Butter – Melted to bind the cookie crumbs into a solid base. You can replace with corn oil, but the binding will be slightly weaker.
- Egg yolks – These enrich the chocolate lava layer, giving it a silky, smooth texture. Do not omit.
- Black chocolate – Use at least 50% cocoa for a rich flavour. You can use milk chocolate for a sweeter and milder alternative.
- Whipping cream – For a smooth and creamy chocolate lava. Full-fat cream works best for richness.
- Gelatin sheets – Essential to set the lava properly; soak in ice water before use. Do not skip this step.
- Fresh strawberries – For the filling and decoration; choose ripe, juicy berries.
- Cocoa powder – Optional, for dusting on top to enhance presentation.
How to Make Strawberry Chocolate Dessert Bars
Make the Cookie Base
Combine Oreo crumbs and melted butter in a bowl.
Press the mixture firmly into the bottom of a 6-inch round mold lined with parchment paper.
Chill in the fridge for 10 minutes to set.
Arrange the Strawberries
Halve some of the fresh strawberries and remove the stems. Keep the remaining strawberries whole for the center filling.
Arrange the halved strawberries along the edges of the mold, with the cut side facing outward, and fill the center with the whole strawberries. This helps the strawberries stay in place when pouring the chocolate.
Make the Chocolate Lava
First, place the gelatin sheets in a small bowl of ice water to soften for 5-10 minutes.
In a small saucepan, combine the egg yolks, chopped dark chocolate, and heavy cream. Place the pan over low heat.
Warm the mixture gently, stirring constantly with a whisk, until the chocolate is completely melted and the mixture is smooth, glossy, and slightly thickened. Do not let it boil.
Remove the pan from the heat. Squeeze the excess water from the softened gelatin sheets and add them to the warm chocolate mixture. Whisk vigorously until the gelatin is fully dissolved and completely incorporated.
Assemble and Chill
Slowly pour the chocolate lava mixture into the mold, covering the strawberries completely.
Gently tap the mold to release air bubbles.
Refrigerate for at least 8 hours or overnight until fully set.
Unmold and Decorate
Remove the dessert from the mold. You can use a warm towel or blow dryer on the mold edges to help release.
Dust the top with cocoa powder if desired and slice to serve.

Tips & Tricks
- Gelatin is key: soak it in cold water to ensure proper setting. Hot water will ruin the set.
- Chill overnight: this ensures the lava layer is firm and the strawberries stay in place.
- Chocolate quality matters: higher cocoa content gives a richer and less sweet flavour.
- Handle gently: pour chocolate slowly to avoid moving the strawberries.
Frequently Asked Questions
Can I use milk chocolate instead of dark chocolate?
Yes, but the dessert will be sweeter and less intense in chocolate flavour.
How long can I store these dessert bars?
Keep them in an airtight container in the fridge for up to 2–3 days.
Can I freeze them?
Yes, store in an airtight container for up to 1 month. Thaw in the fridge overnight before serving.
No-Bake Strawberry Chocolate Dessert Bars
Ingredients
Cookie Base
- 75 g Oreo crumbs
- 35 g butter melted
Chocolate Lava Layer
- 2 egg yolks
- 200 g black chocolate
- 250 g whipping cream
- 5 g gelatin sheets
Filling & Decoration
- Fresh strawberries halved
- Cocoa powder for dusting (optional)
Instructions
Make the Cookie Base
- Combine Oreo crumbs and melted butter in a bowl.
- Press the mixture firmly into the bottom of a 6-inch round mold lined with parchment paper.
- Chill in the fridge for 10 minutes to set.
Arrange the Strawberries
- Halve some of the fresh strawberries and remove the stems. Keep the remaining strawberries whole for the center filling.
- Arrange the halved strawberries along the edges of the mold, with the cut side facing outward, and fill the center with the whole strawberries. This helps the strawberries stay in place when pouring the chocolate.
Make the Chocolate Lava
- First, place the gelatin sheets in a small bowl of ice water to soften for 5-10 minutes. In a small saucepan, combine the egg yolks, chopped dark chocolate, and heavy cream. Place the pan over low heat. Warm the mixture gently, stirring constantly with a whisk, until the chocolate is completely melted and the mixture is smooth, glossy, and slightly thickened. Do not let it boil.
- Remove the pan from the heat. Squeeze the excess water from the softened gelatin sheets and add them to the warm chocolate mixture. Whisk vigorously until the gelatin is fully dissolved and completely incorporated.
Assemble and Chill
- Slowly pour the chocolate lava mixture into the mold, covering the strawberries completely.
- Gently tap the mold to release air bubbles.
- Refrigerate for at least 8 hours or overnight until fully set.
Unmold and Decorate
- Remove the dessert from the mold. You can use a warm towel or blow dryer on the mold edges to help release.
- Dust the top with cocoa powder if desired and slice to serve.
Leave a Reply