
This whipped cream chiffon cake is incredibly soft, light, and full of rich milk flavour. Made with heavy cream instead of water and baked using a gentle water-bath method, it stays tall, fluffy, and moist without collapsing. Perfect for afternoon tea, birthdays, or a light dessert that tastes even better chilled.

Why You’ll Love This Recipe
- This whipped cream chiffon cake is soft, fine-crumbed, and incredibly moist without feeling greasy.
- Using whipped cream instead of water gives the cake a pronounced milk fragrance and richer mouthfeel.
- The water-bath baking method keeps the cake tall, stable, and prevents collapsing.
- The steps are clear and approachable, making it beginner-friendly, even if you’re new to chiffon cakes.
- It tastes amazing fresh, but the texture becomes even more delicate and luxurious after chilling.

Ingredients and Substitutions
- Room-Temperature Whipped Cream – This is the core source of richness and milky flavor. I recommend using animal-based whipping cream for its superior, clean taste and smooth texture. Plant-based whipping cream can be used as a substitute, but note that the final flavor will be milder.
- Eggs – You’ll need to separate the yolks and whites. Using room-temperature eggs is crucial for better volume and integration. Most importantly, ensure not a single drop of yolk gets into the whites, and that the bowl and whisk are completely grease-free, as this is the absolute key to achieving a high, stable, and fluffy cake.
- Low-Gluten Flour (Cake Flour) – This fine, soft flour is essential for the cake’s delicate and tender structure. Do not substitute it with all-purpose or bread flour, as they contain more gluten and will make the cake dense and tough. Always sift it for a lump-free batter.
- Fine Granulated Sugar – We use this sugar solely for whipping the egg whites. It stabilizes the meringue and adds the right amount of sweetness. You can adjust the quantity slightly based on your preference.
- Lemon Juice – Just a small amount helps acidify the egg whites, making them whip up higher and more stable while preventing over-whipping and deflation. If you don’t have it, an equal amount of white vinegar works as a fine substitute.
How to Make Whipped Cream Chiffon Cake
1. Prepare the Yolk Batter
In a large mixing bowl, combine the room-temperature whipping cream and the sifted low-gluten flour. Using a silicone spatula, mix until just combined and no dry flour remains.
Add the three room-temperature egg yolks and mix until the batter is perfectly smooth, thick, and homogeneous. Place this bowl over a pot of warm water (around 50°C / 122°F) to keep it gently warm and fluid while you prepare the meringue.
2. Whip the Meringue
Place the clean, grease-free bowl of egg whites into the freezer for about 10 minutes, until the edges just begin to show tiny ice crystals. This chills the proteins and helps create a more stable meringue.
Remove from the freezer. Add the lemon juice and all of the fine granulated sugar at once to the egg whites.
Using an electric mixer on high speed, whip until the meringue reaches a soft peak stage: when you lift the whisk, the peak should curl over gently like a bird’s beak. Do not whip to stiff, upright peaks.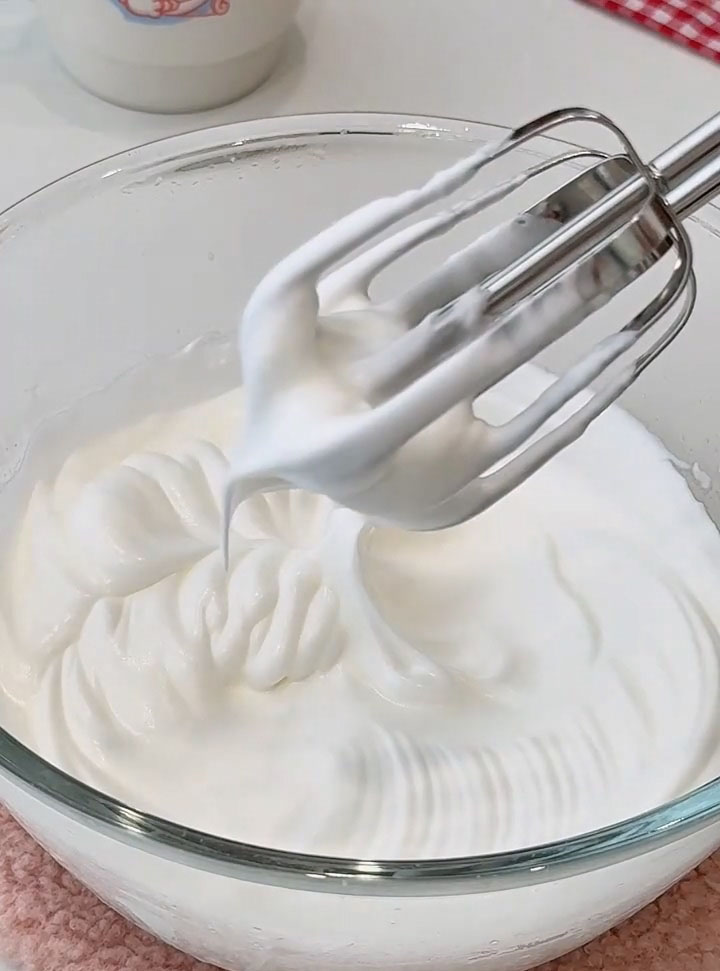
3. Fold the Batters Together
Add about one-third of the whipped meringue to the warm yolk batter.
Gently fold it in by cutting down the middle and scooping from the bottom up and over. This preserves air bubbles.
Once mostly incorporated, pour this mixture back into the bowl with the remaining two-thirds of the meringue. Continue folding gently and quickly until no white streaks remain and the batter is uniform. Avoid stirring or beating.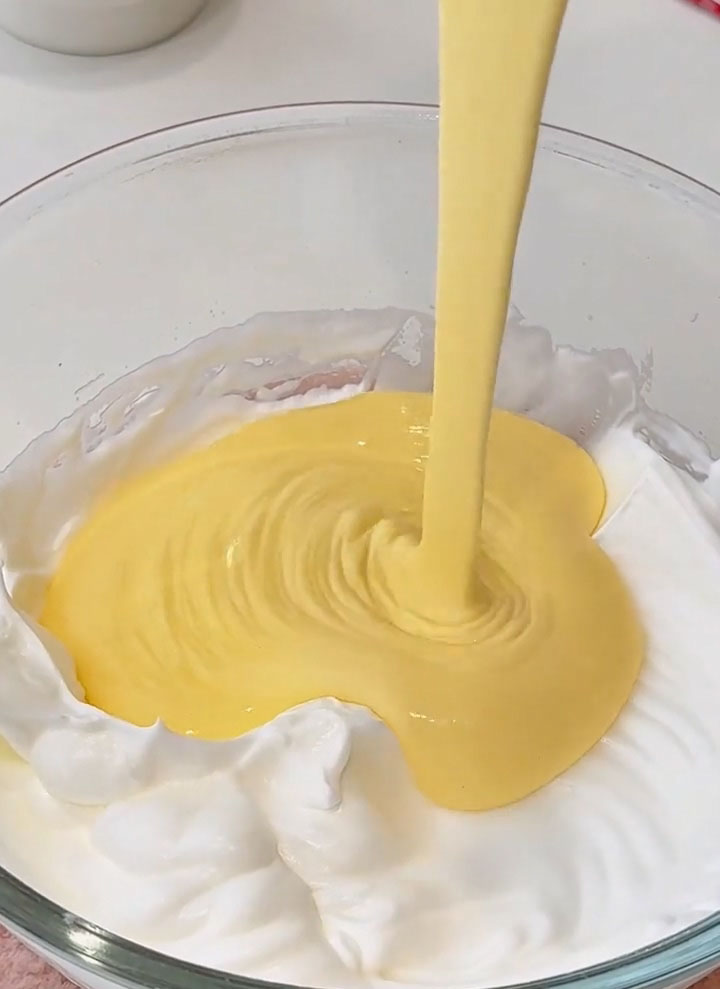
4. Bake with a Water Bath
Preheat your oven to 140°C (285°F). Prepare the water bath: Take your chiffon cake mold (do not grease it) and tightly wrap the outside bottom and sides with aluminum foil.
Pour the cake batter into the mold.
Gently tap it on the counter a few times to release large air bubbles.
Place a deep baking tray on the lowest rack of your oven and carefully fill it with about 2 cm of hot water.
Place the foil-wrapped cake mold directly on the oven rack in the middle position, ensuring it is not sitting in the water tray—this creates a steamy environment without direct contact.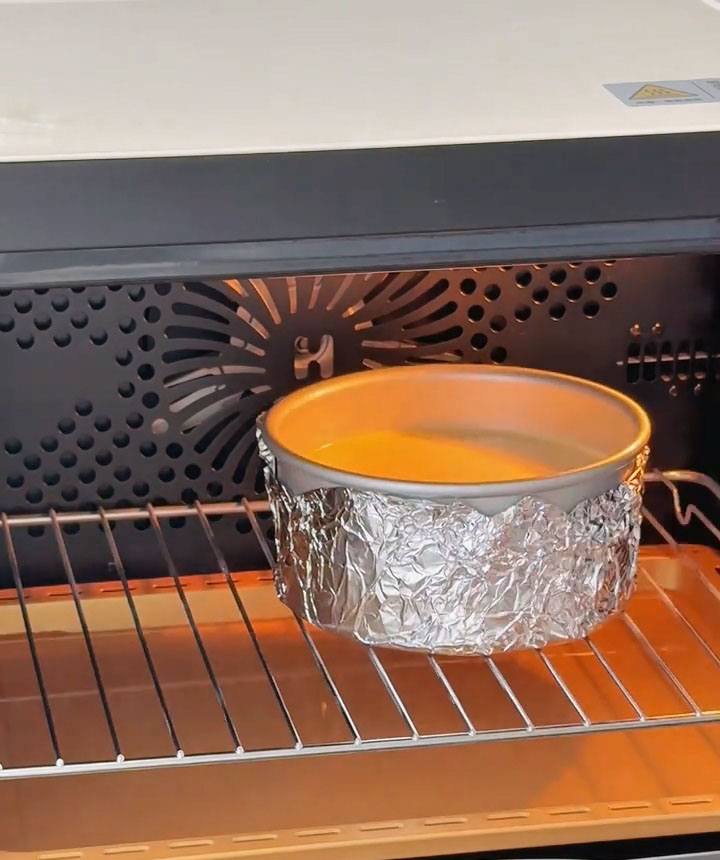
Bake at 140°C (285°F) for 30 minutes, then increase the temperature to 150°C (300°F) and bake for an additional 28-30 minutes. The cake is done when the top is golden, springs back lightly to the touch, and a skewer inserted comes out clean.
5. Cool and Unmold
Remove the cake from the oven immediately and gently tap the pan to release internal heat. Remove the foil, then allow the cake to cool until just warm before unmolding.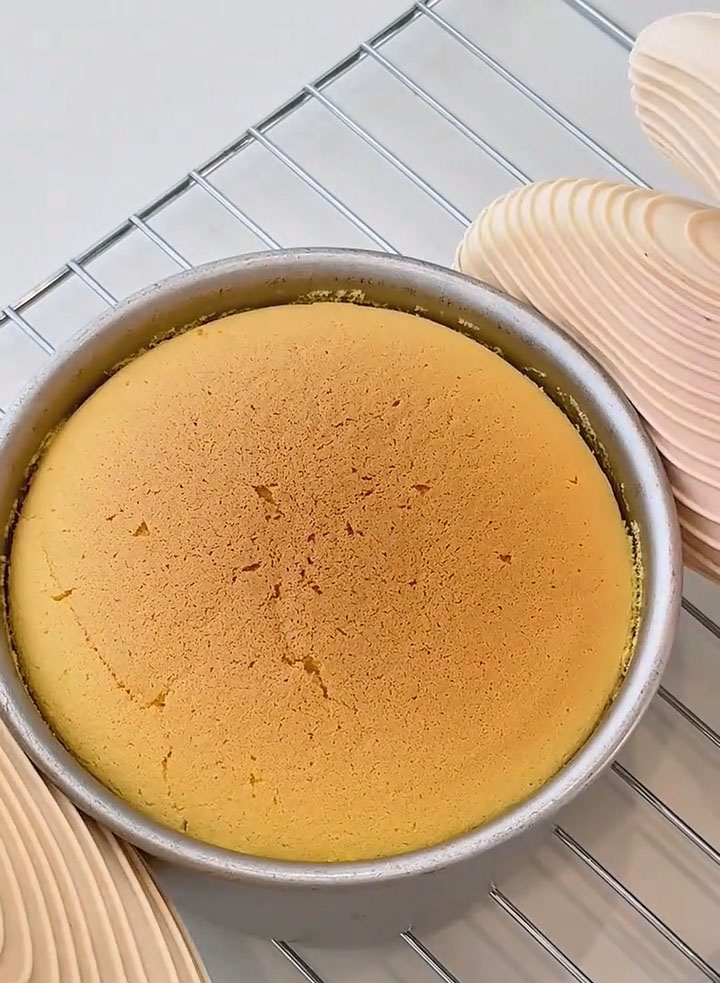
Tips & Tricks
- Master the Meringue: The “soft peak” stage is critical for a chiffon cake that rises high yet remains moist. Over-whipped meringue (stiff peaks) can lead to a dry, crumbly texture or cause the cake to crack during baking.
- Fold, Don’t Stir: The folding technique is non-negotiable. Aggressive stirring will deflate the precious air bubbles you just whipped into the egg whites, resulting in a dense cake.
- Perfect Water Bath Setup: The foil wrap is essential for a non-springform mold. The water tray provides steam for even, gentle cooking and a supremely moist texture, while keeping the mold elevated prevents the bottom from getting soggy.
- Cool Upside Down: This is the signature step for chiffon cakes. It uses gravity to stretch the cake’s structure as it cools, preventing collapse and ensuring maximum height.
- Chill for Enhanced Flavor: While delicious warm, this cake’s flavor truly deepens and becomes more pronounced after being covered and chilled in the refrigerator for a few hours or overnight.
Frequently Asked Questions
Can I use a different type of flour?
No, I do not recommend it. Low-gluten flour (cake flour) has a specific protein content designed for tender cakes. Using all-purpose or bread flour will develop more gluten, leading to a tough, chewy texture instead of the desired soft, airy crumb.
My cake collapsed after baking. What went wrong?
The most common causes are: 1) Under-whipped or over-whipped meringue, 2) Deflating the batter during mixing (not folding gently), or 3) Not cooling the cake upside down immediately after baking. The inverted cooling step is crucial for structure.
Why is my cake wet or dense at the bottom?
This usually happens if the water bath setup is incorrect and the mold is sitting in the water, or if the batter was under-mixed (leaving pockets of unmixed flour) or over-mixed (causing gluten development). Ensuring the mold is on a rack above the water tray is key.
Can I make this without a water bath?
The water bath (steam baking) is essential for this recipe’s uniquely moist and tender texture. Baking without it will result in a drier, more conventional sponge cake texture and may cause more cracking on top.
How should I store this cake?
Once completely cooled, store the cake in an airtight container at room temperature for up to 2 days. For longer storage (up to 5 days), keep it refrigerated. Let it come to room temperature before serving for the best texture and flavor.

The Softest Whipped Cream Chiffon Cake Ever
Ingredients
Yolk Batter
- 135 g room-temperature whipping cream heavy cream
- 3 large egg yolks room temperature
- 60 g low-gluten flour cake flour, sifted
Meringue
- 3 large egg whites room temperature, no yolk traces
- 35 g fine granulated sugar
- 1 teaspoon lemon juice or white vinegar
Instructions
Prepare the Yolk Batter
- In a large mixing bowl, combine the room-temperature whipping cream and the sifted low-gluten flour. Using a silicone spatula, mix until just combined and no dry flour remains.
- Add the three room-temperature egg yolks and mix until the batter is perfectly smooth, thick, and homogeneous. Place this bowl over a pot of warm water (around 50°C / 122°F) to keep it gently warm and fluid while you prepare the meringue.
Whip the Meringue
- Place the clean, grease-free bowl of egg whites into the freezer for about 10 minutes, until the edges just begin to show tiny ice crystals. This chills the proteins and helps create a more stable meringue.
- Remove from the freezer. Add the lemon juice and all of the fine granulated sugar at once to the egg whites.
- Using an electric mixer on high speed, whip until the meringue reaches a soft peak stage: when you lift the whisk, the peak should curl over gently like a bird's beak. Do not whip to stiff, upright peaks.
Fold the Batters Together
- Add about one-third of the whipped meringue to the warm yolk batter.
- Gently fold it in by cutting down the middle and scooping from the bottom up and over. This preserves air bubbles.
- Once mostly incorporated, pour this mixture back into the bowl with the remaining two-thirds of the meringue. Continue folding gently and quickly until no white streaks remain and the batter is uniform. Avoid stirring or beating.
Bake with a Water Bath
- Preheat your oven to 140°C (285°F). Prepare the water bath: Take your chiffon cake mold (do not grease it) and tightly wrap the outside bottom and sides with aluminum foil.
- Pour the cake batter into the mold.
- Gently tap it on the counter a few times to release large air bubbles.
- Place a deep baking tray on the lowest rack of your oven and carefully fill it with about 2 cm of hot water.
- Place the foil-wrapped cake mold directly on the oven rack in the middle position, ensuring it is not sitting in the water tray—this creates a steamy environment without direct contact.
- Bake at 140°C (285°F) for 30 minutes, then increase the temperature to 150°C (300°F) and bake for an additional 28-30 minutes. The cake is done when the top is golden, springs back lightly to the touch, and a skewer inserted comes out clean.
Cool and Unmold
- Immediately upon removing the cake from the oven, drop the mold from a short height onto the counter once to shock it and prevent severe shrinkage.
- Invert the mold immediately by balancing it over the neck of a bottle or on a cooling rack. Let it cool completely upside down (this takes about 1-2 hours). Once completely cool, run a thin, flexible knife or offset spatula closely around the inner tube and outer edge of the mold to release the cake gently.
Leave a Reply