
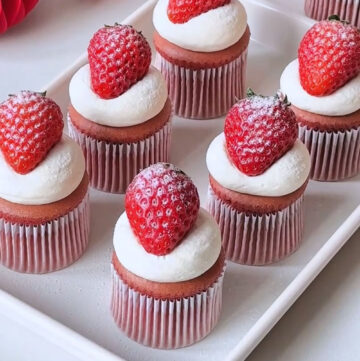
Looking for a showstopper dessert? These strawberry red velvet cupcakes are not only delicious but also full of vibrant color and a gooey strawberry center. Perfect for gatherings, kids’ snacks, or a little treat to share.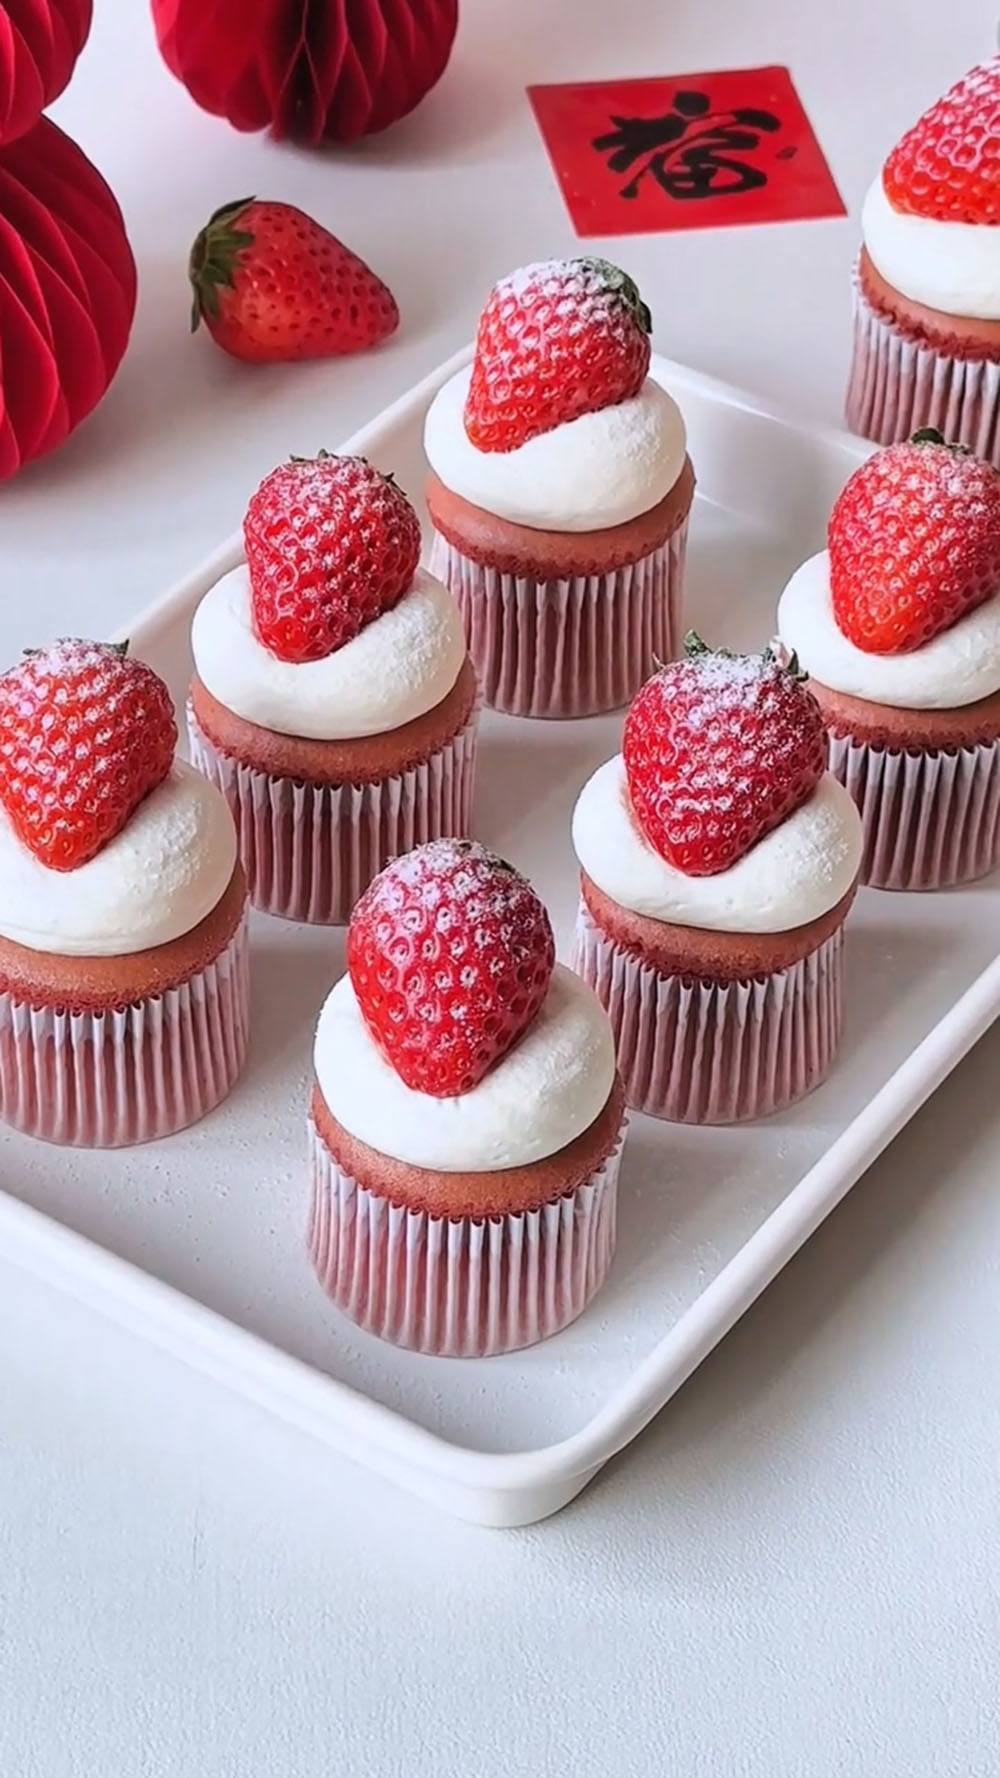
This strawberry molten cupcake is not only visually stunning but also incredibly simple to make.
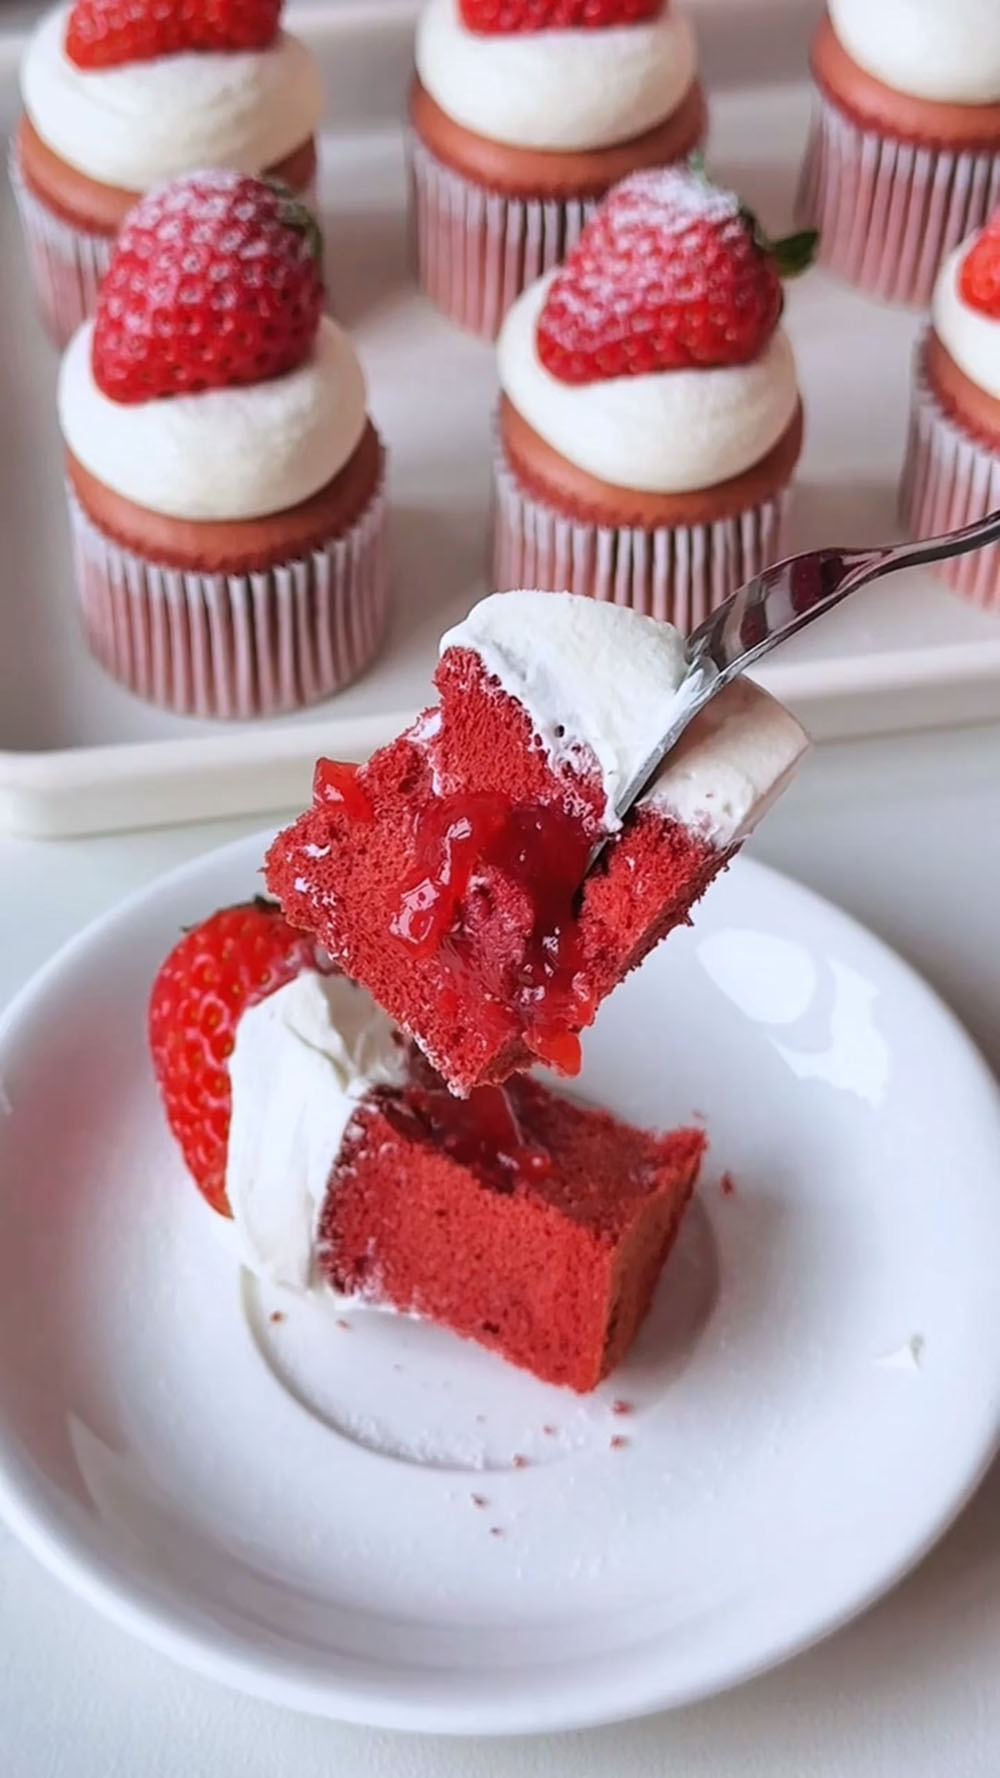
It’s one of those desserts that immediately catches your eye with its vibrant color and perfect flow of strawberry filling when you bite into it.
The best part? It’s so easy to prepare, even if you’re not a baking expert.
I was amazed at how quickly it became a favorite in my household. The kids were so excited when they took their first bite—they literally gasped and said, “Wow!” It’s the kind of dessert that leaves a lasting impression, both in taste and presentation.
Honestly, it has quickly become a go-to treat of mine.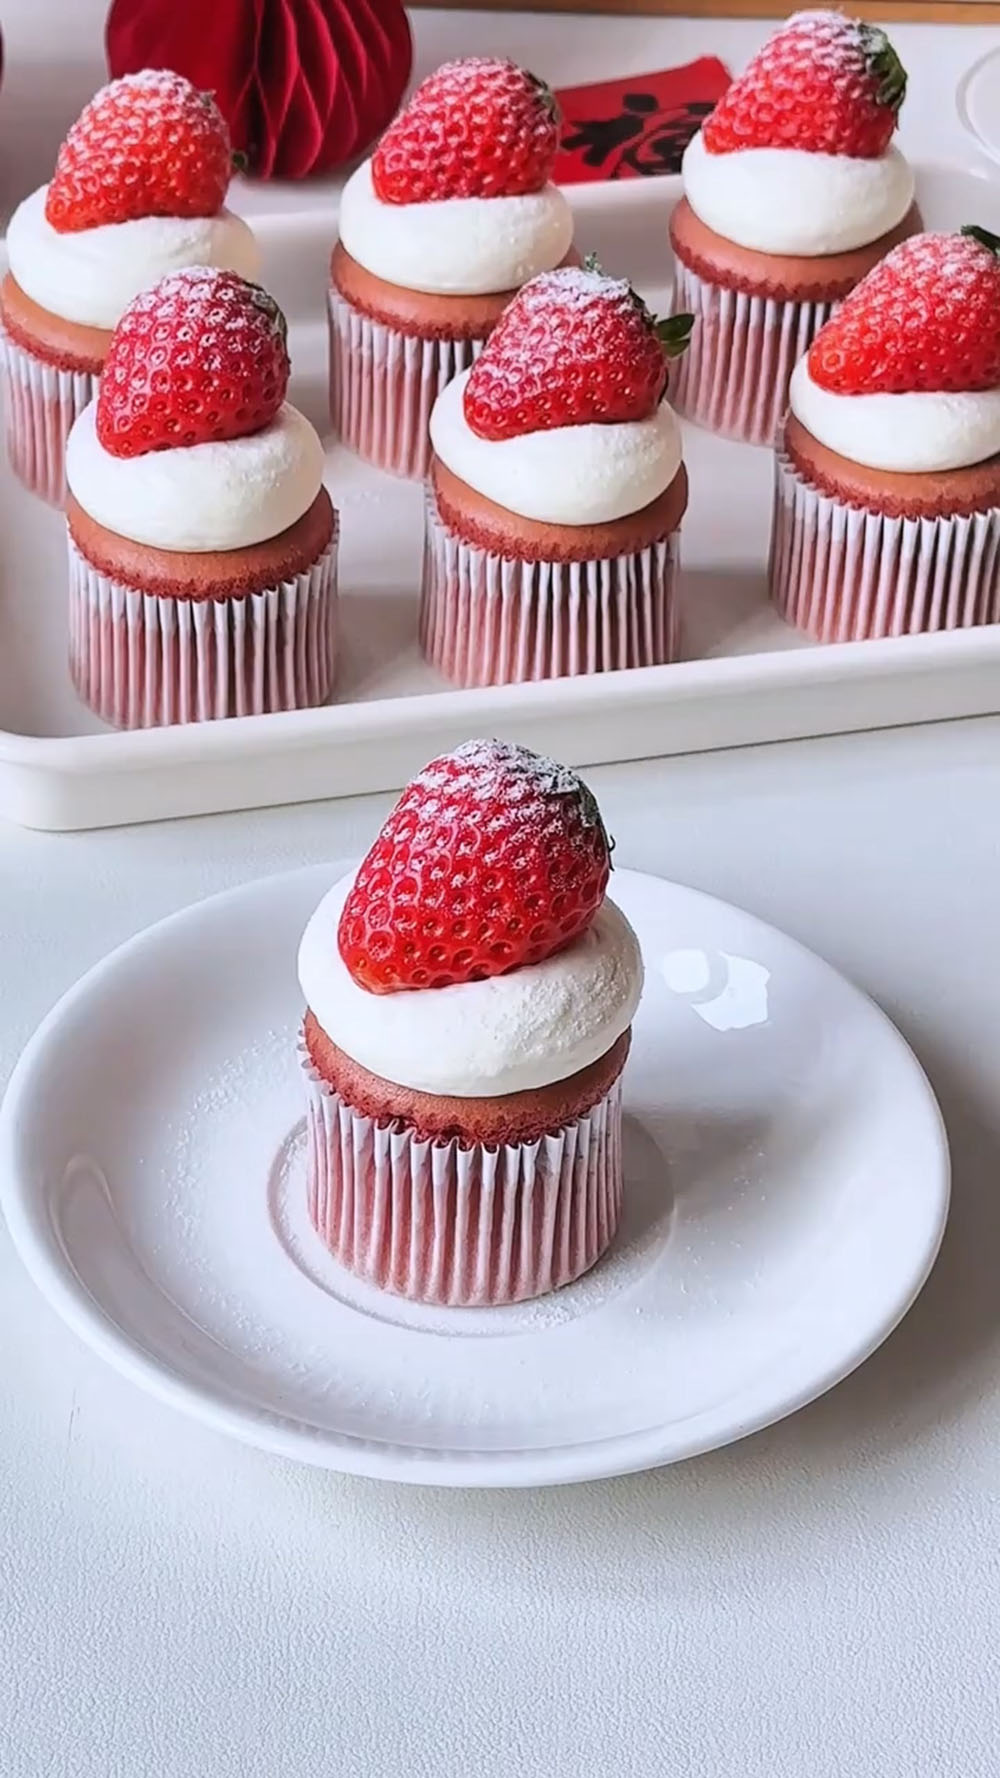
Why you’ll love this recipe
- Festive & Photogenic: The deep red cake, white cream, and red strawberry create a stunning, celebratory look that’s perfect for New Year’s, Valentine’s Day, or any special occasion. They are guaranteed to brighten up your table and your social media feed.
- The Perfect Sweet-Tart Balance: The rich, slightly chocolatey red velvet cake pairs magically with the bright, fruity burst of strawberry jam. The whipped cream topping adds a light, fresh finish that keeps everything from feeling too heavy or sweet.
- Surprisingly Simple from Start to Finish: While they look impressive, these are genuinely easy cupcakes. The batter uses a straightforward method (no creaming butter!), the “filling” requires no extra cooking, and the decoration is minimal. It’s an accessible recipe with a high-reward outcome.
- Great for Making Ahead: You can bake the cupcakes a day in advance and store them unfilled. The assembly with jam and cream is quick, so you can have a stunning dessert ready in minutes when your guests arrive.
Ingredients and Substitutions
- Red Yeast Rice Powder – This is the natural ingredient that gives these cupcakes their beautiful, festive red color and the subtle, characteristic flavor of red velvet. I recommend sifting it with the flour to prevent any tiny clumps in your batter. It’s the key to that signature hue, so don’t skip it.
- Corn Oil – Using a neutral oil like corn oil keeps the cupcakes incredibly moist and tender with a light texture. If you prefer a richer, more buttery flavor, you can substitute it with an equal amount of melted, cooled unsalted butter.
- Low-Gluten Flour (Cake Flour) – This fine, soft flour is essential for achieving the delicate, soft crumb that makes these cupcakes so delightful. Do not substitute it with all-purpose flour, as it has more protein and will make the cupcakes denser.
- Eggs – You’ll need to separate them. The egg yolks go into the batter for richness, while the egg whites are whipped into a meringue with sugar. This meringue is what gives the cupcakes their light and airy rise. Make sure your bowl and beaters are spotlessly clean and grease-free for the best volume.
- Strawberry Jam – This is our secret molten heart! Choose a good-quality, thick strawberry jam. A runny jam will soak into the cake and won’t create that lovely, gooey pocket in the center. Chilling it before using can help it stay in place.
- Whipping Cream – For the topping, use heavy cream or whipping cream with at least 33% fat content. It must be very cold to whip up properly into stiff, pipeable peaks. For best results, chill your bowl and beaters in the freezer for 15 minutes before you start.
Strawberry-Filled Red Velvet Cupcakes
Red Velvet Cupcakes
- 3 large eggs, separated, at room temperature
- 35 g granulated sugar
- 30 g corn oil (or neutral oil)
- 40 g whole milk, at room temperature
- 40 g low-gluten flour (cake flour)
- 6 g red yeast rice powder
- ¼ teaspoon lemon juice or white vinegar
Filling & Topping
- 150 g cold whipping cream (heavy cream), minimum 33% fat
- 10 g granulated sugar (for the cream)
- 6-8 tablespoons thick strawberry jam
- 6-8 small fresh strawberries, for garnish
- Powdered sugar, for dusting (optional)
How to Make Strawberry-Filled Red Velvet Cupcakes
1. Make the Red Velvet Cupcake Batter
Preheat your oven to 120°C (250°F).
In a medium bowl, whisk together the corn oil and milk until they are completely combined and slightly thickened (emulsified).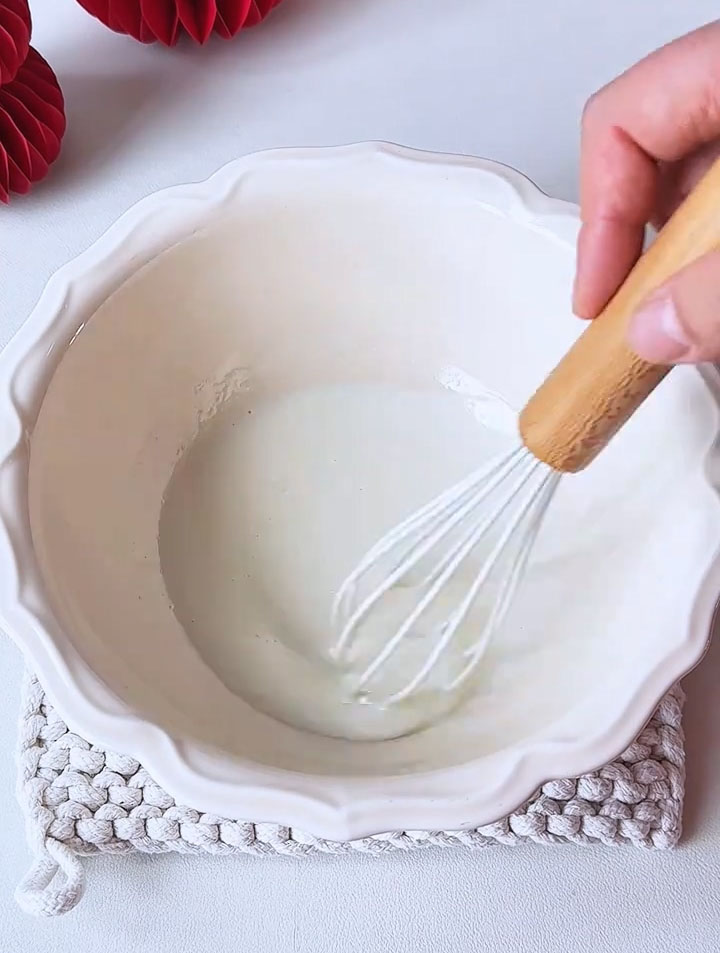
Sift the low-gluten flour and red yeast rice powder directly into the oil-milk mixture. Whisk gently until just combined and no dry streaks of flour remain.
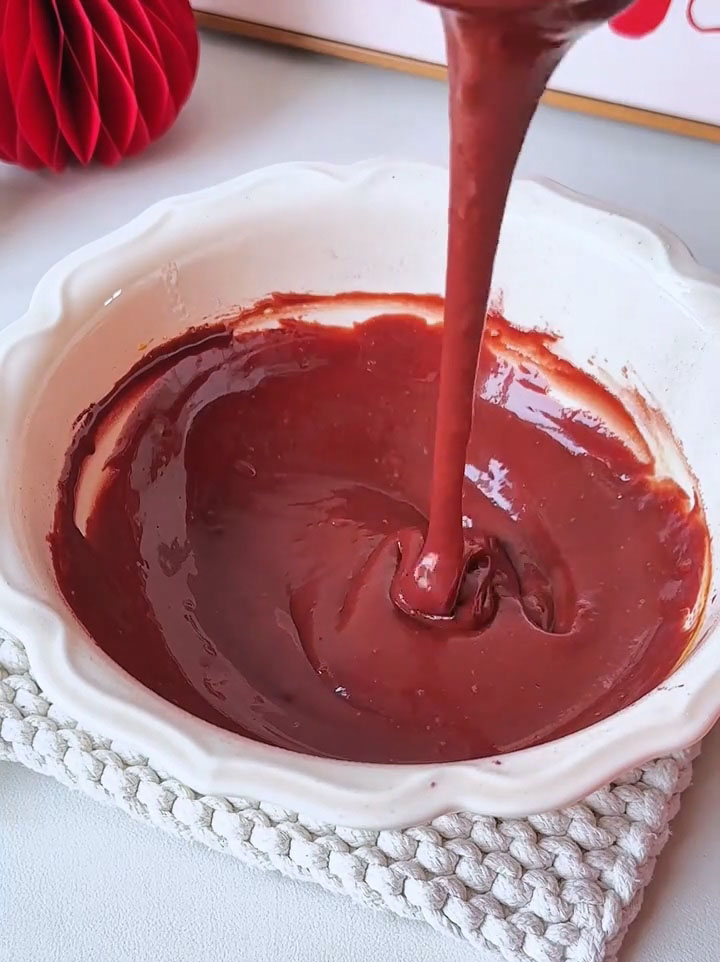
Add the 3 egg yolks to the bowl. Whisk until you have a smooth, thick, and vibrantly red batter. Set aside.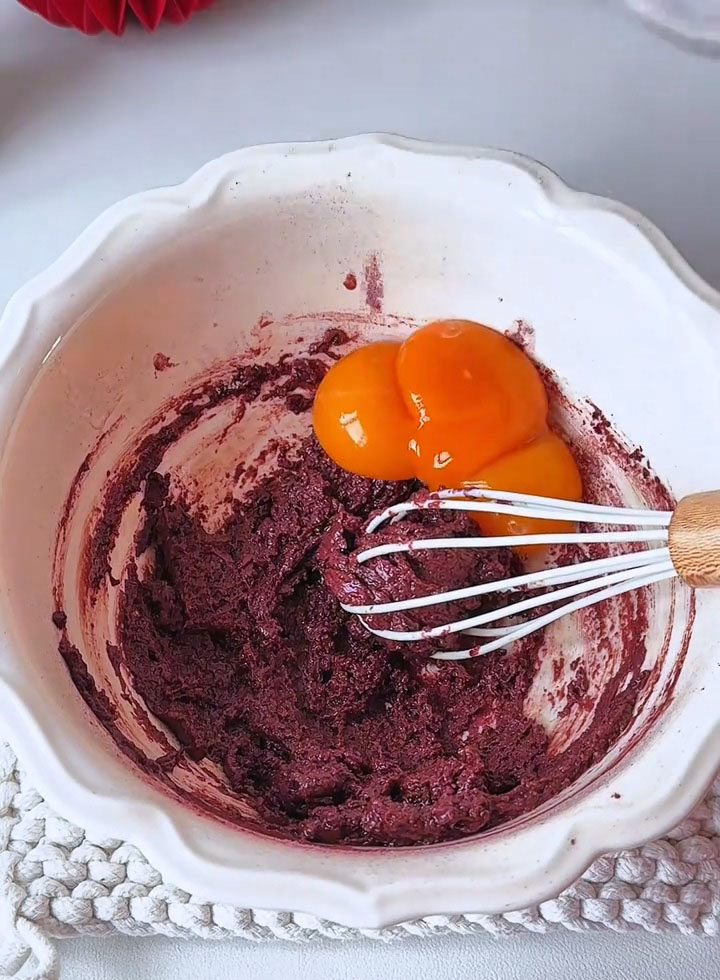
 In a separate, completely clean and dry bowl, combine the 3 egg whites, lemon juice (or vinegar), and 35g of granulated sugar.
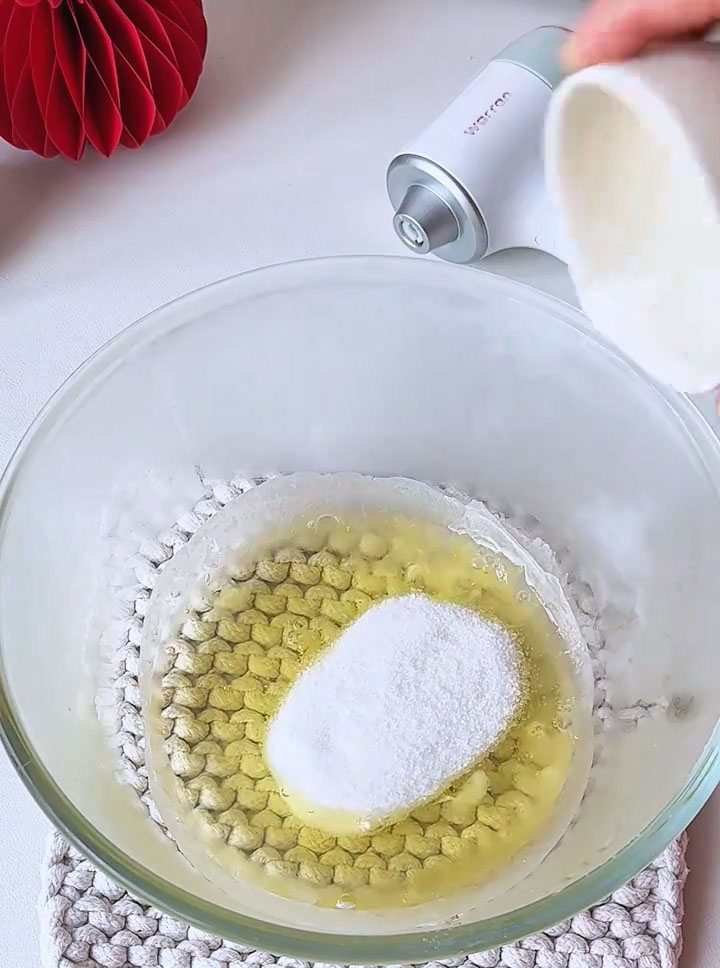
Using an electric mixer, beat until the meringue forms soft peaks – when you lift the whisk, the peak should gently curve over.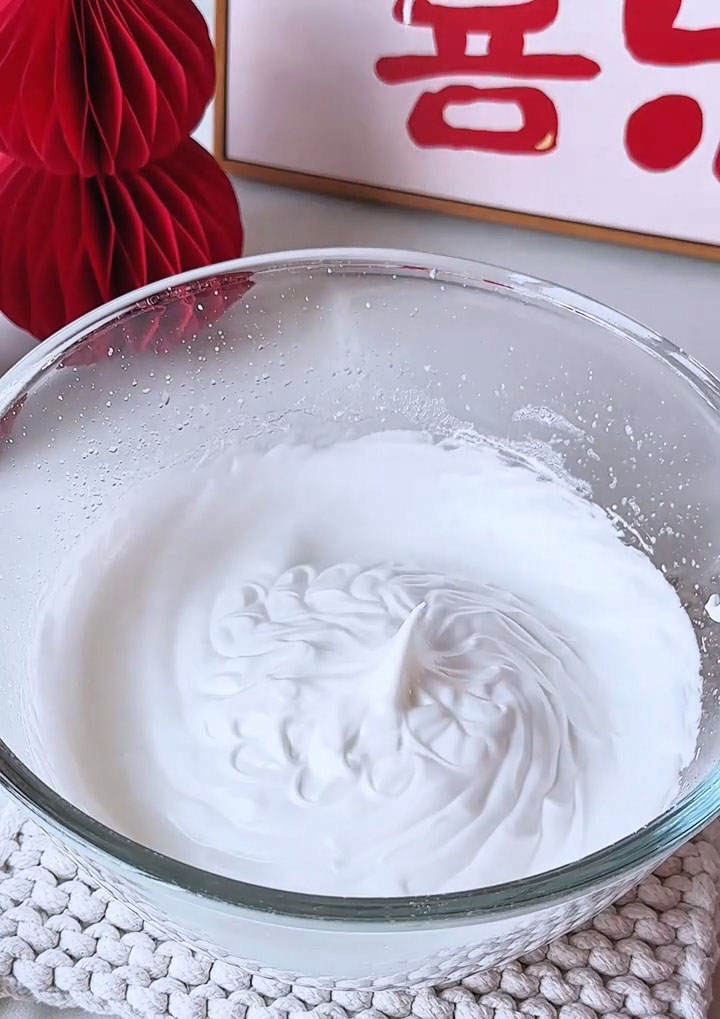
2. Fold and Bake
Add about one-third of the whipped egg whites to the red batter. Using a flexible spatula, gently fold them in to lighten the mixture. Pour this lightened batter back into the bowl with the remaining meringue.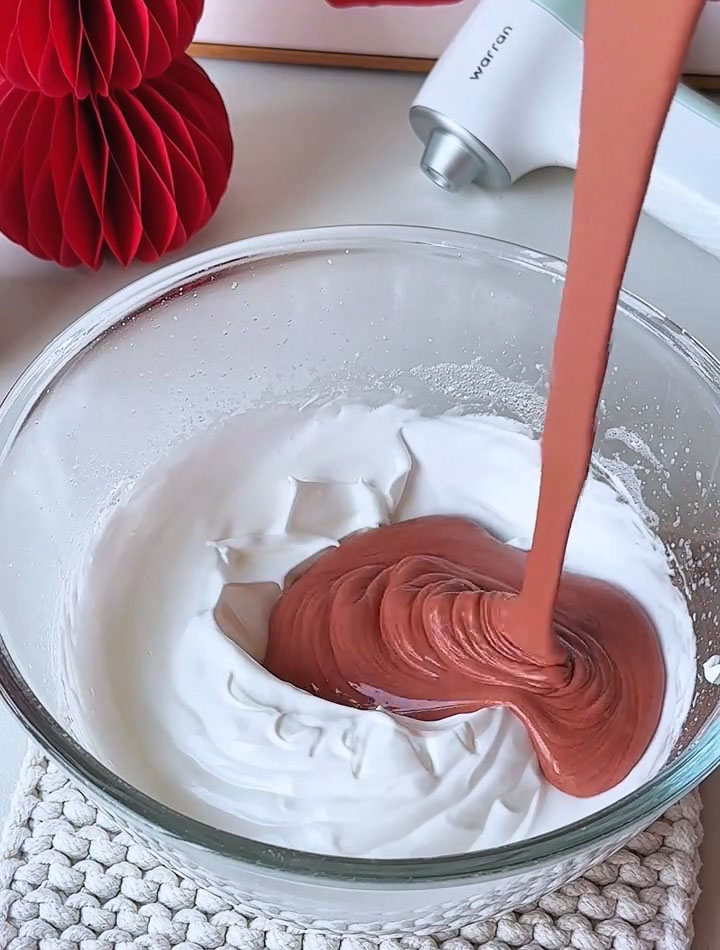
Gently and quickly fold the batter until the meringue is fully incorporated and no white streaks remain. Be careful not to overmix and deflate the air.
Divide the batter evenly among the prepared cupcake liners, filling each one about two-thirds full. Gently tap the pan on the counter to settle the batter.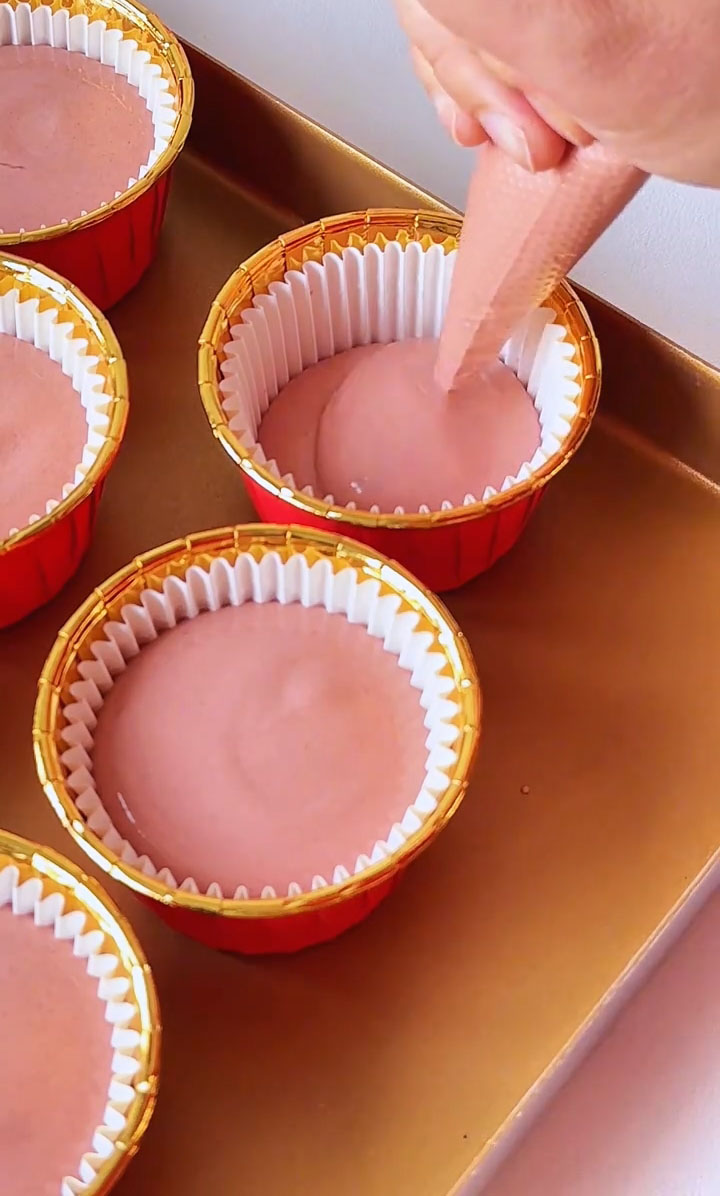
Bake on the middle rack: First at 120°C (250°F) for 30 minutes, then without opening the door, increase the temperature to 145°C (293°F) and bake for another 22-25 minutes. The cupcakes are done when they spring back lightly to the touch and a toothpick inserted into the cake (not the future jam center) comes out clean.
Let the cupcakes cool in the pan for 5 minutes, then transfer them to a wire rack to cool completely.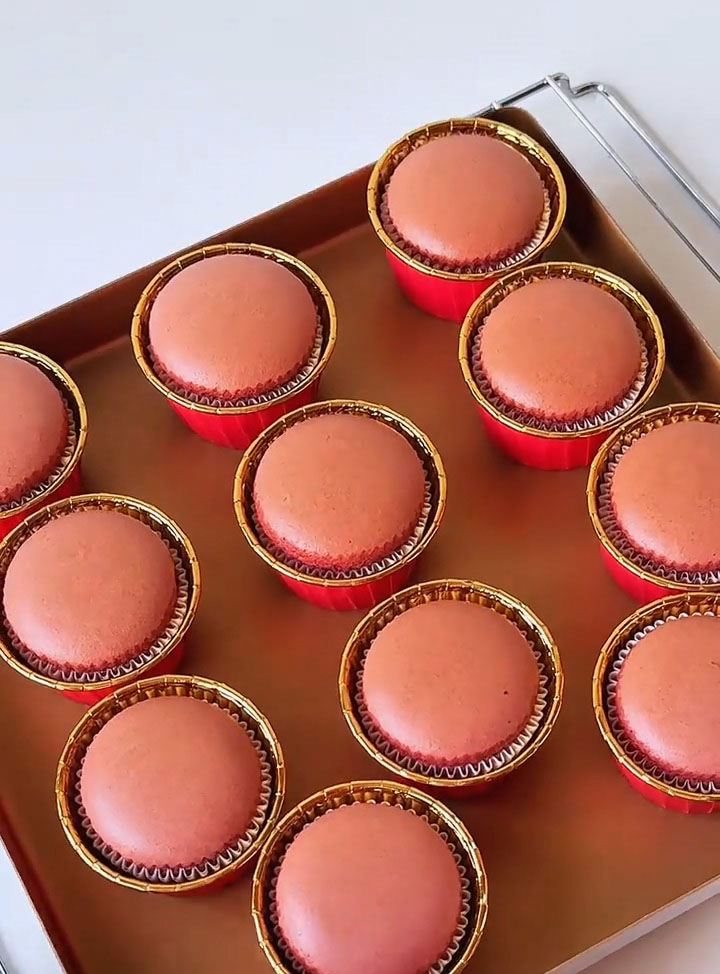
3. Prepare the Filling and Topping
For the Cream: Ensure your whipping cream, bowl, and beaters are very cold. Pour the cream and the 10g of sugar into the chilled bowl. Whip on medium-high speed until the cream holds very stiff peaks. Be careful not to over-whip into butter. Transfer to a piping bag fitted with your favorite star tip and refrigerate.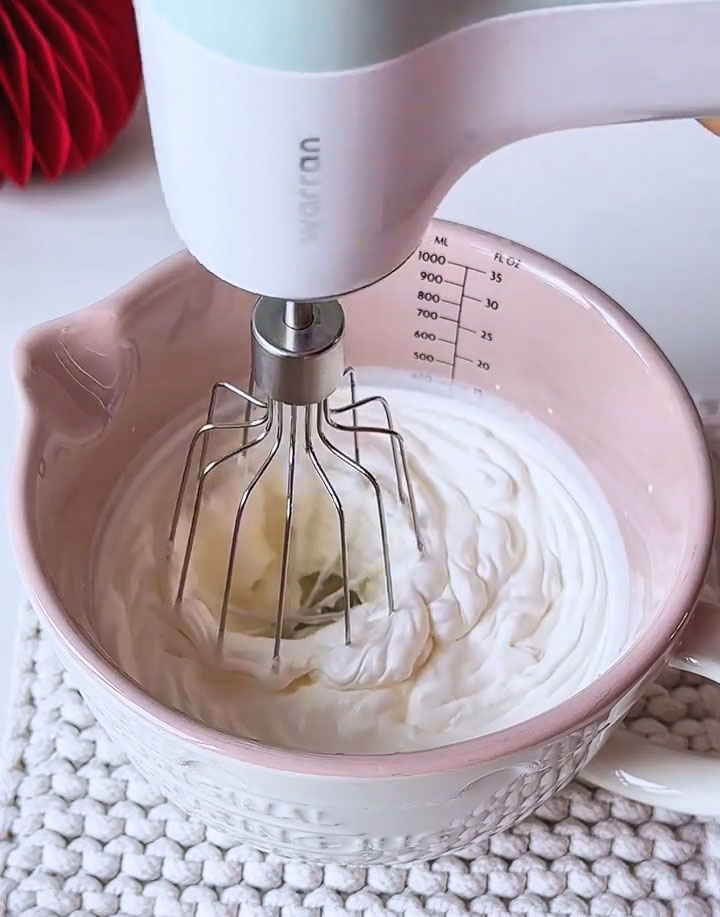
For the Filling: If your strawberry jam is very loose, you can chill it for 15-20 minutes to thicken slightly.
4. Assemble the Cupcakes
Once the cupcakes have cooled, use a chopstick to carefully poke a small hole in the center of each cupcake. Go about two-thirds of the way down—do not cut through the bottom.
Fill each hole with about 1-1.5 teaspoons of the chilled strawberry jam.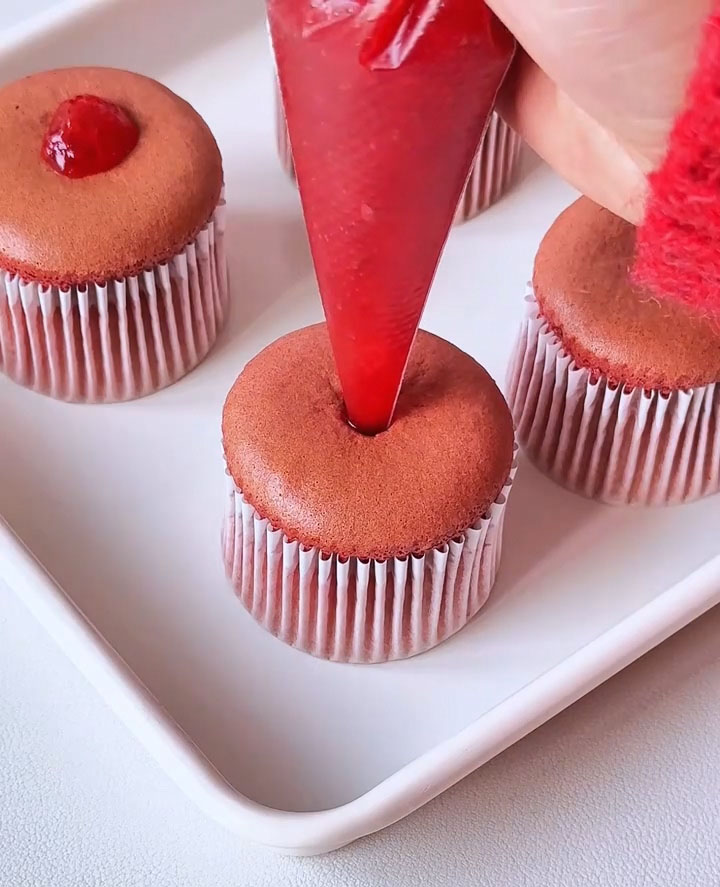
Pipe a generous swirl of the whipped cream on top of each cupcake.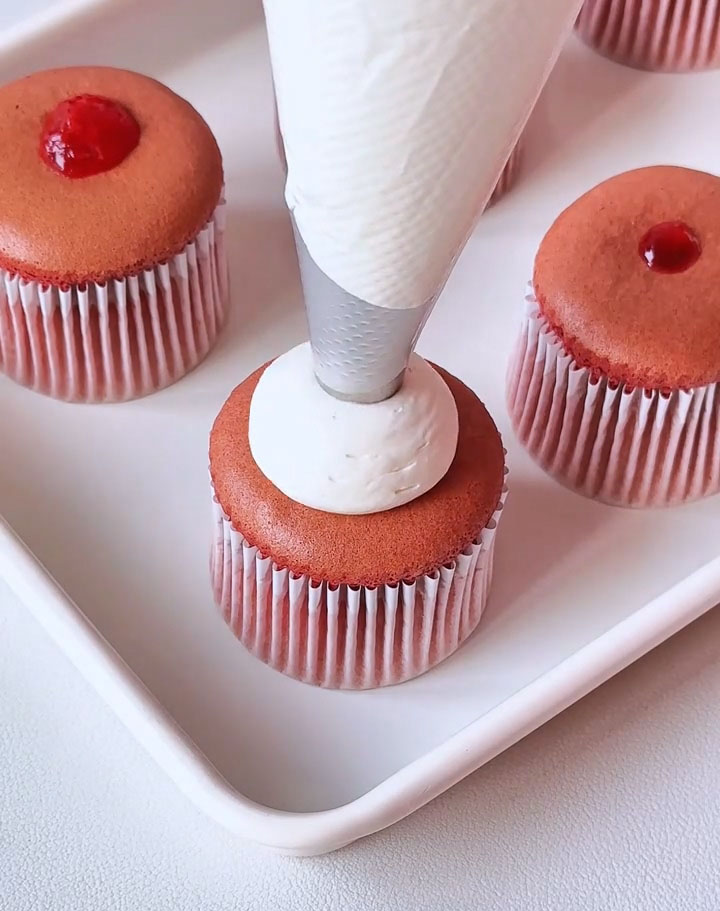
Place a fresh strawberry on top of the cream on each cupcake. For a festive finish, dust lightly with powdered sugar just before serving.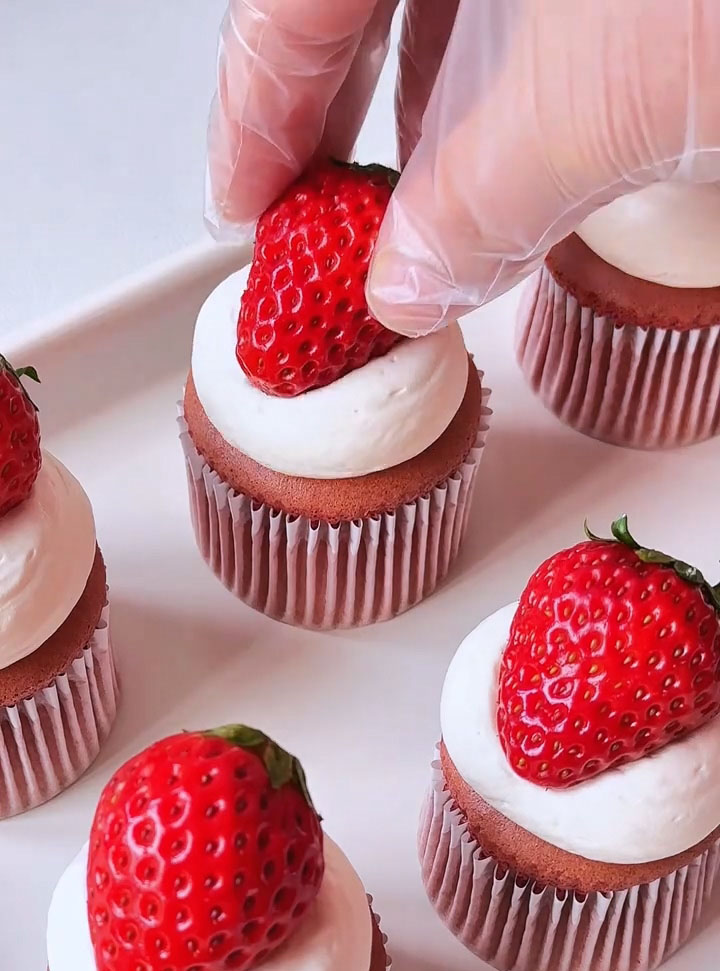
Tips & Tricks
- Sift for a Smooth Red Color: Always sift the red yeast rice powder with the flour. This prevents unsightly red specks and ensures the color is evenly distributed throughout the batter for a perfect, vibrant crumb.
- Master the Meringue for Height: The “soft peak” stage is crucial. If the meringue is under-whipped, the cupcakes won’t rise well. If it’s over-whipped to stiff peaks, the batter can be difficult to fold and the cupcakes may crack or become dry. Look for that gentle curl at the peak of the meringue.
- The Two-Stage Bake is Key: Starting at a lower temperature allows the cupcakes to rise slowly and evenly without doming too much or cracking. The higher temperature finish sets the structure and gives them a perfect finish. Don’t skip this step.
- Keep the Filling Contained: When coring the cupcakes, don’t go all the way to the bottom. Leaving a cake “floor” at the bottom creates a pocket that holds the jam securely, giving you that perfect “流心” (flowing heart) when bitten into, without it leaking out.
- Chill Everything for the Cream: Cold equipment is the secret to quickly whipping cream that holds its shape. If your kitchen is warm, place the bowl and beaters in the freezer for 10-15 minutes before you start.
Frequently Asked Questions
Can I use liquid red food coloring instead of red yeast rice powder?
Yes, you can, but the flavor will be different. Red yeast rice powder adds a very subtle, almost fermented tang that is part of traditional red velvet flavor. If using liquid gel coloring, add it to the oil-milk mixture until you achieve the desired red color. Start with a few drops.
My cupcakes sunk in the middle after baking. What happened?
This is usually caused by underbaking, opening the oven door too early during the initial low-temperature phase, or having batter that was too wet. Ensure you follow the baking times and temperatures precisely, and make sure not to add extra milk.
Can I make these into a full-sized cake?
The baking method and times in this recipe are specifically calibrated for cupcakes. To make a layer cake, you would need to adjust the recipe quantities significantly and use a standard creaming method with butter for a sturdier crumb. I don’t recommend directly converting this recipe for a cake.
How far in advance can I assemble them?
For the best texture, assemble the cupcakes no more than 2-3 hours before serving. The jam will slowly moisten the cake, and the whipped cream can start to soften. You can bake the cupcakes and make the jam filling 1-2 days ahead. Store cupcakes at room temperature and jam in the fridge. Whip the cream and assemble on the day of serving.
My whipped cream became runny. How can I fix it?
If your cream is runny, it was likely under-whipped, or your cream/equipment wasn’t cold enough. You can try re-whipping it, but if it has started to separate, it’s best to start over with new, very cold cream. Adding 1 teaspoon of cornstarch or powdered sugar at the start of whipping can also help stabilize it.
Soft and Moist Strawberry Red Velvet Cupcakes Recipe
Ingredients
Red Velvet Cupcakes
- 3 large eggs separated, at room temperature
- 35 g granulated sugar
- 30 g corn oil or neutral oil
- 40 g whole milk at room temperature
- 40 g low-gluten flour cake flour
- 6 g red yeast rice powder
- ¼ teaspoon lemon juice or white vinegar
Filling & Topping
- 150 g cold whipping cream heavy cream, minimum 33% fat
- 10 g granulated sugar for the cream
- 6-8 tablespoons thick strawberry jam
- 6-8 small fresh strawberries for garnish
- Powdered sugar for dusting (optional)
Instructions
Make the Red Velvet Cupcake Batter
- Preheat your oven to 120°C (250°F).
- In a medium bowl, whisk together the corn oil and milk until they are completely combined and slightly thickened (emulsified).
- Sift the low-gluten flour and red yeast rice powder directly into the oil-milk mixture. Whisk gently until just combined and no dry streaks of flour remain.
- Add the 3 egg yolks to the bowl. Whisk until you have a smooth, thick, and vibrantly red batter. Set aside.
- In a separate, completely clean and dry bowl, combine the 3 egg whites, lemon juice (or vinegar), and 35g of granulated sugar.
- Using an electric mixer, beat until the meringue forms soft peaks - when you lift the whisk, the peak should gently curve over.
Fold and Bake
- Add about one-third of the whipped egg whites to the red batter. Using a flexible spatula, gently fold them in to lighten the mixture. Pour this lightened batter back into the bowl with the remaining meringue.
- Gently and quickly fold the batter until the meringue is fully incorporated and no white streaks remain. Be careful not to overmix and deflate the air.
- Divide the batter evenly among the prepared cupcake liners, filling each one about two-thirds full. Gently tap the pan on the counter to settle the batter.
- Bake on the middle rack: First at 120°C (250°F) for 30 minutes, then without opening the door, increase the temperature to 145°C (293°F) and bake for another 22-25 minutes. The cupcakes are done when they spring back lightly to the touch and a toothpick inserted into the cake (not the future jam center) comes out clean.
- Let the cupcakes cool in the pan for 5 minutes, then transfer them to a wire rack to cool completely.
Prepare the Filling and Topping
- For the Cream: Ensure your whipping cream, bowl, and beaters are very cold. Pour the cream and the 10g of sugar into the chilled bowl. Whip on medium-high speed until the cream holds very stiff peaks. Be careful not to over-whip into butter. Transfer to a piping bag fitted with your favorite star tip and refrigerate.
- For the Filling: If your strawberry jam is very loose, you can chill it for 15-20 minutes to thicken slightly.
Assemble the Cupcakes
- Once the cupcakes have cooled, use a chopstick to carefully poke a small hole in the center of each cupcake. Go about two-thirds of the way down—do not cut through the bottom.
- Fill each hole with about 1-1.5 teaspoons of the chilled strawberry jam.
- Pipe a generous swirl of the whipped cream on top of each cupcake.
- Place a fresh strawberry on top of the cream on each cupcake. For a festive finish, dust lightly with powdered sugar just before serving.
Leave a Reply