
Looking for an easy gluten-free matcha dessert? This Matcha Baked Milk Custard is smooth, tender, and lightly caramelized on top—no special skills required.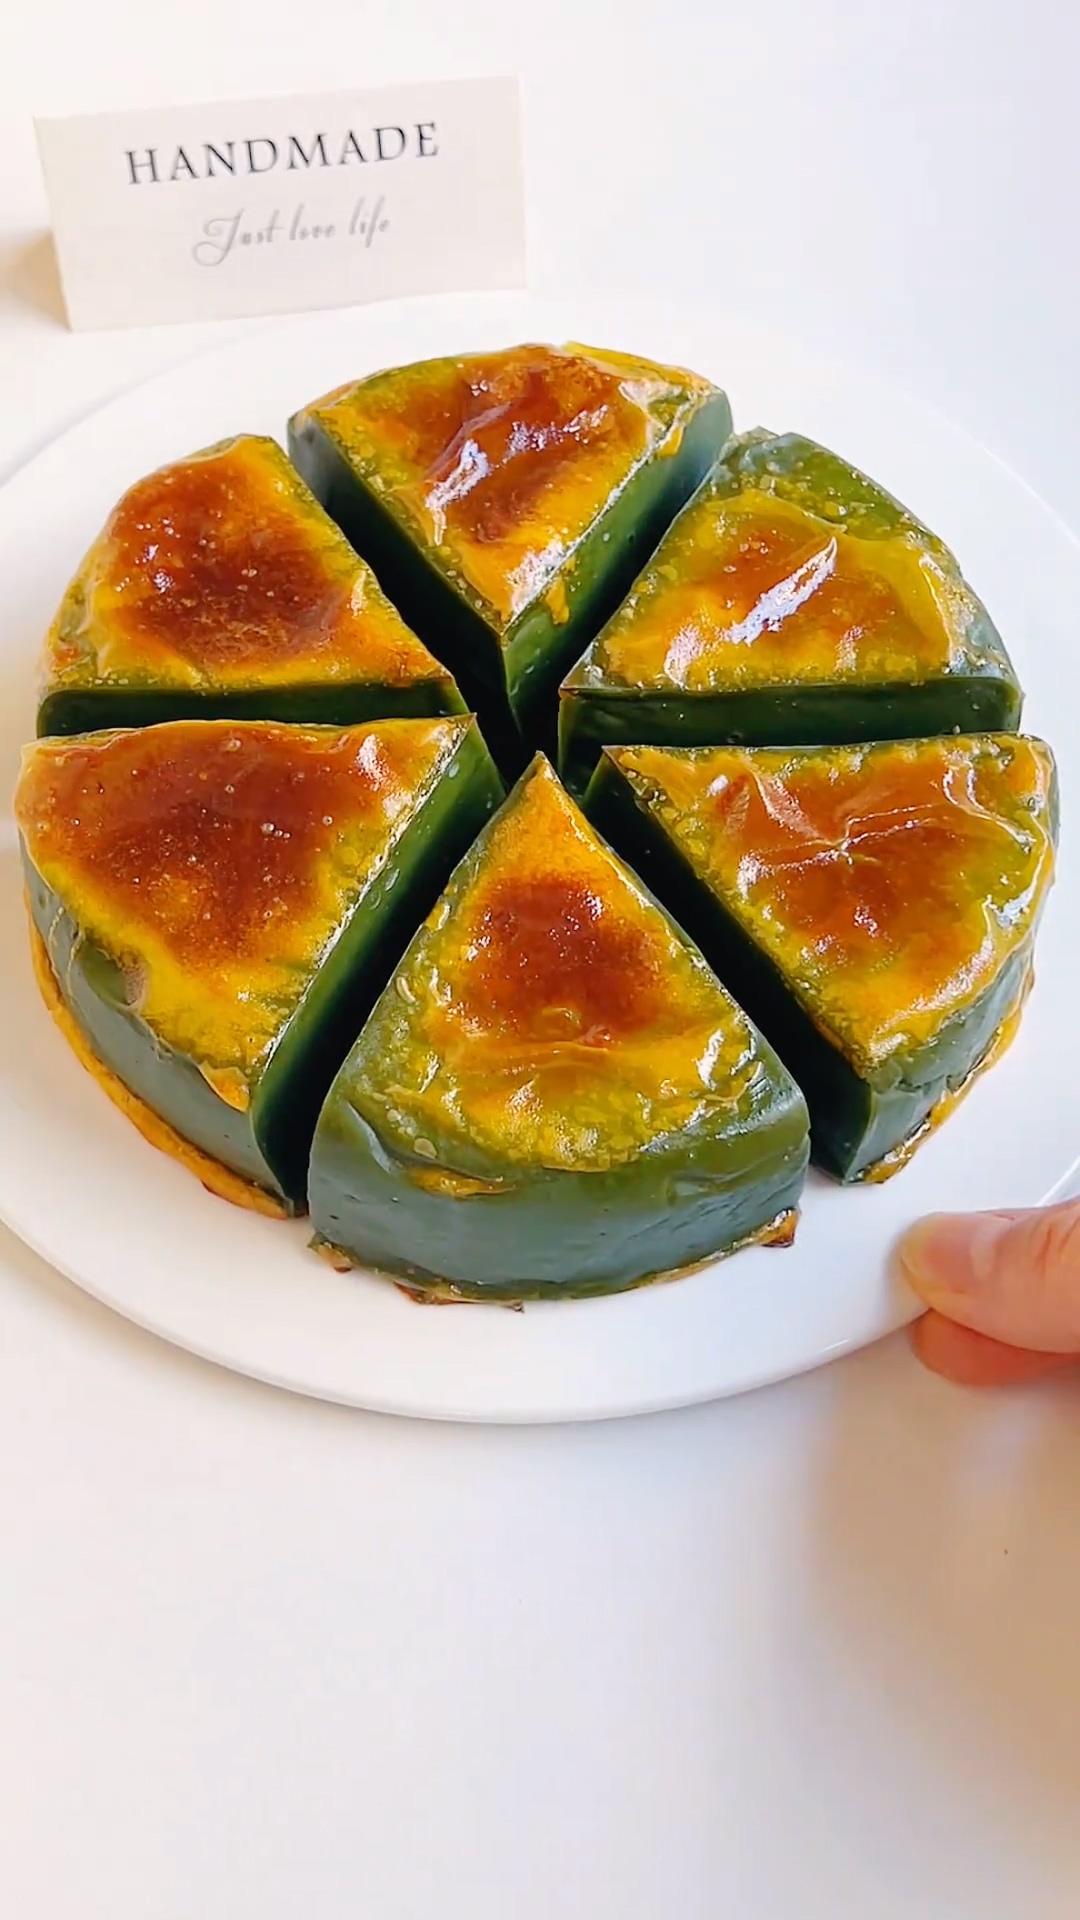
I’ve always had a deep love for matcha.
From soft, fluffy cakes to chewy mochi and comforting drinks, I find myself reaching for matcha again and again—the aroma, the gentle bitterness, and that signature green tea fragrance never get old for me.
Today, I’m sharing one of my recent favorites: Matcha Baked Milk Custard. It’s wonderfully simple, requires minimal effort, and comes together with just a bit of mixing and baking.
The result is a custard that’s lightly crisp on the outside, silky and tender on the inside, with a balanced matcha flavor that’s fragrant but not overpowering.
I genuinely enjoy every bite of this dessert, and it’s the kind of treat I love making again and again for a cozy afternoon or an easy sweet fix.

Why You’ll Love This Recipe
- Naturally Gluten-Free & Simple: The structure comes entirely from cornstarch, making this a fantastic dessert for those avoiding gluten, and the process is wonderfully straightforward—just mix, cook, set, and bake.
- Magical Texture Contrast: The final bake creates a magical transformation: a delicate, slightly caramelized crust forms on top, protecting the incredibly smooth, tender, and QQ (chewy-soft) custard beneath.
- Perfectly Balanced Flavor: The earthy, slightly bitter notes of high-quality matcha beautifully cut through the sweetness and richness of the milk, creating a dessert that is deeply flavorful but never cloying.
- Make-Ahead Friendly: The custard needs to set overnight in the fridge, which makes it a perfect dessert to prepare a day ahead for stress-free entertaining.
Ingredients and Substitutions
- Milk – I recommend using whole milk for the richest flavor and creamiest texture. It forms the luxurious base of the custard. While you can use low-fat or skim milk, the final dessert will be less rich and the flavor slightly milder.
- Cornstarch – This is the essential thickening agent that gives the custard its signature smooth, firm-yet-tender, and sliceable texture. It’s what makes this recipe naturally gluten-free. Do not substitute with other starches like tapioca or potato starch, as they set with different textures.
- Egg – You’ll need one large egg at room temperature. It adds richness, helps with setting, and contributes to that beautiful golden-brown color on the baked surface. Be sure to whisk it well before adding.
- Granulated Sugar – We use just enough to sweeten the custard and balance the matcha’s bitterness. You can adjust the amount slightly to your taste. The sugar also aids in browning during the final bake.
- Matcha Powder – This is the star of the show. For the most vibrant green color and a smooth, not bitter, matcha flavor, I always suggest using a high-quality ceremonial-grade matcha powder. Culinary grade will work, but the color may be duller and the flavor more astringent. Be sure to sift it to avoid lumps.
How to Make Gluten-Free Matcha Baked Milk Custard
1. Mix the Matcha Custard Base
In a large mixing bowl, combine the sifted matcha powder and cornstarch. Whisk them together until evenly distributed and no lumps of matcha remain.
Add the whole egg and granulated sugar to the bowl. Pour in the milk. Whisk until everything is fully incorporated and you have a smooth, thin, pale green liquid.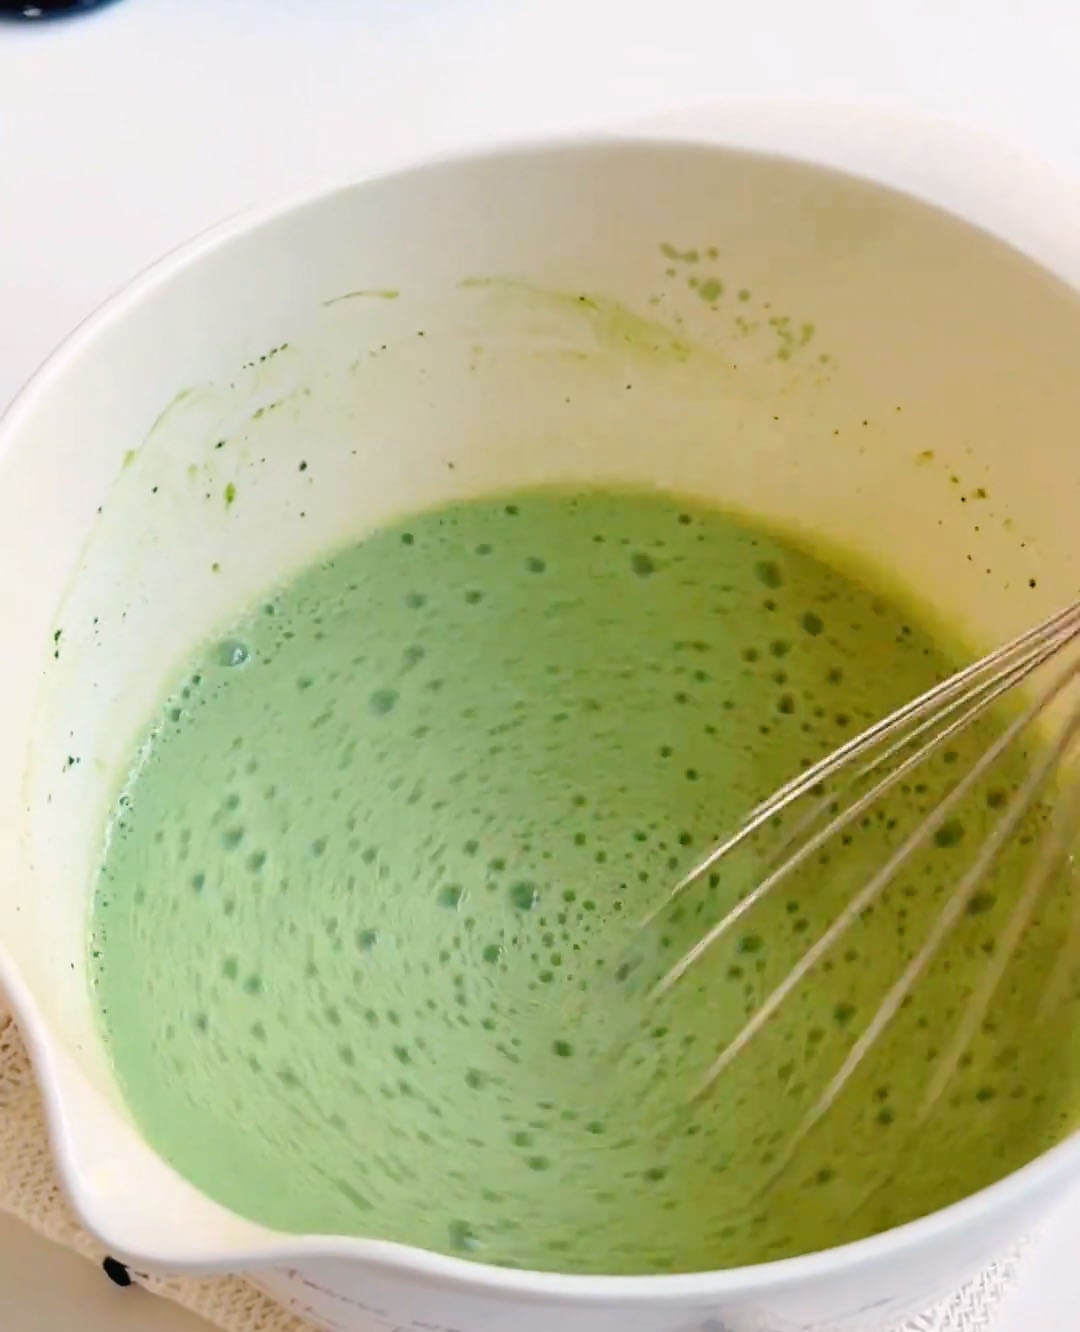
2. Cook the Custard to Thicken
Place a fine-mesh sieve over a medium-sized saucepan. Pour the matcha-milk mixture through the sieve into the pan to catch any potential lumps.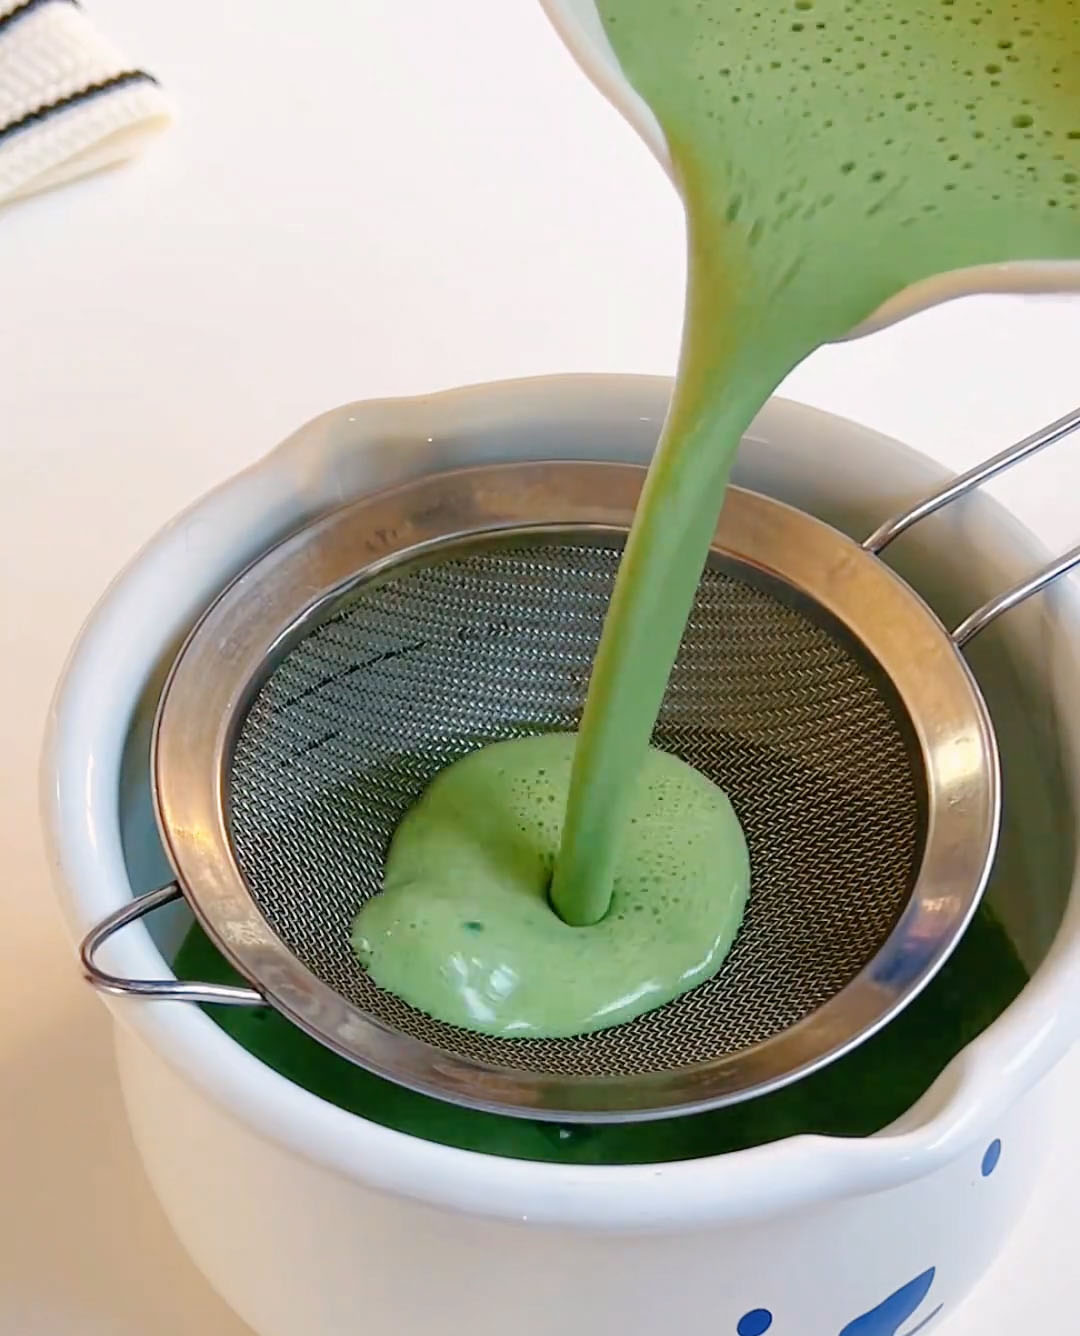
Place the saucepan over medium-low heat. Cook, stirring constantly and scraping the bottom and sides of the pan with a silicone spatula.
After a few minutes, the mixture will begin to thicken.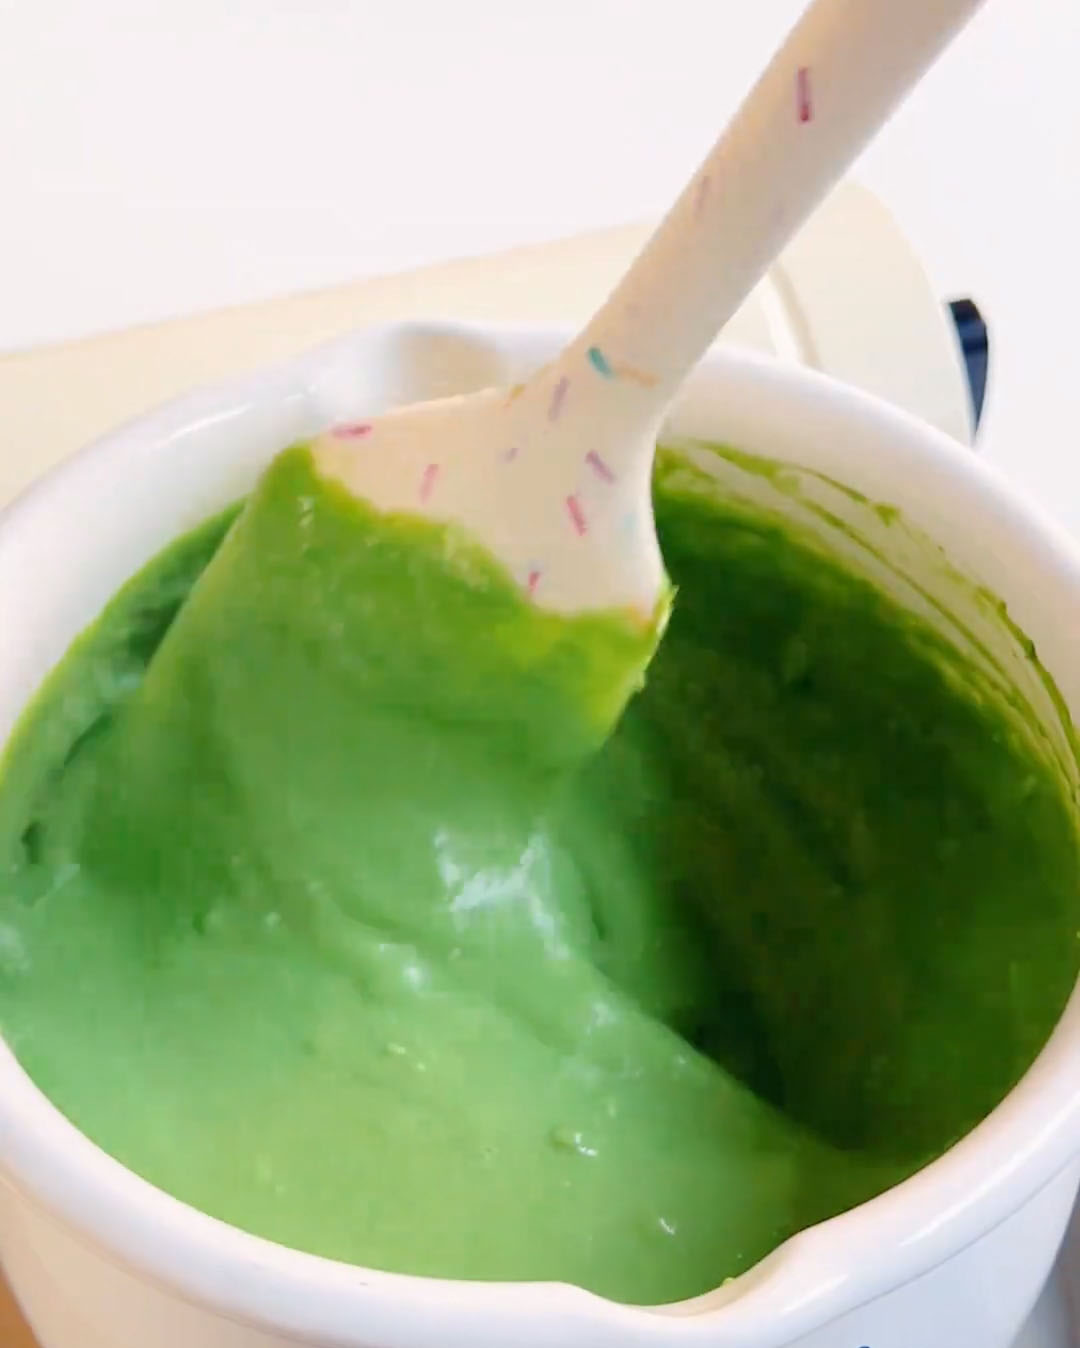
Continue stirring until it becomes very thick and pudding-like, and leaves a clear trail on the back of the spatula that doesn’t immediately drip away. This should take about 8-10 minutes total. Once thickened, immediately remove from heat.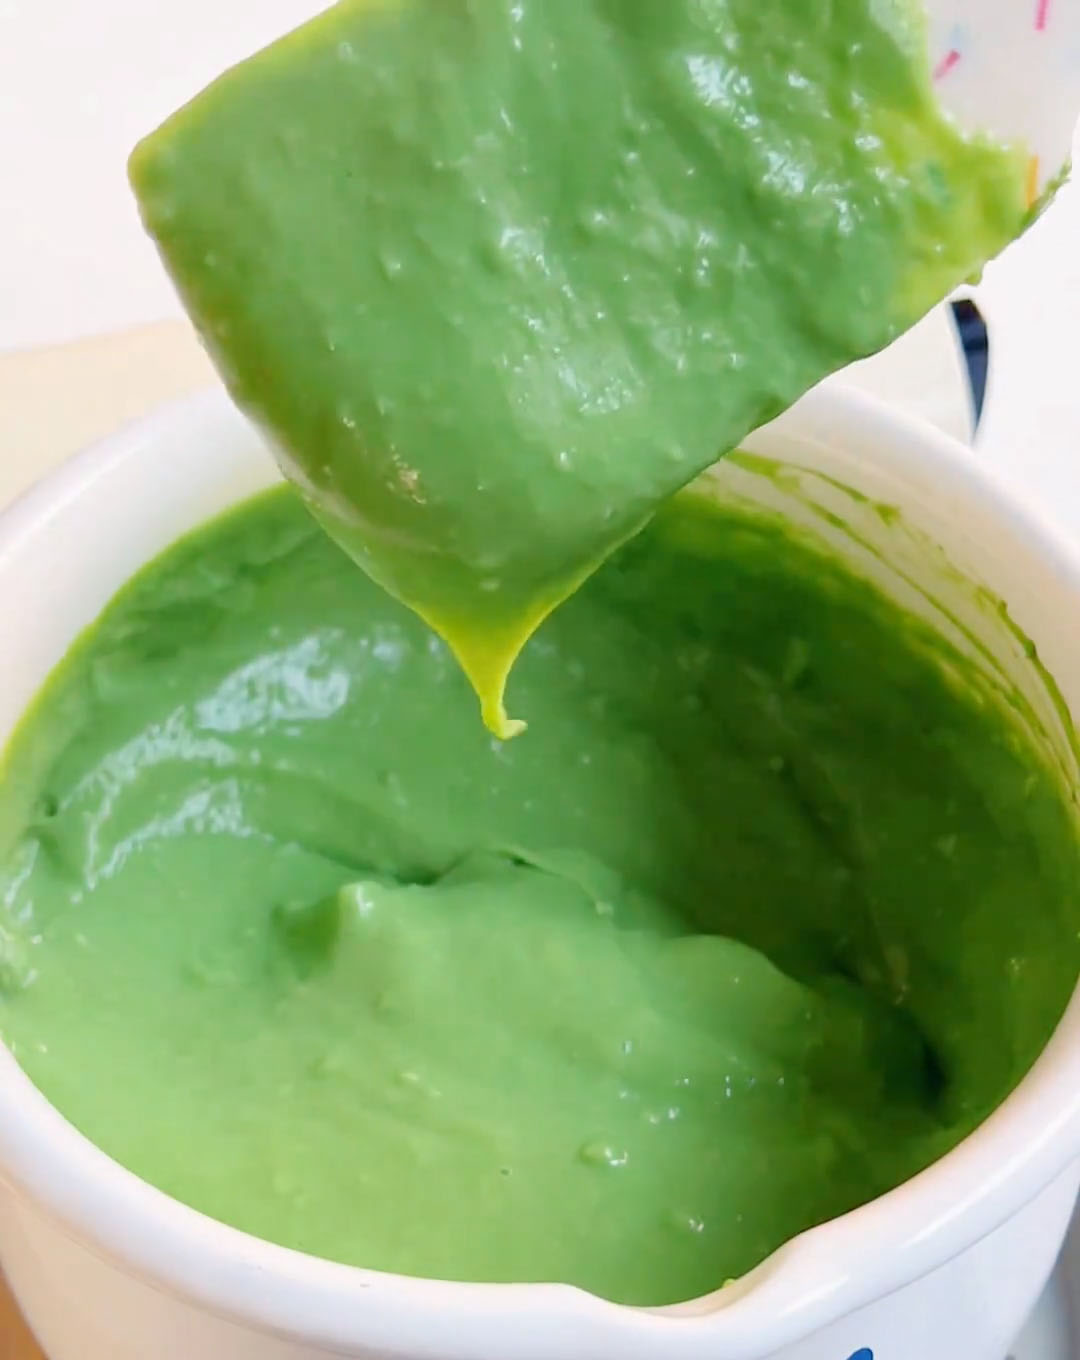
3. Set the Custard Overnight
Quickly pour the hot, thickened custard into your desired container or mold (a small glass or ceramic baking dish, or individual ramekins work well). Smooth the top with the spatula.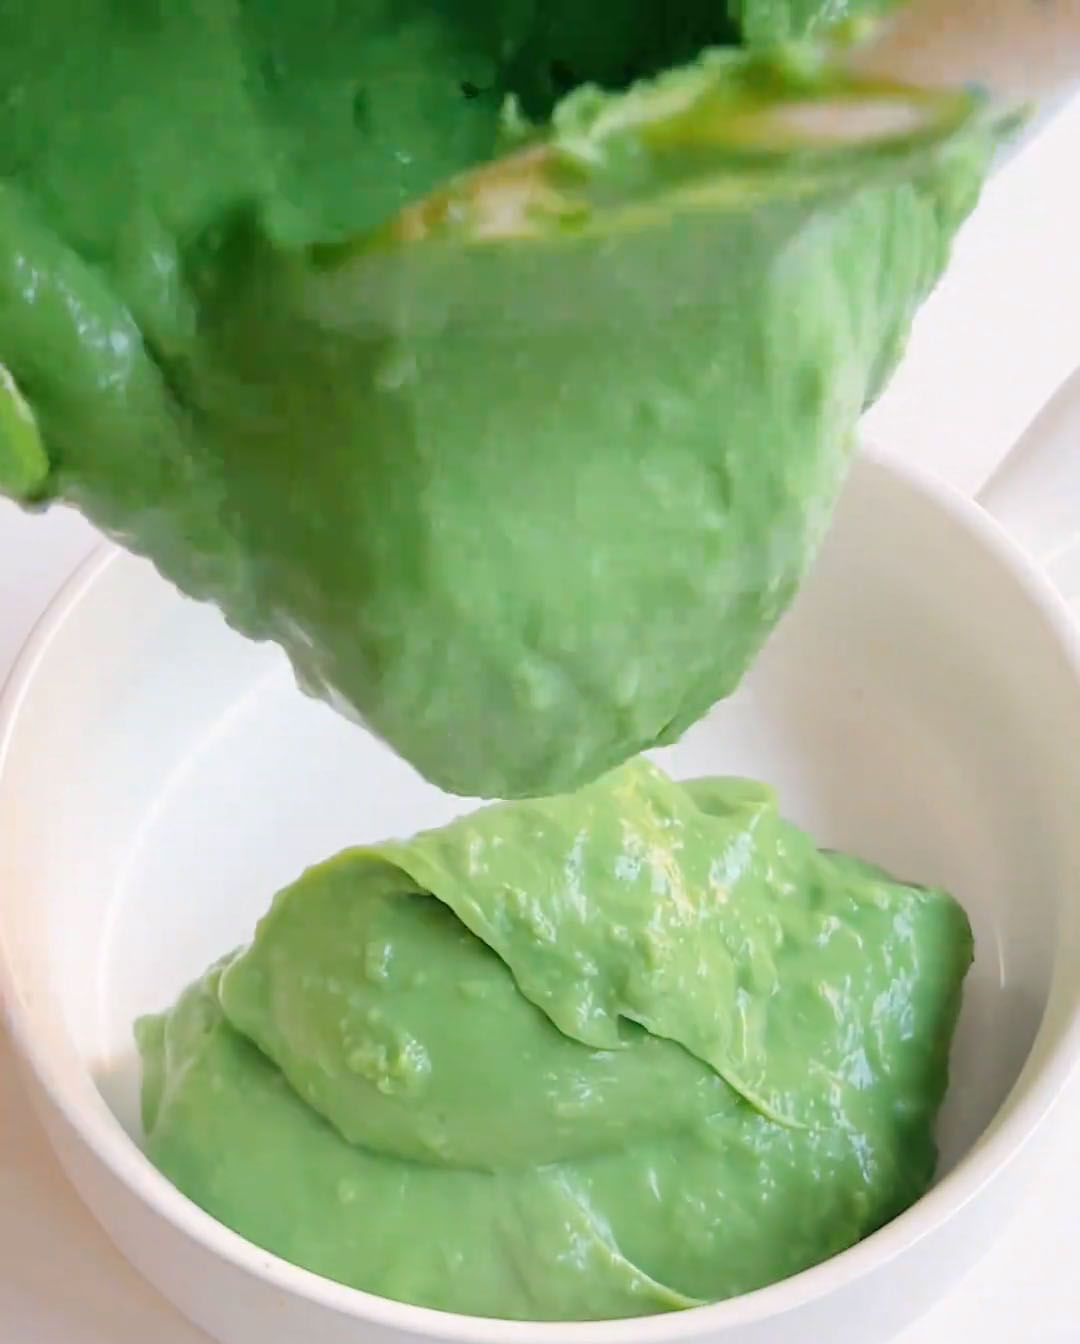
Gently tap the container on the counter a few times to release any trapped air bubbles.
Cover with plastic wrap and lightly press the surface flat with your hand. Let it cool to room temperature on the counter, then transfer to the refrigerator. Chill for at least 4 hours, but preferably overnight, to allow it to set completely and become firm enough to slice.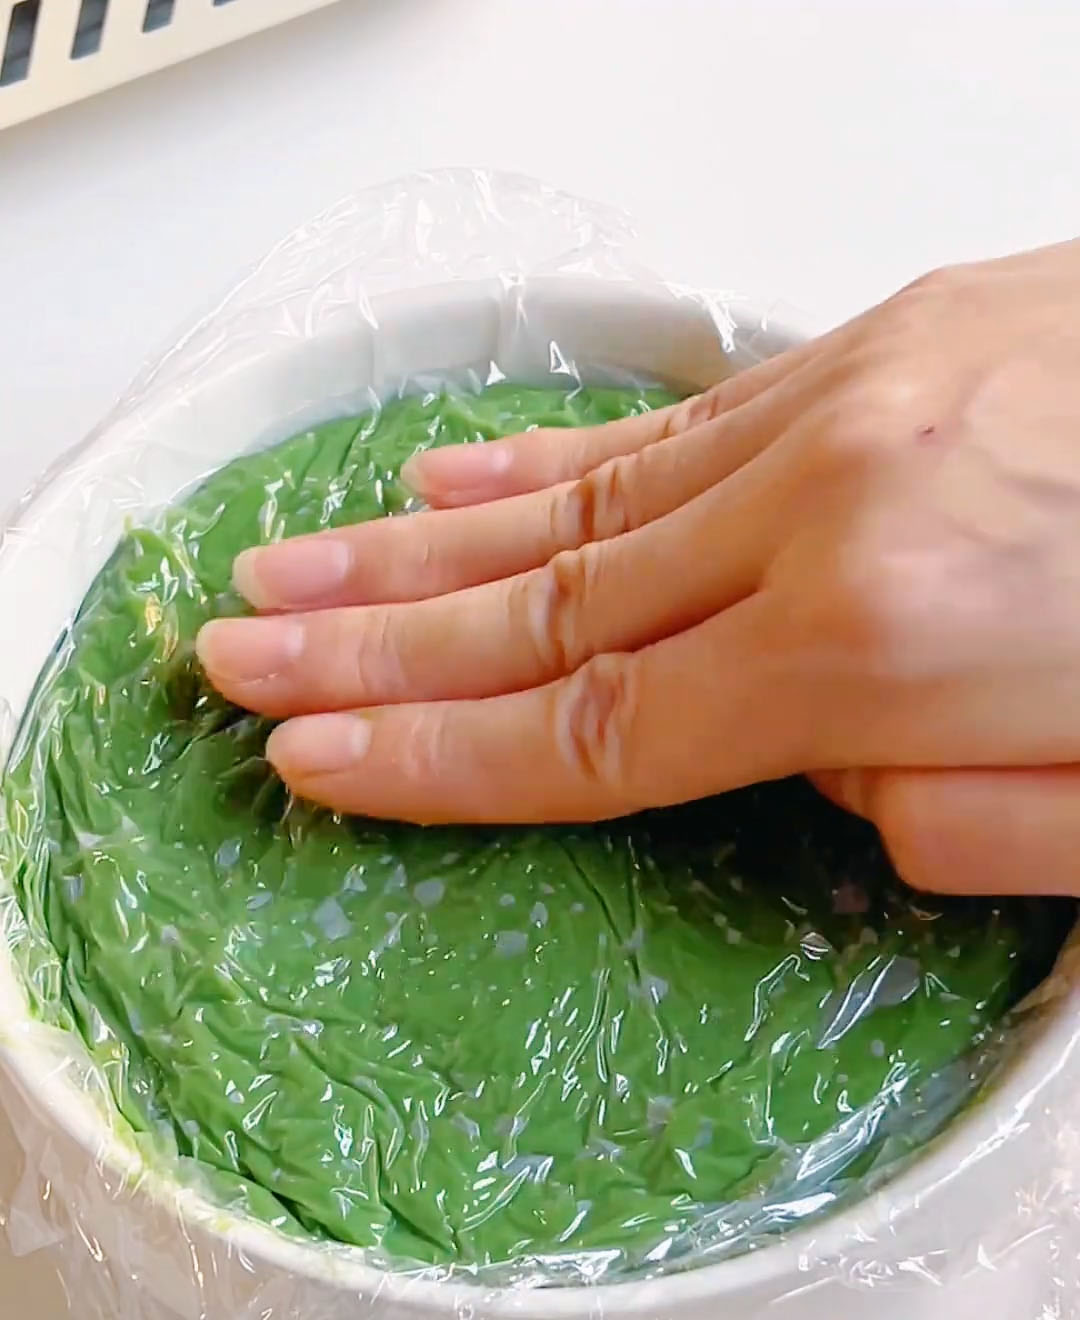
4. Bake to Create the Golden Crust
The next day, line a small baking sheet with parchment paper.
Remove the set custard from the fridge. Invert it onto a cutting board—it should release cleanly. Using a sharp knife, cut it into your desired shapes (squares, rectangles, or triangles).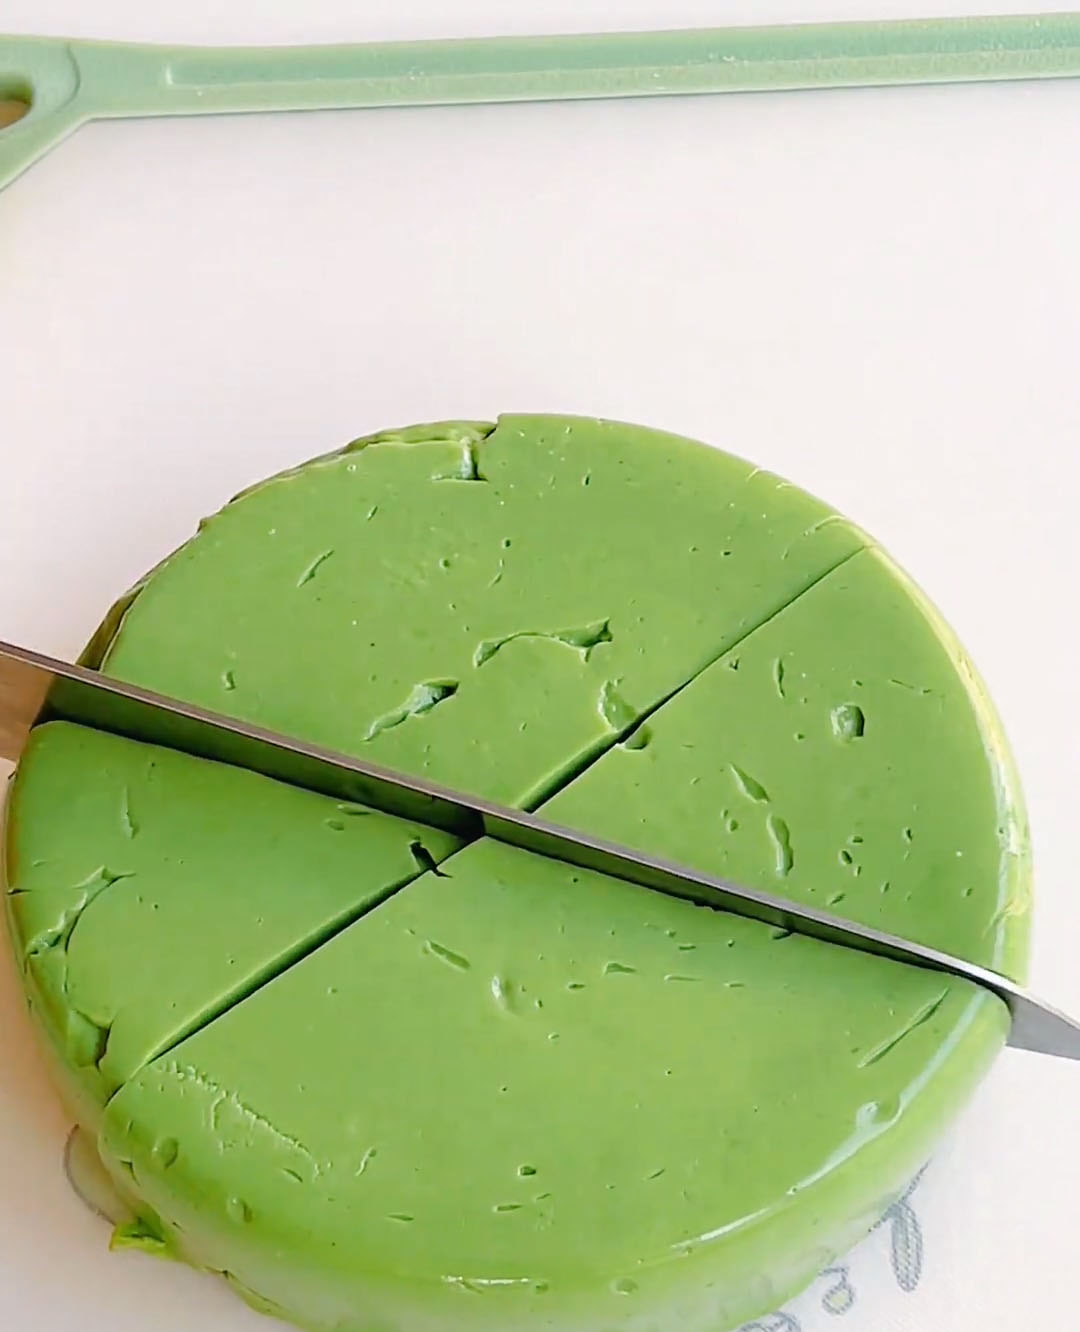
Place the pieces on the prepared baking sheet, spaced slightly apart. Lightly brush the top each piece with the beaten egg yolk. This will give them a beautiful, glossy, deep golden color when baked.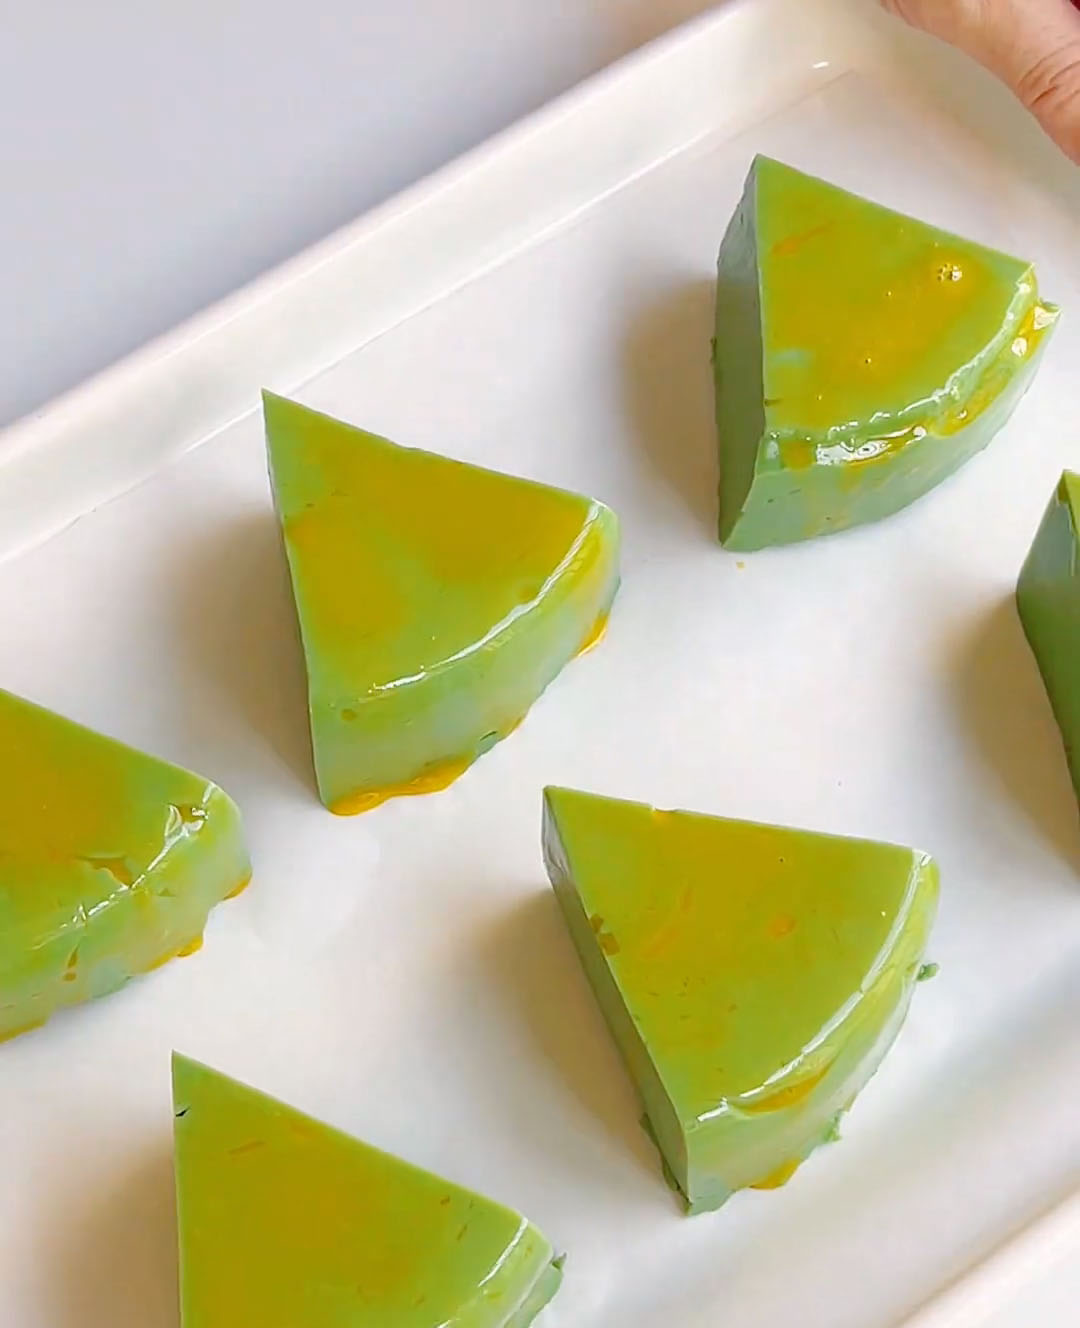
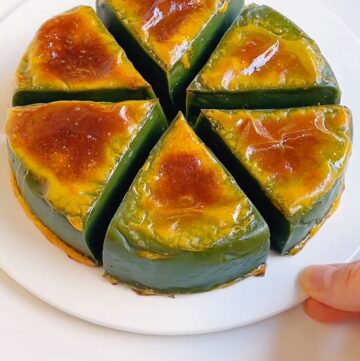
Place the cake pieces on the middle rack and bake at 180°C (356°F) for 18 minutes, until the surface is golden and lightly crisp.
Tips & Tricks
- Sift the Matcha: Always sift your matcha powder with the cornstarch. Matcha clumps easily, and sifting ensures a perfectly smooth, vibrant green custard with no bitter specks.
- Stir Constantly: When cooking the custard on the stove, never stop stirring. Cornstarch-thickened mixtures can quickly develop lumps or scorch on the bottom if left unattended.
- Chill Thoroughly: Do not rush the chilling step. The custard needs that full overnight rest to become completely firm and sliceable. If it’s too soft, it will fall apart when you try to cut and bake it.
- Egg Wash for Color: Brushing with egg yolk is the secret to that professional, glossy, deep golden-brown top. You can use whole beaten egg, but the yolk alone gives a richer color.
- Serve Fresh from the Oven: The baked crust is at its crispiest and most magical within the first hour after baking. While still tasty later, the texture contrast is most pronounced when fresh.
Frequently Asked Questions
Can I make this dairy-free?
Yes, you can substitute the whole milk with an unsweetened, creamy plant-based milk like oat milk or full-fat coconut milk. The flavor will be different but still delicious.
Why is my custard lumpy?
Lumps usually form if the cornstarch wasn’t fully dissolved in the initial paste, or if the heat was too high during cooking, causing the starch to clump. Always start with a smooth paste off the heat and cook over medium-low, stirring constantly.
My custard didn’t set firm enough. What happened?
This could be due to inaccurate measurement of cornstarch, not cooking the mixture long enough on the stove to fully activate the starch, or not chilling for a sufficient amount of time. Make sure you cook until very thick and chill overnight.
Can I skip the baking step?
You can! The chilled, set custard is delicious on its own as a matcha pudding or mousse. The baking step is purely to add the contrasting crispy top layer.
How do I store leftovers?
Store any leftover baked custard in an airtight container in the refrigerator for up to 3 days. Note that the crispy top will soften in the fridge. For best texture, you can briefly reheat slices in a toaster oven to re-crisp the top.
Silky Matcha Baked Milk Custard with Lightly Caramelized Top
Ingredients
For the Custard
- 500 ml whole milk
- 50 g cornstarch
- 1 large egg at room temperature
- 35 g granulated sugar
- 8 g about 2 heaping teaspoons high-quality matcha powder, sifted
For Baking
- 1 extra egg yolk lightly beaten (for egg wash)
Instructions
Mix the Matcha Custard Base
- In a large mixing bowl, combine the sifted matcha powder and cornstarch. Whisk them together until evenly distributed and no lumps of matcha remain.
- Add the whole egg and granulated sugar to the bowl. Pour in the milk. Whisk until everything is fully incorporated and you have a smooth, thin, pale green liquid.
Cook the Custard to Thicken
- Place a fine-mesh sieve over a medium-sized saucepan. Pour the matcha-milk mixture through the sieve into the pan to catch any potential lumps.
- Place the saucepan over medium-low heat. Cook, stirring constantly and scraping the bottom and sides of the pan with a silicone spatula.
- After a few minutes, the mixture will begin to thicken.
- Continue stirring until it becomes very thick and pudding-like, and leaves a clear trail on the back of the spatula that doesn't immediately drip away. This should take about 8-10 minutes total. Once thickened, immediately remove from heat.
Set the Custard Overnight
- Quickly pour the hot, thickened custard into your desired container or mold (a small glass or ceramic baking dish, or individual ramekins work well). Smooth the top with the spatula.
- Gently tap the container on the counter a few times to release any trapped air bubbles.
- Cover with plastic wrap and lightly press the surface flat with your hand. Let it cool to room temperature on the counter, then transfer to the refrigerator. Chill for at least 4 hours, but preferably overnight, to allow it to set completely and become firm enough to slice.
Bake to Create the Golden Crust
- The next day, line a small baking sheet with parchment paper.
- Remove the set custard from the fridge. Invert it onto a cutting board—it should release cleanly. Using a sharp knife, cut it into your desired shapes (squares, rectangles, or triangles).
- Place the pieces on the prepared baking sheet, spaced slightly apart. Lightly brush the top each piece with the beaten egg yolk. This will give them a beautiful, glossy, deep golden color when baked.
- Place the cake pieces on the middle rack and bake at 180°C (356°F) for 18 minutes, until the surface is golden and lightly crisp.
Leave a Reply