
This lazy lemon Basque cheesecake is rich, creamy, and completely foolproof. Everything goes into the blender at once—no complicated steps, no water bath. With a tangy lemon flavour and a smooth, jiggly centre, it’s the perfect make-ahead dessert for afternoon tea or gatherings.
Basque cheesecake is something I completely fell in love with after trying it for the first time—and my kids love it just as much.
It’s incredibly easy to make, can be prepared ahead of time, and that’s probably why I’ve become a little obsessed with creating different Basque cheesecake variations.
Over time, I’ve made so many favourites, including:
- Double Layer Pistachio Chocolate Basque Cheesecake
- Strawberry Matcha Basque Cheesecake
- Tiramisu Basque Cheesecake
- Matcha Mochi Basque Cheesecake Bites
- Chocolate Oreo Basque Cheesecake
Today, I’m very happy to share this Double Layer Lemon Basque Cheesecake.
True to my lazy baking style, everything comes together using just one blender—simple, effortless, and absolutely foolproof.
Why you’ll love this recipe
- It’s a true one-button blender recipe with minimal cleanup and zero stress
- The Basque cheesecake base is rich and creamy, while the lemon top layer keeps it fresh and light
- No water bath, no whipping eggs, and no complicated temperature control
- The balance of sweetness and acidity makes it easy to enjoy without feeling heavy
- Perfect for afternoon tea, gatherings, or make-ahead desserts since it sets beautifully in the fridge
Ingredients and substitutions
- Cream cheese – I always recommend letting it soften fully at room temperature until you can easily press it with your finger. This is crucial for a smooth, lump-free batter, especially when everything goes into the blender at once.
- Granulated sugar – This controls the overall sweetness of the cheesecake. The amount used keeps the cake balanced and not overly sweet, especially with the added lemon juice.
- Eggs – Whole eggs are used here to help the cheesecake set properly while keeping the texture creamy rather than dense. Make sure they’re at room temperature so they blend smoothly.
- Lemon juice – Freshly squeezed lemon juice gives the cleanest, brightest flavour. If using concentrated lemon juice, I recommend reducing the amount to avoid overpowering the cheesecake.
- Heavy cream – I prefer dairy heavy cream for its smooth texture and rich mouthfeel, which works beautifully in both the baked base and the no-bake top layer.
- Cornstarch – This helps stabilize the Basque cheesecake so it sets nicely without becoming overly runny in the centre. It’s a small amount, but it makes a big difference.
- Gelatin – Used only in the top lemon cheese layer to help it set cleanly and hold its shape once sliced.
- Milk – Hot milk is used to dissolve the gelatin evenly. Whole milk gives the best flavour and texture.
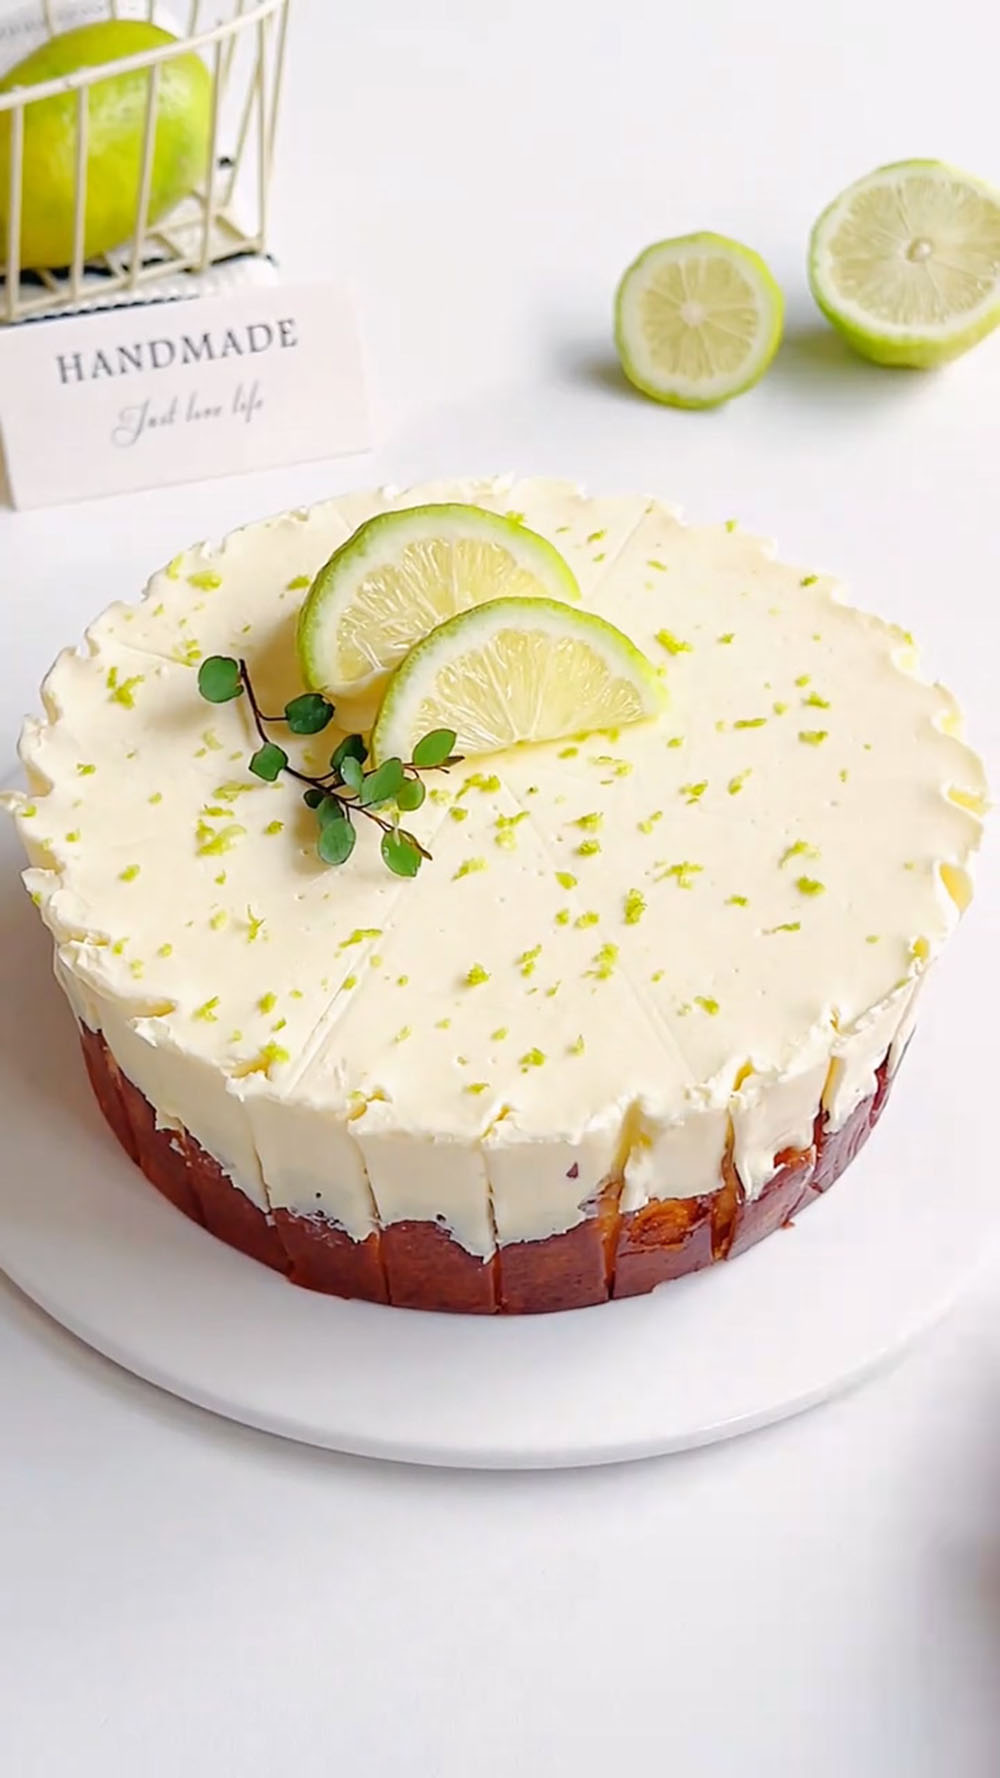
- Lime (for garnish) – Lime slices and zest add a fresh, citrusy finish and make the cake look bright and elegant without overpowering the lemon flavour.
Two-Layer Lemon Basque Cheesecake
Lemon Basque Bottom Layer (Blender)
- 250 g full-fat cream cheese, completely softened
- 55 g granulated sugar
- 2 large eggs, at room temperature
- 10 g fresh lemon juice (about ¼ lemon)
- 160 g cold whipping cream (heavy cream)
- 8 g cornstarch
Lemon Cream Cheese Top Layer (No-Bake)
- 110 g full-fat cream cheese, softened
- 25 g granulated sugar
- 5 g gelatin sheets (or 1 tsp powdered gelatin)
- 40 g whole milk
- 180 g cold whipping cream (heavy cream)
- 8 g fresh lemon juice
Decoration
- 100 ml cold whipping cream, whipped with 1 tbsp sugar (optional)
- 1 lime or lemon, for zesting and slices
How to Make Two-Layer Lemon Basque Cheesecake
Part 1: Make the Blender Basque Base
- Prep: Preheat your oven to 210°C (410°F). Line a 6-inch round springform or cake pan with parchment paper, pressing it to fit the sides.
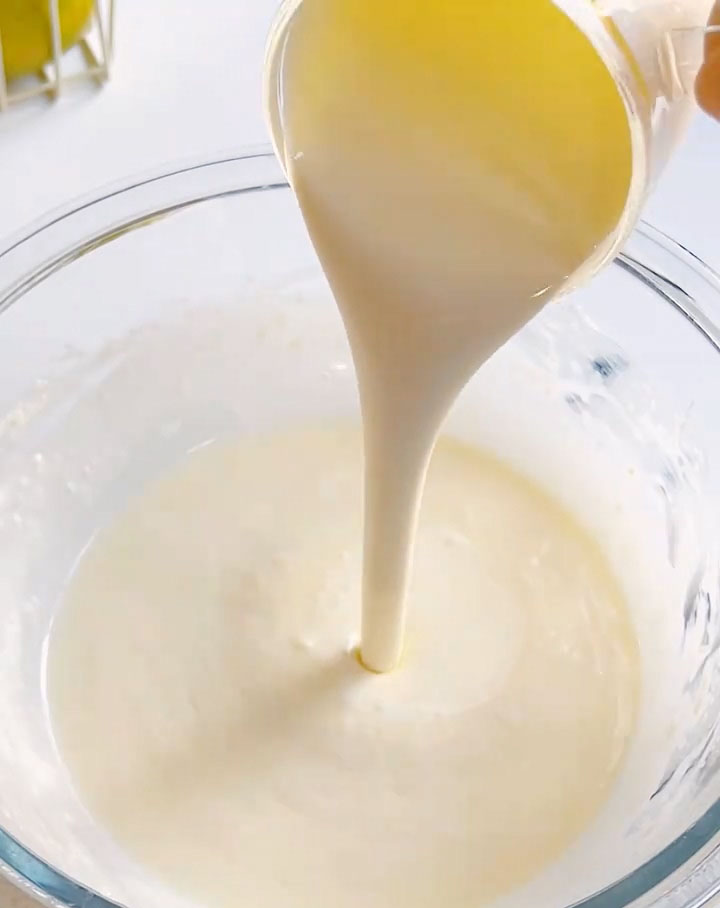
- Blend Everything: Place the completely softened 250g of cream cheese, 55g sugar, 2 eggs, 10g lemon juice, 160g whipping cream, and 8g cornstarch into the jar of your blender.
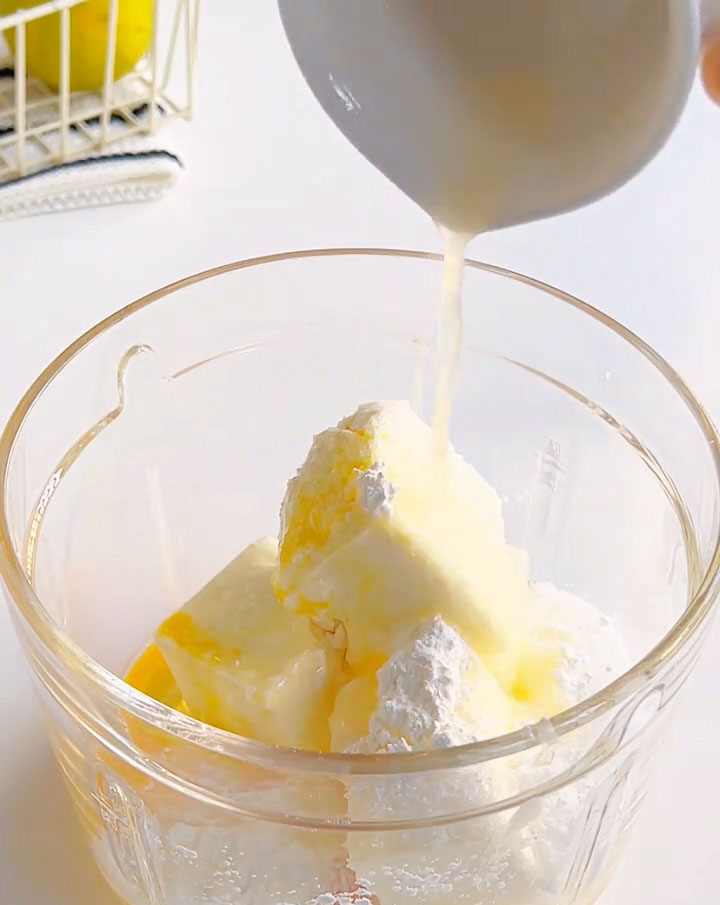
- Puree: Secure the lid. Blend on medium-high speed for 30 seconds to 1 minute. Stop and scrape down the sides once if needed, then blend for another 15-20 seconds until the mixture is utterly smooth, homogenous, and free of any cream cheese lumps.
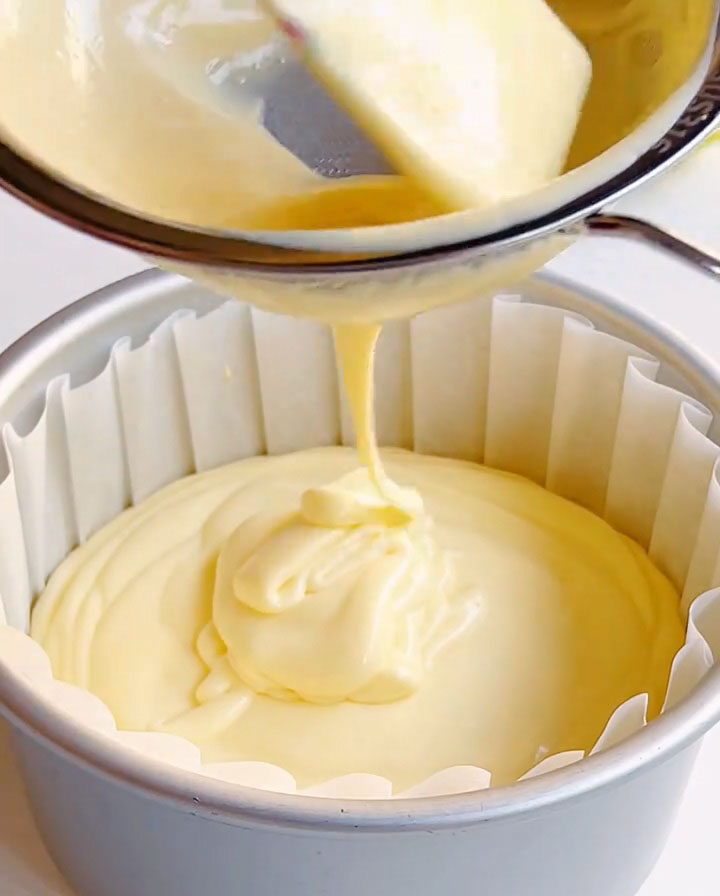
- Strain & Bake: Pour the batter through a fine-mesh sieve into the prepared pan. This catches any last tiny lumps for an ultra-smooth texture. Gently tap the pan on the counter to release air bubbles.
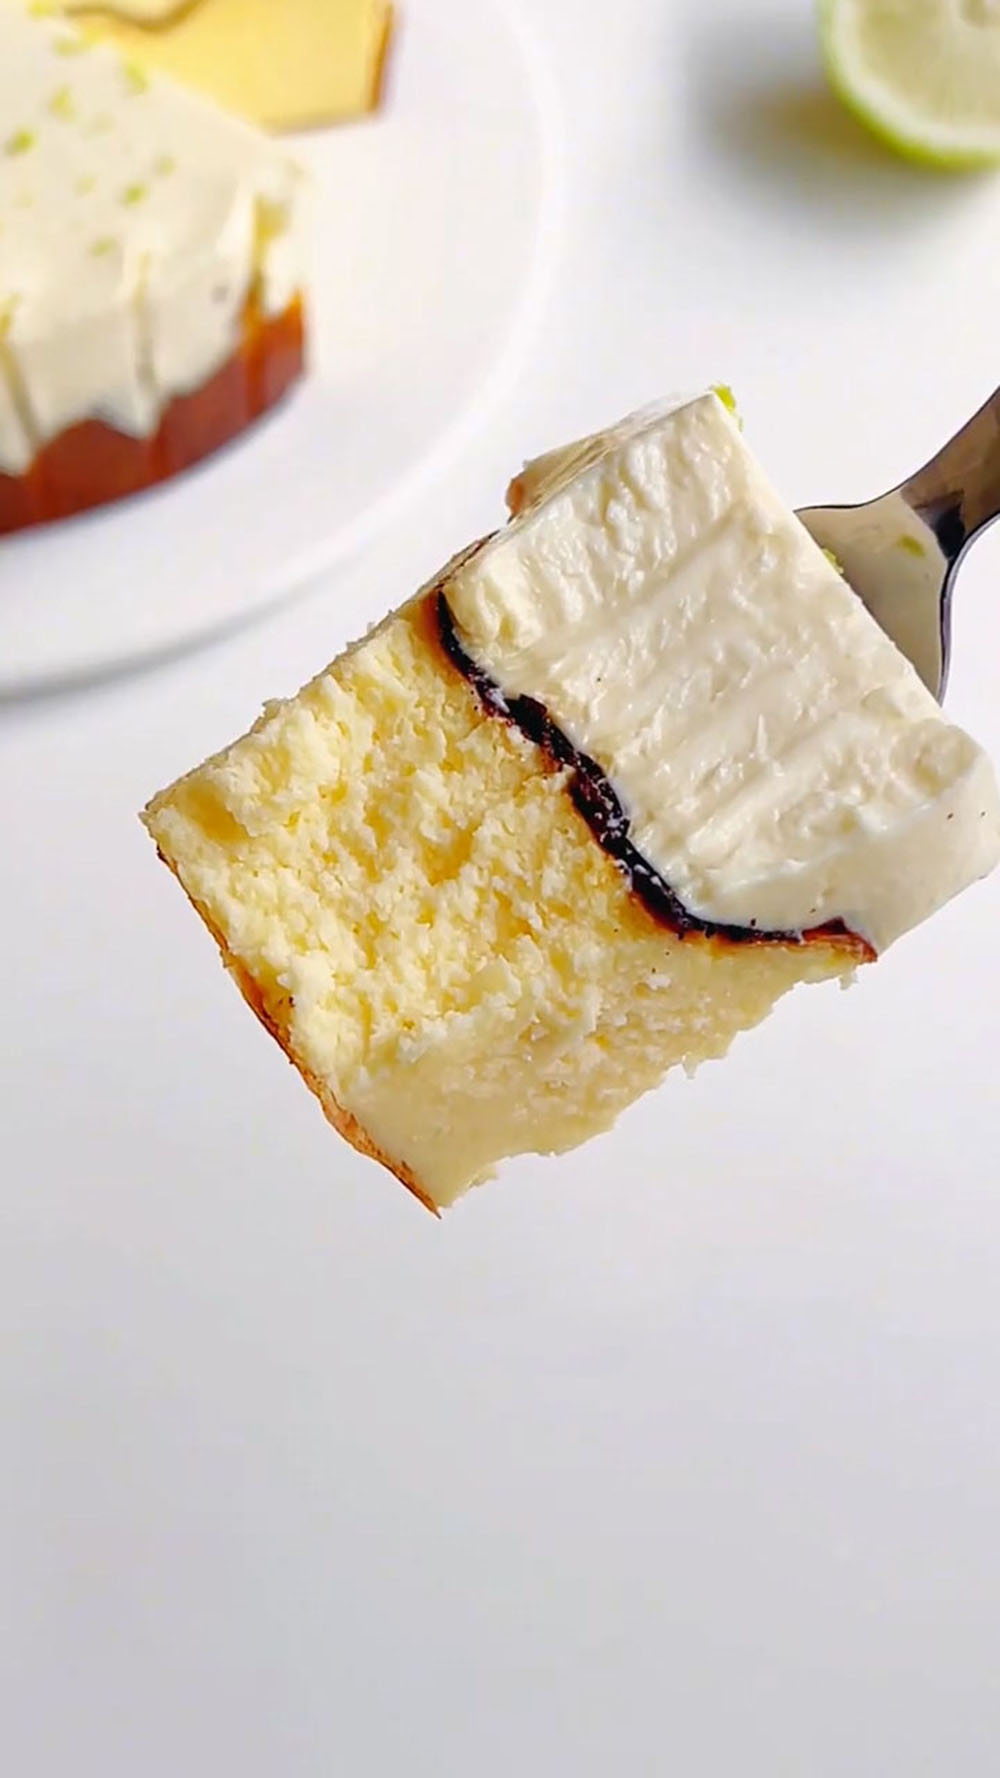
- Bake: Place the pan on the middle rack of the hot oven. Bake for 25 minutes. The top will be deeply golden brown and puffed, the edges will be set, but the center will still have a pronounced, jiggly wobble when you gently shake the pan. This is perfect.
- Cool: Remove from the oven and let the cake cool completely on a wire rack to room temperature. It will deflate and crack—this is normal and part of its rustic charm.
Part 2: Make the No-Bake Lemon Top Layer
- Prep Gelatin: If using gelatin sheets, soak them in a bowl of ice water for 5-10 minutes until soft and floppy. Squeeze out all excess water. If using powdered gelatin, sprinkle it evenly over 2 tablespoons of cold water in a small dish and let it sit for 5 minutes to bloom.
- Heat Milk & Dissolve Gelatin: Warm the 40g of milk until hot but not boiling (about 30 seconds in the microwave). Add the softened gelatin (squeezed sheets or bloomed powder) and stir until it is completely, utterly dissolved with no grains. Set aside to cool to room temperature.
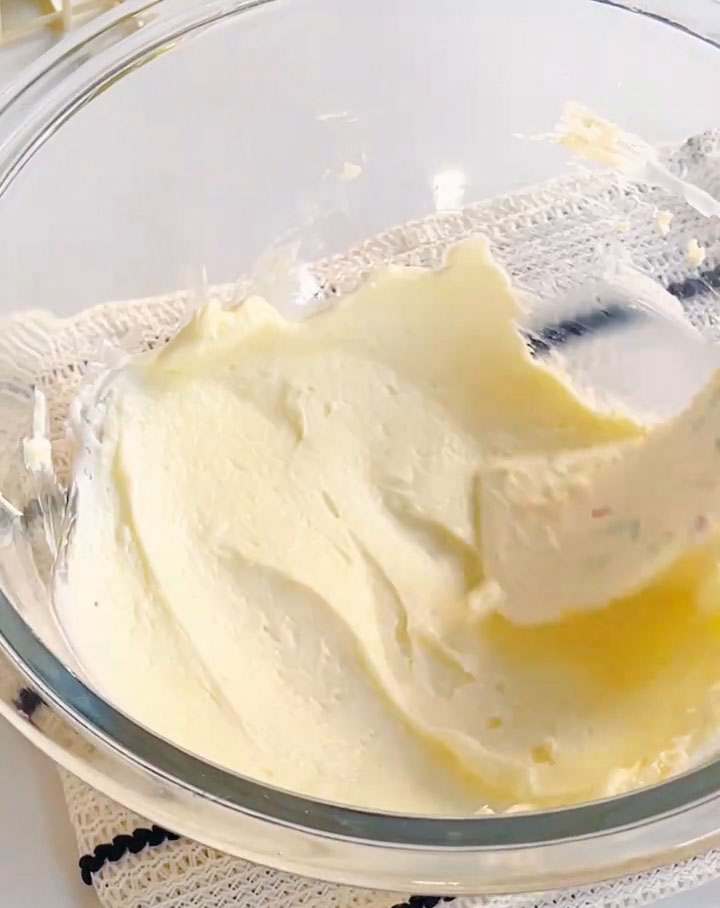
- Mix Cream Cheese Base: In a medium bowl, beat the softened 110g of cream cheese with the 25g of sugar until smooth and creamy.
- Add Gelatin, Lemon & whipping cream : Once the gelatin-milk mixture is at room temperature (test a drop on your wrist—it should feel neutral, not warm), pour it into the cream cheese mixture and mix well. Add the whipping cream and lemon juice, then gently fold until smooth and uniform.
Part 3: Assemble & Chill
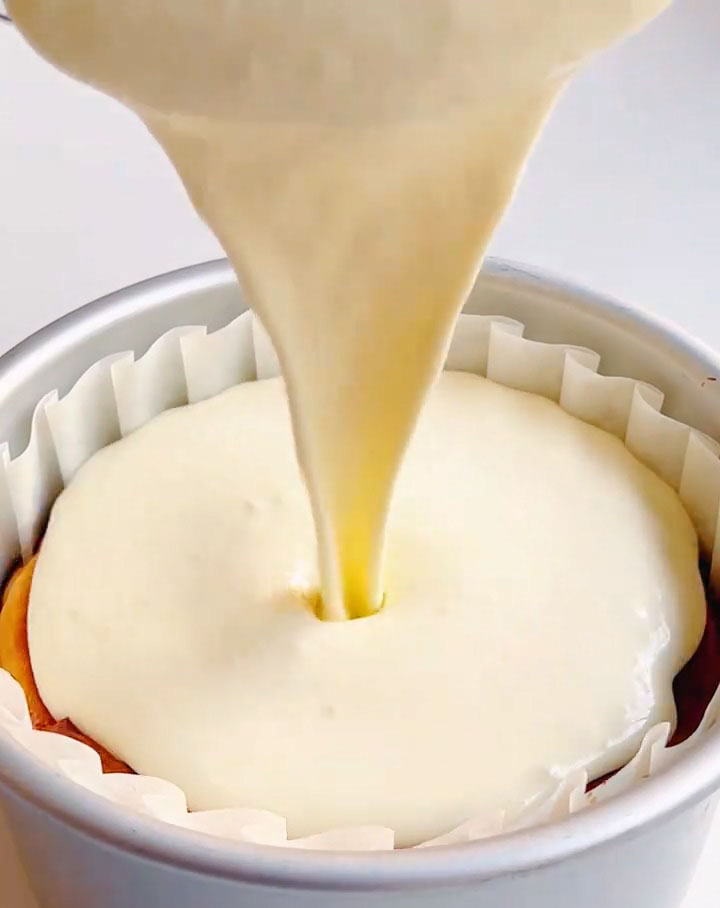
- Pour: Once the baked Basque base is completely cool, pour the lemon cream cheese mousse over the top. Gently shake the pan or use an offset spatula to smooth the top into an even layer.
- Chill: Carefully transfer the cake to the refrigerator. Chill for at least 4 hours, but preferably overnight, to allow the top layer to set completely.
Part 4: Decorate & Serve
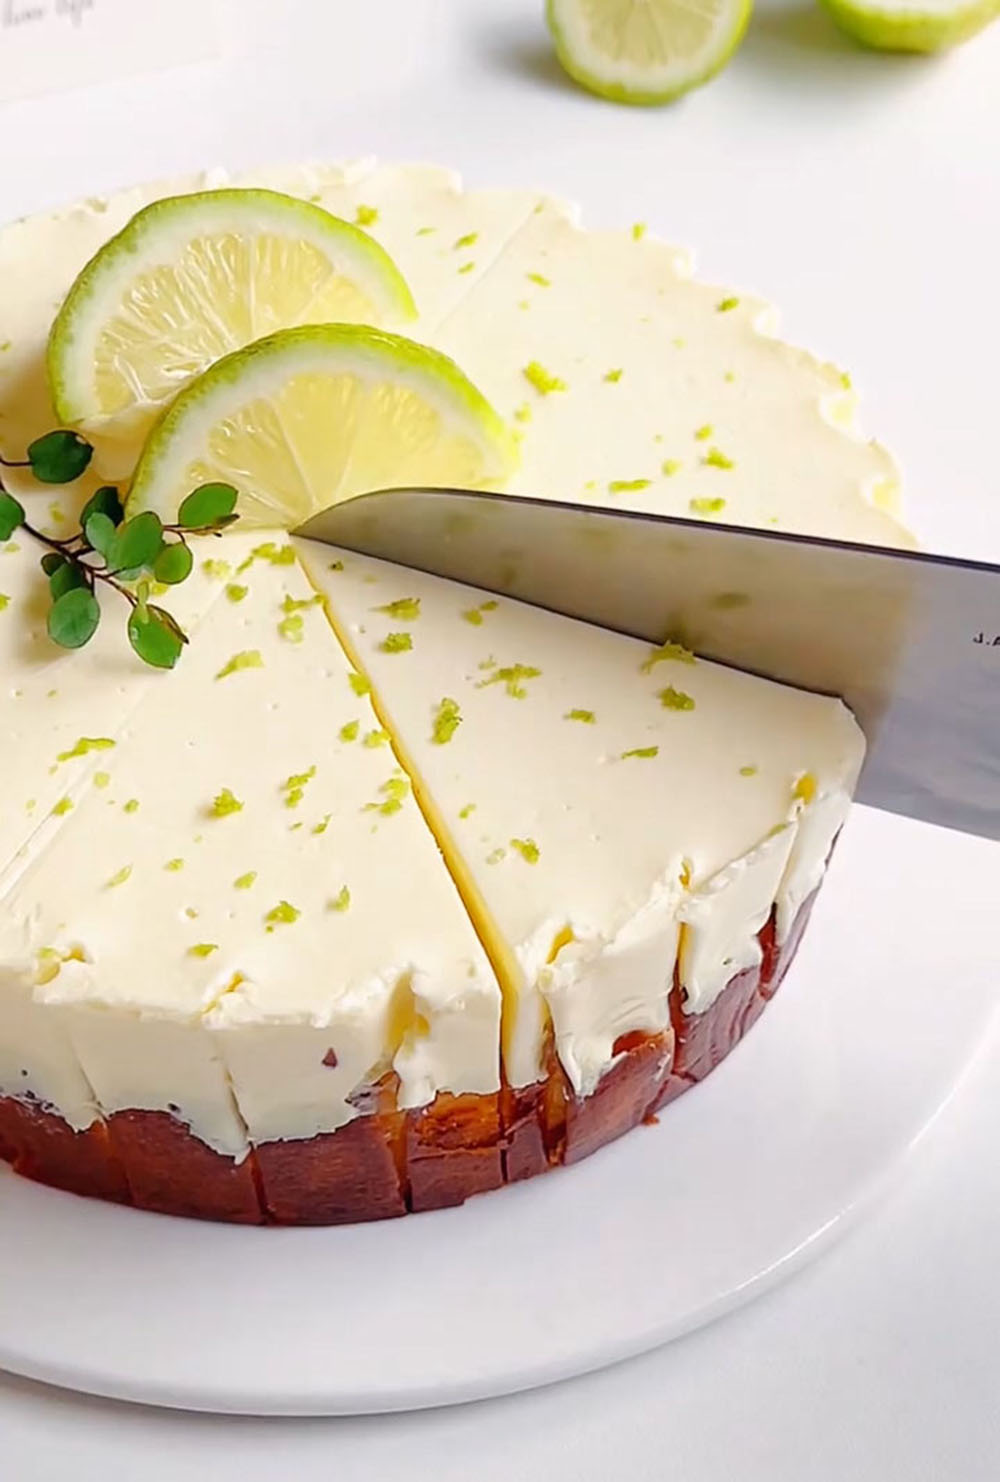
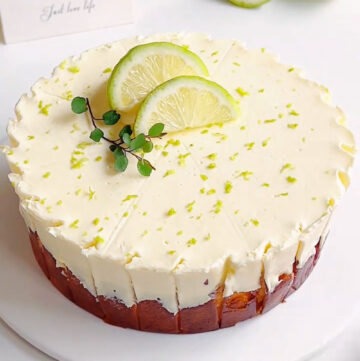
- Once fully set, remove the cake from the pan. If desired, whip the optional 100ml of cream with sugar to stiff peaks and pipe rosettes or dollops around the edge.
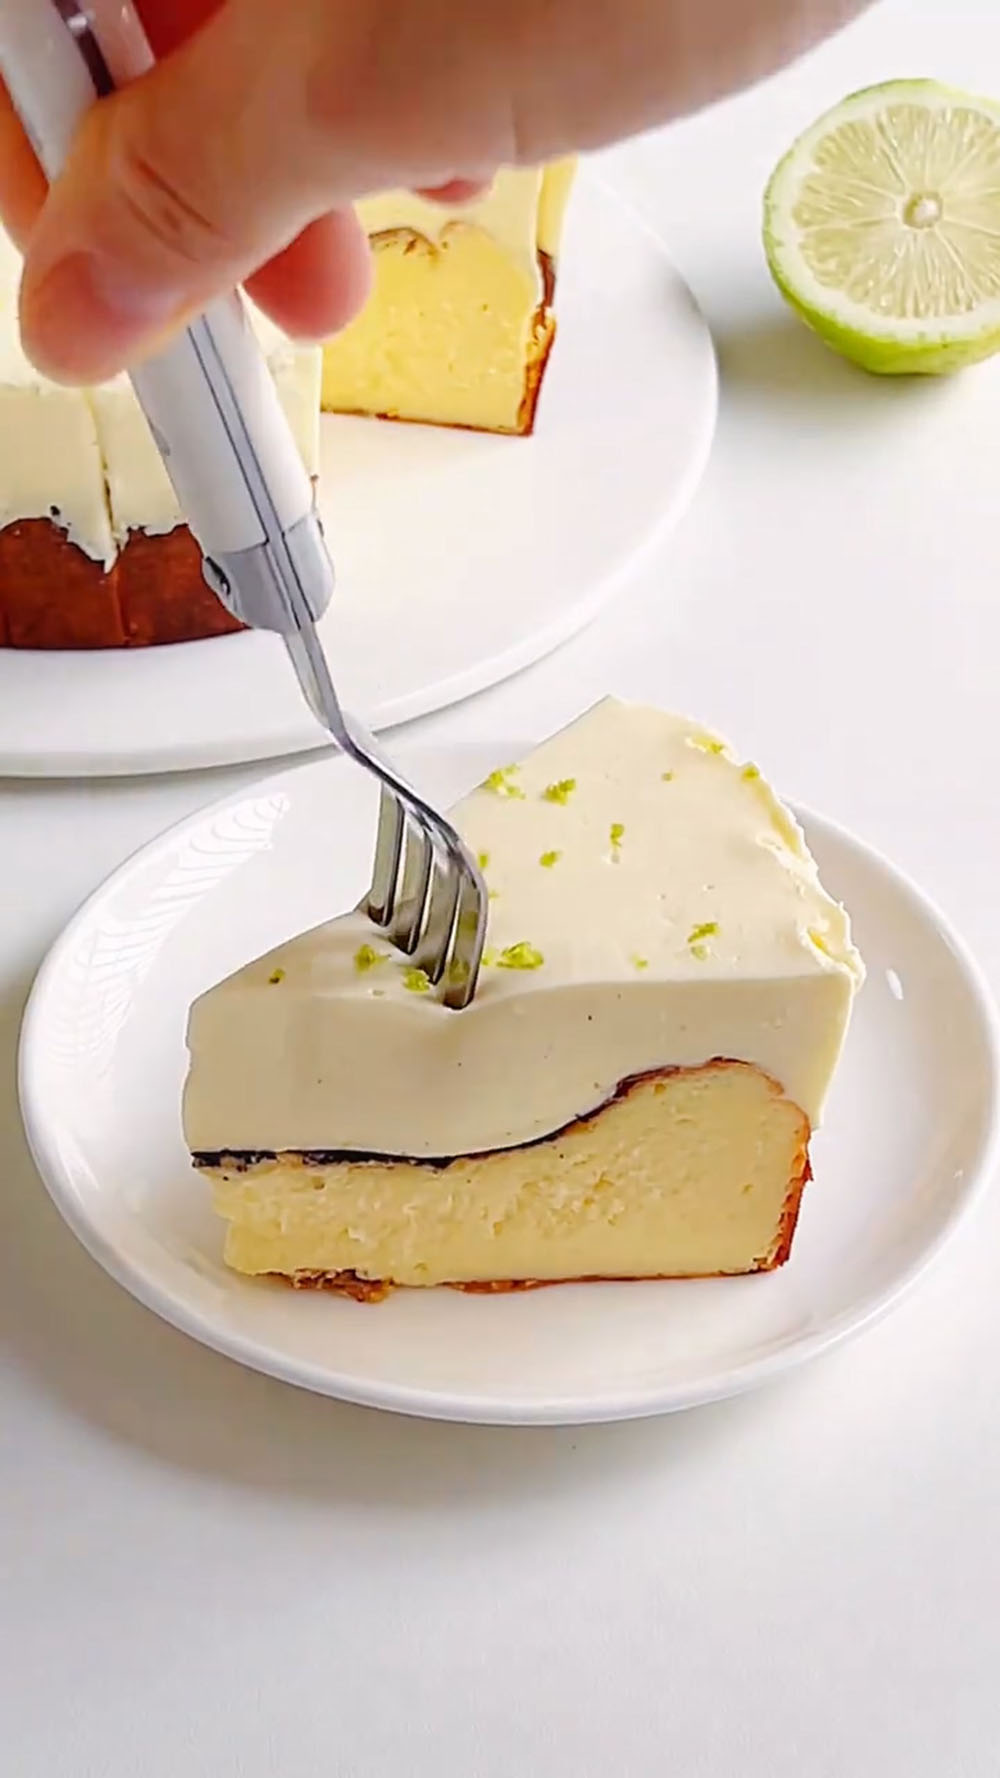
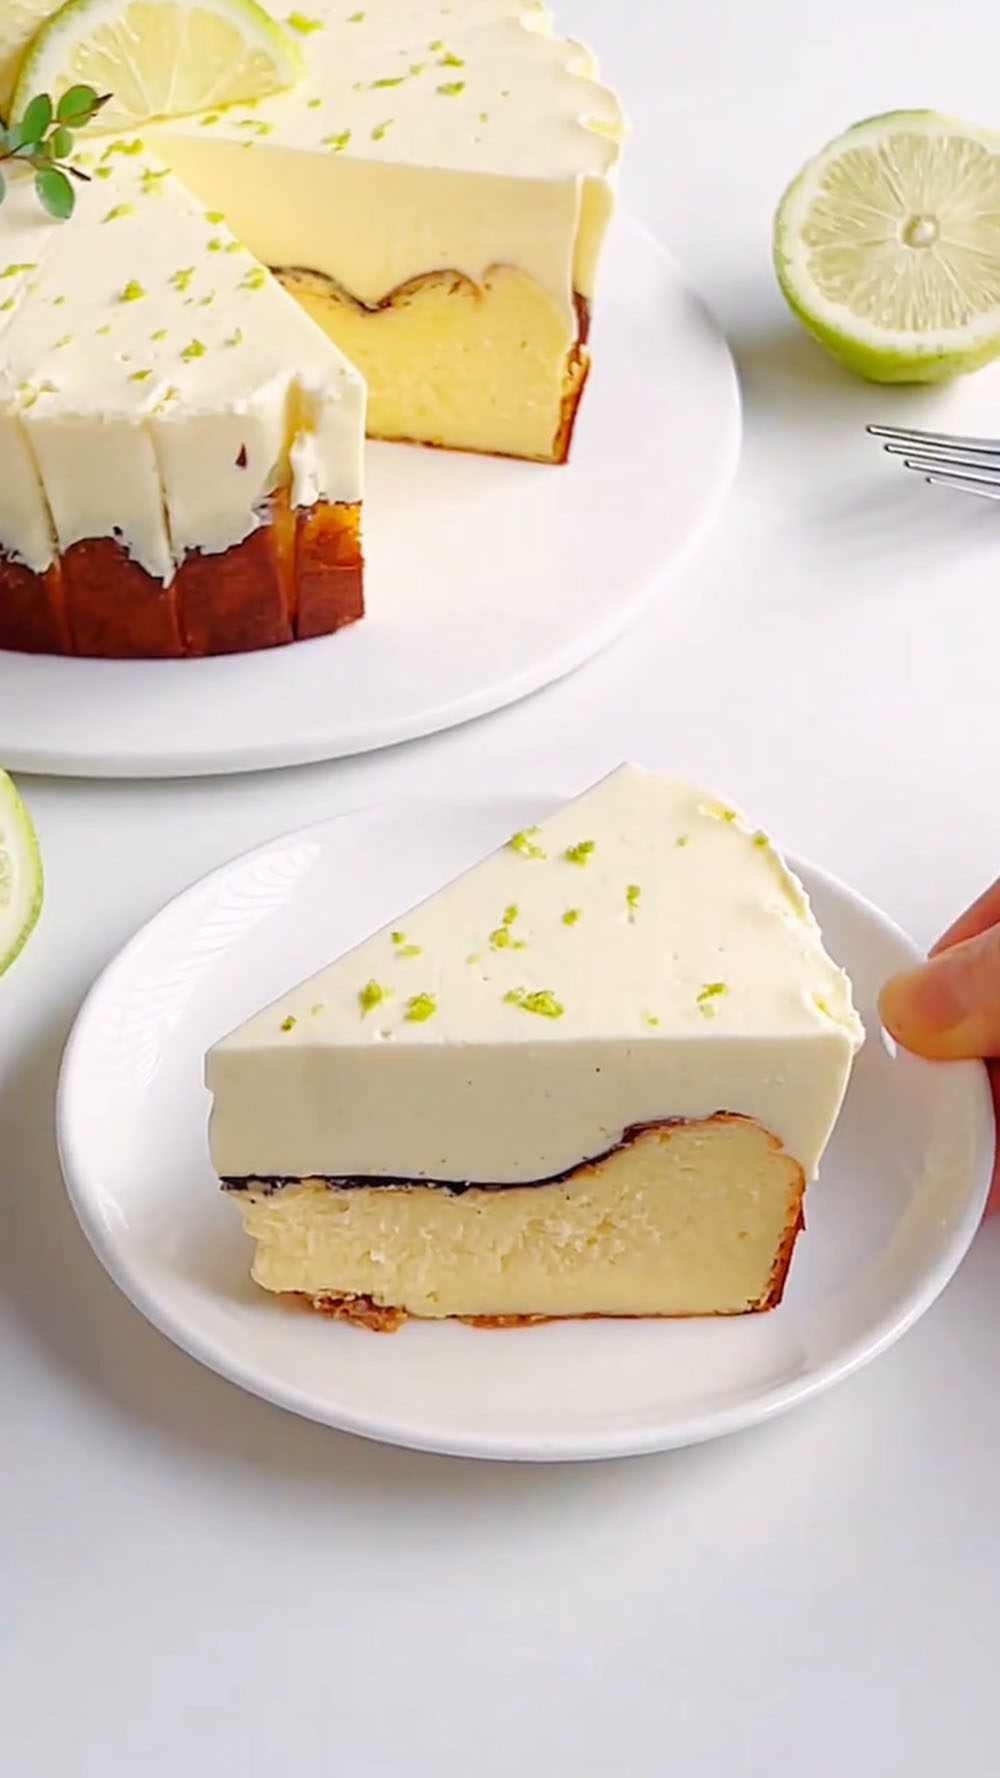
- Using a fine grater or zester, grate the zest of a lime or lemon all over the top of the cake. Arrange a few thin slices of citrus for garnish.
- Slice with a sharp knife dipped in hot water for clean cuts. Serve cold.

Tips & Tricks
- Softened Cream Cheese is Non-Negotiable: This cannot be stressed enough for the blender method. If the cream cheese is even slightly cold, it will leave tiny lumps that the blender can’t fully incorporate, resulting in a grainy texture. Plan ahead.
- Embrace the Wobble: The key to the perfect Basque texture is taking it out of the oven while the center is still very wobbly. It will continue to cook from residual heat and set firmly in the fridge. Overbaking will give you a firm, dry cake.
- Cool the Gelatin Solution Completely: Before adding the dissolved gelatin to the cream cheese, it must be at room temperature. Adding it warm can cause the cream cheese to become runny or prevent the layer from setting properly. Patience is key here.
- Don’t Over-whip the Cream for the Top Layer: Whip the cream only to soft peaks. Over-whipped, stiff cream is difficult to fold in smoothly and can make the top layer dense instead of light and moussey.
- The Sieve is Your Best Friend: Straining the blender batter might seem like an extra step, but it guarantees the silkiest, most professional texture for the baked layer by catching any tiny, stubborn lumps of cornstarch or cream cheese.
Frequently Asked Questions
Can I make this without a blender?
Yes, but it defeats the “lazy” purpose. You would need to use a hand or stand mixer: beat softened cream cheese and sugar first, then add eggs one at a time, then lemon juice, then cream, and finally whisk in cornstarch. The blender method is about ultimate convenience and fewer dishes.
My top layer didn’t set. What happened?
The most likely culprit is the gelatin. It may not have been fully dissolved in the hot milk, or the milk-gelatin mixture was still too warm when added to the cream cheese, which can deactivate the gelatin’s setting power. Ensure it’s fully dissolved and cooled to room temperature before using.
Can I use a different citrus fruit?
Absolutely! This recipe is fantastic with lime (for a sharper tang) or even orange (for a sweeter, milder flavor). Just use the same quantity of fresh juice.
How long does this keep in the fridge?
The assembled cake will keep beautifully, covered, in the refrigerator for 3-4 days. The flavors often improve after a day.
Can I freeze this cheesecake?
You can freeze the baked Basque base layer tightly wrapped for up to a month. Thaw in the fridge before adding the no-bake top layer. I do not recommend freezing the fully assembled cake with the gelatin-set top layer, as it can become grainy upon thawing.
Lazy Lemon Basque Cheesecake (One-Button Blender Recipe)
Ingredients
Lemon Basque Bottom Layer (Blender)
- 250 g full-fat cream cheese completely softened
- 55 g granulated sugar
- 2 large eggs at room temperature
- 10 g fresh lemon juice about ¼ lemon
- 160 g cold whipping cream heavy cream
- 8 g cornstarch
Lemon Cream Cheese Top Layer (No-Bake)
- 110 g full-fat cream cheese softened
- 25 g granulated sugar
- 5 g gelatin sheets or 1 tsp powdered gelatin
- 40 g whole milk
- 180 g cold whipping cream heavy cream
- 8 g fresh lemon juice
Decoration
- 100 ml cold whipping cream whipped with 1 tbsp sugar (optional)
- 1 lime or lemon for zesting and slices
Instructions
Part 1: Make the Blender Basque Base
- Prep: Preheat your oven to 210°C (410°F). Line a 6-inch round springform or cake pan with parchment paper, pressing it to fit the sides.
- Blend Everything: Place the completely softened 250g of cream cheese, 55g sugar, 2 eggs, 10g lemon juice, 160g whipping cream, and 8g cornstarch into the jar of your blender.
- Puree: Secure the lid. Blend on medium-high speed for 30 seconds to 1 minute. Stop and scrape down the sides once if needed, then blend for another 15-20 seconds until the mixture is utterly smooth, homogenous, and free of any cream cheese lumps.
- Strain & Bake: Pour the batter through a fine-mesh sieve into the prepared pan. This catches any last tiny lumps for an ultra-smooth texture. Gently tap the pan on the counter to release air bubbles.
- Bake: Place the pan on the middle rack of the hot oven. Bake for 25 minutes. The top will be deeply golden brown and puffed, the edges will be set, but the center will still have a pronounced, jiggly wobble when you gently shake the pan. This is perfect.
- Cool: Remove from the oven and let the cake cool completely on a wire rack to room temperature. It will deflate and crack—this is normal and part of its rustic charm.
Part 2: Make the No-Bake Lemon Top Layer
- Prep Gelatin: If using gelatin sheets, soak them in a bowl of ice water for 5-10 minutes until soft and floppy. Squeeze out all excess water. If using powdered gelatin, sprinkle it evenly over 2 tablespoons of cold water in a small dish and let it sit for 5 minutes to bloom.
- Heat Milk & Dissolve Gelatin: Warm the 40g of milk until hot but not boiling (about 30 seconds in the microwave). Add the softened gelatin (squeezed sheets or bloomed powder) and stir until it is completely, utterly dissolved with no grains. Set aside to cool to room temperature.
- Mix Cream Cheese Base: In a medium bowl, beat the softened 110g of cream cheese with the 25g of sugar until smooth and creamy.
- Add Gelatin, Lemon & whipping cream : Once the gelatin-milk mixture is at room temperature (test a drop on your wrist—it should feel neutral, not warm), pour it into the cream cheese mixture and mix well. Add the whipping cream and lemon juice, then gently fold until smooth and uniform.
Part 3: Assemble & Chill
- Pour: Once the baked Basque base is completely cool, pour the lemon cream cheese mousse over the top. Gently shake the pan or use an offset spatula to smooth the top into an even layer.
- Chill: Carefully transfer the cake to the refrigerator. Chill for at least 4 hours, but preferably overnight, to allow the top layer to set completely.
Part 4: Decorate & Serve
- Once fully set, remove the cake from the pan. If desired, whip the optional 100ml of cream with sugar to stiff peaks and pipe rosettes or dollops around the edge.
- Using a fine grater or zester, grate the zest of a lime or lemon all over the top of the cake. Arrange a few thin slices of citrus for garnish.
- Slice with a sharp knife dipped in hot water for clean cuts. Serve cold.
Leave a Reply