
These mini strawberry towel rolls are my latest obsession — and honestly, they might become yours too.
Inspired by classic strawberry crepe rolls, these little beauties are exactly what they sound like: soft, delicate red velvet crepes wrapped around fluffy whipped cream and fresh strawberries, all rolled up into adorable one-bite bundles.
I have a few more crepe roll cakes on my blog — Matcha Crepe Roll, Mango Crepe Roll, Chocolate Crepe Roll — so I can say with confidence that I have experience making crepe rolls.
The moment these came out of my little mini electric pan, I was truly amazed. My daughter saw them and literally exclaimed, “They’re so beautiful!” And honestly? She wasn’t wrong.
The best part? You don’t need an oven, a steamer, or any special equipment.
I use a small mini electric pan, but you can use a regular non-stick frying pan.

Why You’ll Love This Recipe
- No oven, no steamer, no baking — You don’t need any special equipment. A simple non-stick pan (or mini electric pan) is all it takes.
- One-bite, popable size — These mini towel rolls are small, adorable, and absolutely perfect for parties, tea time, or grazing platters. No cutting, no mess — just grab and enjoy.
- Soft, chewy, translucent crepes — The red velvet crepe wrappers are incredibly tender and slightly translucent, with a beautiful soft red-pink color that looks stunning.
- Light, refreshing, not too sweet — The whipped cream is lightly sweetened, the strawberries add natural tartness and freshness, and the crepe itself isn’t heavy. It’s the perfect balance.
- Quick and beginner-friendly — The batter comes together in minutes, each crepe cooks quickly, and the rolling technique is simple enough for first-timers.
- Stunning presentation — Between the red velvet color, the fluffy cream, and the bright strawberry tops, these little rolls look like they came from a fancy patisserie. But you made them at home!
Ingredients and Substitutions
For the Crepe Wrappers
- Eggs — Eggs provide structure and richness to the crepe batter. Use large eggs at room temperature for the best results.
- White sugar — Just a small amount (15g) adds a touch of sweetness to the crepes without making them dessert-sweet on their own.
- Cake flour — Cake flour has a lower protein content than all-purpose flour, which results in softer, more tender crepes. If you don’t have cake flour, you can make a substitute: measure out 100g of all-purpose flour, remove 2 tablespoons, and replace with 2 tablespoons of cornstarch, then sift well. Do not skip sifting — it’s essential for lump-free batter.
- Red velvet liquid (optional) — This is a concentrated liquid food coloring that gives the crepes that beautiful soft red-pink color. It’s completely optional — without it, your crepes will be a pale golden-brown (still delicious, just not red). If you don’t have red velvet liquid, you can use regular red food coloring (just 1-2 drops) or even a teaspoon of beetroot powder for a natural alternative. I recommend using it because the color is part of what makes these towel rolls so special.
- Milk — Whole milk is best for rich, tender crepes, but 2% works just fine.
- Corn oil — A neutral oil with no strong flavor. Corn oil keeps the crepes soft and flexible even after refrigeration (which is crucial for rolling).
For the Cream Filling
- Heavy cream — This is what gives you that light, fluffy, cloud-like cream filling. Heavy cream (36%+ milk fat) whips up beautifully and holds its shape. You can use whipping cream (30-36% fat) as well, but the cream will be slightly less stable. Keep your cream very cold until the moment you whip it — this is essential for success.
- White sugar — Just 12g of sugar sweetens the cream lightly without making it cloying.
For Filling & Decoration
- Fresh strawberry pieces — Fresh strawberries are non-negotiable here. Their bright, juicy, slightly tart flavor cuts through the richness of the cream perfectly. Dice them into small, uniform pieces so they distribute evenly when you roll. Avoid frozen strawberries — they release too much water and will make your crepes soggy.
How to Make Mini Strawberry Towel Rolls
Make the Crepe Batter
In a medium mixing bowl, crack 2 eggs and add 15g white sugar. Whisk vigorously until the eggs are broken up and the sugar has mostly dissolved.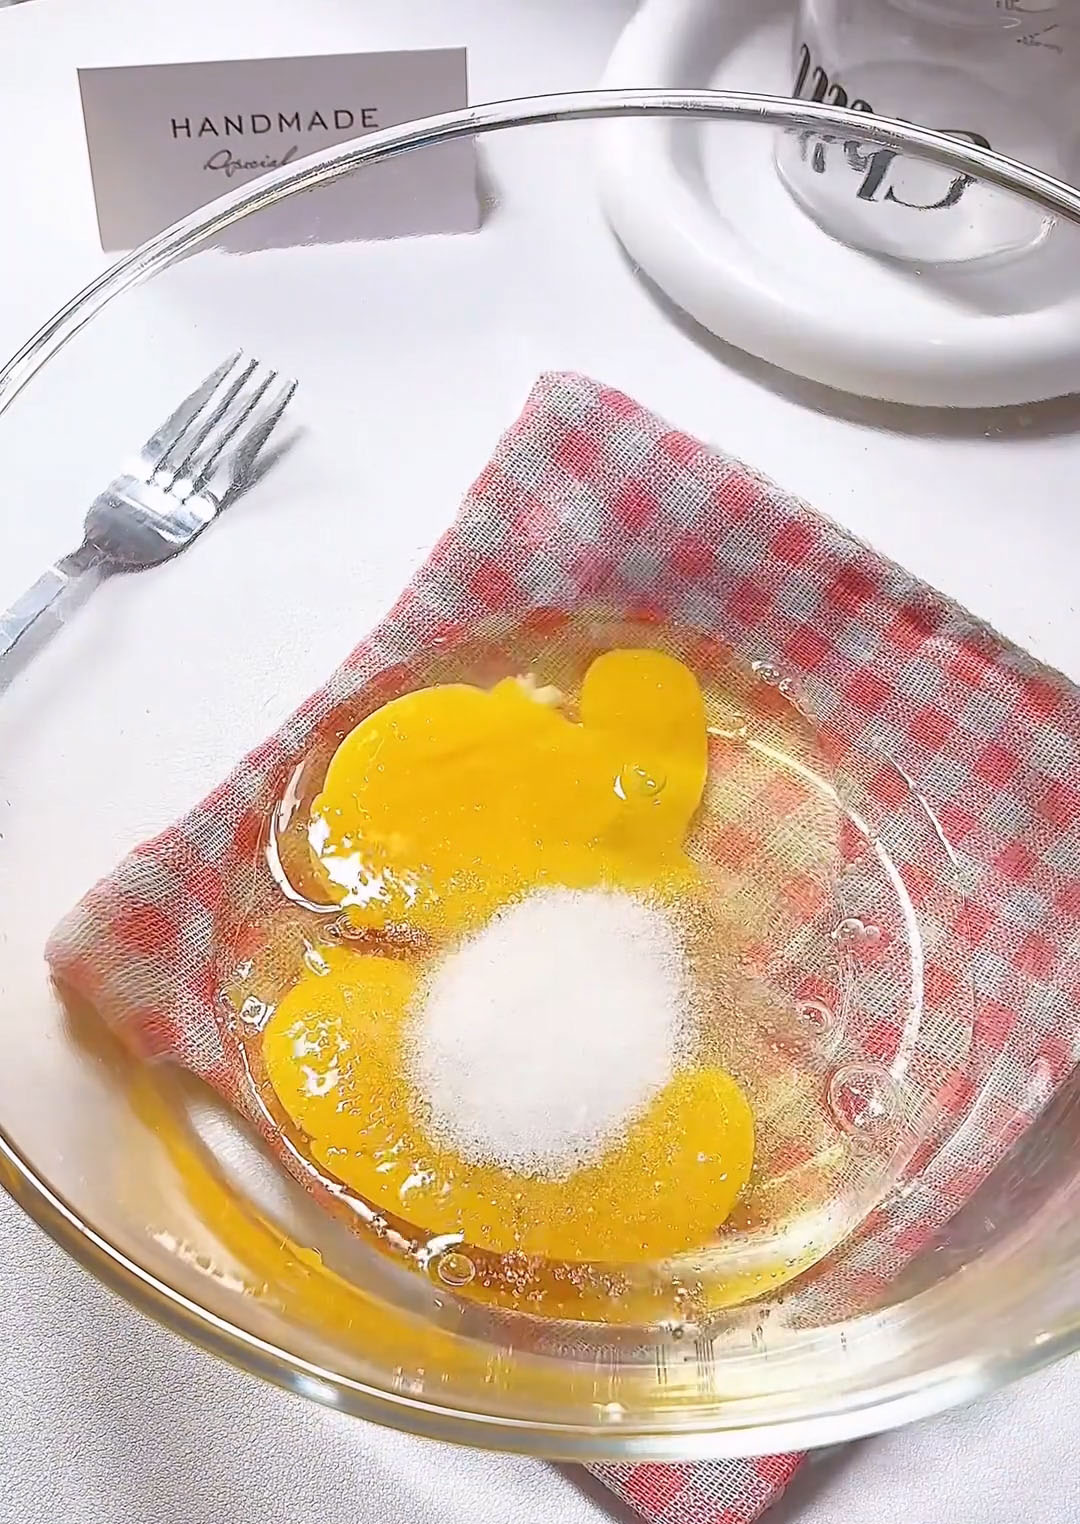
Sift 100g cake flour directly into the bowl with the egg mixture. Sifting is not optional here. Whisk until just combined; a few small lumps are fine at this stage.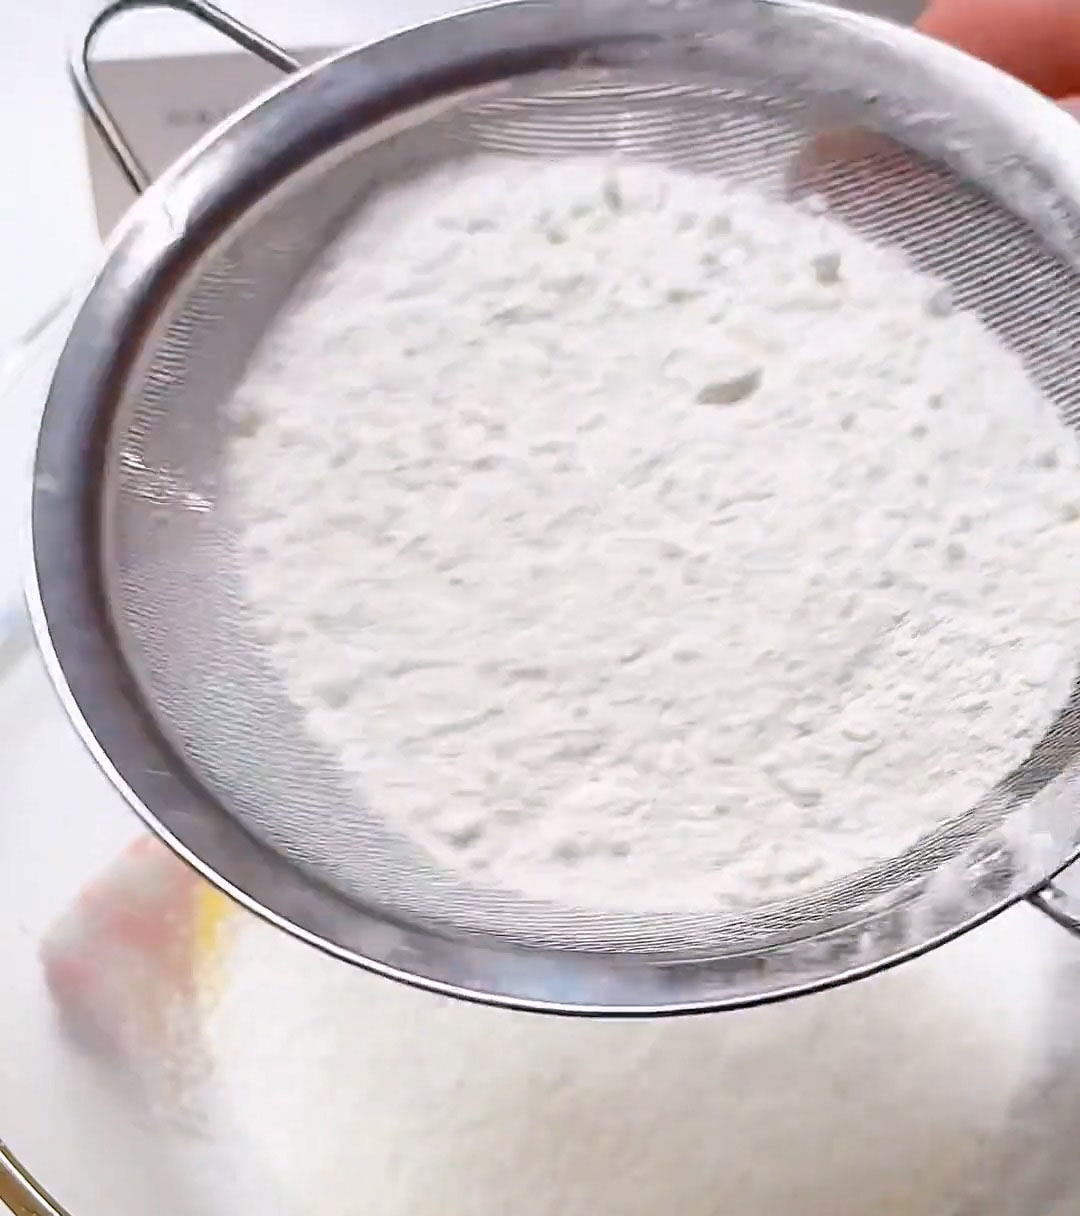
Add 2 drops of red velvet liquid (if using) and whisk. The color should be a soft pink-red — you can add one more drop if you want a deeper color, but go slowly. A little goes a long way.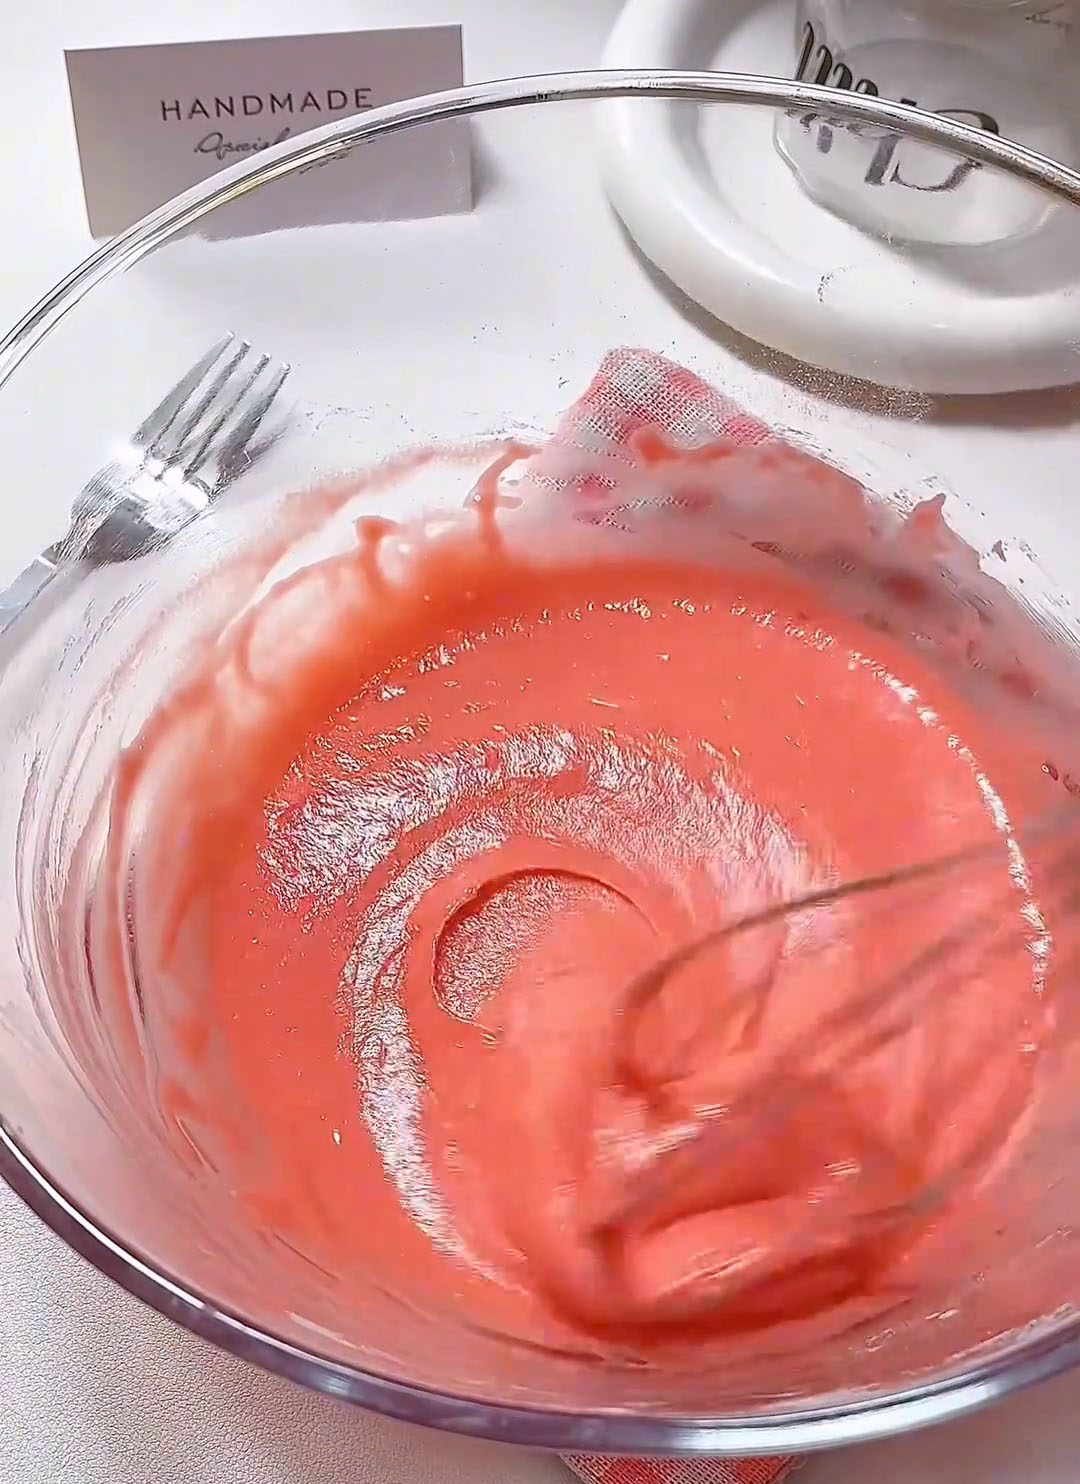
Pour in 180g milk and 30g corn oil. Whisk until the batter is smooth and homogeneous. The batter should be thin and pourable, similar to heavy cream.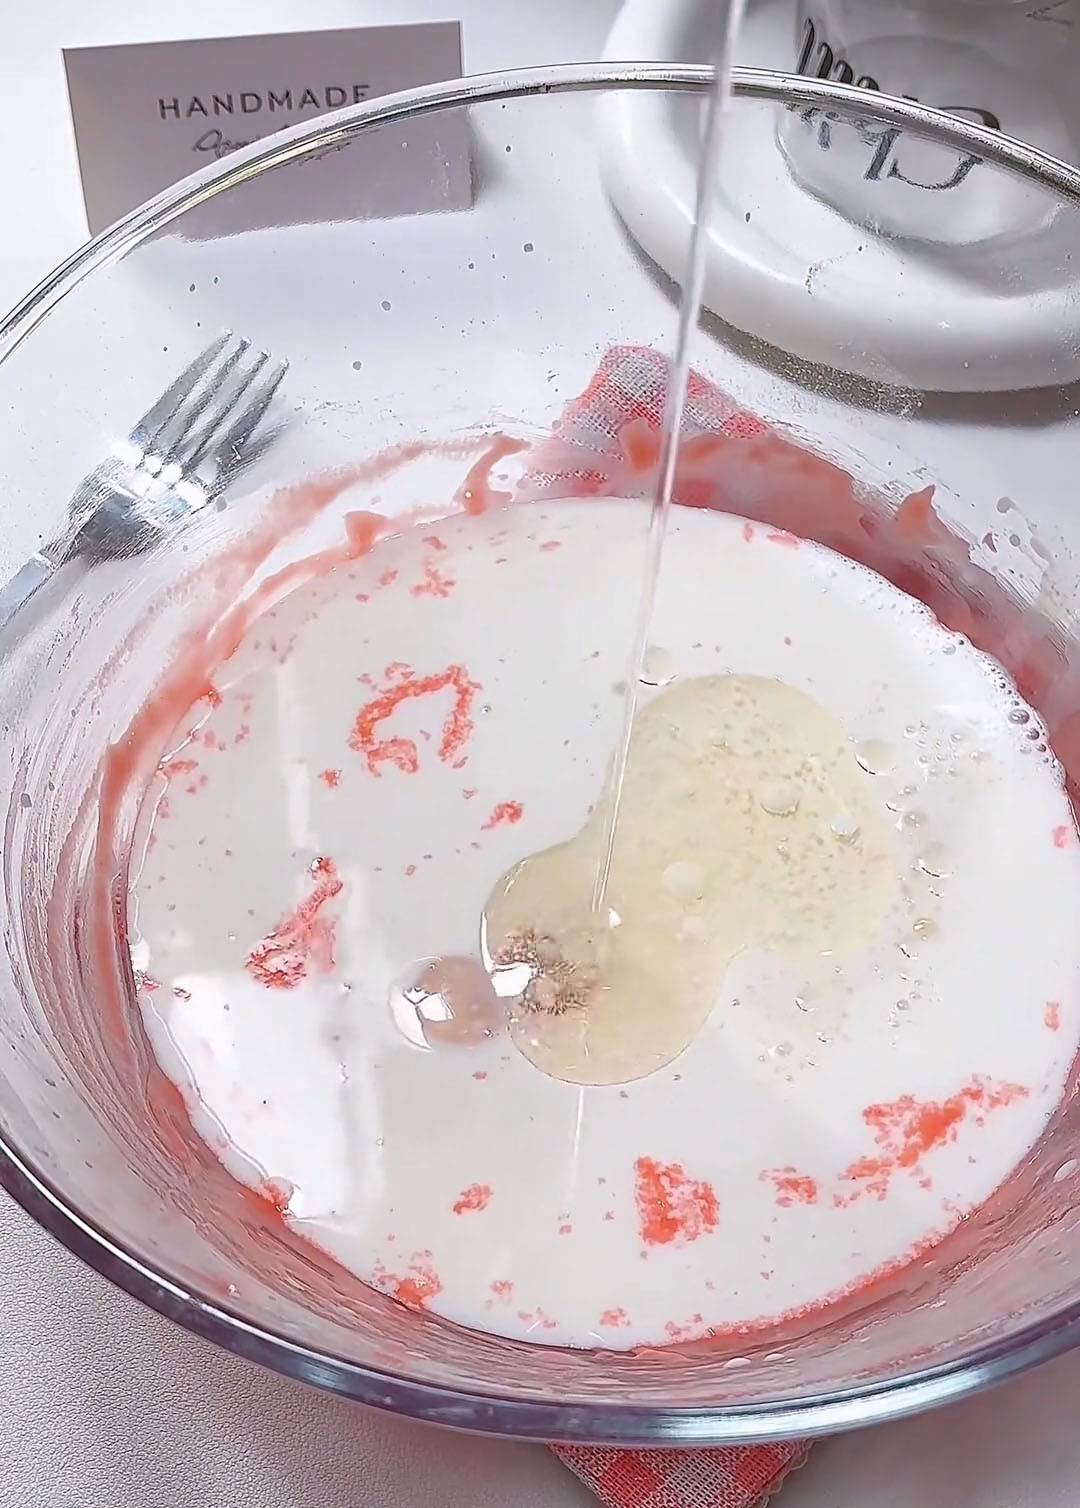
Strain the batter through a fine-mesh sieve once. This is a critical step. Even if your batter looks smooth, there will be tiny lumps of flour or bits of egg that will ruin the texture of your crepes. Straining guarantees silky, lump-free, professional-quality crepes. Use the back of a spoon or a spatula to push the batter through the sieve. Discard any solids left behind.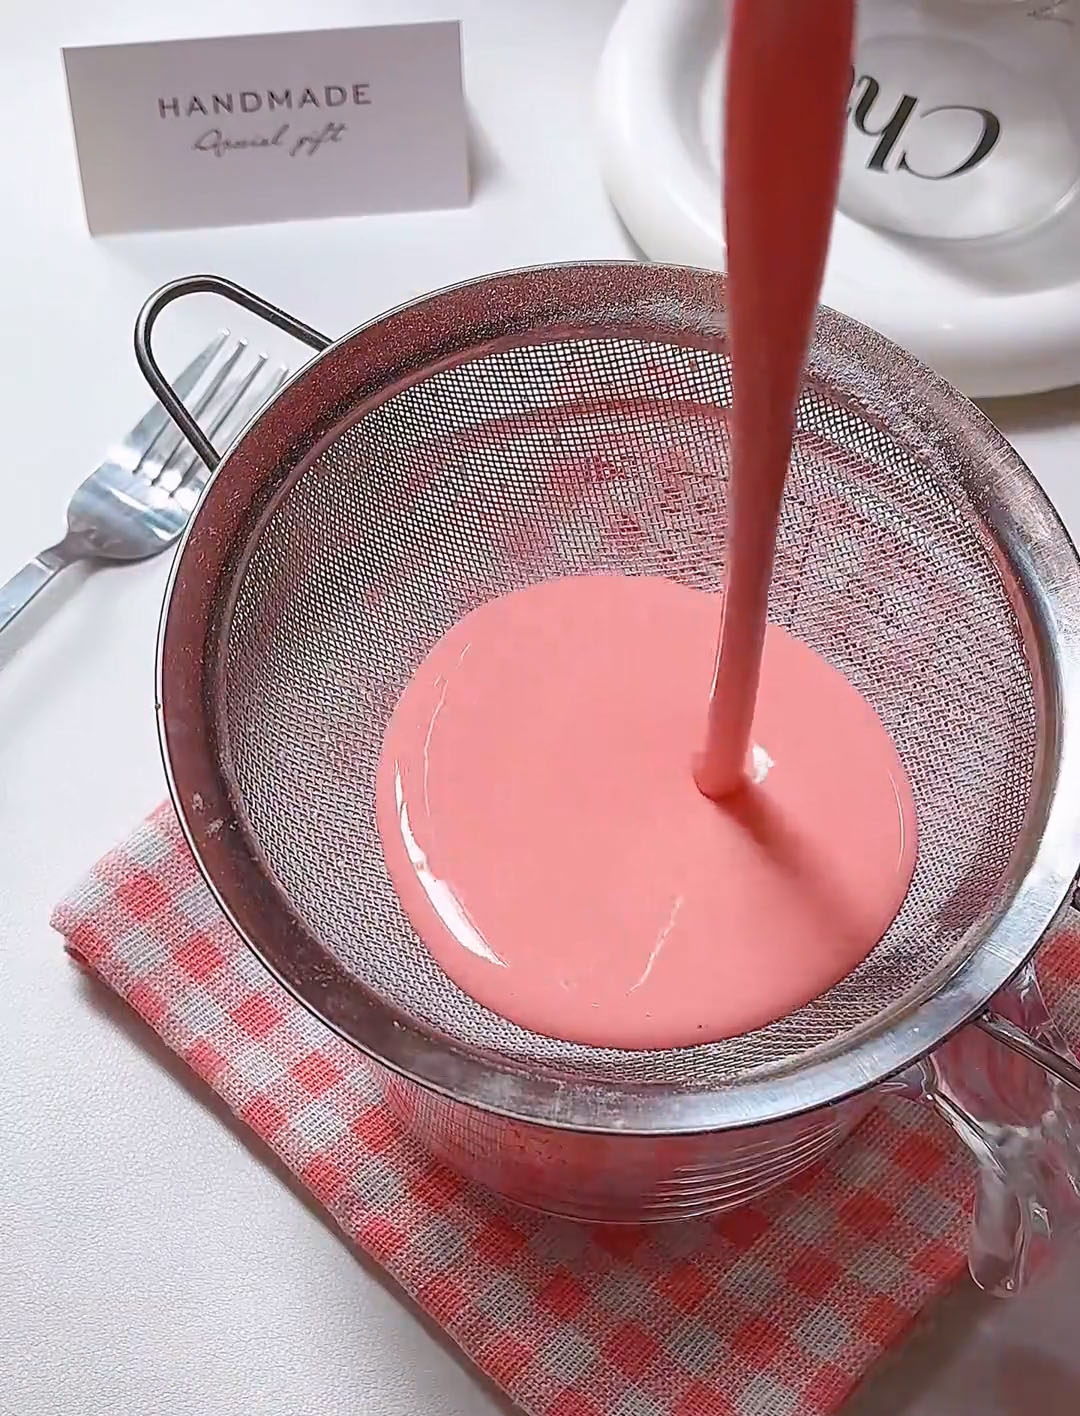
Cook the Crepes
Heat your mini electric pan (or a small non-stick frying pan) over low heat. You want the pan warm but not screaming hot — if a drop of water sizzles aggressively and evaporates immediately, it’s too hot.
Pour a small amount of batter into the center of the pan — about 2-3 tablespoons, depending on the size of your pan. Immediately tilt and swirl the pan in a circular motion so the batter spreads into a thin, even layer covering the entire bottom. Work quickly — the batter will start to set as soon as it hits the heat.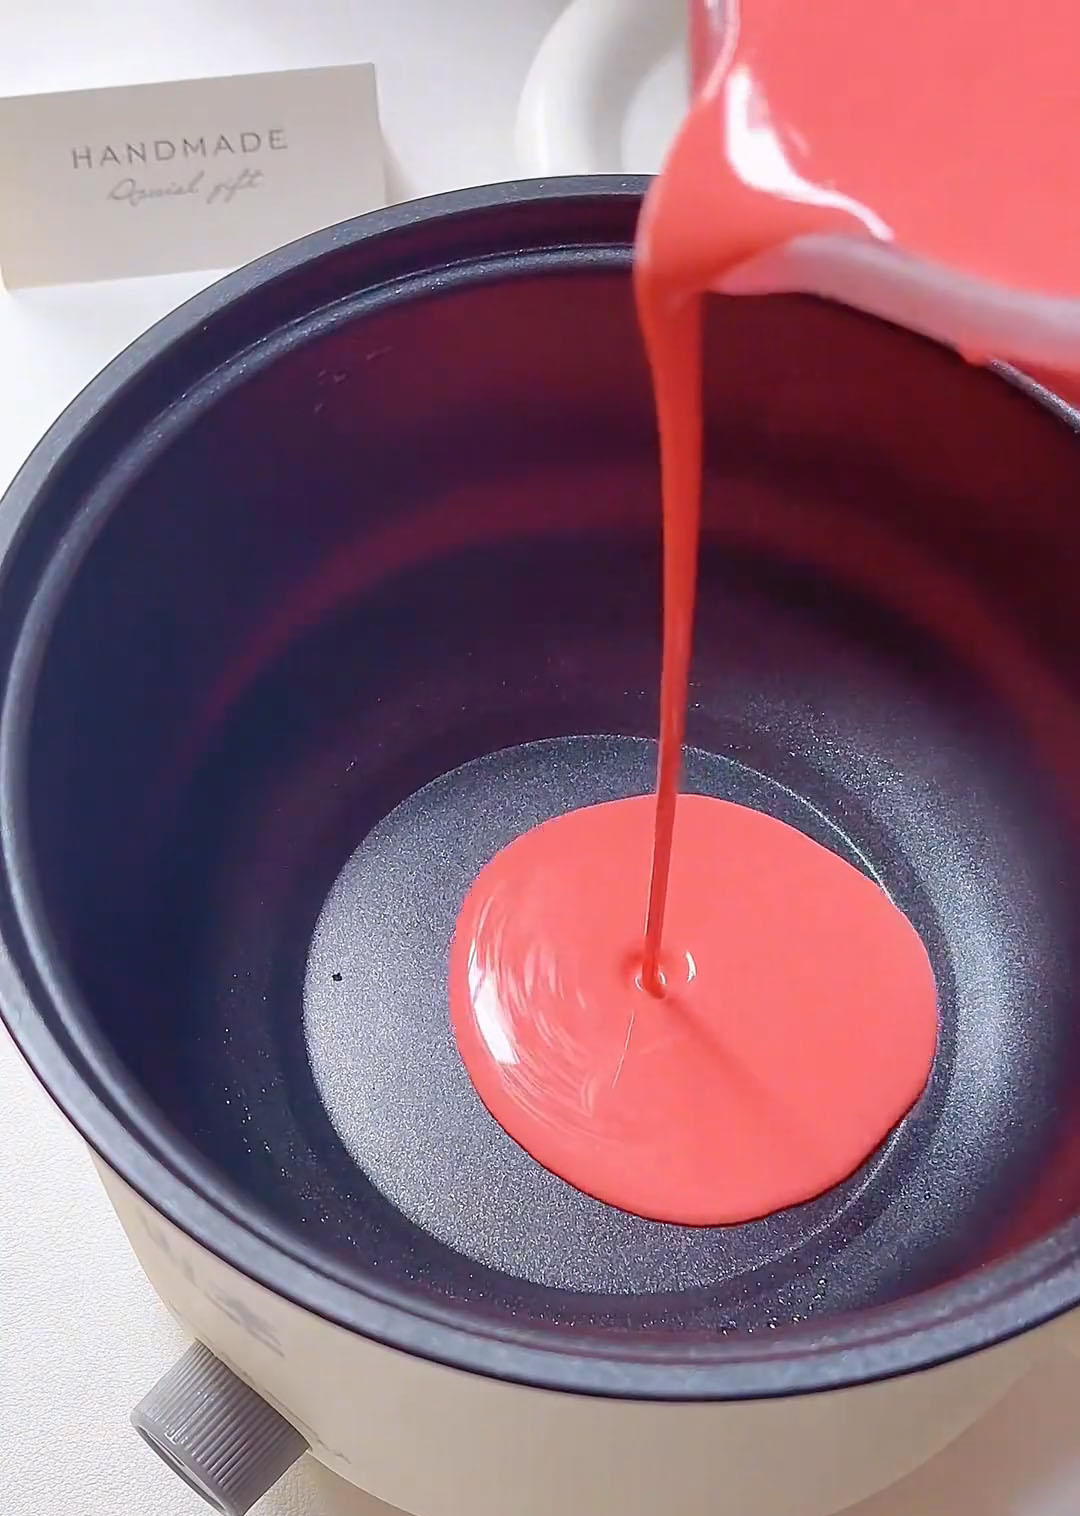
Cook over low heat until the surface forms bubbles and is fully set.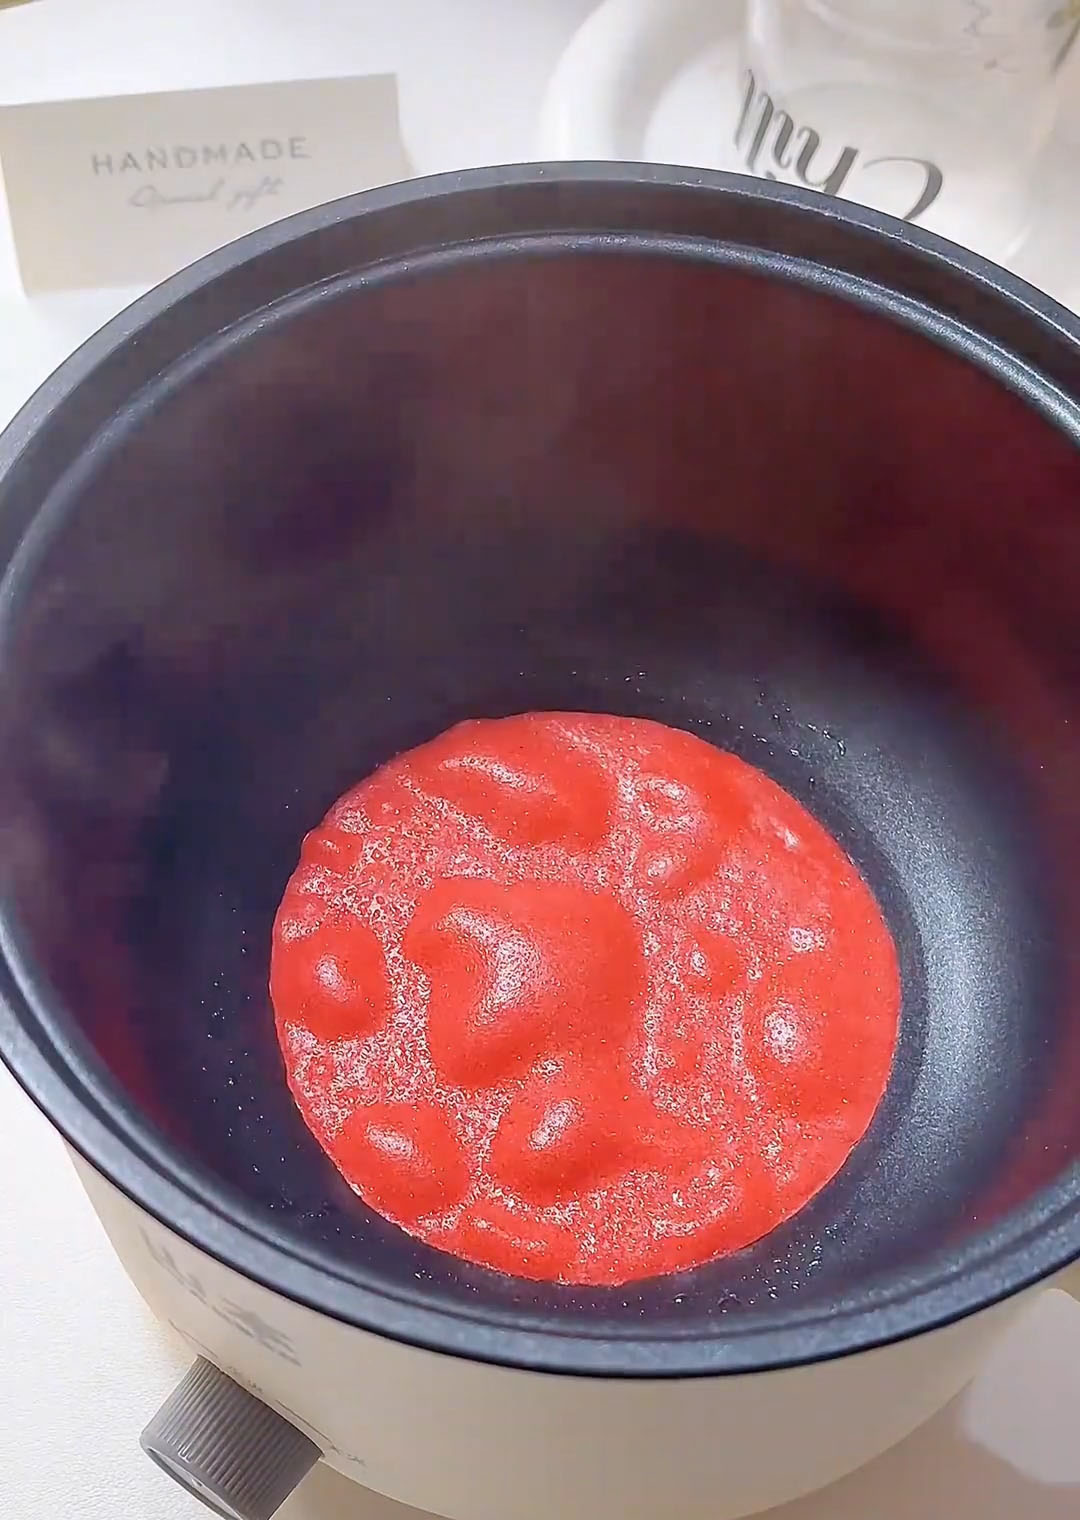
Transfer the cooked crepe to a wire rack or a large plate to cool completely. Repeat with the remaining batter. Stack the crepes slightly offset so they don’t stick together. You should get about 8-10 mini crepes depending on the size of your pan.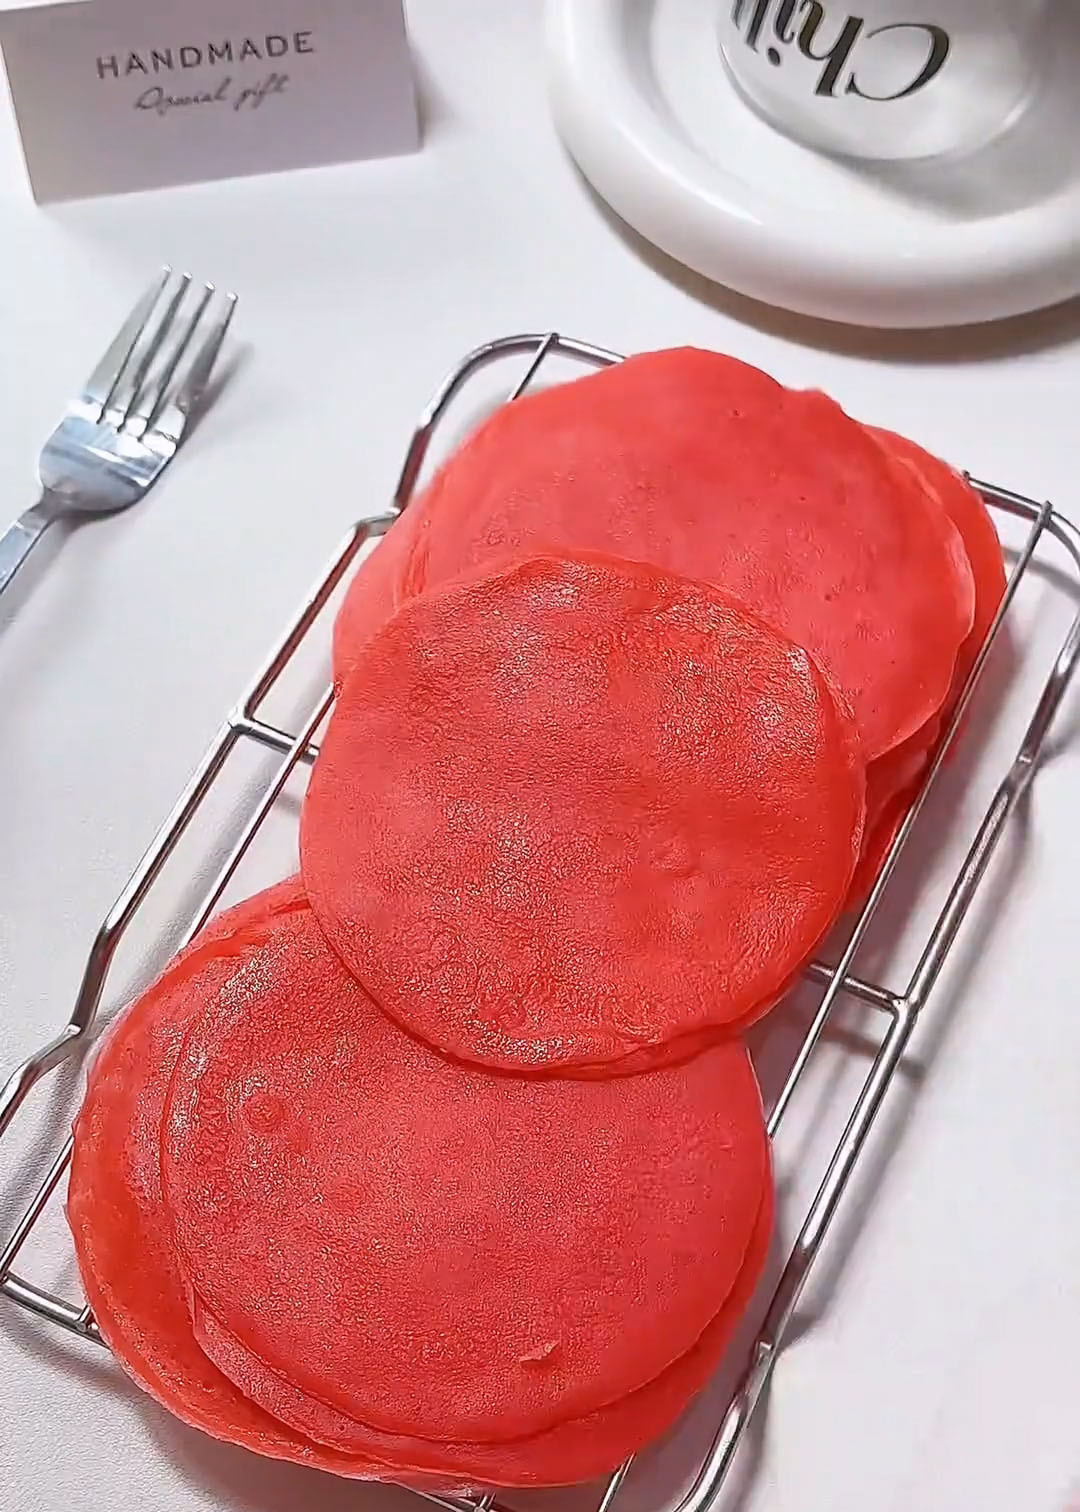
Important: Let every single crepe cool completely before you add any cream. Warm crepes will melt the whipped cream instantly, leaving you with a sad, soupy mess. Be patient — this makes all the difference.
Whip the Cream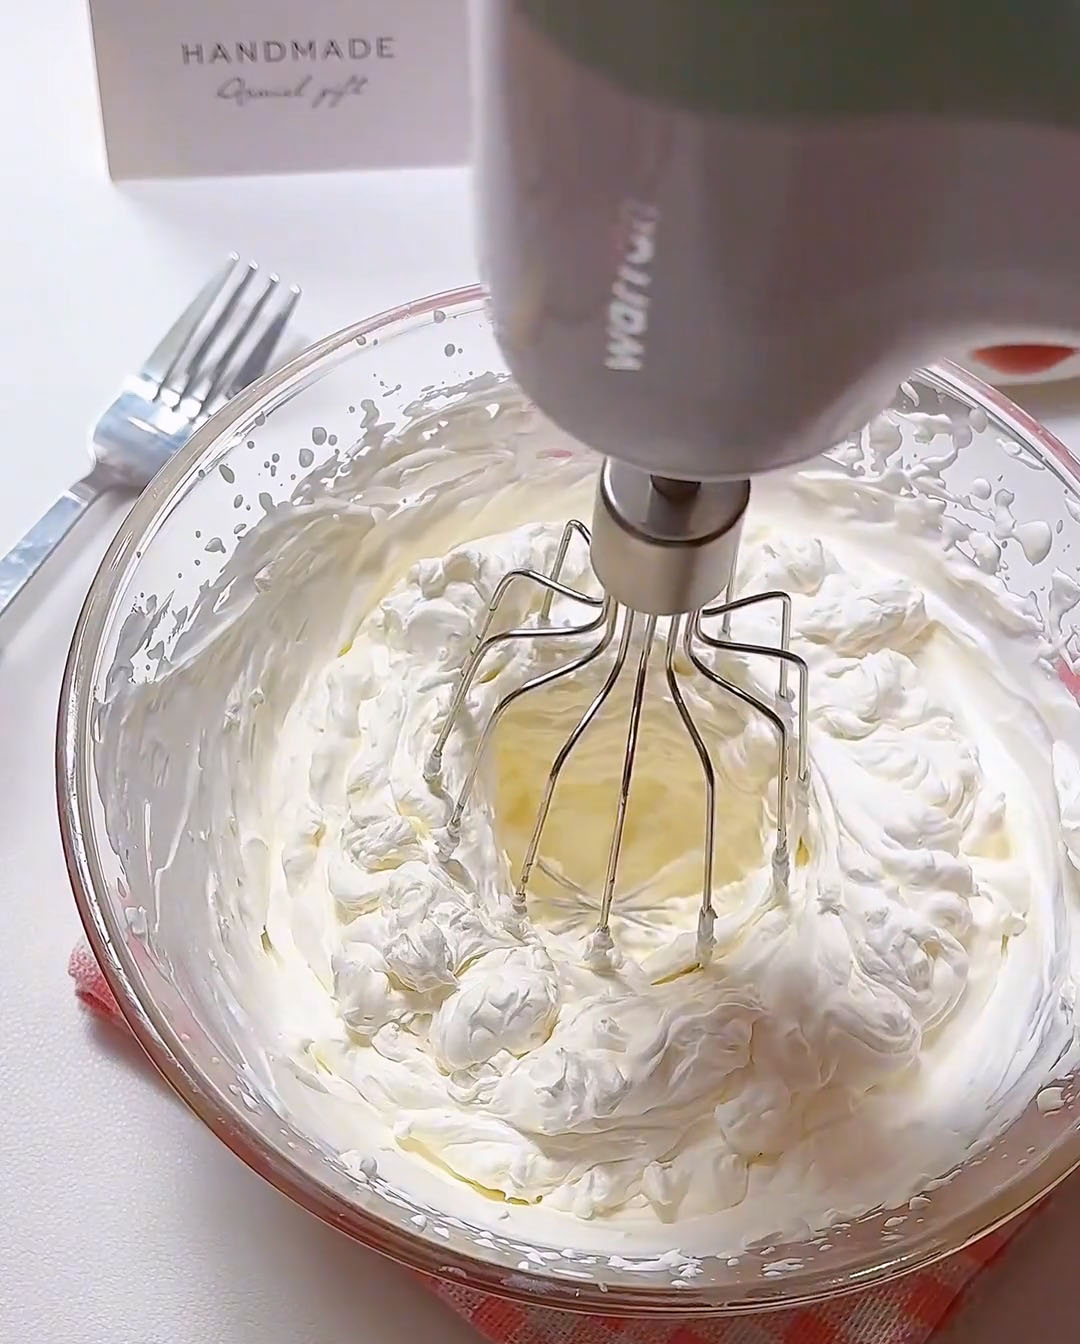
While your crepes are cooling, make the cream filling. In a chilled mixing bowl (pop it in the freezer for 5-10 minutes if you can), combine 200g cold heavy cream and 12g white sugar.
Using an electric hand mixer fitted with a whisk attachment, whip the cream on medium speed. Start slow to avoid splashing, then increase to medium-high. Whip until the cream reaches a thick, yogurt-like consistency — it should hold soft peaks, be smooth and billowy, and be thick enough to pipe but not so stiff that it’s grainy or dry. This usually takes 1-2 minutes.
Transfer the whipped cream to a piping bag fitted with a round tip (or just snip the tip off a disposable piping bag). Set aside in the refrigerator while you prepare the strawberries.
Prepare the Strawberries
Wash and pat dry fresh strawberries. Remove the green tops and dice the strawberries into small, uniform pieces — about the size of small peas. You want them small enough to distribute evenly when you roll, but large enough to provide a noticeable burst of fresh fruit flavor.
Assemble the Towel Rolls
Take one completely cooled crepe and place it on a clean work surface with the prettiest side facing down (the side that was against the pan will have a nicer pattern).
Fold the crepe in half gently. You should now have a half-circle or half-moon shape.
Pipe a line of whipped cream along the straight edge of the folded crepe, leaving a small border at the ends.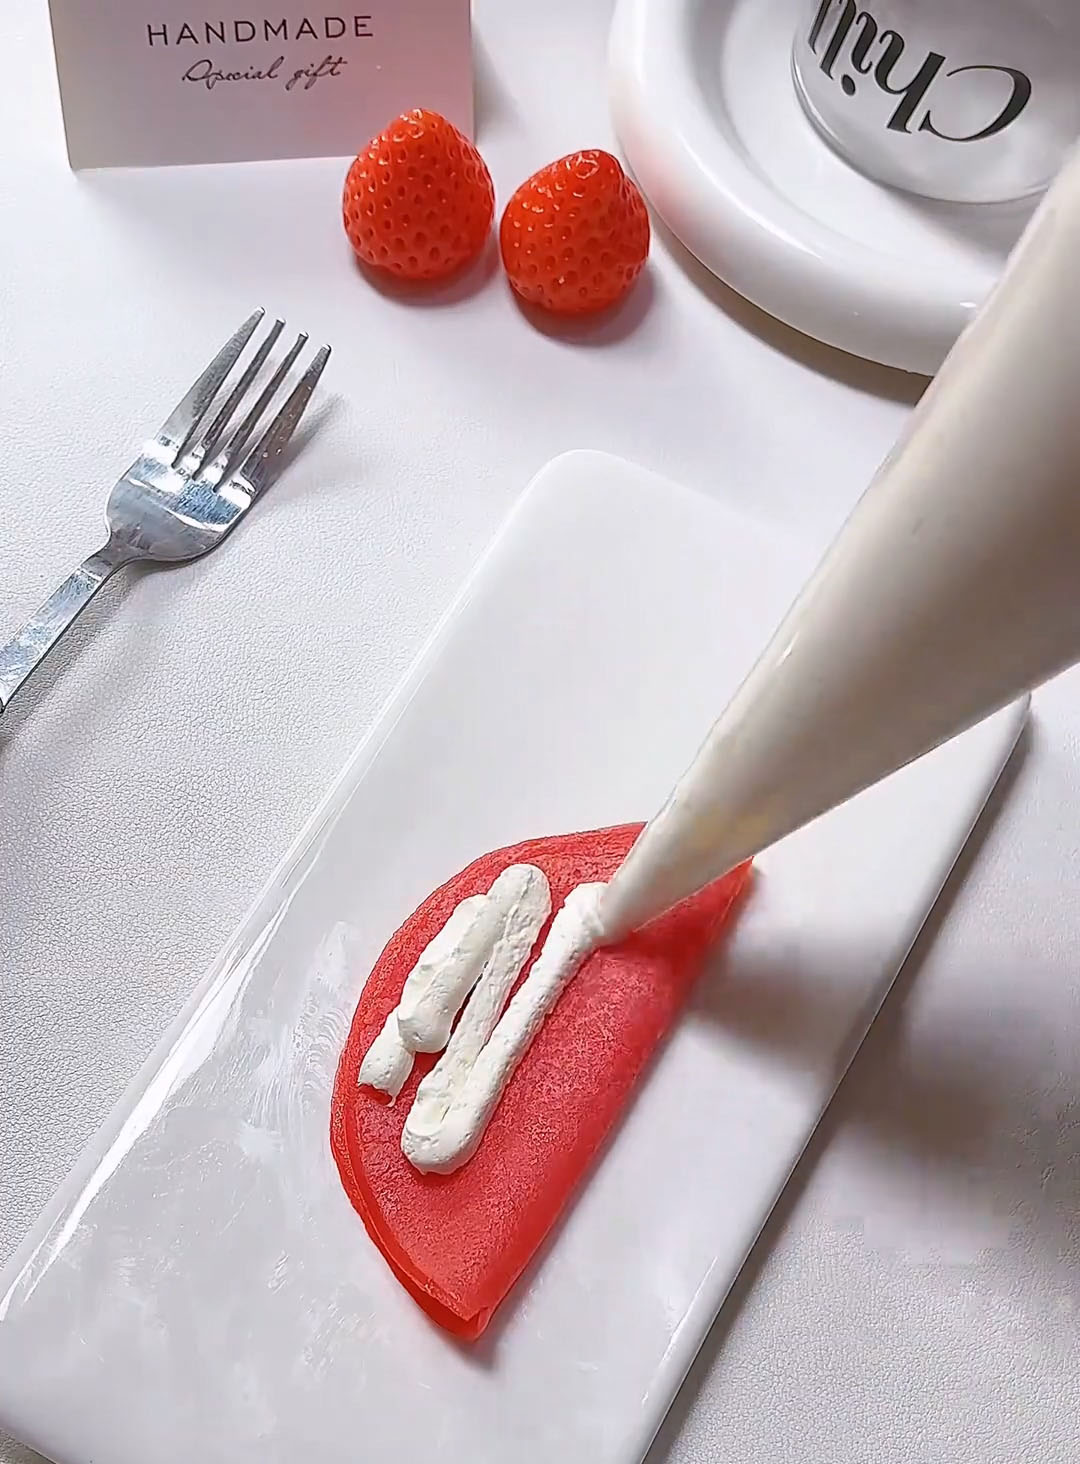
Use a small offset spatula or the back of a spoon to spread the cream into an even, thin layer across the entire surface of the folded crepe. Don’t overload it — too much cream will squeeze out when you roll.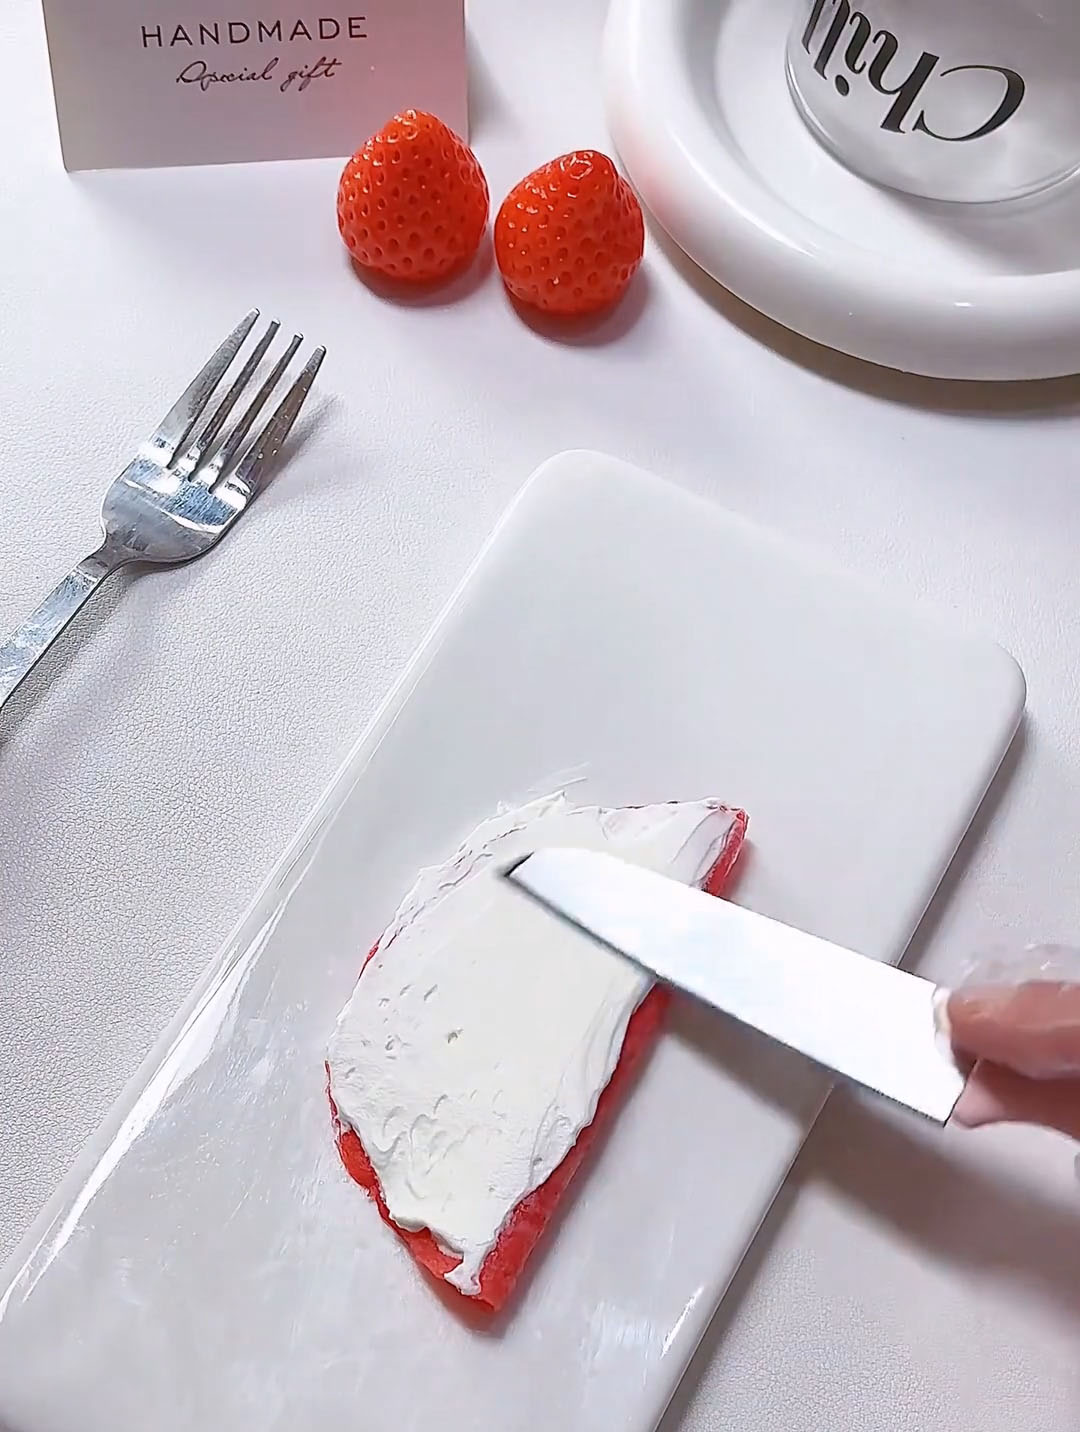
Gently roll the crepe up into a tight cylinder. Roll slowly and steadily, using your fingers to keep the filling tucked in.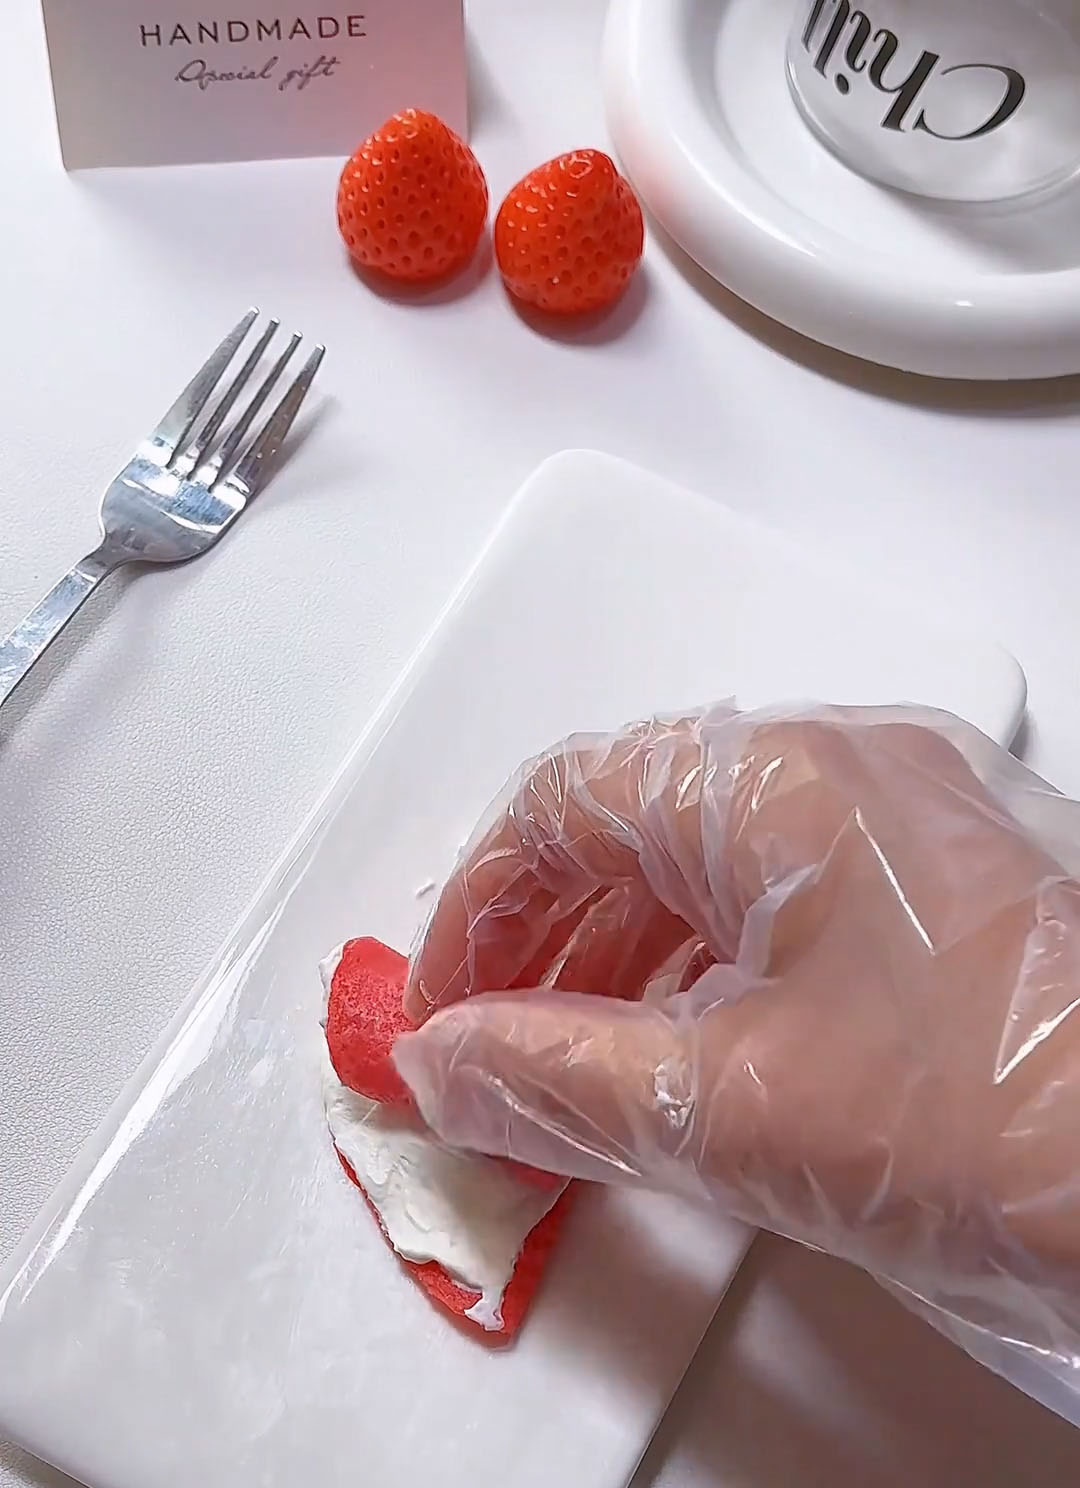
Place the finished towel roll seam-side down on your serving plate. Repeat with the remaining crepes and filling.
Decorate
Pipe a small dollop of cream on top of the mini towel rolls.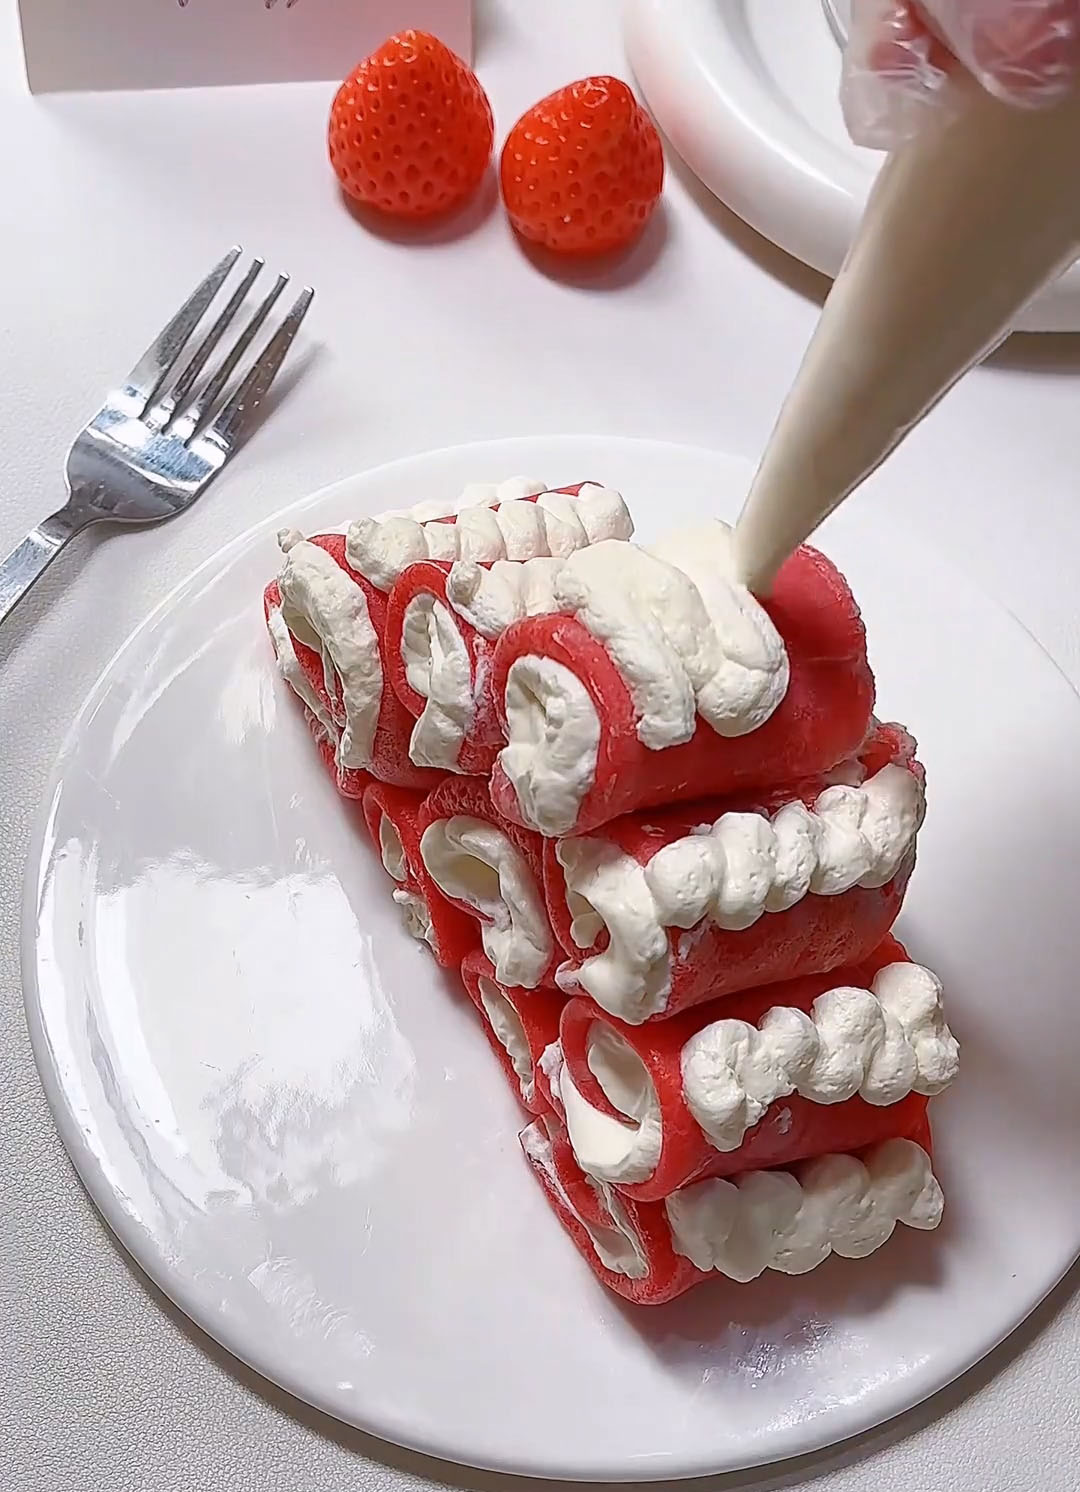
Top each cream dollop with a small strawberry piece — a slice, a small dice, or even a tiny whole strawberry half if your strawberries are small.
Frequently Asked Questions
Can I use all-purpose flour instead of cake flour?
Yes, but the crepes will be slightly less tender. If you only have all-purpose flour, measure out 100g, remove 2 tablespoons of flour, and replace with 2 tablespoons of cornstarch. Sift everything together well. This homemade “cake flour” substitute works beautifully.
Do I have to use red velvet liquid?
No, it’s completely optional. Without it, your crepes will be a pale golden-brown color — they’ll still taste delicious and have the same texture. The red color is purely for visual appeal. If you want a natural alternative, you can use 1 teaspoon of beetroot powder mixed with a tablespoon of warm water, or 1-2 drops of regular red food coloring.
Can I use a regular large frying pan instead of a mini electric pan?
Absolutely. Just be aware that your crepes will be larger, so you’ll get fewer rolls (maybe 4-5 instead of 8-10). Use a small non-stick pan if you have one — 8 inches is ideal. If you only have a 10 or 12-inch pan, you can still make this work; just pour a smaller amount of batter and swirl quickly to keep the crepe thin.
Can I make the crepes ahead of time?
Yes! You can cook the crepes up to 1 day in advance. Stack them with parchment paper between each crepe, wrap tightly in plastic wrap, and store in the refrigerator. Let them come to room temperature (or briefly warm them in the pan for a few seconds) before assembling — cold crepes are less flexible and can crack when you roll them.
Why are my crepes cracking when I roll them?
This usually happens for one of two reasons: the crepes are too thick (you didn’t swirl the batter thin enough) or the crepes are too cold. Crepes are most flexible when they’re at room temperature. If yours crack, try letting them warm up for 10 minutes before rolling. Also make sure you’re cooking them just until set — overcooked crepes become brittle.
Can I use frozen strawberries?
I don’t recommend it. Frozen strawberries release a lot of water as they thaw, which will make your crepes soggy and your cream watery. Fresh strawberries are worth the investment here — they’re the star of the filling.
Can I use a different fruit instead of strawberries?
Absolutely. This recipe works beautifully with diced mango, raspberries (fresh, not frozen), sliced bananas, or even diced kiwi. Just make sure the fruit is ripe but not mushy, and cut it into small, uniform pieces. If using very juicy fruit like raspberries, be gentle when rolling so they don’t burst.
Why did my cream turn out runny?
Runny cream usually means one of three things: your cream wasn’t cold enough when you whipped it, you didn’t whip it long enough, or you used a low-fat cream (half-and-half or light cream will never whip properly). Make sure you’re using heavy cream or whipping cream with at least 30% milk fat, and keep everything very cold.
How do I keep the towel rolls from unrolling?
Place them seam-side down on your serving plate. The weight of the roll will keep the seam pressed against the plate. If they still want to unroll, you can secure them with a toothpick through the center (remove before serving) or refrigerate them for 30 minutes to let the cream firm up and “glue” the roll together.

Mini Strawberry Crepe Roll Recipe (Beginner Friendly!)
Ingredients
Crepe Wrappers
- 2 large eggs
- 15 g white sugar
- 100 g cake flour
- 2 drops red velvet liquid optional
- 180 g milk
- 30 g corn oil
Cream Filling
- 200 g heavy cream
- 12 g white sugar
- Filling & Decoration
- fresh strawberry pieces as needed
Instructions
Make the Crepe Batter
- In a medium mixing bowl, crack 2 eggs and add 15g white sugar. Whisk vigorously until the eggs are broken up and the sugar has mostly dissolved.
- Sift 100g cake flour directly into the bowl with the egg mixture. Sifting is not optional here. Whisk until just combined; a few small lumps are fine at this stage.
- Add 2 drops of red velvet liquid (if using) and whisk. The color should be a soft pink-red — you can add one more drop if you want a deeper color, but go slowly. A little goes a long way.
- Pour in 180g milk and 30g corn oil. Whisk until the batter is smooth and homogeneous. The batter should be thin and pourable, similar to heavy cream.
- Strain the batter through a fine-mesh sieve once. This is a critical step. Even if your batter looks smooth, there will be tiny lumps of flour or bits of egg that will ruin the texture of your crepes. Straining guarantees silky, lump-free, professional-quality crepes. Use the back of a spoon or a spatula to push the batter through the sieve. Discard any solids left behind.
Cook the Crepes
- Heat your mini electric pan (or a small non-stick frying pan) over low heat. You want the pan warm but not screaming hot — if a drop of water sizzles aggressively and evaporates immediately, it's too hot.
- Pour a small amount of batter into the center of the pan — about 2-3 tablespoons, depending on the size of your pan. Immediately tilt and swirl the pan in a circular motion so the batter spreads into a thin, even layer covering the entire bottom. Work quickly — the batter will start to set as soon as it hits the heat.
- Cook over low heat until the surface forms bubbles and is fully set.
- Transfer the cooked crepe to a wire rack or a large plate to cool completely. Repeat with the remaining batter. Stack the crepes slightly offset so they don't stick together. You should get about 8-10 mini crepes depending on the size of your pan.
- Important: Let every single crepe cool completely before you add any cream. Warm crepes will melt the whipped cream instantly, leaving you with a sad, soupy mess. Be patient — this makes all the difference.
Whip the Cream
- While your crepes are cooling, make the cream filling. In a chilled mixing bowl (pop it in the freezer for 5-10 minutes if you can), combine 200g cold heavy cream and 12g white sugar.
- Using an electric hand mixer fitted with a whisk attachment, whip the cream on medium speed. Start slow to avoid splashing, then increase to medium-high. Whip until the cream reaches a thick, yogurt-like consistency — it should hold soft peaks, be smooth and billowy, and be thick enough to pipe but not so stiff that it's grainy or dry. This usually takes 1-2 minutes.
- Transfer the whipped cream to a piping bag fitted with a round tip (or just snip the tip off a disposable piping bag). Set aside in the refrigerator while you prepare the strawberries.
Prepare the Strawberries
- Wash and pat dry fresh strawberries. Remove the green tops and dice the strawberries into small, uniform pieces — about the size of small peas. You want them small enough to distribute evenly when you roll, but large enough to provide a noticeable burst of fresh fruit flavor.
Assemble the Towel Rolls
- Take one completely cooled crepe and place it on a clean work surface with the prettiest side facing down (the side that was against the pan will have a nicer pattern).
- Fold the crepe in half gently. You should now have a half-circle or half-moon shape.
- Pipe a line of whipped cream along the straight edge of the folded crepe, leaving a small border at the ends.
- Use a small offset spatula or the back of a spoon to spread the cream into an even, thin layer across the entire surface of the folded crepe. Don't overload it — too much cream will squeeze out when you roll.
- Gently roll the crepe up into a tight cylinder. Roll slowly and steadily, using your fingers to keep the filling tucked in.
- Place the finished towel roll seam-side down on your serving plate. Repeat with the remaining crepes and filling.
Decorate
- Pipe a small dollop of cream on top of the mini towel rolls.
- Top each cream dollop with a small strawberry piece — a slice, a small dice, or even a tiny whole strawberry half if your strawberries are small.
Leave a Reply