
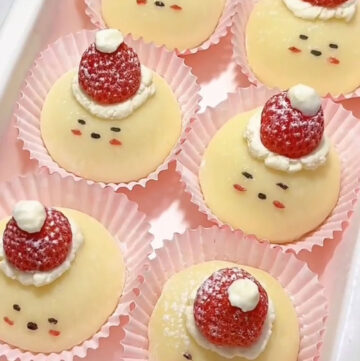
The cutest holiday dessert ever! These snowman mochis are filled with creamy whipped cream and juicy strawberries, wrapped in soft, stretchy mochi. Easy, no-bake, and absolutely adorable.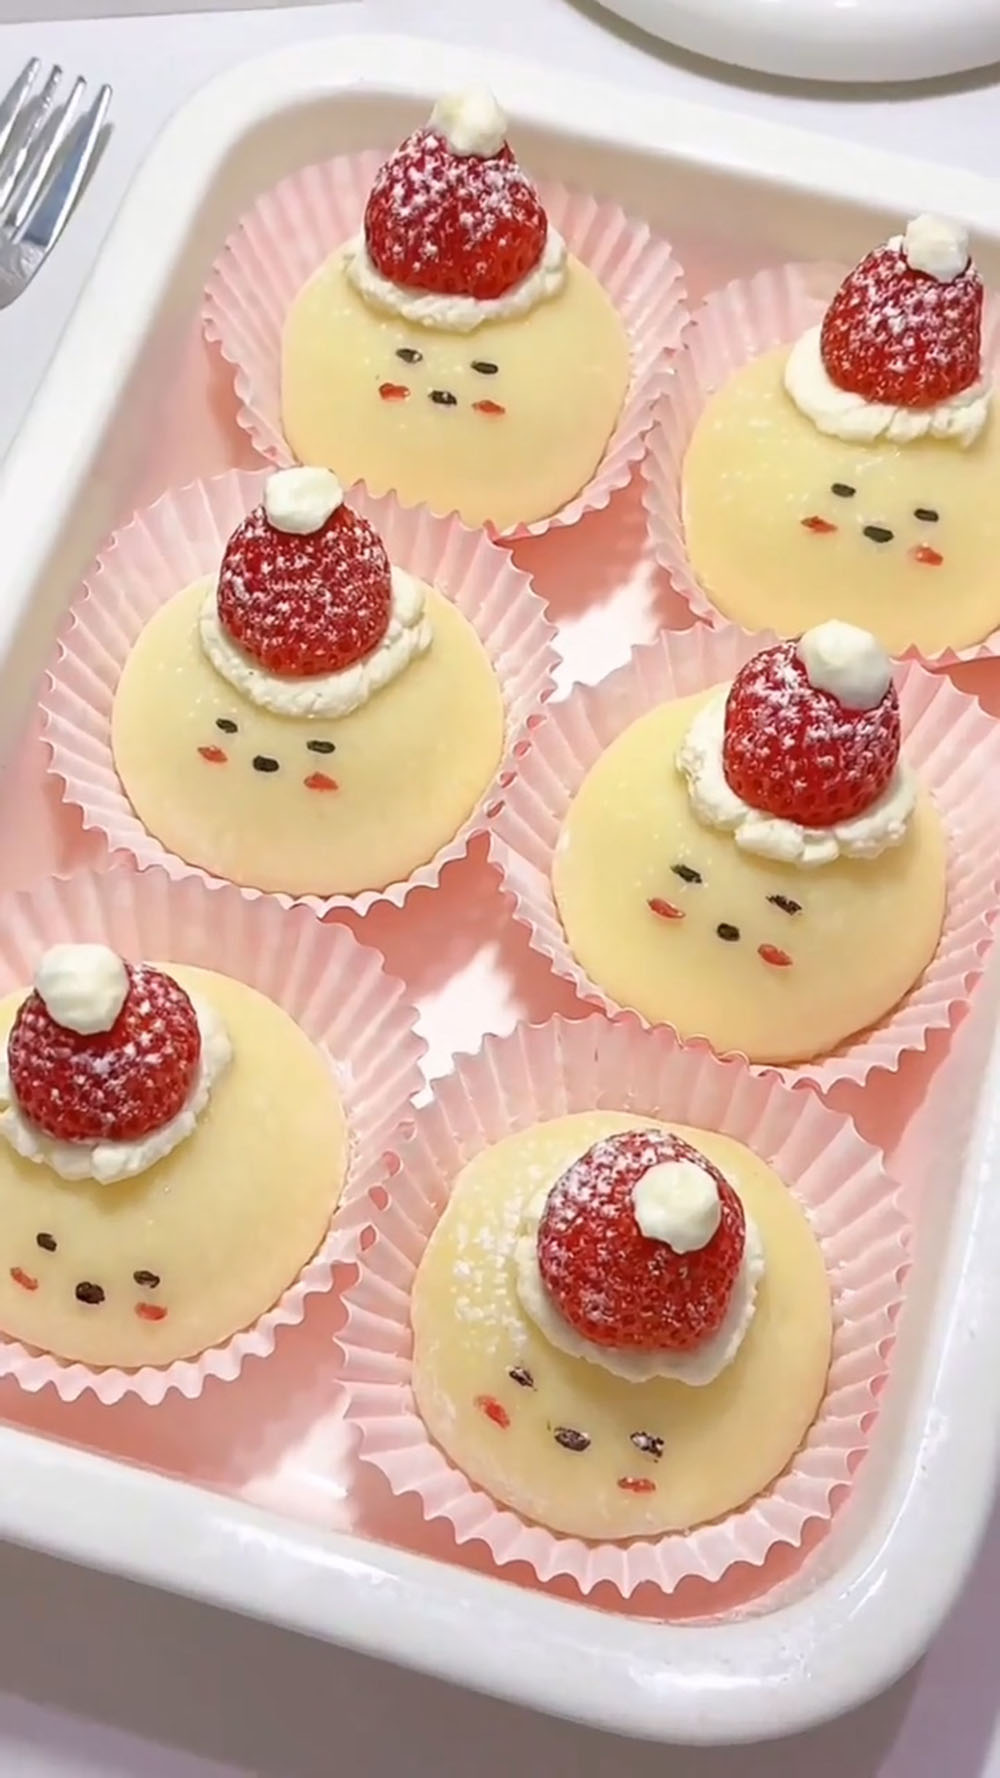
I’ve shared so many mochi recipes on Cookingwithchun — yes, so many.
- Osmanthus Mochi
- Matcha Mochi Bites
- Brown Sugar Pearl Mochi
- Sweet Potato Mochi with Cheese
- Watermelon Mochi Bites
- Passionfruit Mochi
- Cherry Mochi
- Chocolate Mochi
Yesterday, I went strawberry picking with my kids. We came home with baskets full of bright red, perfectly ripe strawberries.
Some went into Strawberry Popsicles. Some went into Strawberry Crepe Rolls. And the rest? I saved them for this mochi.
Today, I’m going to share this adorable mochi with you. They look like little snowmen — plump, round, and impossibly cute.
A soft, chewy mochi wrapper wrapped around fluffy whipped cream and a whole fresh strawberry, then decorated with tiny faces, cream hats, and a dusting of powdered sugar snow.
They’re like little edible snowmen that bring all the joy of a snowy Christmas morning to your dessert plate.
The best part? No oven. No steaming. Just a simple non-stick pan and a little patience.
The mochi wrapper comes together in minutes on the stovetop, and the assembly is so fun that you’ll want to make these with your kids (or just by yourself — I won’t judge).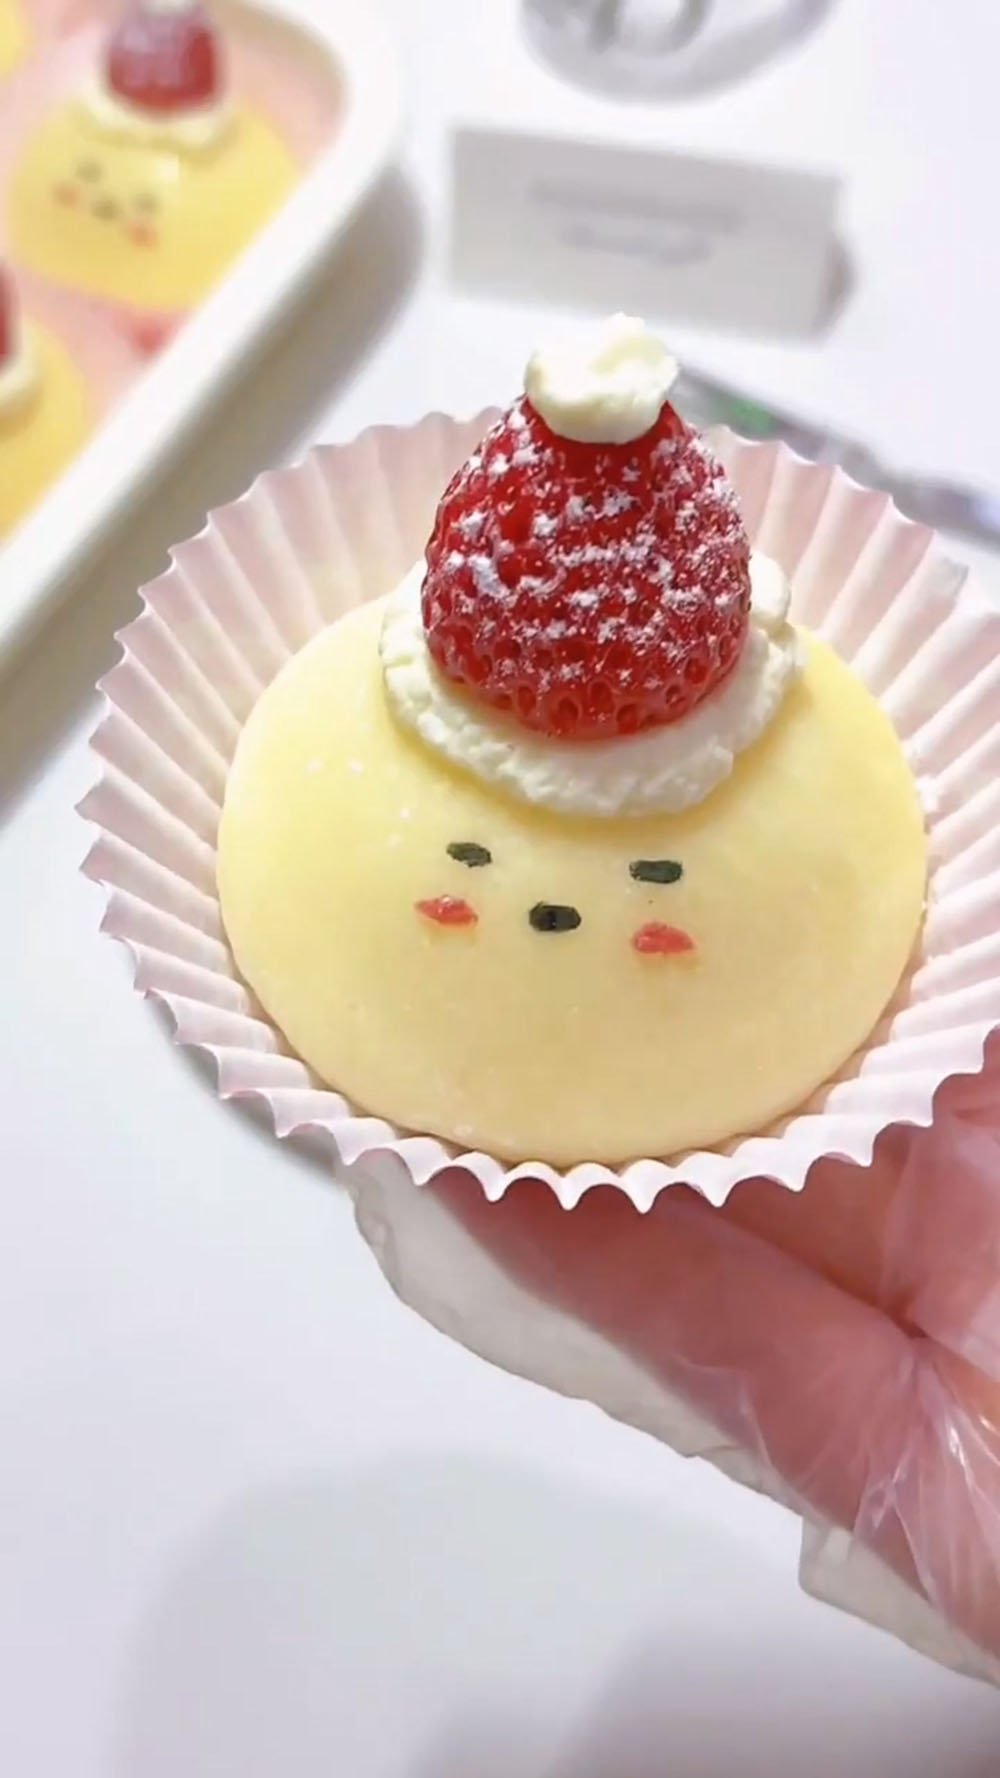
Why You’ll Love This Recipe
- These mochis are soft, stretchy, and perfectly chewy—no hard skin even after chilling.
- No oven or steaming required—everything is made in a simple pan.
- The combination of light cream and juicy strawberries creates a balanced, refreshing sweetness.
- They’re beginner-friendly and fail-proof, even if it’s your first time making mochi.
- The snowman design is adorable and festive, perfect for holidays, parties, or gifting.
Ingredients and Substitutions
For the Cream Filling
- Heavy cream — This creates that light, fluffy, cloud-like filling that contrasts beautifully with the dense mochi wrapper.
- White sugar — Just enough sugar to sweeten the cream without making it cloying.
For the Mochi Wrapper
- Glutinous rice flour — This is the essential ingredient for mochi. Unlike regular rice flour, glutinous rice flour (also called sweet rice flour or mochiko) creates that signature soft, chewy, elastic texture. Do not substitute regular rice flour — it will not work. Look for it in the Asian section of your grocery store or at any Asian market.
- Cornstarch — Cornstarch lightens the texture of the mochi wrapper and helps prevent it from becoming too dense or heavy.
- White sugar — The mochi wrapper needs a bit of sweetness to balance the tangy strawberry and the lightly sweetened cream.
- Milk — Milk adds richness and tenderness to the mochi wrapper. Whole milk is best for the creamiest result, but 2% works just fine. The fat in the milk helps keep the mochi soft even after refrigeration.
- Butter — Butter adds richness, flavor, and — most importantly — helps keep the mochi soft and pliable even after sitting in the refrigerator.
- Cooked glutinous rice flour (for dusting, to prevent sticking) — This is glutinous rice flour that has been cooked (usually by toasting in a dry pan) to make it safe to eat and to prevent it from absorbing moisture from the mochi dough. Never use raw flour for dusting — it will taste unpleasant and can make your mochi gritty. You can buy pre-cooked glutinous rice flour (often labeled “roasted glutinous rice flour” or “kinako” — though kinako is roasted soybean flour, so check the label carefully), or make your own by toasting raw glutinous rice flour in a dry pan over low heat until lightly golden and fragrant.
For Decoration
- Fresh strawberries — Choose strawberries that are bright red, ripe, and uniformly sized.
- Powdered sugar (for snow scene decoration) — A light dusting of powdered sugar transforms these mochi into snowy winter scenes.
- Edible food coloring pens / melted chocolate (for drawing faces) — These are for drawing the snowmen’s faces — eyes, noses, smiles. Edible food coloring pens are the easiest option (look for them at baking supply stores or online). Alternatively, you can melt a small amount of dark or white chocolate, transfer it to a piping bag or a small zip-top bag with the corner snipped off, and pipe the faces onto the mochi.
How to Make Christmas Strawberry Snowman Mochi
Make the Cream Filling
Pour 250g cold heavy cream into a chilled mixing bowl. Add 25g white sugar.
Using an electric hand mixer fitted with a whisk attachment, whip the cream on medium speed. Start slow to avoid splashing, then increase to medium-high. Continue whipping until the cream reaches stiff peaks.
Transfer the whipped cream to a piping bag fitted with a round tip (or just snip the tip off a disposable piping bag). Set aside in the refrigerator while you prepare the mochi wrapper.
Make the Mochi Wrapper
In a medium mixing bowl, combine 100g glutinous rice flour, 30g cornstarch, and 35g white sugar. Pour in 170g milk. Whisk until the mixture is smooth and the dry ingredients are fully incorporated. The batter should be thin and pourable, similar to heavy cream.
Strain the batter through a fine-mesh sieve once.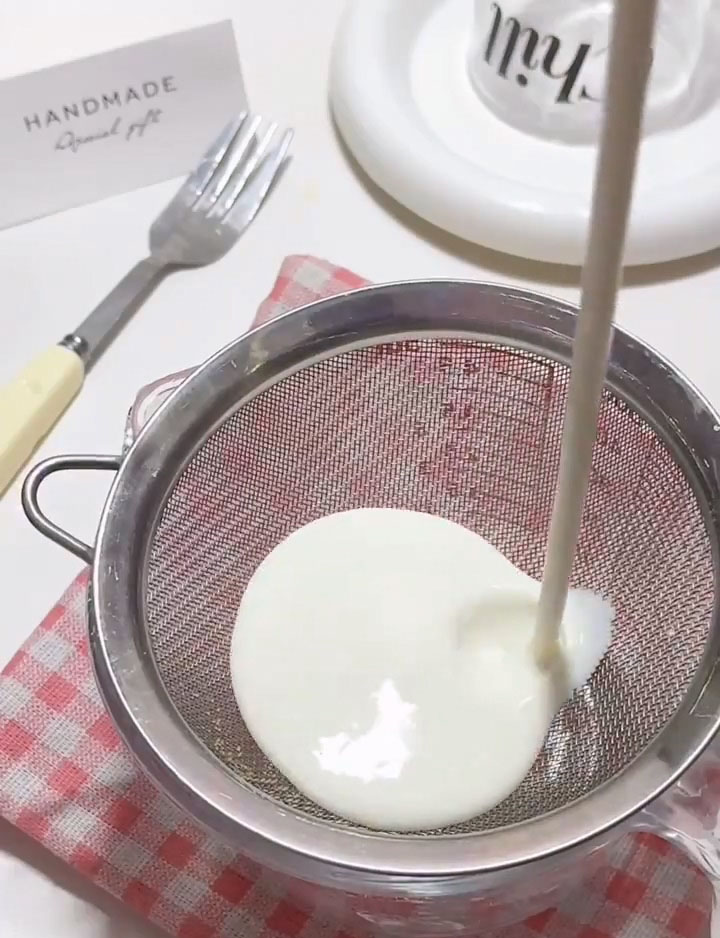
Heat a non-stick pan over low heat. Pour the strained batter into the pan. Add 20g butter.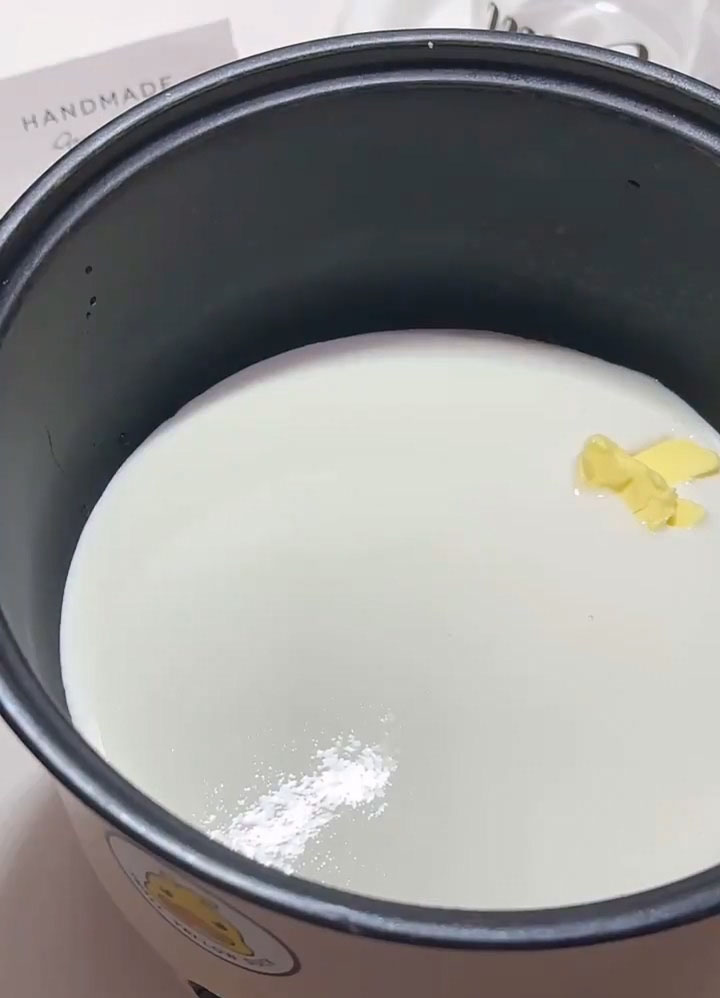
Cook over low heat, stirring constantly with a silicone spatula or a wooden spoon. The mixture will look like a lumpy paste at first — keep stirring. As it heats, it will start to come together into a single mass. Continue stirring and folding until the dough forms a complete, cohesive ball that pulls away cleanly from the sides and bottom of the pan. This usually takes about 5-8 minutes.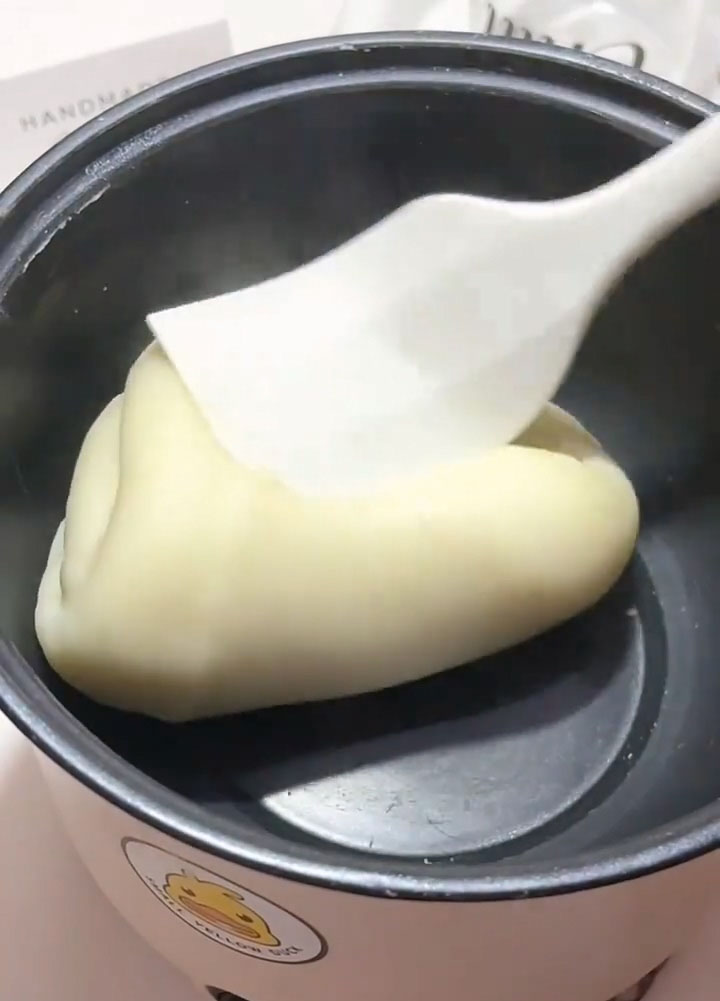
Transfer the cooked dough to a clean work surface. Let it cool just enough that you can handle it without burning yourself (but it should still be warm).
Now comes the most important step for achieving that signature soft, stretchy, chewy mochi texture: knead and stretch the dough repeatedly. Fold it over itself, press it down, stretch it out, fold again. Repeat this process for 5-10 minutes. You’ll notice the dough becoming smoother, glossier, and more elastic with each stretch.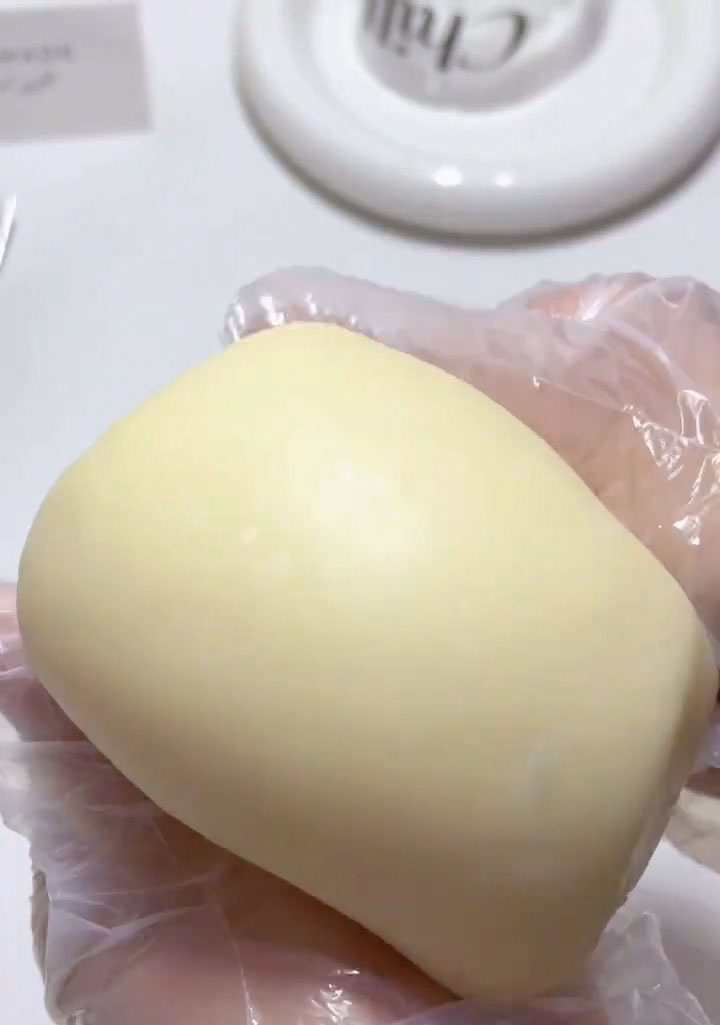
When the dough is smooth, glossy, and stretchy (you should be able to pull it into a thin sheet without it tearing), it’s ready. Set aside and cover with plastic wrap to prevent it from drying out while you prepare your work station.
Prepare Your Work Station
Spread a thin layer of cooked glutinous rice flour on a clean work surface. Keep extra cooked flour nearby in a small bowl.
Have your piping bag of whipped cream ready in the refrigerator.
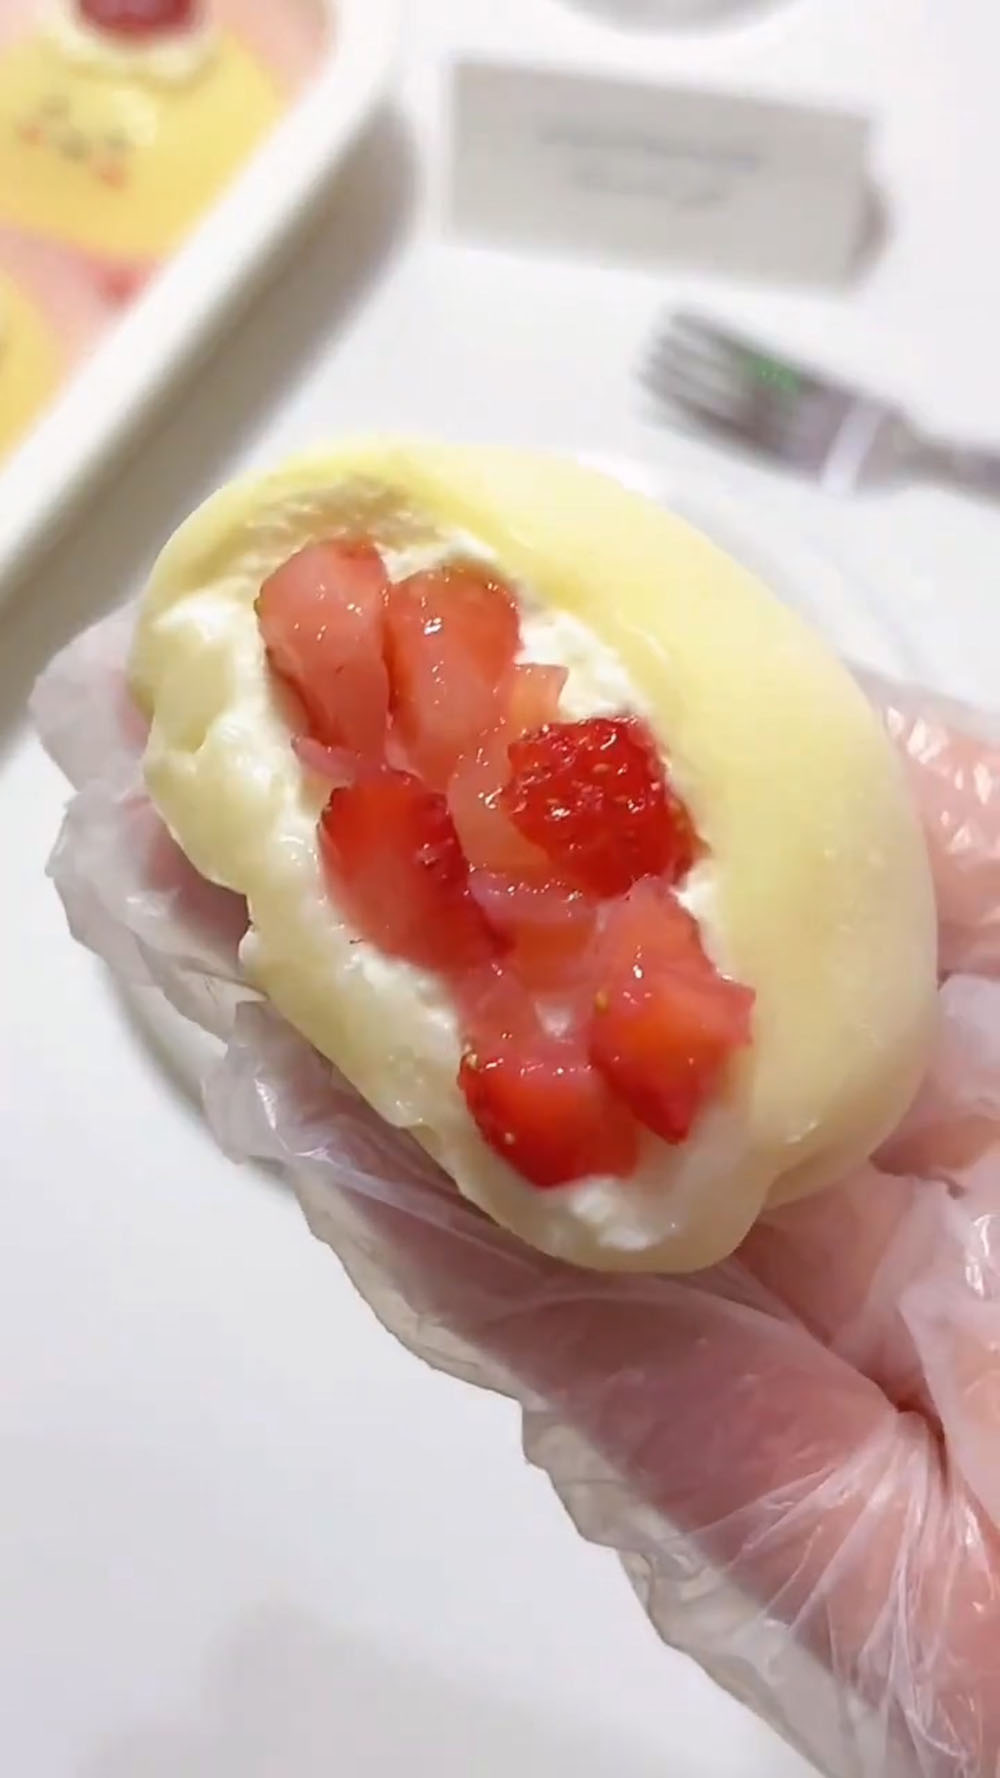
Wash and dry the fresh strawberries. Remove the green tops (the stems and leaves). Dice some of the strawberries. If your strawberries are very large, you can cut them in half lengthwise or even use just half a strawberry per snowman. For the cutest presentation, try to select strawberries that are roughly the same size.
Assemble the Snowman Bodies
Pinch off a small piece of mochi dough — about the size of a golf ball (roughly 30-40g). Dust it lightly with cooked glutinous rice flour.
Using a small rolling pin (or even just your fingers), roll the dough into a thin circle, about 3-4 inches in diameter.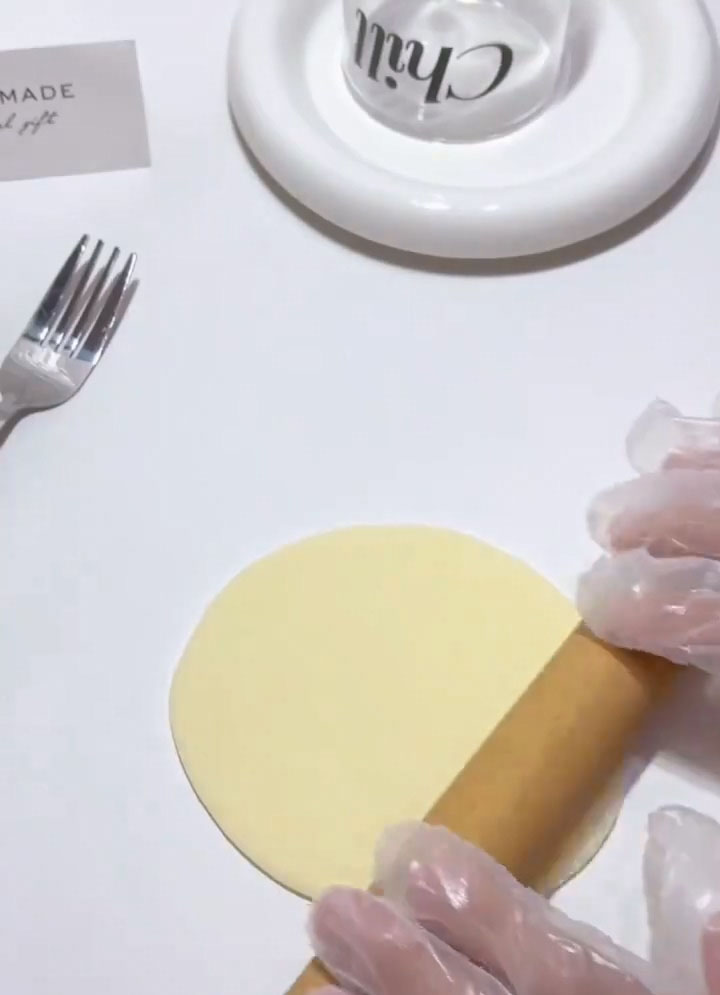
Gently press the rolled-out mochi circle into a small bowl, letting it drape over the edges slightly.
Pipe a ring of whipped cream around the inside bottom of the mochi-lined mold.
Spoon a scoop of diced strawberries on top of the whipped cream.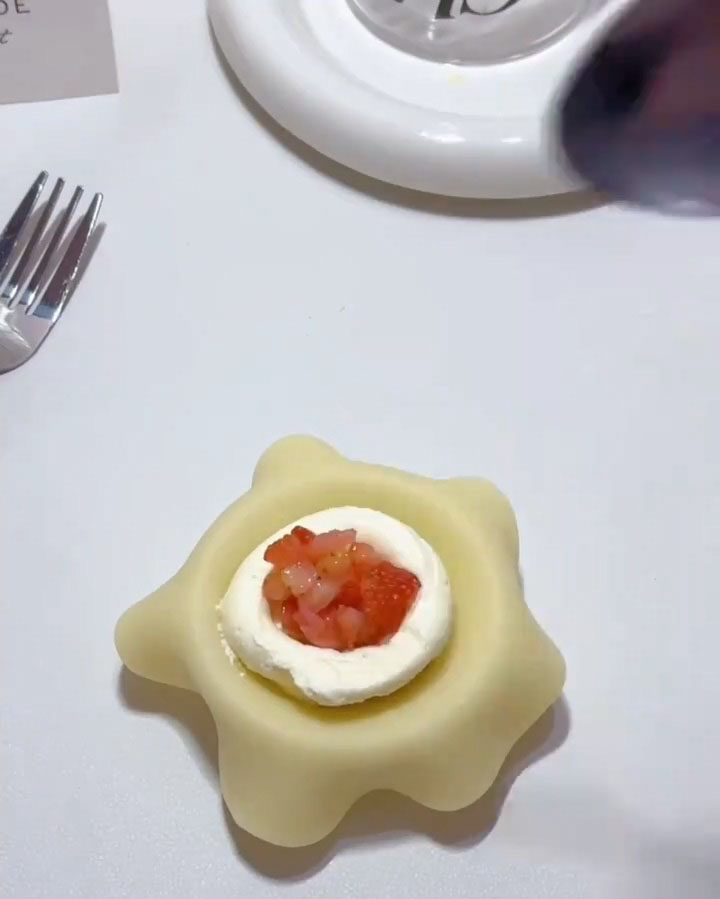
Pipe more whipped cream around and over the strawberry.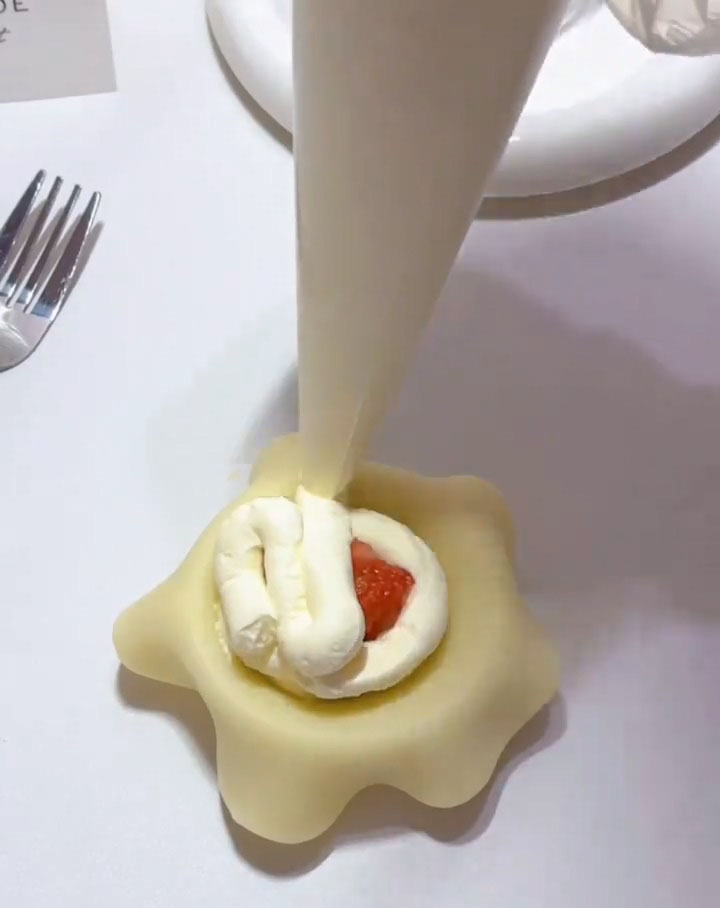
Now, gather the edges of the mochi wrapper up and over the filling, like you’re closing a little dumpling or a drawstring pouch. Pinch the edges together firmly to seal. Twist slightly and press to ensure a tight seal.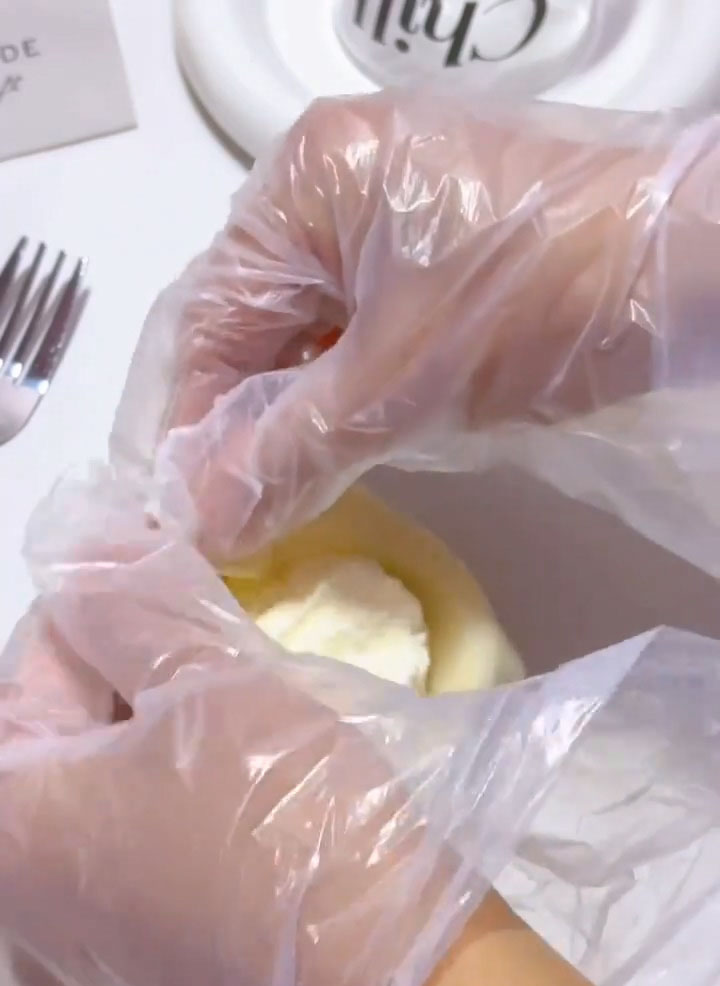
If there’s excess dough at the seal, you can trim it off with clean scissors. Dust the trimmed area with a little cooked glutinous rice flour.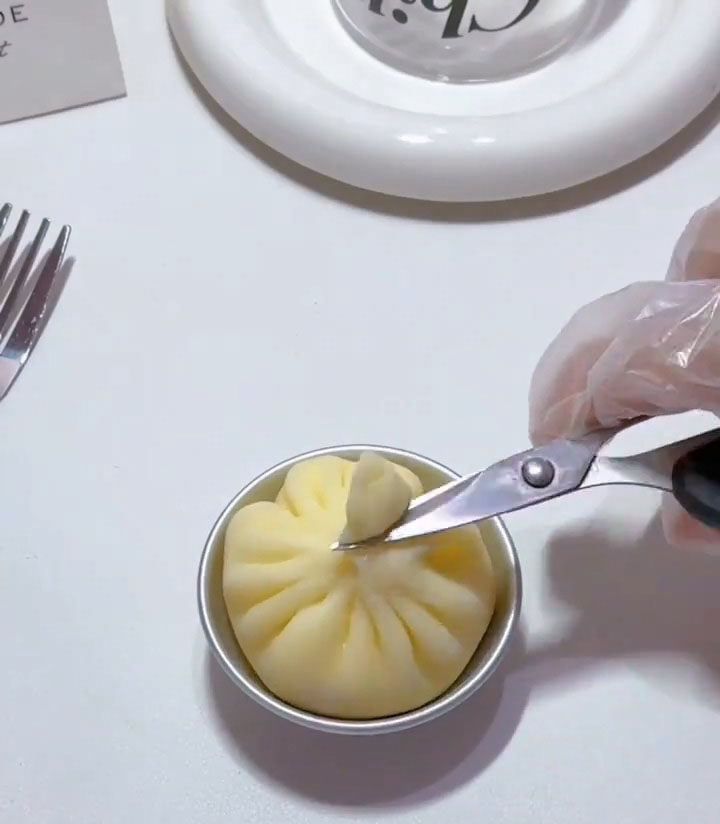
Carefully remove the assembled mochi from the mold. Dust the bottom (the sealed side) with cooked glutinous rice flour to prevent sticking. Place the mochi seal-side down on your work surface or a parchment-lined tray.
Repeat with the remaining dough, cream, and strawberries.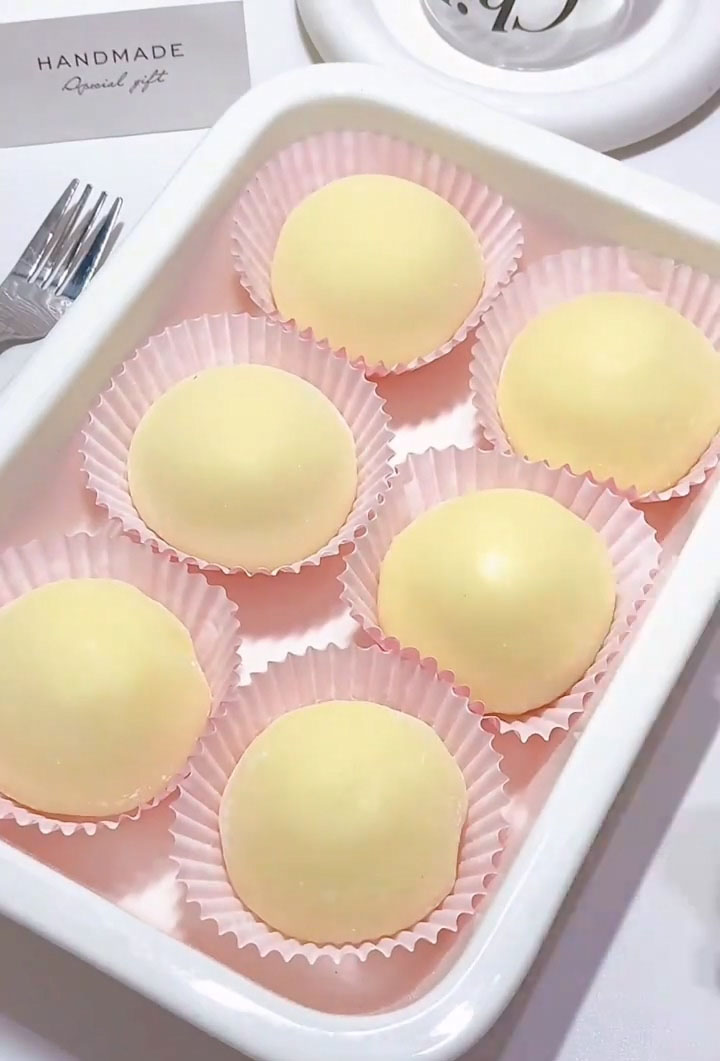
Decorate as Christmas Snowmen
Now for the fun part — bringing your snowmen to life!
Using edible food coloring pens or melted chocolate, draw faces on the front of each mochi snowman. Draw two eyes (small dots) and a smile. You can also draw a small carrot-shaped nose in orange if you have an orange pen or orange-tinted chocolate.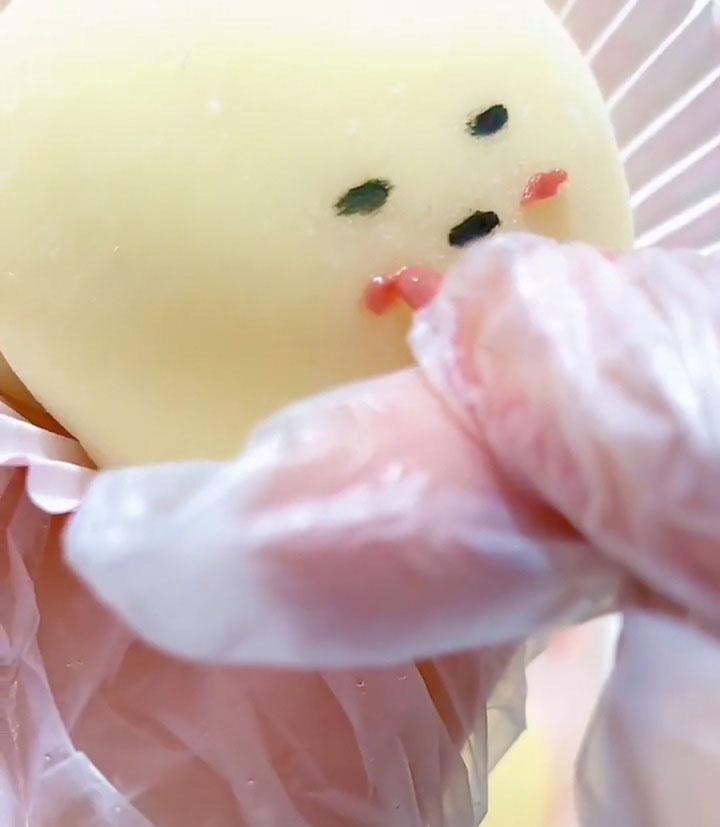
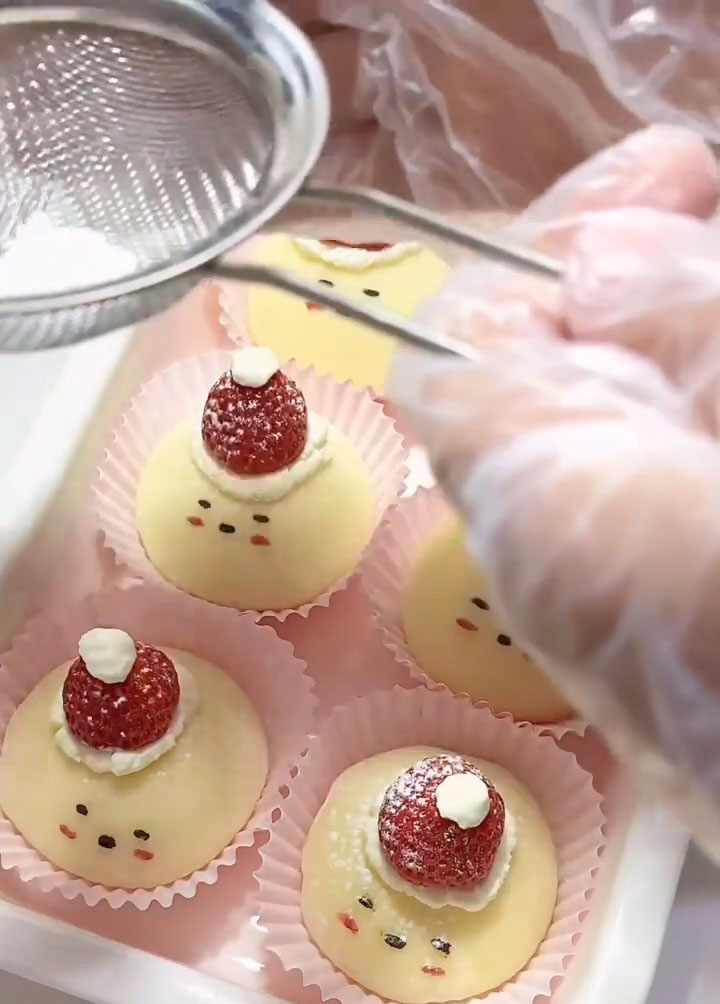
To make the cream hat: Transfer some of the remaining whipped cream to a piping bag with a small round tip. Pipe a small dollop of cream on the very top of the snowman’s head (the top of the strawberry). This will be the “base” of the hat.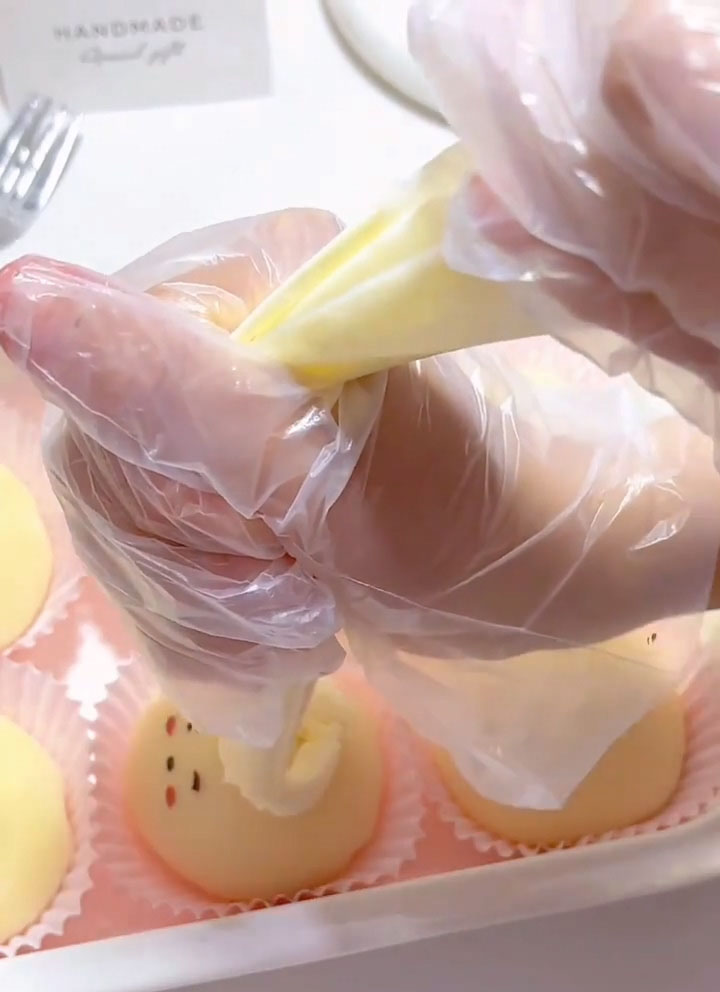
Place a strawberry on top of that cream dollop — this becomes the snowman’s hat.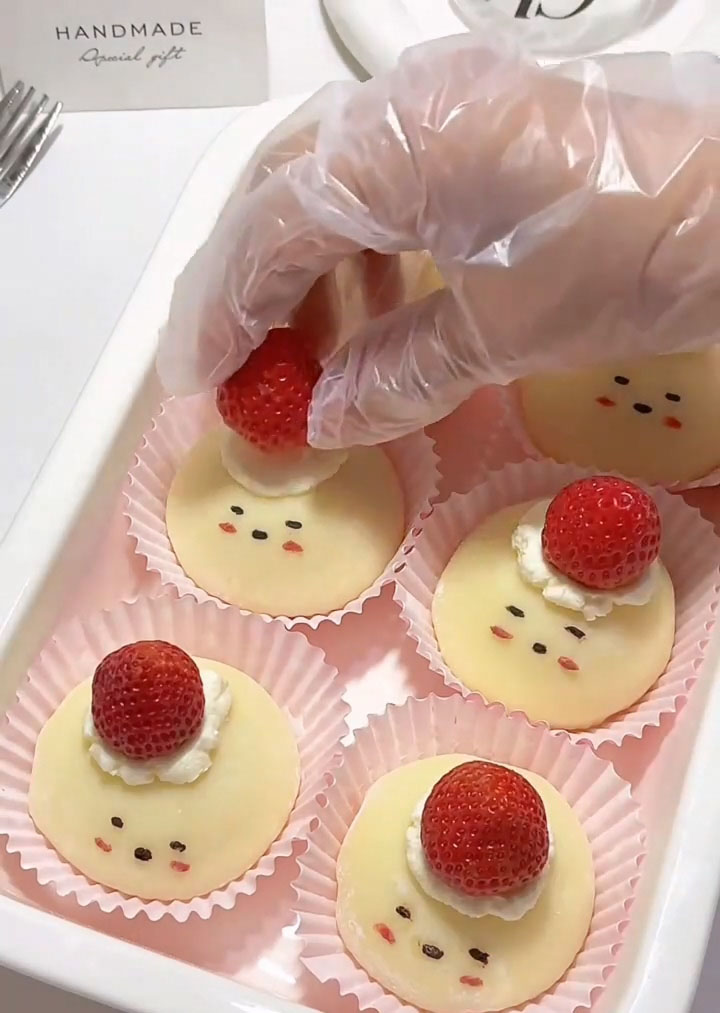
Pipe one more tiny cream ball on top of the strawberry hat. This gives the hat a little pom-pom or button effect.
To create the snow scene: Place a fine-mesh sieve over the assembled snowmen. Add a small amount of powdered sugar to the sieve and tap gently, dusting the snowmen and the plate around them with a light layer of “snow.”
Festive Christmas Mochi (Strawberry Snowman Style!)
Ingredients
Cream Filling
- 250 g heavy cream
- 25 g white sugar
Mochi Wrapper
- 100 g glutinous rice flour
- 30 g cornstarch
- 35 g white sugar
- 170 g milk
- 20 g butter
- cooked glutinous rice flour for dusting, as needed
Decoration
- fresh strawberries as needed
- powdered sugar for snow scene decoration, a small amount
- edible food coloring pens or melted chocolate for drawing faces, as needed
Instructions
Make the Cream Filling
- Pour 250g cold heavy cream into a chilled mixing bowl. Add 25g white sugar.
- Using an electric hand mixer fitted with a whisk attachment, whip the cream on medium speed. Start slow to avoid splashing, then increase to medium-high. Continue whipping until the cream reaches stiff peaks.
- Transfer the whipped cream to a piping bag fitted with a round tip (or just snip the tip off a disposable piping bag). Set aside in the refrigerator while you prepare the mochi wrapper.
Make the Mochi Wrapper
- In a medium mixing bowl, combine 100g glutinous rice flour, 30g cornstarch, and 35g white sugar. Pour in 170g milk. Whisk until the mixture is smooth and the dry ingredients are fully incorporated. The batter should be thin and pourable, similar to heavy cream.
- Strain the batter through a fine-mesh sieve once.
- Heat a non-stick pan over low heat. Pour the strained batter into the pan. Add 20g butter.
- Cook over low heat, stirring constantly with a silicone spatula or a wooden spoon. The mixture will look like a lumpy paste at first — keep stirring. As it heats, it will start to come together into a single mass. Continue stirring and folding until the dough forms a complete, cohesive ball that pulls away cleanly from the sides and bottom of the pan. This usually takes about 5-8 minutes.
- Transfer the cooked dough to a clean work surface. Let it cool just enough that you can handle it without burning yourself (but it should still be warm).
- Now comes the most important step for achieving that signature soft, stretchy, chewy mochi texture: knead and stretch the dough repeatedly. Fold it over itself, press it down, stretch it out, fold again. Repeat this process for 5-10 minutes. You'll notice the dough becoming smoother, glossier, and more elastic with each stretch.
- When the dough is smooth, glossy, and stretchy (you should be able to pull it into a thin sheet without it tearing), it's ready. Set aside and cover with plastic wrap to prevent it from drying out while you prepare your work station.
Prepare Your Work Station
- Spread a thin layer of cooked glutinous rice flour on a clean work surface. Keep extra cooked flour nearby in a small bowl.
- Have your piping bag of whipped cream ready in the refrigerator.
- Wash and dry the fresh strawberries. Remove the green tops (the stems and leaves). Dice some of the strawberries. If your strawberries are very large, you can cut them in half lengthwise or even use just half a strawberry per snowman. For the cutest presentation, try to select strawberries that are roughly the same size.
Assemble the Snowman Bodies
- Pinch off a small piece of mochi dough — about the size of a golf ball (roughly 30-40g). Dust it lightly with cooked glutinous rice flour.
- Using a small rolling pin (or even just your fingers), roll the dough into a thin circle, about 3-4 inches in diameter.
- Gently press the rolled-out mochi circle into a small bowl, letting it drape over the edges slightly.
- Pipe a ring of whipped cream around the inside bottom of the mochi-lined mold.
- Spoon a scoop of diced strawberries on top of the whipped cream.
- Pipe more whipped cream around and over the strawberry.
- Now, gather the edges of the mochi wrapper up and over the filling, like you're closing a little dumpling or a drawstring pouch. Pinch the edges together firmly to seal. Twist slightly and press to ensure a tight seal.
- If there's excess dough at the seal, you can trim it off with clean scissors. Dust the trimmed area with a little cooked glutinous rice flour.
- Carefully remove the assembled mochi from the mold. Dust the bottom (the sealed side) with cooked glutinous rice flour to prevent sticking. Place the mochi seal-side down on your work surface or a parchment-lined tray.
- Repeat with the remaining dough, cream, and strawberries.
Decorate as Christmas Snowmen
- Now for the fun part — bringing your snowmen to life!
- Using edible food coloring pens or melted chocolate, draw faces on the front of each mochi snowman. Draw two eyes (small dots) and a smile. You can also draw a small carrot-shaped nose in orange if you have an orange pen or orange-tinted chocolate.
- To make the cream hat: Transfer some of the remaining whipped cream to a piping bag with a small round tip. Pipe a small dollop of cream on the very top of the snowman's head (the top of the strawberry). This will be the "base" of the hat.
- Place a strawberry on top of that cream dollop — this becomes the snowman's hat.
- Pipe one more tiny cream ball on top of the strawberry hat. This gives the hat a little pom-pom or button effect.
- To create the snow scene: Place a fine-mesh sieve over the assembled snowmen. Add a small amount of powdered sugar to the sieve and tap gently, dusting the snowmen and the plate around them with a light layer of "snow."
Leave a Reply