
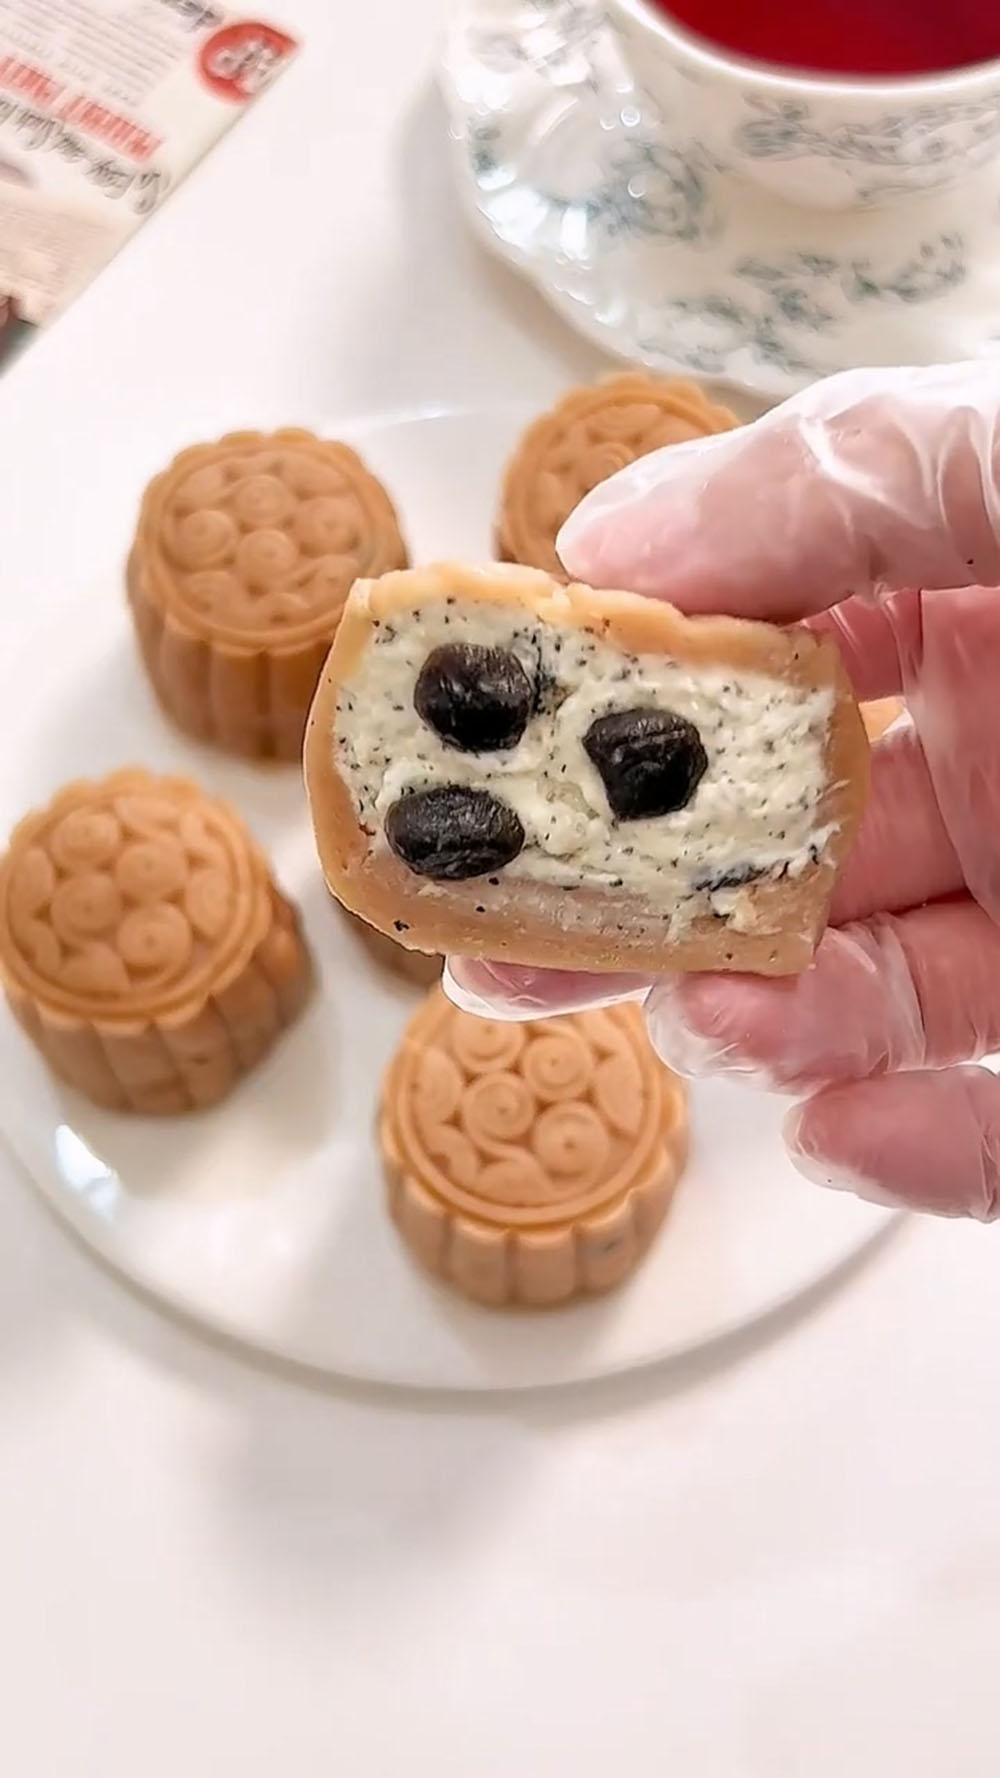
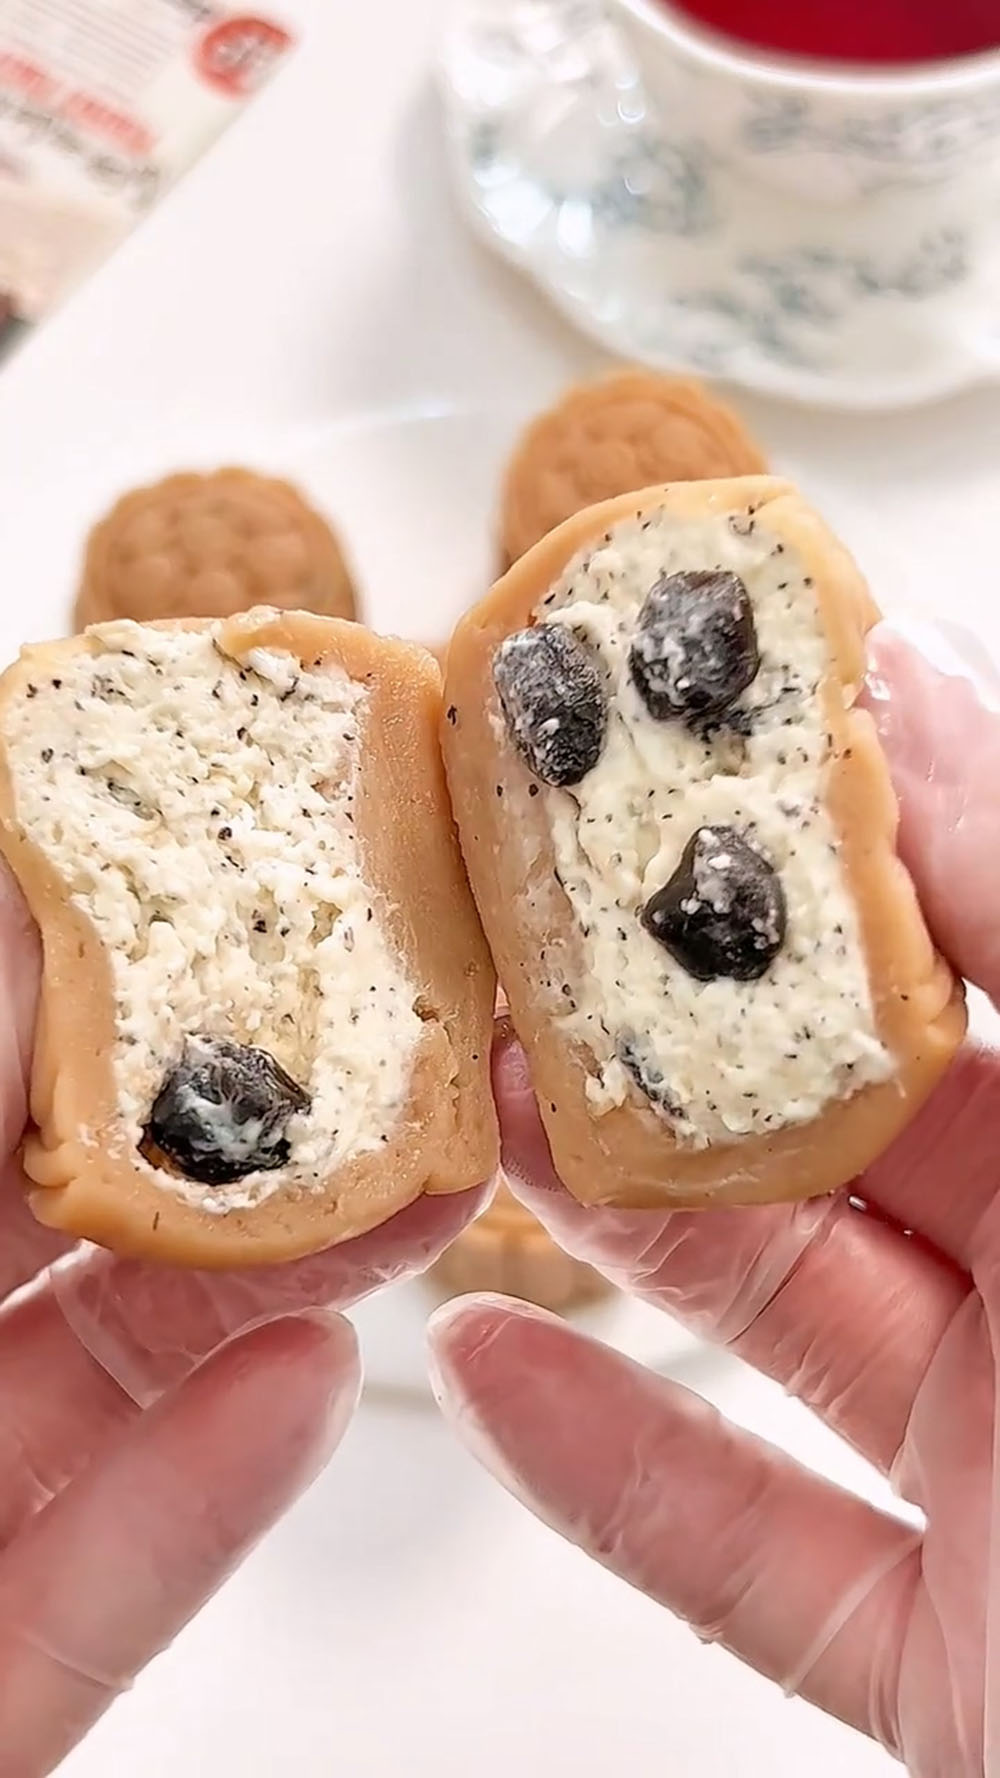
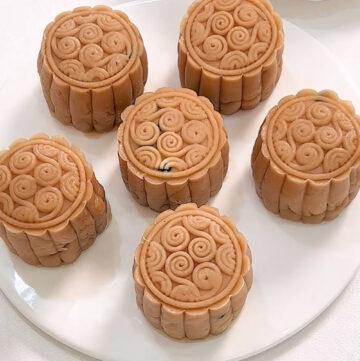
These Earl Grey snow skin mooncakes are soft, chewy, and filled with a creamy milk tea cream cheese filling. The snow skin is gently steamed for that perfect texture, making this a beginner-friendly and elegant dessert.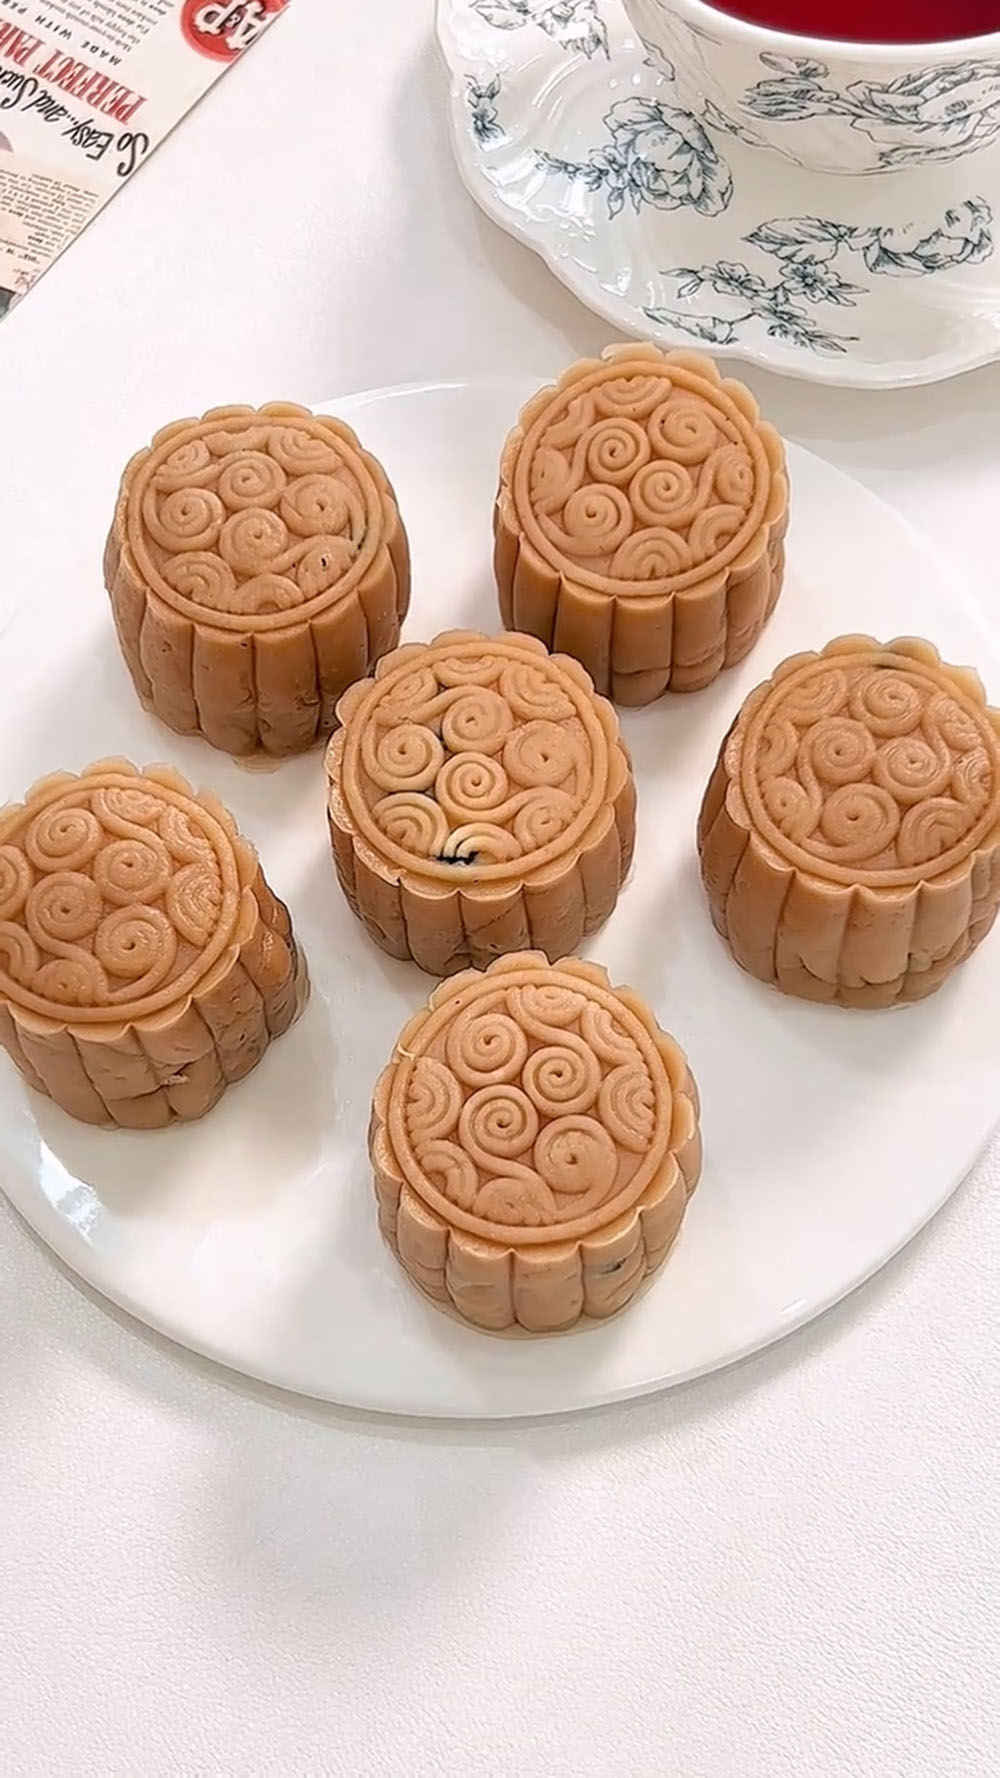
After trying Earl Grey tea in a dessert for the first time, I was completely hooked—I honestly can’t get enough of this flavor.
Since then, I’ve been finding every excuse to incorporate it into my baking and no-bake desserts.
Today, I made these Earl Grey snow skin mooncakes, and I have to say—they might be one of my favorite versions so far.
And really, who says mooncakes are only meant for Mid-Autumn Festival? Definitely not in my home. If I’m craving it, I’ll make it—no special occasion needed. Sometimes the best desserts are the ones you make just because you feel like it.
If you’ve never made mooncakes before, don’t worry—wrapping them is much easier than it looks. You don’t need to stress about making them perfectly smooth or symmetrical.
Once they go into the mold and get pressed, everything comes together beautifully. It’s actually a really fun and satisfying process, especially when you see the final pattern reveal.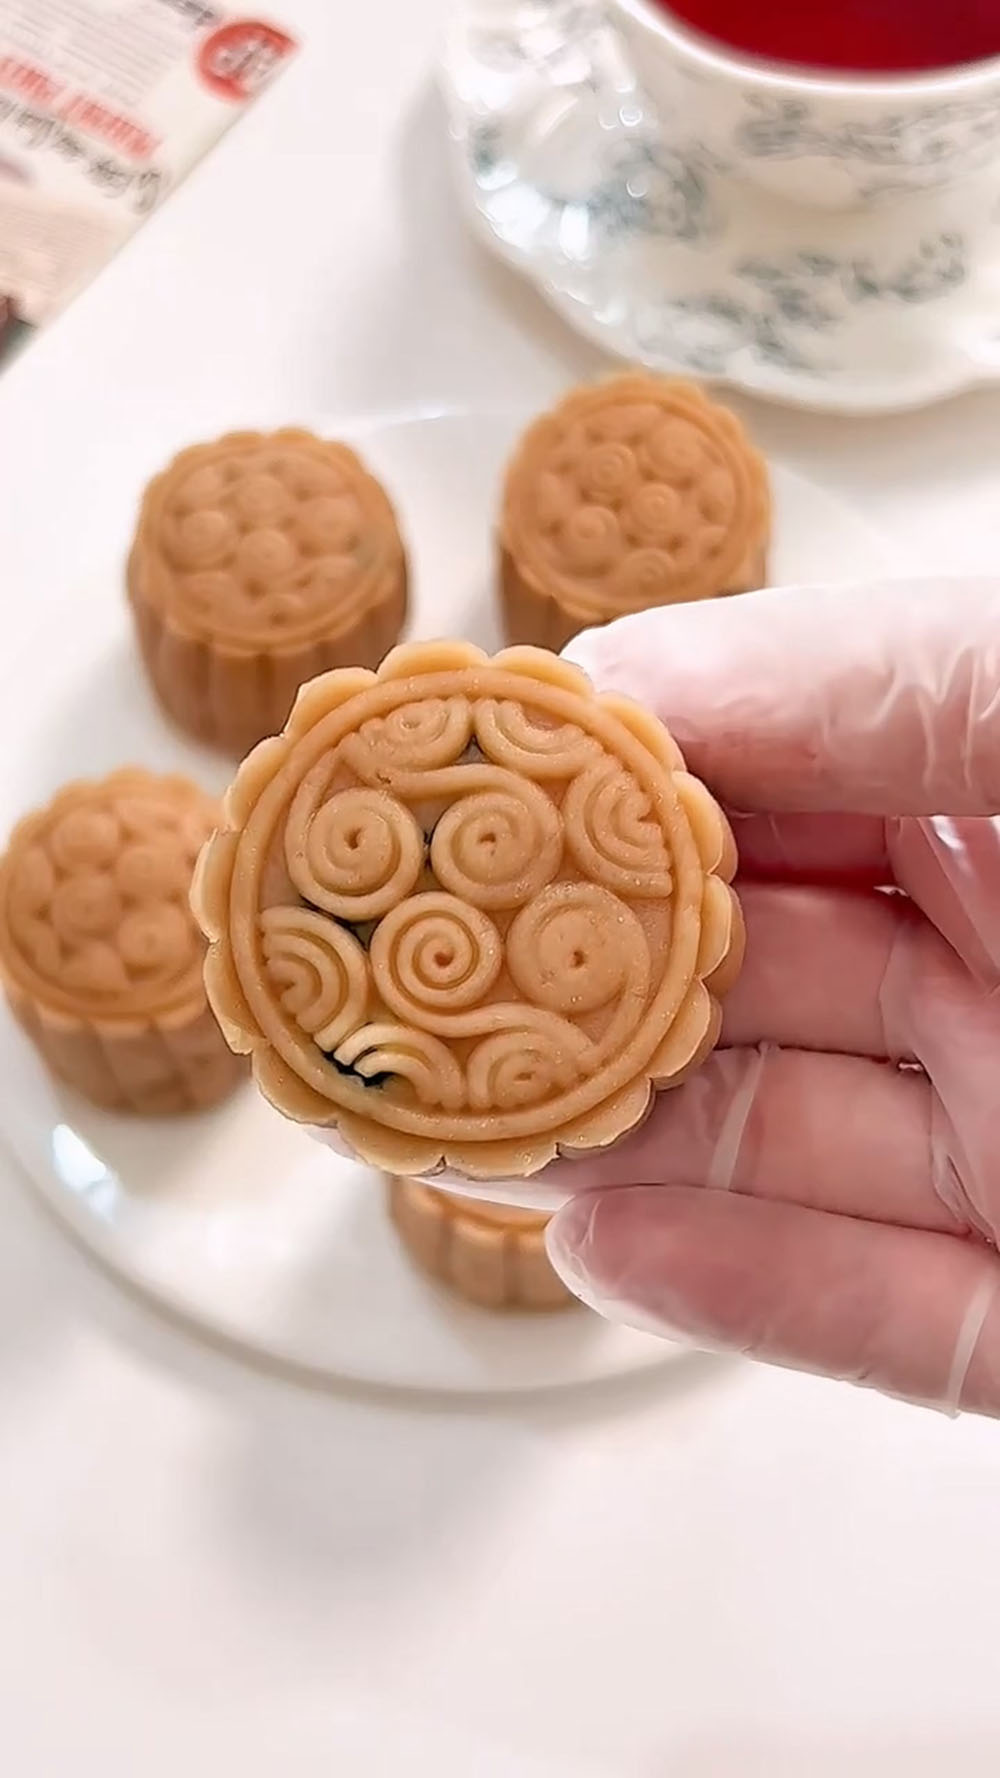
Why you’ll love this recipe
- These mooncakes are completely no-bake and beginner-friendly, perfect if you don’t want to deal with ovens or complicated techniques.
- The combination of Earl Grey tea and creamy milk tea filling creates a rich yet balanced flavor that’s not overly sweet.
- The snow skin is soft, chewy, and slightly bouncy, with a delicate tea aroma in every bite.
- The filling is smooth, creamy, and lightly tangy, paired beautifully with the fragrant tea notes.
- You can customize it with tapioca pearls for a fun bubble tea twist, making it extra unique and playful.
Ingredients and substitutions
Milk Tea Cream Cheese Filling
- Cream cheese – I always recommend using full-fat cream cheese and letting it soften at room temperature before mixing. This ensures a smooth, lump-free filling that’s rich and creamy. Avoid substituting with other cheeses as it will change the texture and flavor.
- Milk – Regular room temperature milk works perfectly here. I recommend using full-fat milk for a richer milk tea flavor and smoother consistency.
- Earl Grey tea powder – This is what gives the filling its signature tea aroma. Use pure Earl Grey tea powder for the best flavor and avoid flavored or sweetened versions.
- Gelatin sheets – Essential for setting the filling so it holds its shape. Always soak in cold water and gently squeeze out excess water before using.
- Whipping cream – Use dairy whipping cream for the best texture and flavor. It adds lightness and creaminess to the filling without making it too heavy.
- Sugar – Just enough to balance the slight tanginess of the cream cheese and enhance the milk tea flavor. You can adjust slightly to taste.
- Tapioca pearls – Completely optional, but I highly recommend adding them if you love bubble tea. They add a fun chewy texture to the creamy filling.
Earl Grey Snow Skin
- Hot milk – Hot milk helps fully extract the tea flavor from the tea bags. Full-fat milk will give a richer taste.
- Earl Grey tea bags – These deepen the tea flavor in the snow skin. You can gently squeeze them after steeping to get every bit of flavor out.
- Whipping cream – Adds richness and keeps the snow skin soft and tender instead of dry.
- Corn oil – Helps improve elasticity so the dough doesn’t crack when wrapping. Stick to neutral oils.
- Condensed milk – Adds sweetness and enhances the creamy milk tea flavor beautifully.
- Sugar – Keeps the sweetness light and balanced so it’s not overly rich.
- Wheat starch – This is key for that slightly translucent and chewy texture in the snow skin. I don’t recommend skipping it.
- Rice flour – Helps reduce stickiness and gives structure to the dough.
- Glutinous rice flour – The main ingredient that creates the soft, chewy texture we love in snow skin mooncakes.
- Cooked glutinous rice flour – Used for dusting to prevent sticking when shaping and molding.
Ingredients for Recipe Format
Milk Tea Cream Cheese Filling
- 200 g cream cheese
- 51 g milk
- 4 g Earl Grey tea powder
- 8 g gelatin sheets
- 160 g heavy cream
- 34 g sugar
- Tapioca pearls (optional)
Earl Grey Tea Snow Skin
- 150 g warm milk
- 2 Earl Grey tea bags
- 78 g heavy cream
- 18 g corn oil
- 22 g condensed milk
- 20 g sugar
- 22 g wheat starch
- 45 g rice flour
- 45 g glutinous rice flour
- Cooked glutinous rice flour (for dusting)
How to Make Earl Grey Tea Snow Skin Mooncakes
Make the Milk Tea Cream Cheese Filling
- Pour 51 g of warm milk into a small bowl. Add 4 g of Earl Grey tea powder and stir thoroughly until the powder is completely dissolved and no lumps remain. Add the 8 g of gelatin sheets (which have been pre-soaked in cold water until soft and then squeezed dry) and continue stirring until the gelatin has fully melted. Set the mixture aside to cool.
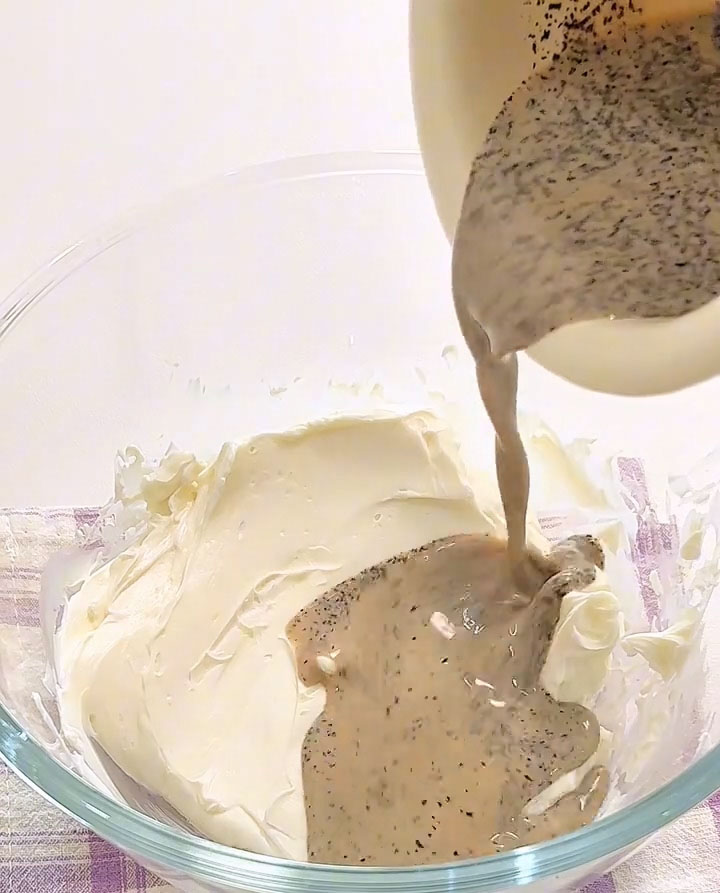
- Place 200 g of cream cheese, which has been softened at room temperature, into a large mixing bowl. Use a silicone spatula to stir and press until the cheese is completely smooth with no lumps. Pour the cooled milk tea-gelatin mixture into the bowl and stir until the cheese and tea liquid are fully combined and the texture is uniform.
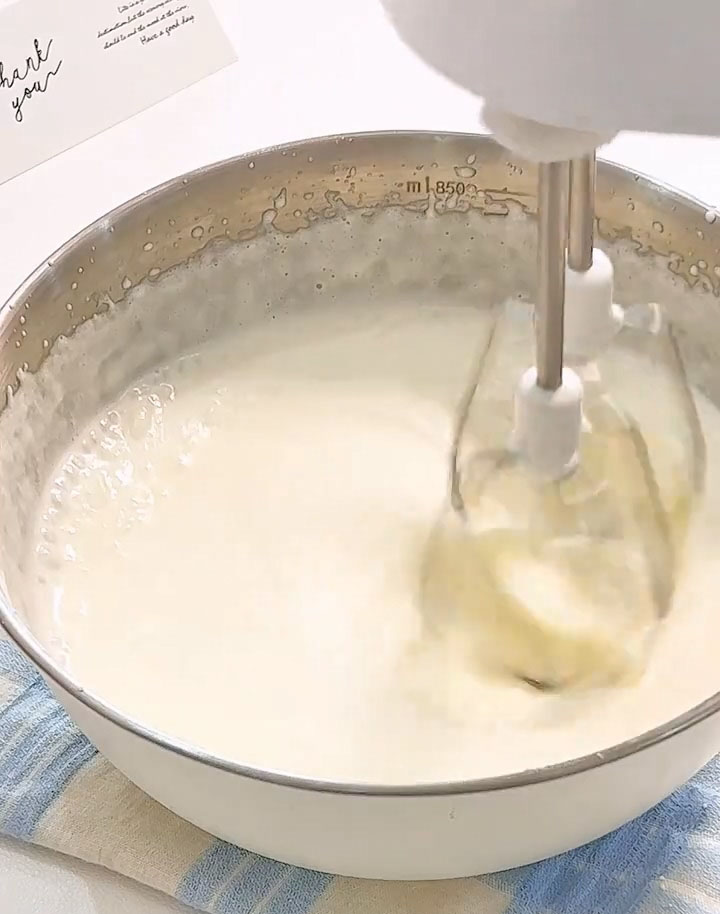
- In a separate clean, dry bowl, combine 160 g of chilled heavy cream and 34 g of sugar. Use an electric hand mixer to whip the cream until it reaches a yogurt-like consistency—thick enough to cling to the beaters without being runny. Pour the whipped cream into the cream cheese mixture and gently fold together until no streaks remain.
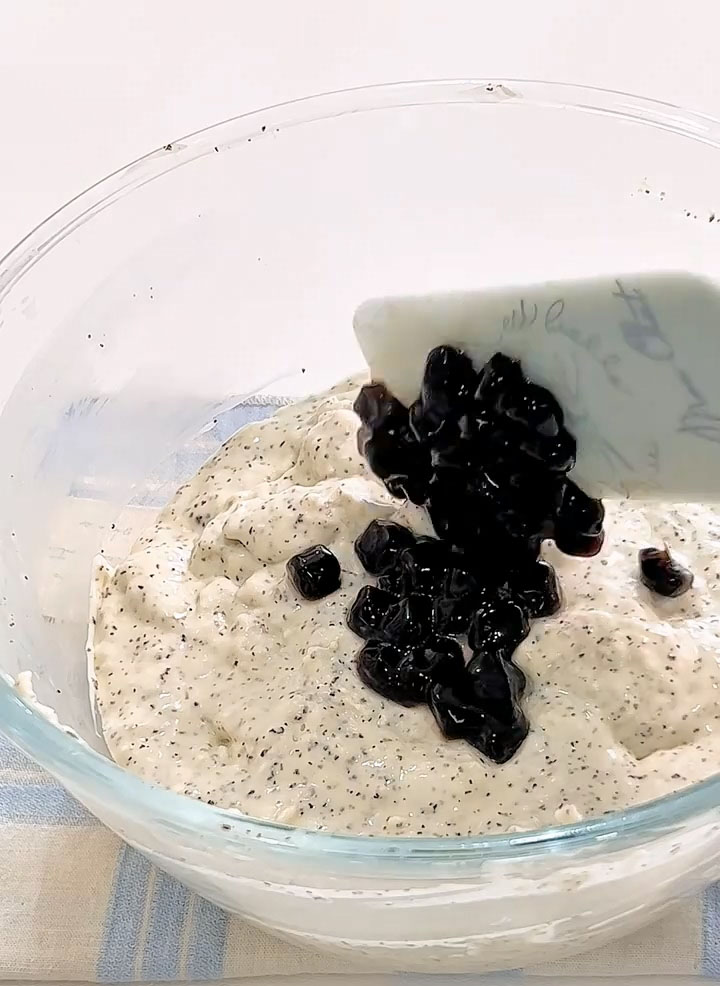
- If using tapioca pearls, add the cooked and well-drained pearls to the mixture and fold gently until they are evenly distributed throughout the filling. Transfer the finished filling to a food storage container, smooth the top with a spatula, and refrigerate for at least 4 hours, or until the filling is completely firm and holds its shape when handled.
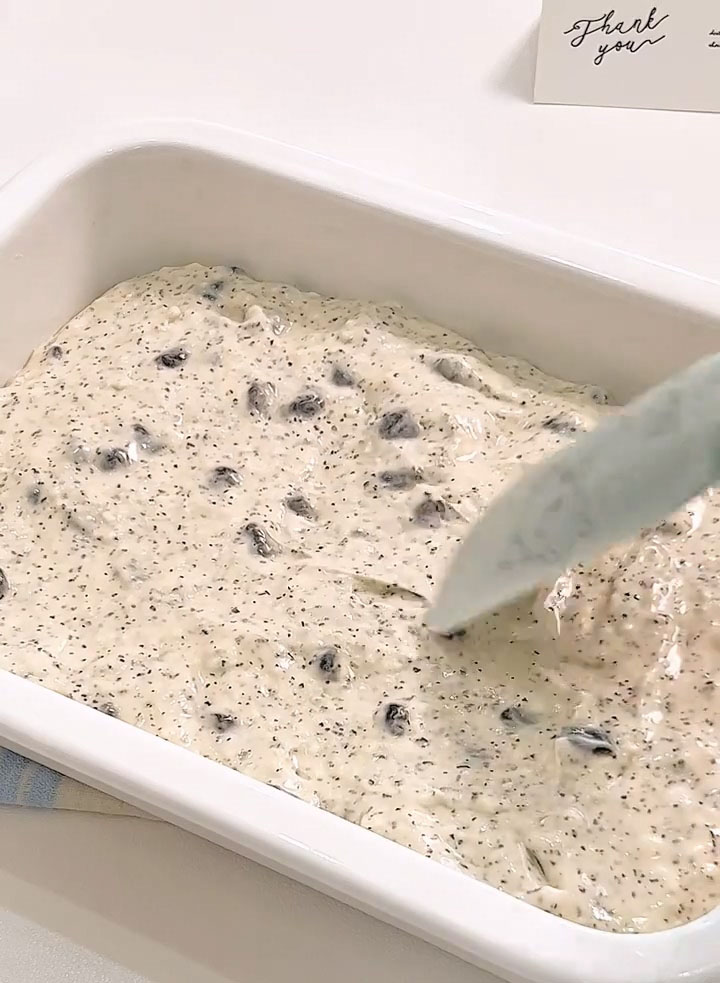
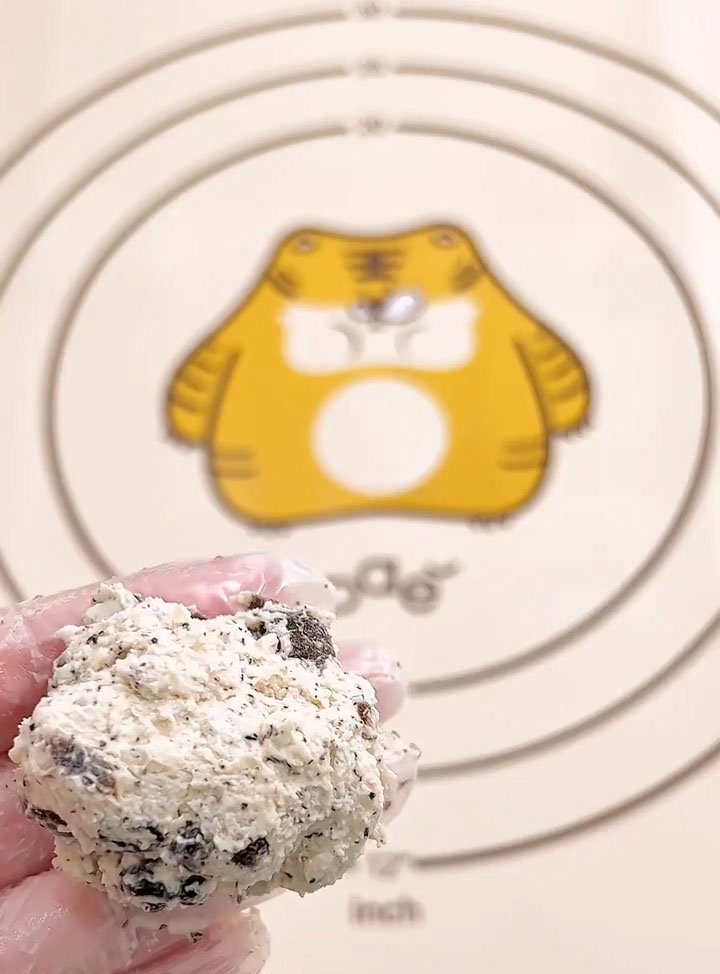
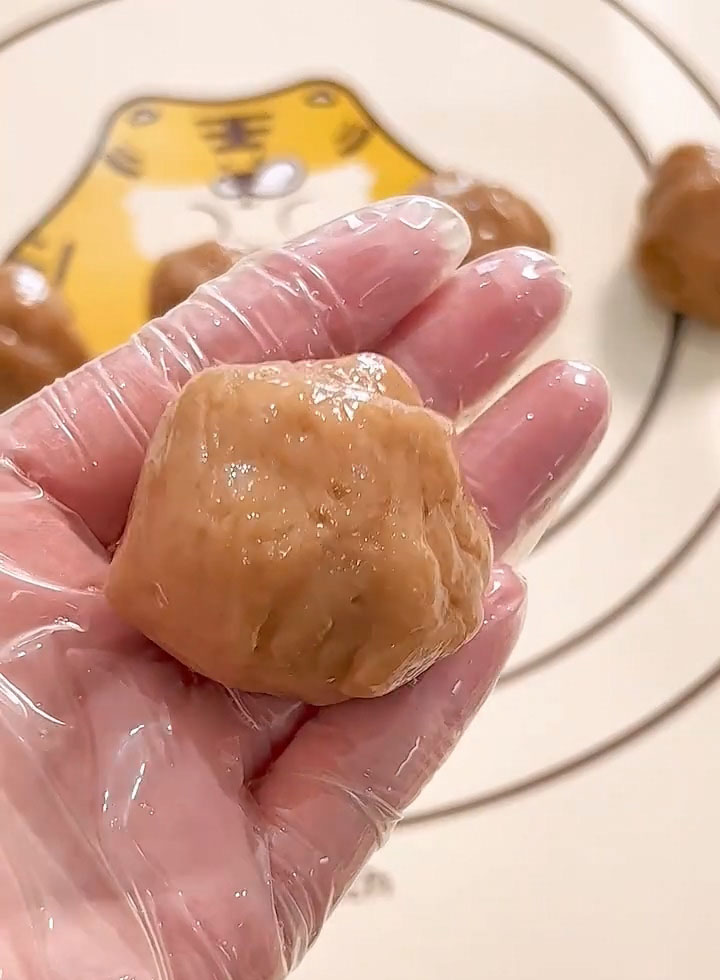
- Once chilled, remove the filling from the refrigerator and divide it into 30 g portions. Roll each portion into a smooth ball and set aside.
Make the Earl Grey Tea Snow Skin
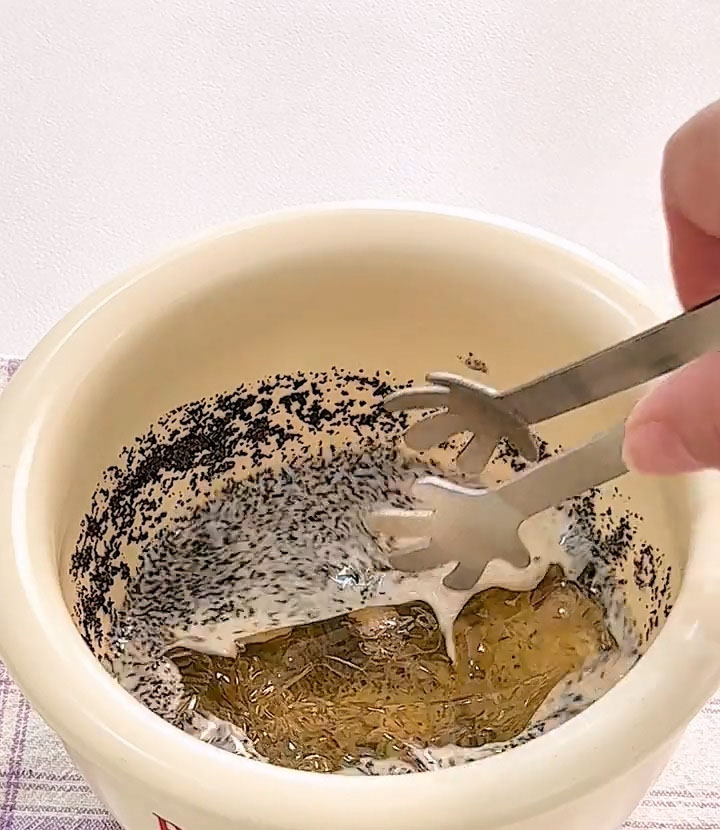
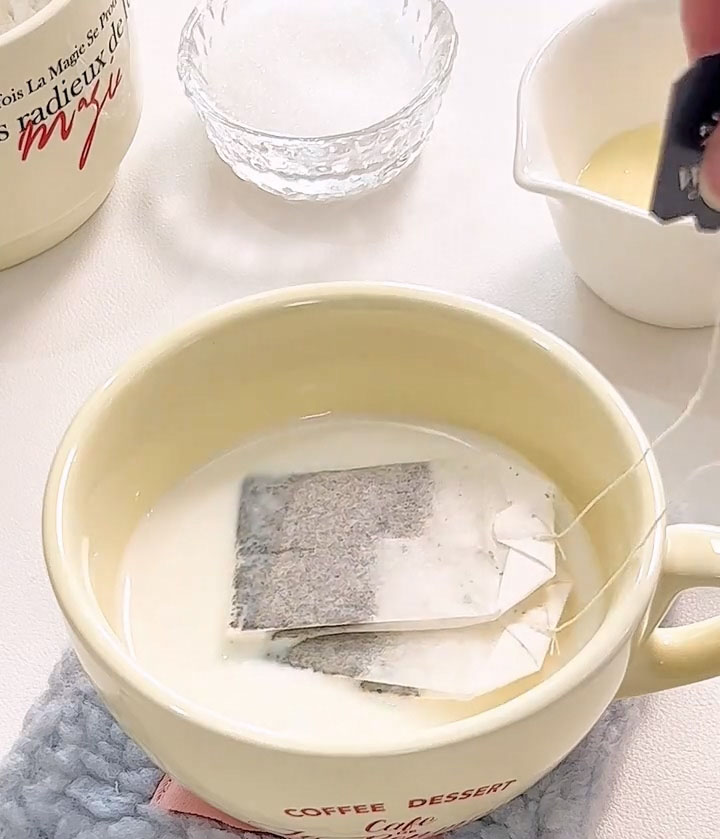
- Pour 150 g of warm milk into a bowl. Add 2 Earl Grey tea bags and let them steep for about 5 minutes, until the milk turns a deep tea color. Remove the tea bags, gently squeezing them to release any remaining liquid back into the bowl. Allow the infused milk to cool until it is warm to the touch.
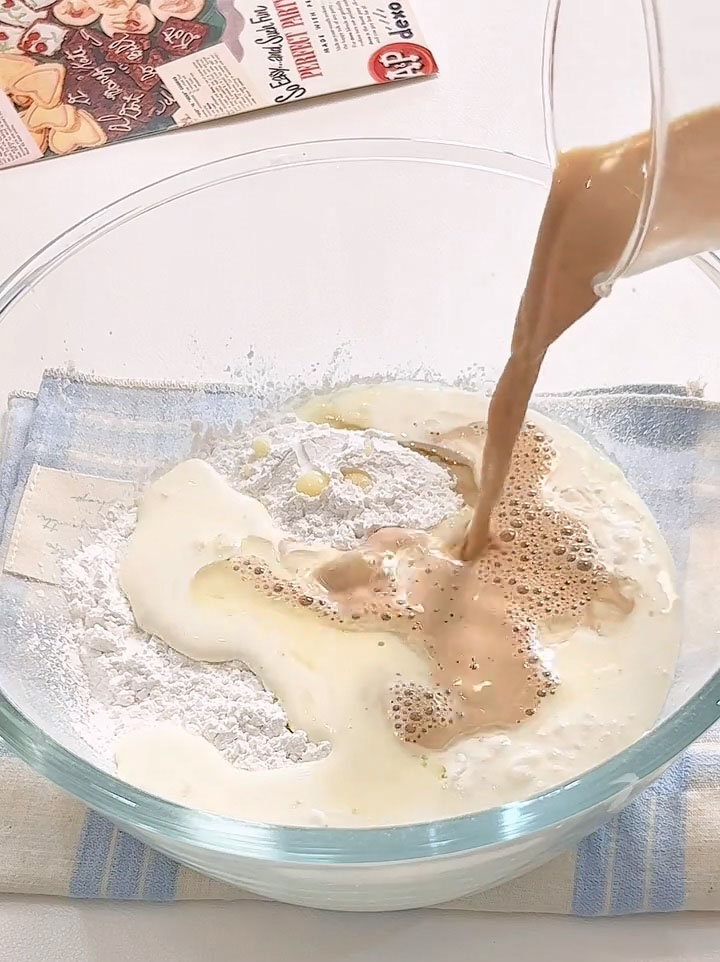
- In a large mixing bowl, combine the dry ingredients: 22 g of wheat starch, 45 g of rice flour, and 45 g of glutinous rice flour. Add 78 g of heavy cream, 18 g of corn oil, 22 g of condensed milk, and 20 g of sugar. Pour in the prepared Earl Grey-infused milk. Use a silicone spatula to mix everything together until the batter is smooth with no dry lumps or visible particles.
- Strain the batter through a fine-mesh sieve into a heatproof bowl to ensure a silky texture. Cover the bowl tightly with plastic wrap and poke a few small holes in the wrap with a toothpick to allow steam to escape during cooking.
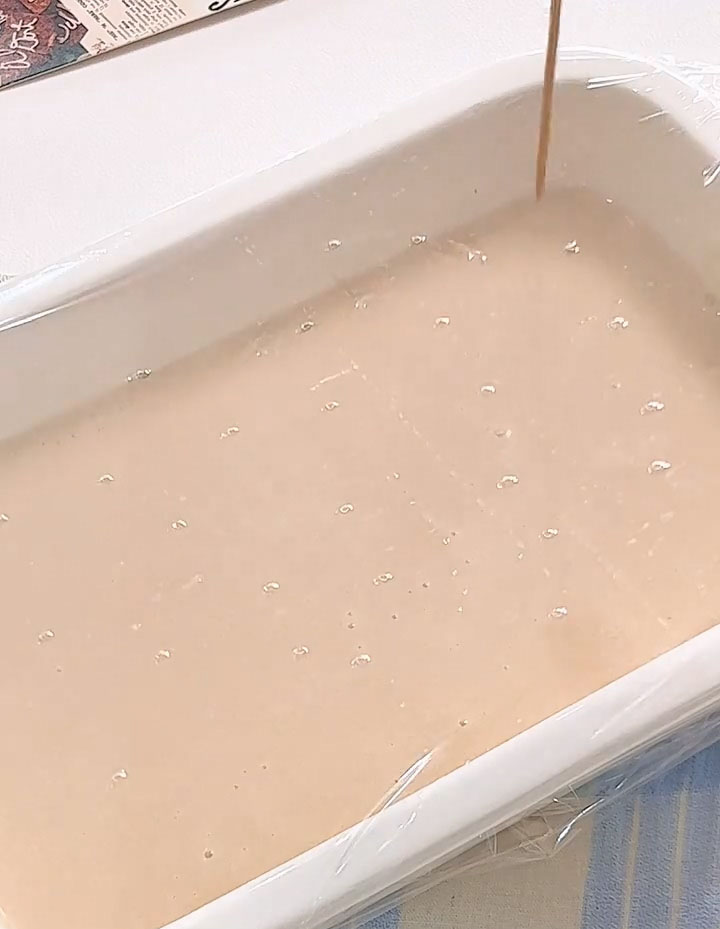
- Bring water in a steamer to a rolling boil. Place the bowl of batter into the steamer and steam over medium heat for 20 minutes. The skin is ready when it is fully set and a chopstick inserted into the center comes out clean with no sticky batter.
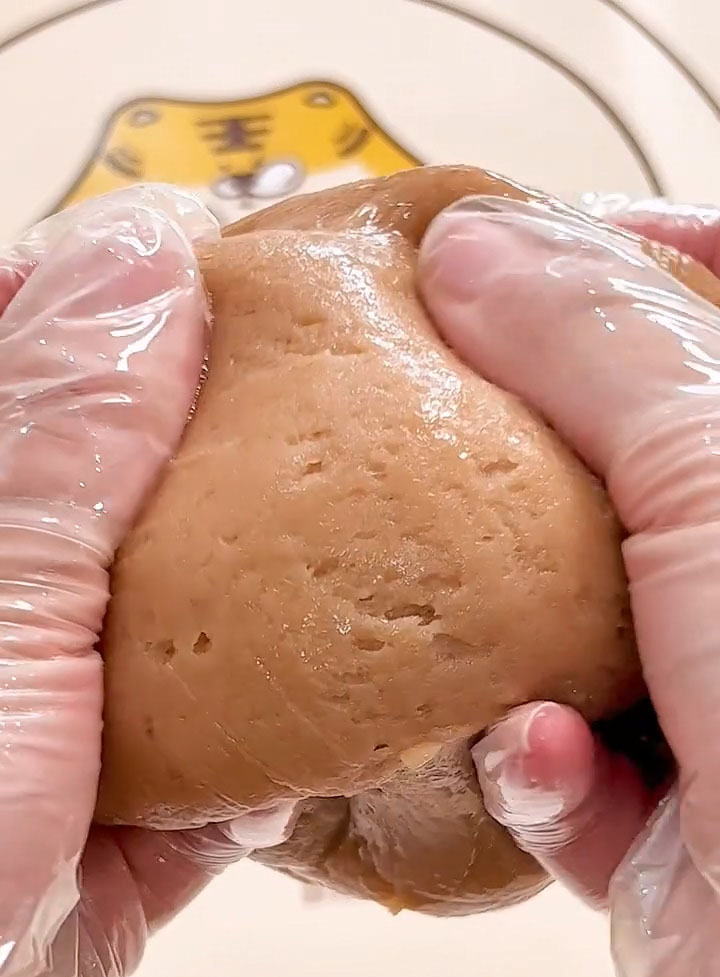
- Remove the bowl from the steamer and allow the skin to cool until it is warm enough to handle. Wearing disposable gloves, knead the skin by folding, pressing, and pulling it repeatedly until it becomes smooth, elastic, and no longer sticky to the touch. Divide the skin into 35 g portions and roll each into a ball.
Assemble the Mooncakes
- Take one 35 g portion of snow skin and flatten it into a disc. Aim for a disc that is slightly thicker in the center and thinner around the edges—this helps prevent the filling from breaking through the bottom while making the edges easier to seal.
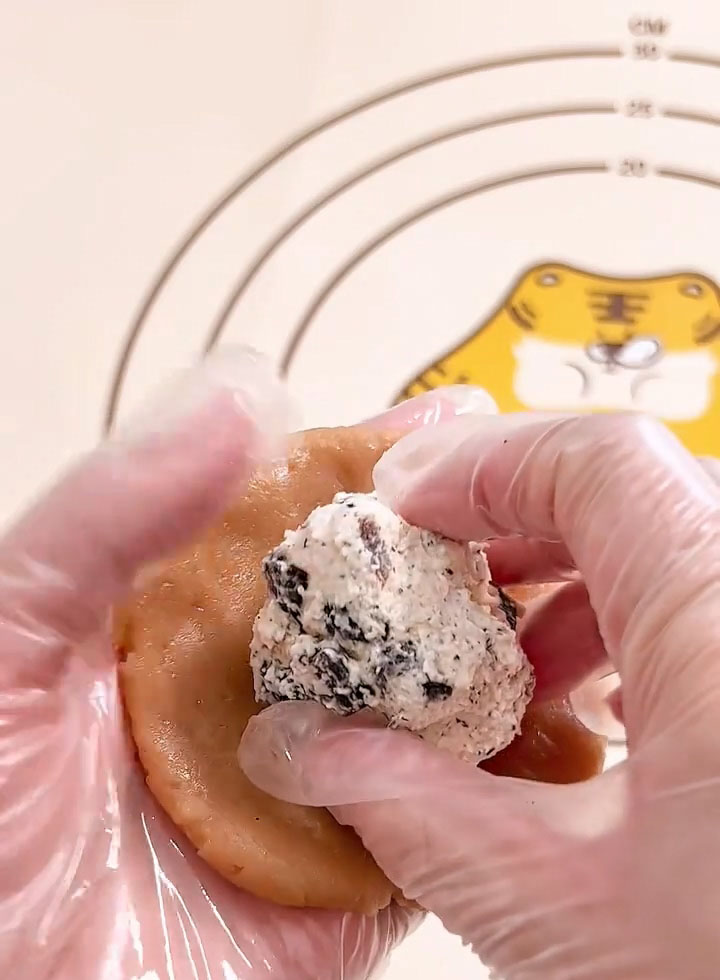
- Place one 30 g ball of milk tea cream cheese filling in the center of the disc. Gently cup the disc in your hand and use your other hand to push the skin upward around the filling, gradually enclosing it. Pinch the edges together firmly to seal, ensuring there are no gaps or openings.
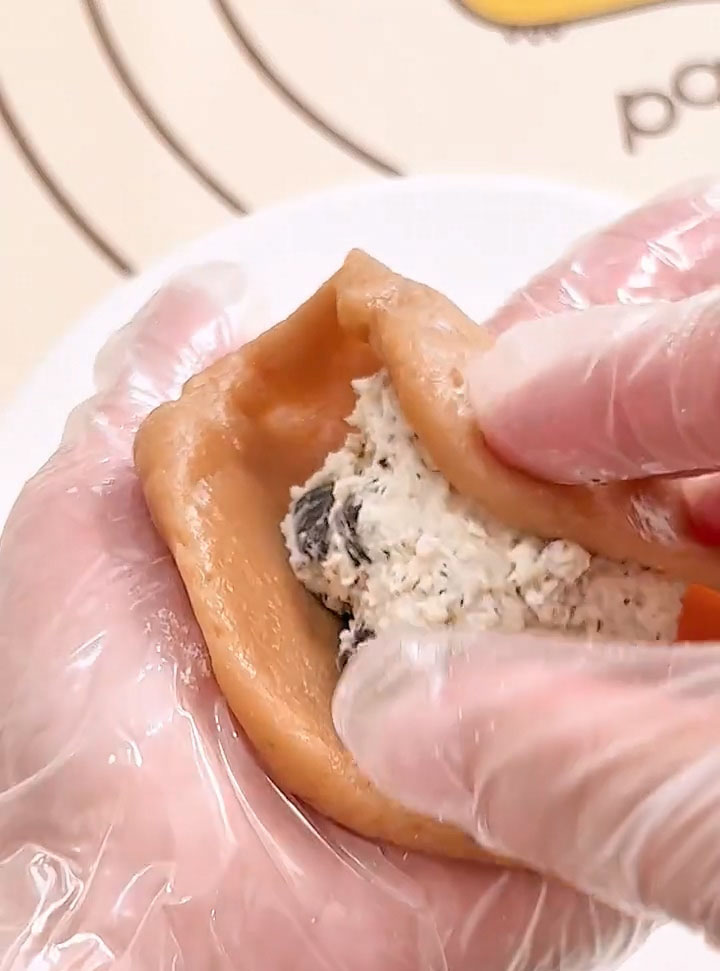
- Roll the assembled ball gently between your palms to smooth the surface, then lightly dust it with cooked glutinous rice flour to prevent sticking.
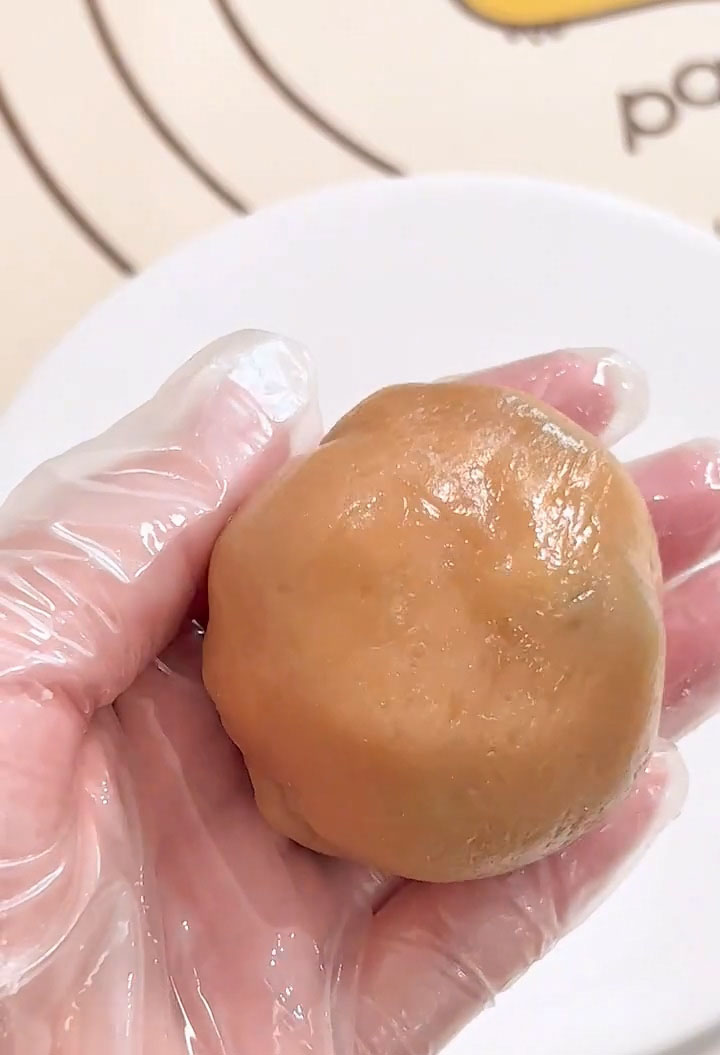
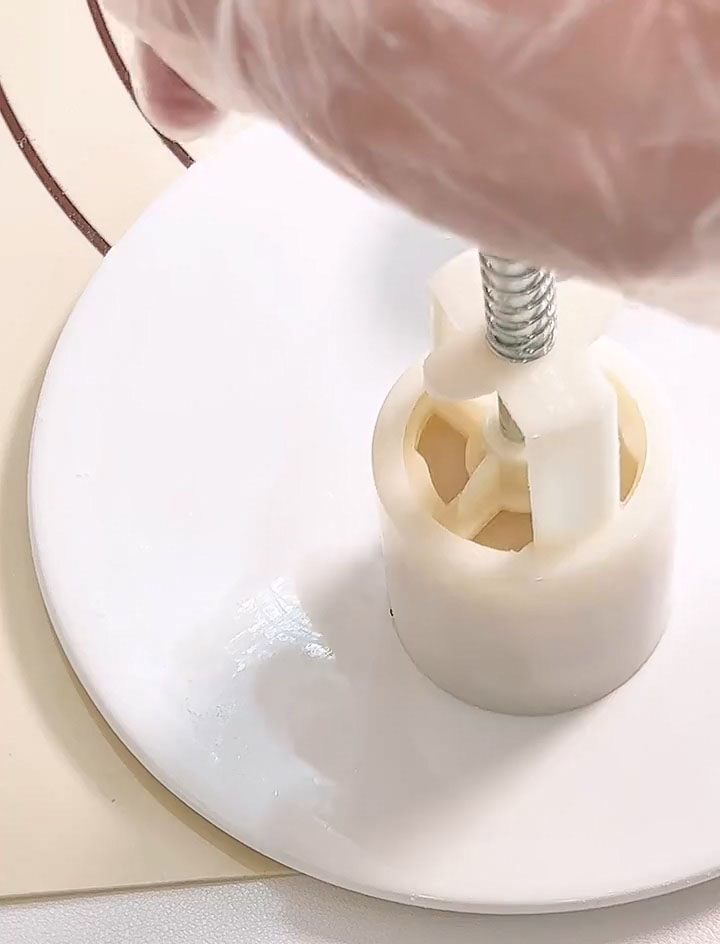
- Place the dusted ball into a mooncake mold. Press the mold handle firmly and evenly, then release to reveal the shaped mooncake. Repeat with the remaining skin and filling portions.
Storage
Store your finished Earl Grey Tea Snow Skin Mooncakes in an airtight container in the refrigerator. They will remain fresh for up to 3–4 days. Keep them chilled until ready to serve, as the filling is best enjoyed cold and firm.
Frequently Asked Questions
Why is my snow skin too sticky?
If your snow skin is excessively sticky, it may not have been kneaded enough. Kneading while the dough is still warm activates the starches and creates a smoother, less sticky surface. Additionally, be sure to dust your hands and work surface with cooked glutinous rice flour when handling the dough.
Can I make these mooncakes without tapioca pearls?
Absolutely. The tapioca pearls are optional and included for those who enjoy the bubble tea experience. The filling is just as delicious without them, offering a pure milk tea cream cheese flavor.
Why did my filling not set?
The gelatin sheets are essential for setting the filling. If your filling remained soft, the gelatin may not have been fully dissolved, or it may not have chilled for a sufficient amount of time. Be sure to dissolve the gelatin completely in the warm milk mixture and allow the filling to chill for at least 4 hours.
Can I use a different type of tea?
While Earl Grey provides a distinctive bergamot flavor that pairs wonderfully with milk, you can experiment with other black teas or even jasmine tea for a different aromatic profile. Keep in mind that the flavor will vary based on the tea you choose.
How do I prevent cracks in the snow skin when wrapping?
Cracking usually occurs if the skin is too dry or if it has cooled too much. Keep the skin covered while you work, and if it becomes stiff, knead it briefly to restore pliability. Also, forming the disc with a thicker center helps prevent stress points that can lead to cracks.
Is it necessary to use both tea powder and tea bags?
Using both creates a more robust tea flavor that permeates both the filling and the skin. The tea powder infuses the filling with concentrated flavor, while the tea bags steeped in milk give the skin a subtle, aromatic base. If you prefer a milder tea taste, you can reduce the amount of tea powder or use only one tea bag.
Earl Grey Tea Snow Skin Mooncakes (Milk Tea Filling)
Ingredients
Milk Tea Cream Cheese Filling
- 200 g cream cheese
- 51 g milk
- 4 g Earl Grey tea powder
- 8 g gelatin sheets
- 160 g heavy cream
- 34 g sugar
- Tapioca pearls optional
Earl Grey Tea Snow Skin
- 150 g warm milk
- 2 Earl Grey tea bags
- 78 g heavy cream
- 18 g corn oil
- 22 g condensed milk
- 20 g sugar
- 22 g wheat starch
- 45 g rice flour
- 45 g glutinous rice flour
- Cooked glutinous rice flour for dusting
Instructions
Make the Milk Tea Cream Cheese Filling
- Pour 51 g of warm milk into a small bowl. Add 4 g of Earl Grey tea powder and stir thoroughly until the powder is completely dissolved and no lumps remain. Add the 8 g of gelatin sheets (which have been pre-soaked in cold water until soft and then squeezed dry) and continue stirring until the gelatin has fully melted. Set the mixture aside to cool.
- Place 200 g of cream cheese, which has been softened at room temperature, into a large mixing bowl. Use a silicone spatula to stir and press until the cheese is completely smooth with no lumps. Pour the cooled milk tea-gelatin mixture into the bowl and stir until the cheese and tea liquid are fully combined and the texture is uniform.
- In a separate clean, dry bowl, combine 160 g of chilled heavy cream and 34 g of sugar. Use an electric hand mixer to whip the cream until it reaches a yogurt-like consistency—thick enough to cling to the beaters without being runny. Pour the whipped cream into the cream cheese mixture and gently fold together until no streaks remain.
- If using tapioca pearls, add the cooked and well-drained pearls to the mixture and fold gently until they are evenly distributed throughout the filling. Transfer the finished filling to a food storage container, smooth the top with a spatula, and refrigerate for at least 4 hours, or until the filling is completely firm and holds its shape when handled.
- Once chilled, remove the filling from the refrigerator and divide it into 30 g portions. Roll each portion into a smooth ball and set aside.
Make the Earl Grey Tea Snow Skin
- Pour 150 g of warm milk into a bowl. Add 2 Earl Grey tea bags and let them steep for about 5 minutes, until the milk turns a deep tea color. Remove the tea bags, gently squeezing them to release any remaining liquid back into the bowl. Allow the infused milk to cool until it is warm to the touch.
- In a large mixing bowl, combine the dry ingredients: 22 g of wheat starch, 45 g of rice flour, and 45 g of glutinous rice flour. Add 78 g of heavy cream, 18 g of corn oil, 22 g of condensed milk, and 20 g of sugar. Pour in the prepared Earl Grey-infused milk. Use a silicone spatula to mix everything together until the batter is smooth with no dry lumps or visible particles.
- Strain the batter through a fine-mesh sieve into a heatproof bowl to ensure a silky texture. Cover the bowl tightly with plastic wrap and poke a few small holes in the wrap with a toothpick to allow steam to escape during cooking.
- Bring water in a steamer to a rolling boil. Place the bowl of batter into the steamer and steam over medium heat for 20 minutes. The skin is ready when it is fully set and a chopstick inserted into the center comes out clean with no sticky batter.
- Remove the bowl from the steamer and allow the skin to cool until it is warm enough to handle. Wearing disposable gloves, knead the skin by folding, pressing, and pulling it repeatedly until it becomes smooth, elastic, and no longer sticky to the touch. Divide the skin into 35 g portions and roll each into a ball.
Assemble the Mooncakes
- Take one 35 g portion of snow skin and flatten it into a disc. Aim for a disc that is slightly thicker in the center and thinner around the edges—this helps prevent the filling from breaking through the bottom while making the edges easier to seal.
- Place one 30 g ball of milk tea cream cheese filling in the center of the disc. Gently cup the disc in your hand and use your other hand to push the skin upward around the filling, gradually enclosing it. Pinch the edges together firmly to seal, ensuring there are no gaps or openings.
- Roll the assembled ball gently between your palms to smooth the surface, then lightly dust it with cooked glutinous rice flour to prevent sticking.
- Place the dusted ball into a mooncake mold. Press the mold handle firmly and evenly, then release to reveal the shaped mooncake. Repeat with the remaining skin and filling portions.
Leave a Reply