
I absolutely love making this dessert when I crave something bright, creamy, and refreshingly tangy. It’s incredibly easy to put together and always feels like a elegant, gourmet treat without any baking required.
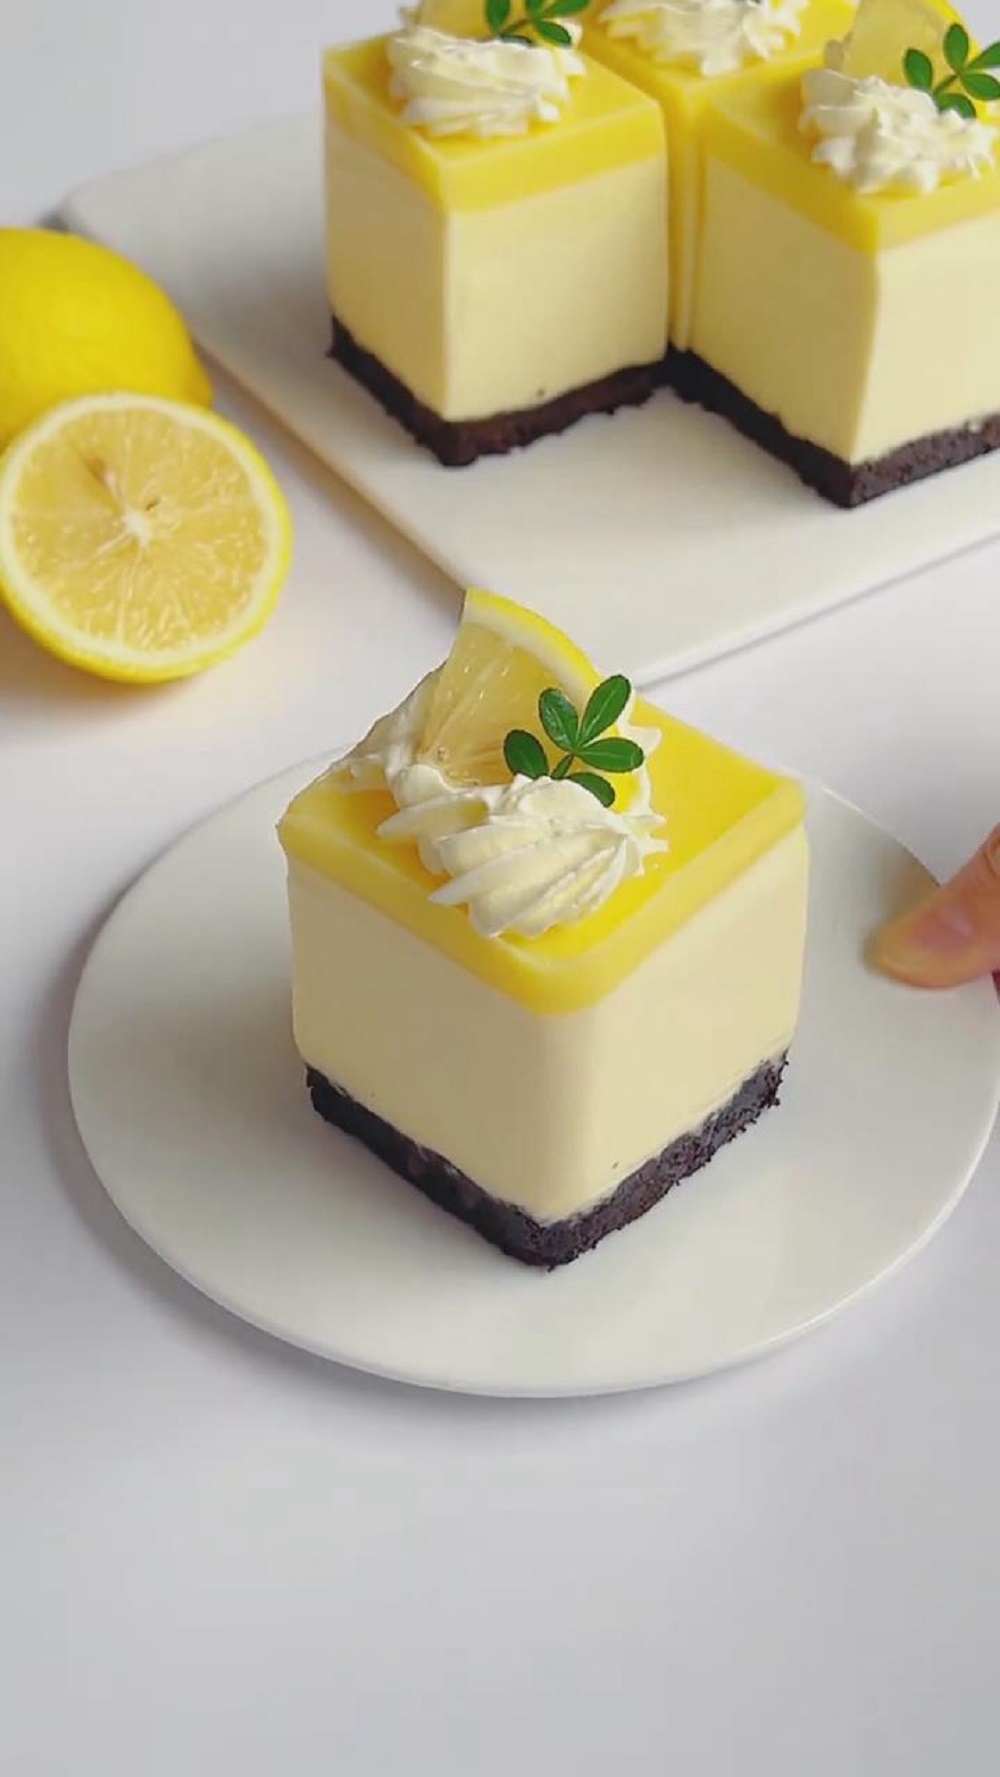
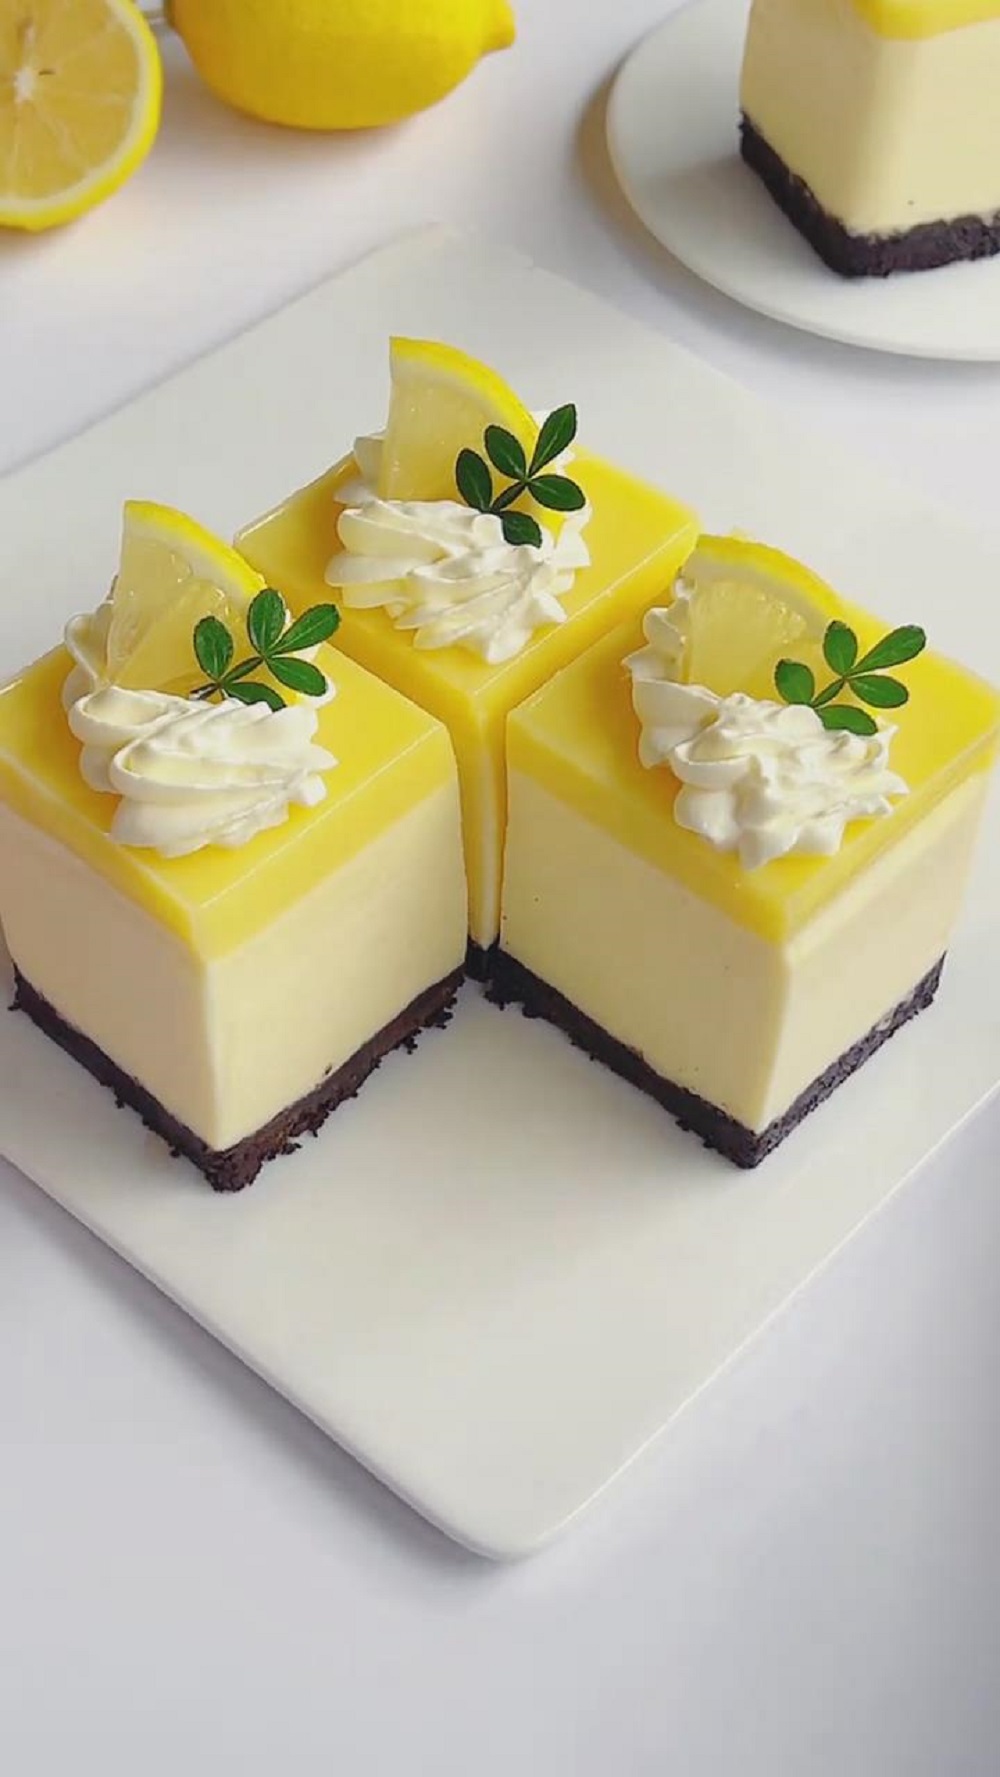
My No-Bake Lemon Cheesecake Mousse Cake
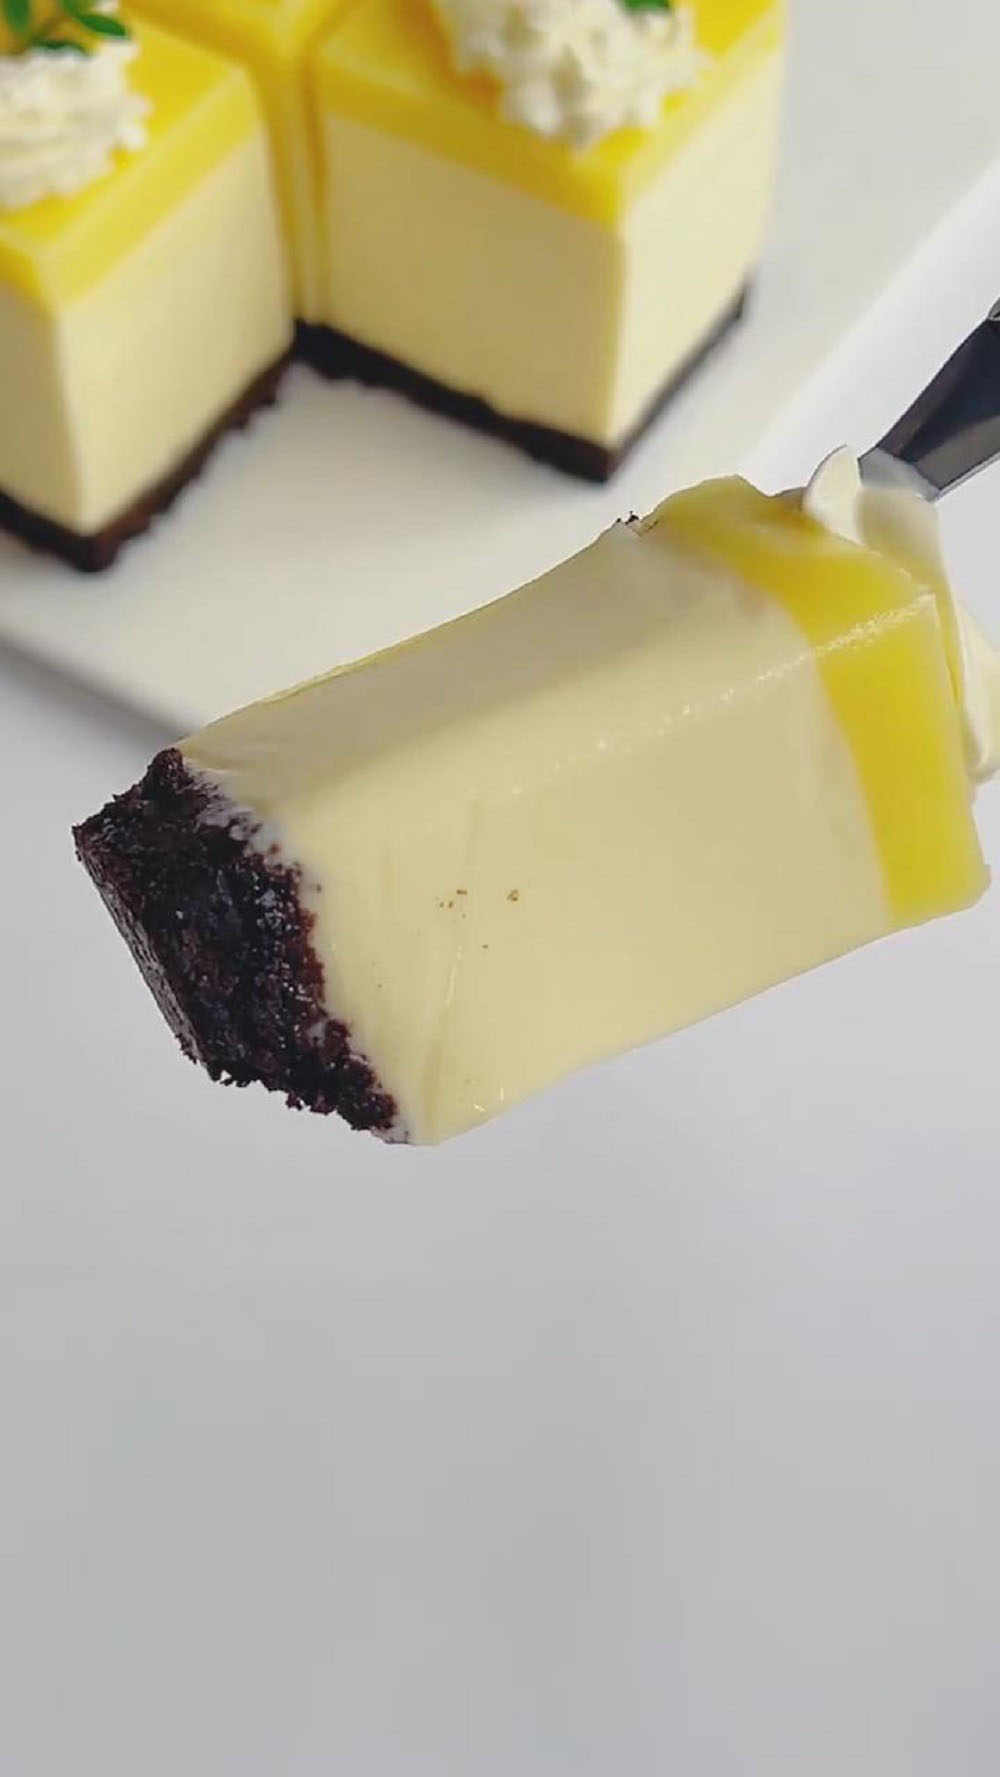
I’ve layered a crunchy Oreo crust with a luxuriously smooth and zesty lemon cheesecake mousse, all topped with a shimmering layer of pure lemon gelée. This recipe is my foolproof method for creating a stunning dessert that’s both impressively delicious and surprisingly simple.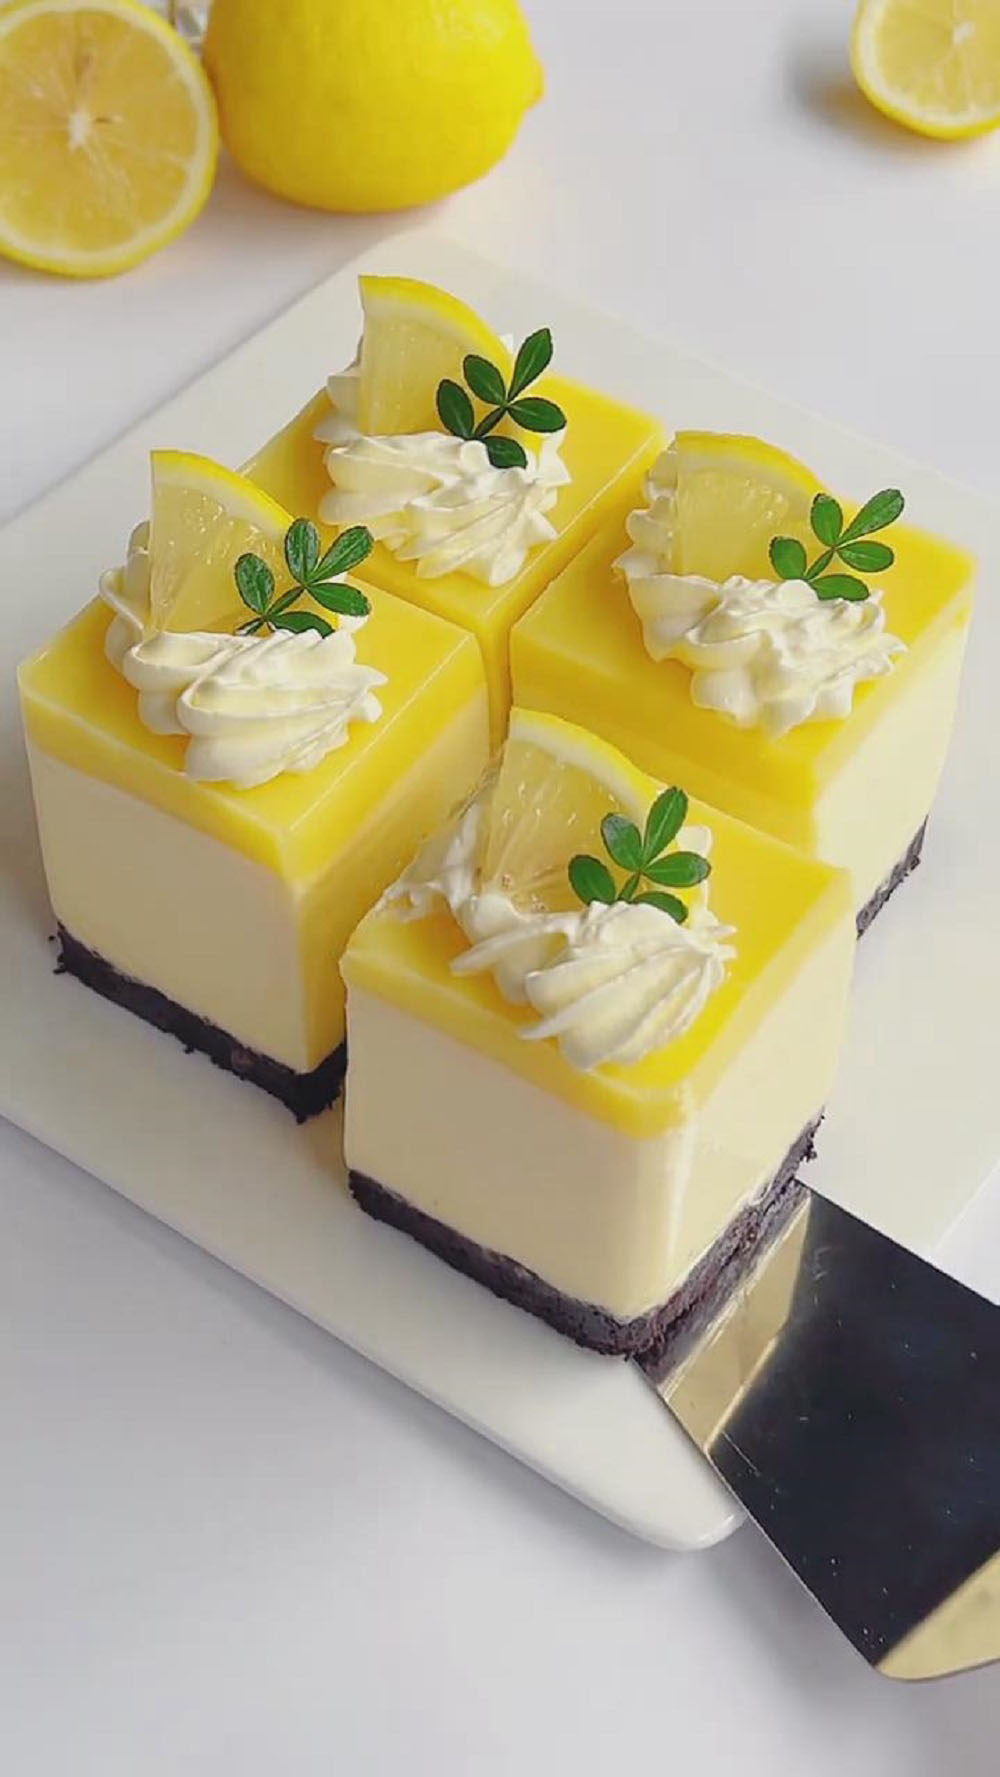
Why you’ll love this recipe:
- No Baking Required: Perfect for warm days or when you don’t want to turn on the oven. It’s all done in the fridge!
- Incredibly Refreshing: The bright, tangy lemon flavor is perfectly balanced with the sweet, creamy cheesecake base, making it a light yet satisfying dessert.
- Stunning Presentation: With its distinct layers and optional elegant decorations, this cake looks like it came from a professional patisserie.
- Make-Ahead Dream: You can (and should!) make this a day ahead, making it the ultimate stress-free dessert for entertaining.
Ingredients:
(Fits 11×11×8cm mold, serves about 4–6 people)
For the cake base
- 70g Oreo crumbs (filling removed)
- 35g unsalted butter, melted and cooled
For the cheesecake mousse layer
- 210g cream cheese, softened to room temperature
- 25g fine sugar
- 80g lemon curd (store-bought or homemade)
- 120g heavy cream (at least 30% fat)
- 8g gelatin sheets, softened in ice water and squeezed dry
- 90g whole milk, warmed to about 50°C
For the lemon topping
- 100g lemon curd
- 5g gelatin sheets, softened in ice water and squeezed dry
- 50g hot water
Optional decorations
- 50g whipped cream
- 2–3 thin slices of fresh lemon
- 3–4 mint leaves
Note:
Always soak gelatin in ice water; warm water will dissolve it too soon.
Use room-temperature cream cheese to ensure smooth mixing.
Instructions:
Step 1: Make the Oreo Crust
Place 70g of Oreo crumbs into a clean bowl. Use a rolling pin or the back of a spoon to crush them into finer crumbs (skip if already fine enough). This ensures the crust packs together firmly.
Pour 35g of melted butter into the Oreo crumbs. Use a spatula to mix until all crumbs are evenly coated with butter (The mixture should hold together when pressed).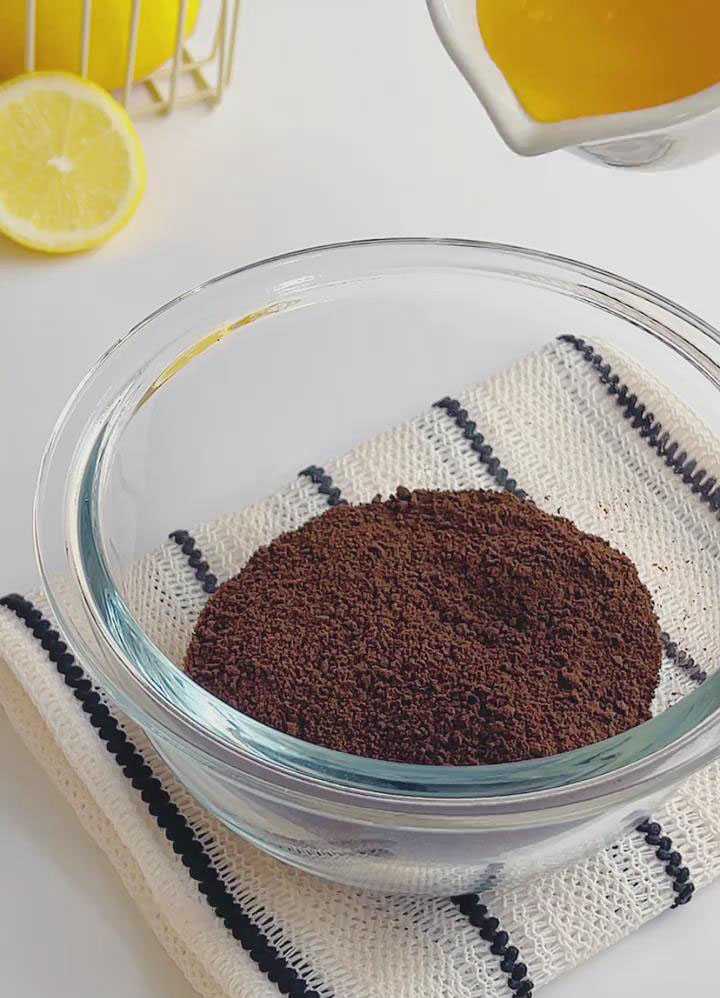
Transfer the buttered crumb mixture into an 11×11×8cm pan (preferably lined with parchment paper for easy removal). Use the flat bottom of a spoon or a small glass to press the mixture firmly and evenly into the bottom of the pan, paying special attention to the edges to prevent crumbling later.
Place the pressed crust in the refrigerator to set for at least 20 minutes (or until the mousse mixture is ready, ensuring the base is completely firm).
Step 2: Make the Cheesecake Mousse Layer
In another clean, dry, and grease-free large bowl, place the 210g of softened cream cheese.
Add 25g of fine sugar to the cream cheese. Mix with a spatula for about 30 seconds until the sugar is dissolved and the cheese mixture is smooth and lump-free (Avoid high-speed mixing to prevent incorporating too many air bubbles, which affects the mousse’s texture).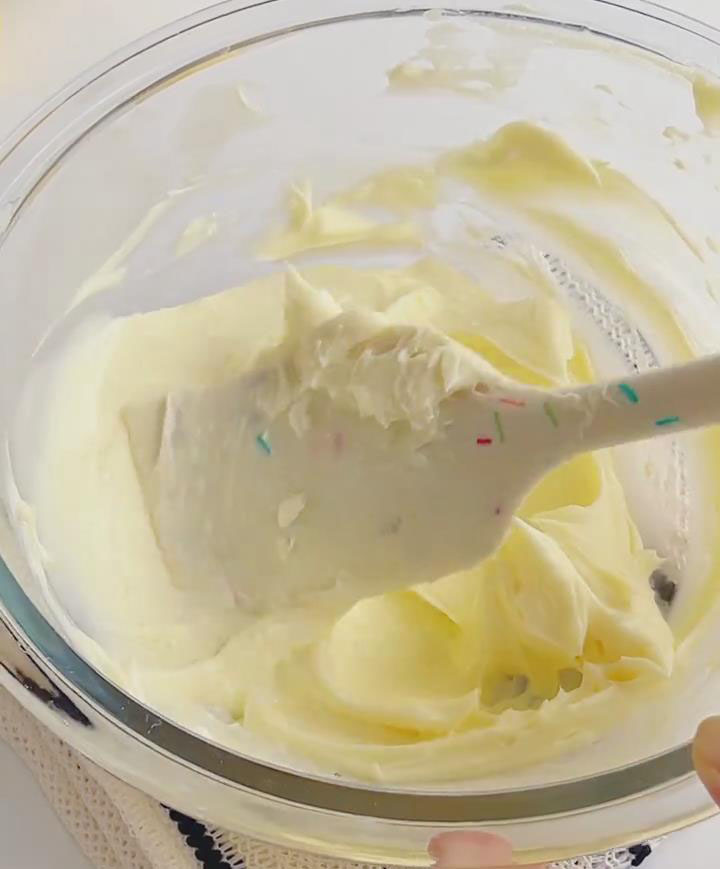
Add 80g of lemon curd and 120g of heavy cream. Use a whisk or mixer on low speed to combine until the mixture is smooth and slightly fluid.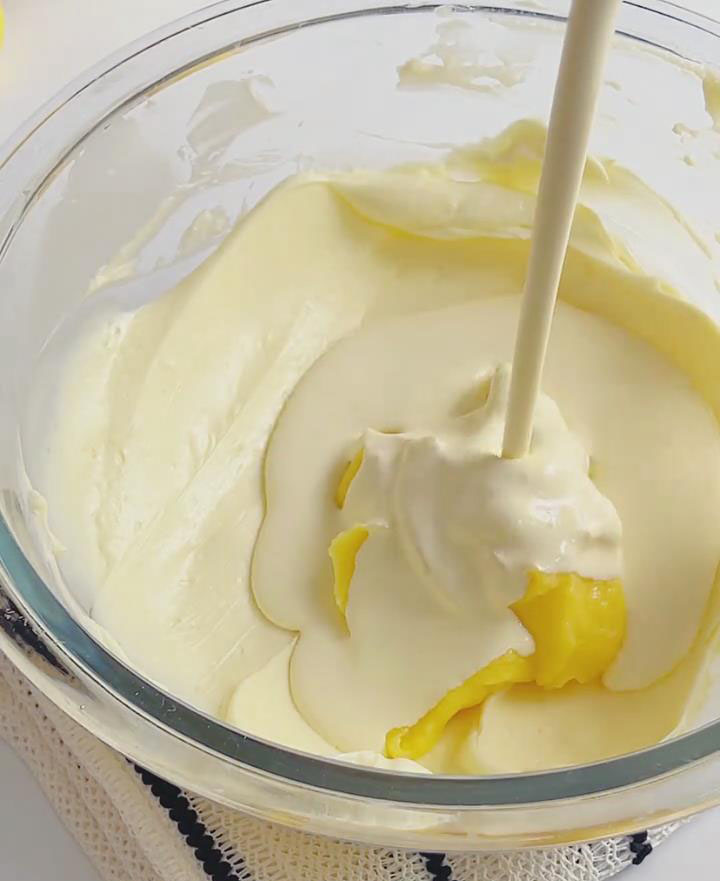
In a small bowl, heat 90g of whole milk until warm (should feel warm, not hot, to the touch). Add the softened, squeezed-dry 8g of gelatin sheets. Stir with a spoon or chopsticks until the gelatin is completely dissolved with no granules remaining.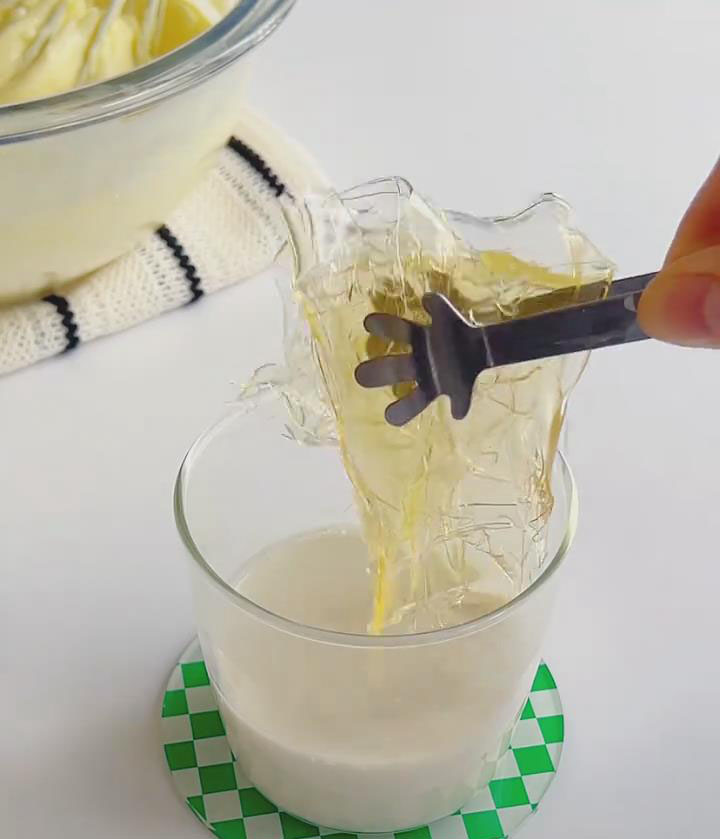
Pour the gelatin-milk mixture into the cheese batter. Stir quickly and thoroughly to combine (preventing the gelatin from setting in clumps). The mousse mixture is now ready.
Take the chilled Oreo crust out of the refrigerator. Slowly pour the mousse mixture into the pan. Gently tap the pan on the counter 2-3 times to release any air bubbles trapped in the mousse (pop any remaining surface bubbles with a toothpick).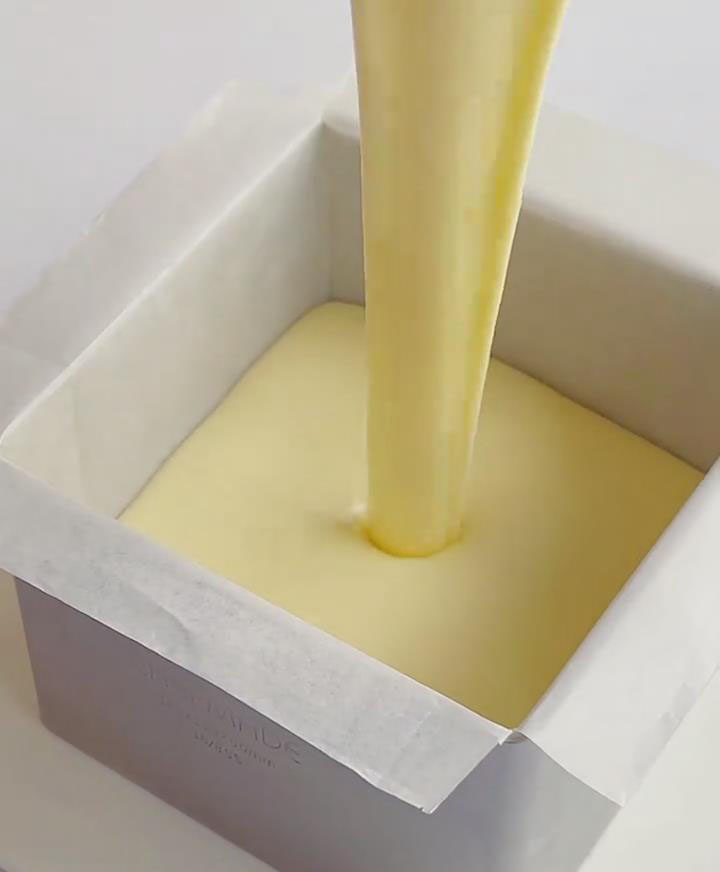
Return the pan to the refrigerator. Chill until the mousse layer is completely set, for at least 4 hours (Overnight is recommended for a firm set, making the next steps easier).
Step 3: Make the Lemon Topping Layer
Once the mousse layer is fully set, make the lemon topping. In a clean bowl, combine 100g of lemon curd with 50g of boiling water. Stir with a spoon until the lemon curd is completely dissolved into a smooth liquid (Strain through a sieve if any undissolved bits remain, ensuring a perfectly smooth topping).
Add the softened, squeezed-dry 5g of gelatin sheets. Stir until the gelatin is completely dissolved. Let this lemon-gelatin mixture cool down to room temperature (Pouring it in while hot could melt the set mousse layer below).
Take the chilled mousse cake out of the refrigerator. Slowly and evenly pour the cooled lemon topping over the surface of the mousse. Gently tilt the pan to distribute the topping evenly.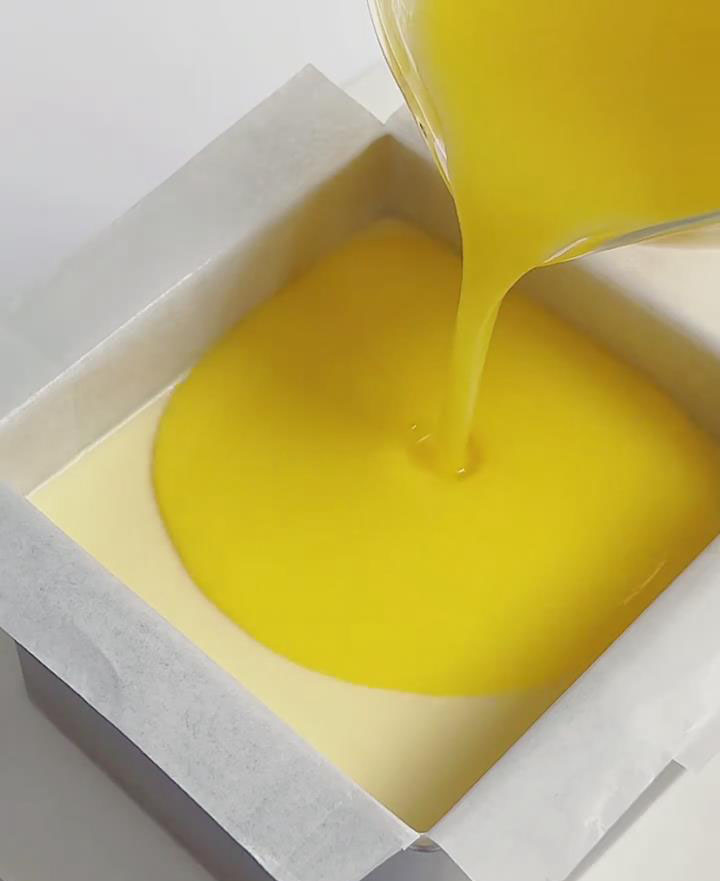
Place the pan back in the refrigerator to let the lemon topping set completely, for at least 1 hour (until the surface is firm and doesn’t feel sticky to the touch).
Step 4: Unmold and Decorate
Wrap the outside of the mold with a warm towel for 10–15 seconds to loosen. Gently push the cake out from the bottom.
If using decorative cream, whip the 50g of heavy cream until stiff peaks form (peaks stand straight up). Transfer to a piping bag fitted with your chosen tip. Pipe rosettes or borders along the edges of the cake or onto individual slices.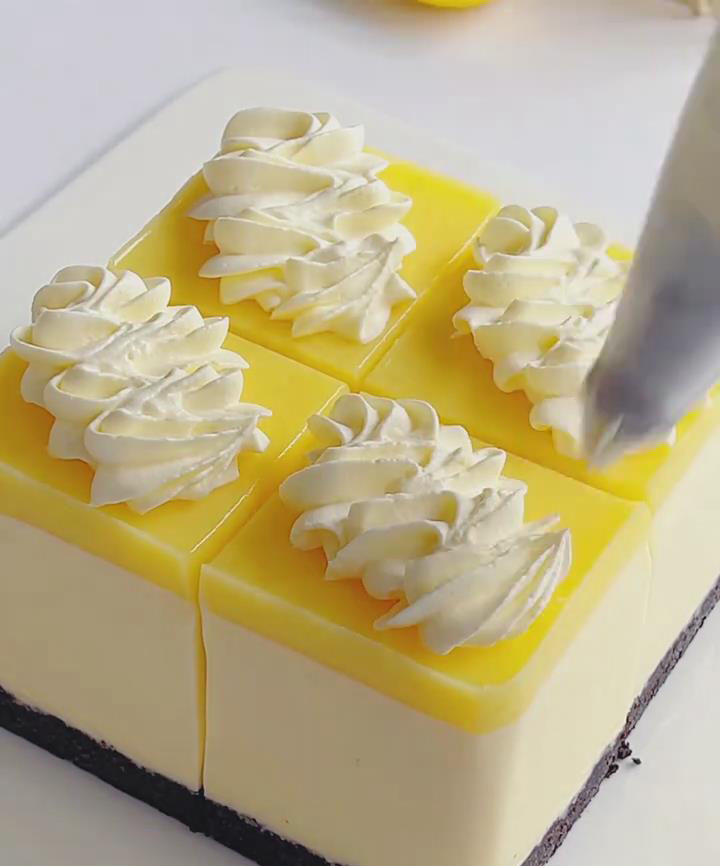
Gently pat the fresh lemon slices dry and ensure all seeds are removed. Place them on or next to the cream decorations. Add a few mint leaves for a fresh garnish.
Use a clean, sharp knife (wiped clean between cuts for neat slices) to cut the cake into even portions (suggested size: approx. 4x5cm pieces). Serve immediately.
Notes:
Gelatin Sheets: Must be softened in ice cold water. Using room temperature water can cause the gelatin to start dissolving and lose its setting power. Always squeeze out excess water thoroughly after softening to avoid diluting your mixture.
Temperature Control: The gelatin mixture must be cooled to room temperature before adding it to the mousse or topping layers. Adding it while hot can melt the cream cheese and cause the whipped cream to deflate. When unmolding, avoid heating the pan for too long to prevent the cake from melting or deforming.
Storage: The finished Lemon Cheesecake Mousse must be stored sealed in the refrigerator. Best consumed within 3 days. For longer storage, freeze it (lasts about 1 month). Thaw in the refrigerator for about 1 hour before serving.
Flavor Adjustments: For a stronger lemon flavor, you can add a small amount of finely grated lemon zest (avoid the bitter white pith) to the cheesecake mousse layer. If you prefer less sweetness, you can reduce the sugar slightly, but be aware that very low sugar can sometimes affect the setting texture slightly.
Smoothness is Key: For the absolute silkiest texture, you can strain the cheesecake mousse mixture through a fine-mesh sieve after adding the gelatin to remove any potential tiny lumps of cream cheese.
Frequently Asked Questions
Q: Can I use gelatin powder instead of sheets?
A: Yes. The general conversion is 1 sheet of gelatin = about 1 teaspoon (3g) of powdered gelatin. Bloom the powdered gelatin in 2 tablespoons of cold water until it becomes a solid sponge-like gel, then proceed to melt it in the warm milk or hot water as directed.
Q: Where can I find lemon curd, or can I make it?
A: Lemon curd is available in most supermarkets near the jams or in the baking aisle. It’s also very easy to make at home with lemon juice, zest, sugar, eggs, and butter. A simple online search will yield many reliable recipes.
Q: My mousse layer didn’t set firmly. What happened?
A: The most common reasons are: 1) The gelatin wasn’t fully dissolved before being added. 2) The mousse wasn’t chilled long enough (4 hours is the minimum; overnight is best). 3) The gelatin measurement was inaccurate. 4) The mixture was too warm when the gelatin was added, deactivating its setting power.
Leave a Reply