
These milk popsicles are smooth, creamy, and made with just 4 simple ingredients. No cream, no eggs, and no ice crystals—perfect easy summer treat!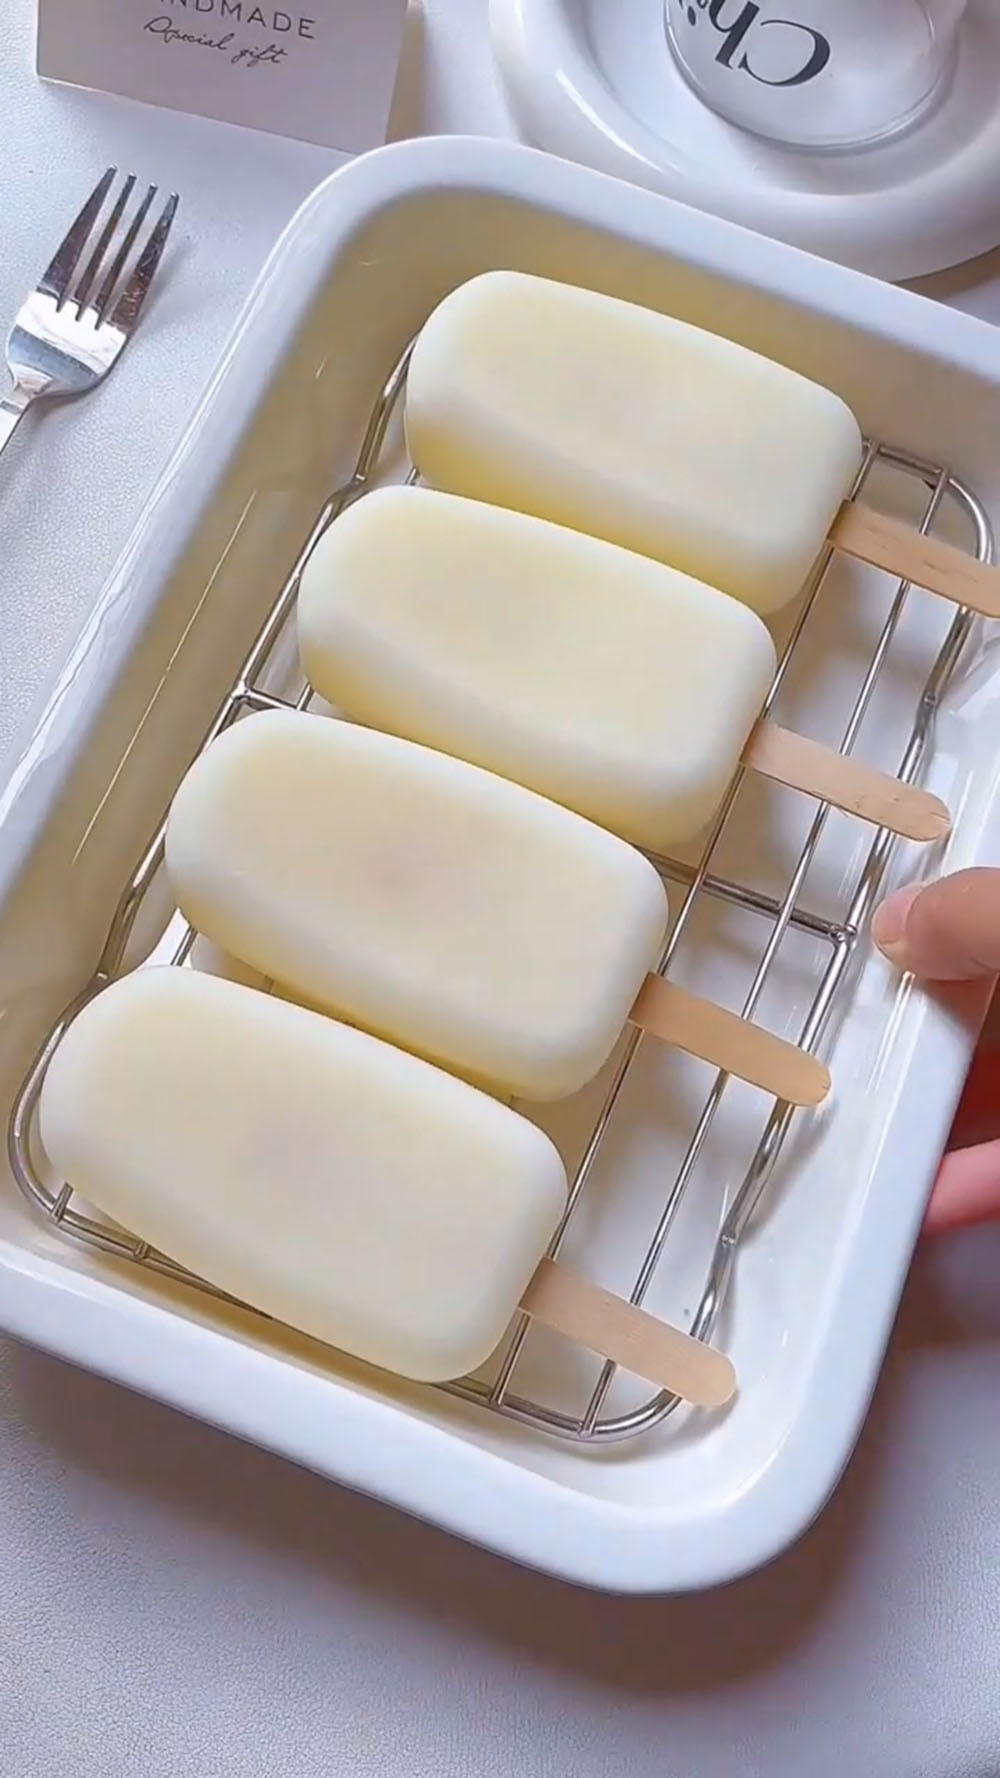
Easy Milk Popsicles Recipe (No Ice Crystals!)
Making popsicles is honestly a little addictive—once the weather starts to warm up, I naturally find myself making batch after batch in the kitchen.
But out of all the variations, this simple milk popsicle is one I keep coming back to.
It might look plain at first glance, nothing fancy or over-the-top, but sometimes that’s exactly what you want.
When I’m craving something lighter and more refreshing—especially compared to rich chocolate popsicles—this one just hits the spot.
Another reason I love it is how easy it is to make. The ingredients are super basic—things you probably already have at home—and the process is quick and straightforward.
You don’t need any complicated steps or special equipment. The only “hard” part is waiting for it to freeze, but once it’s ready, you’ll have a batch of creamy, nostalgic popsicles that are perfect for any hot day.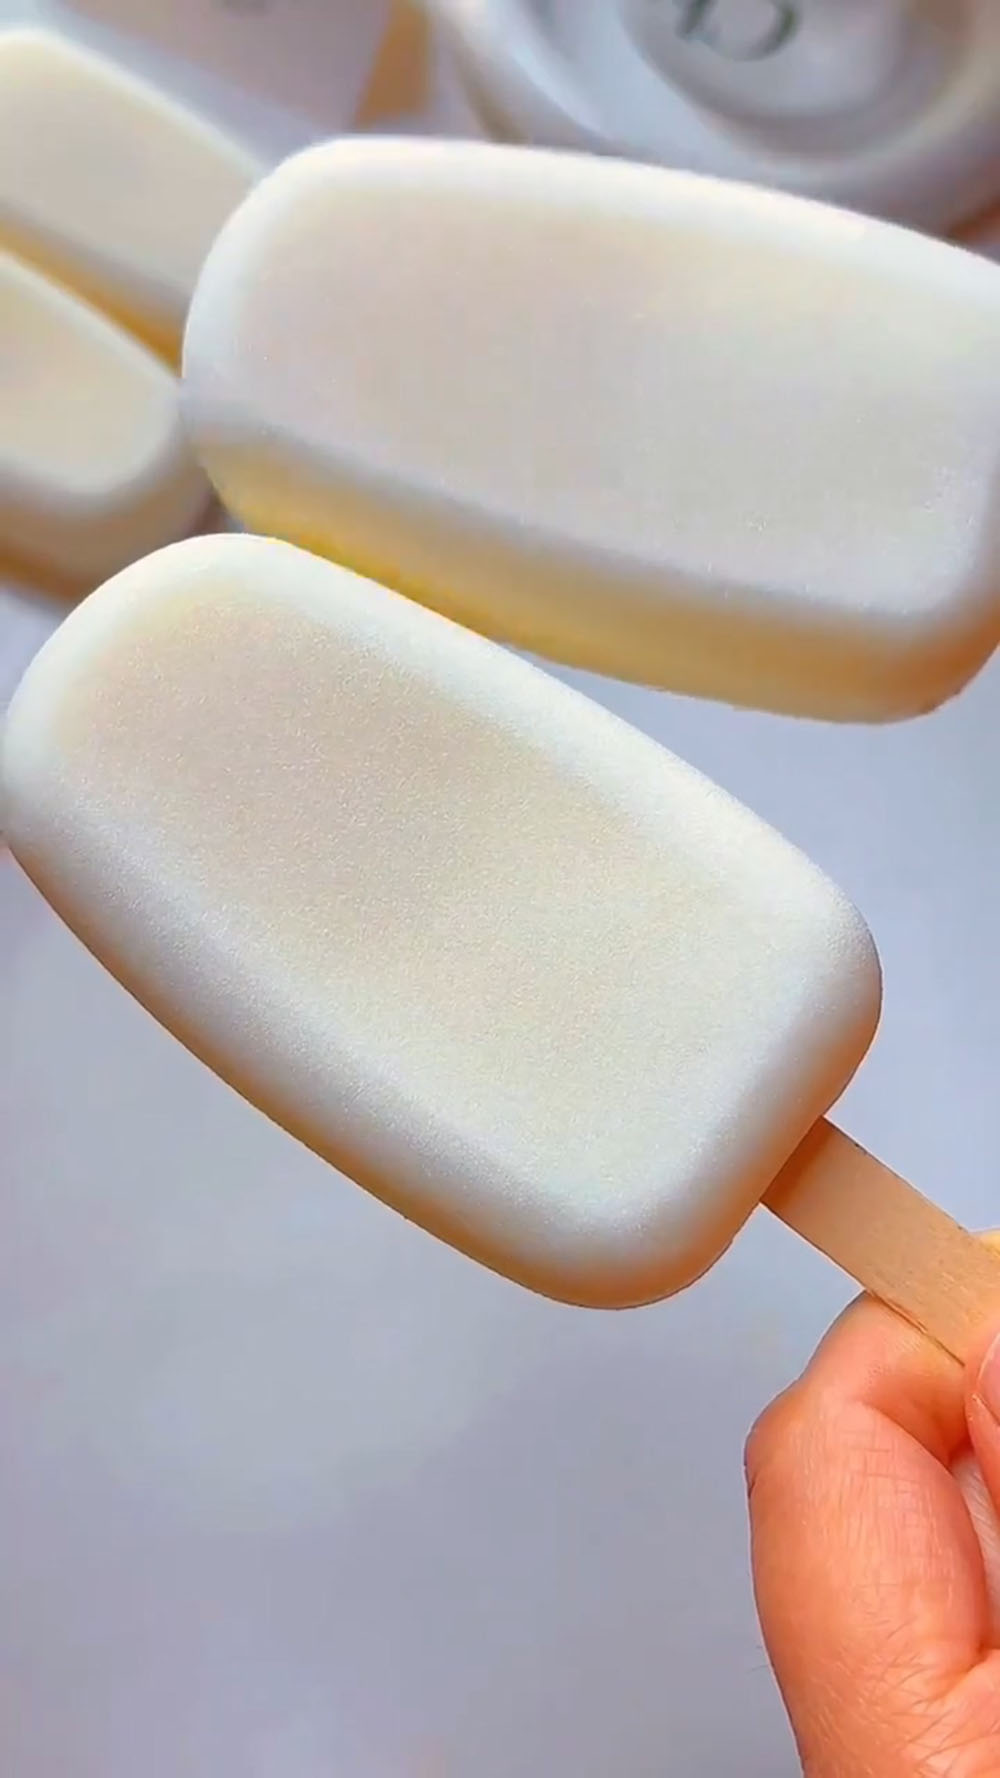
Why You’ll Love This Recipe
- No heavy cream, no eggs — This recipe keeps things simple and budget-friendly. You won’t need to hunt down specialty ingredients or use up expensive cream.
- Ready in 5 minutes (plus freezing) — The active prep time is barely 5 minutes. Just whisk, cook, pour, and freeze. The freezer does the rest.
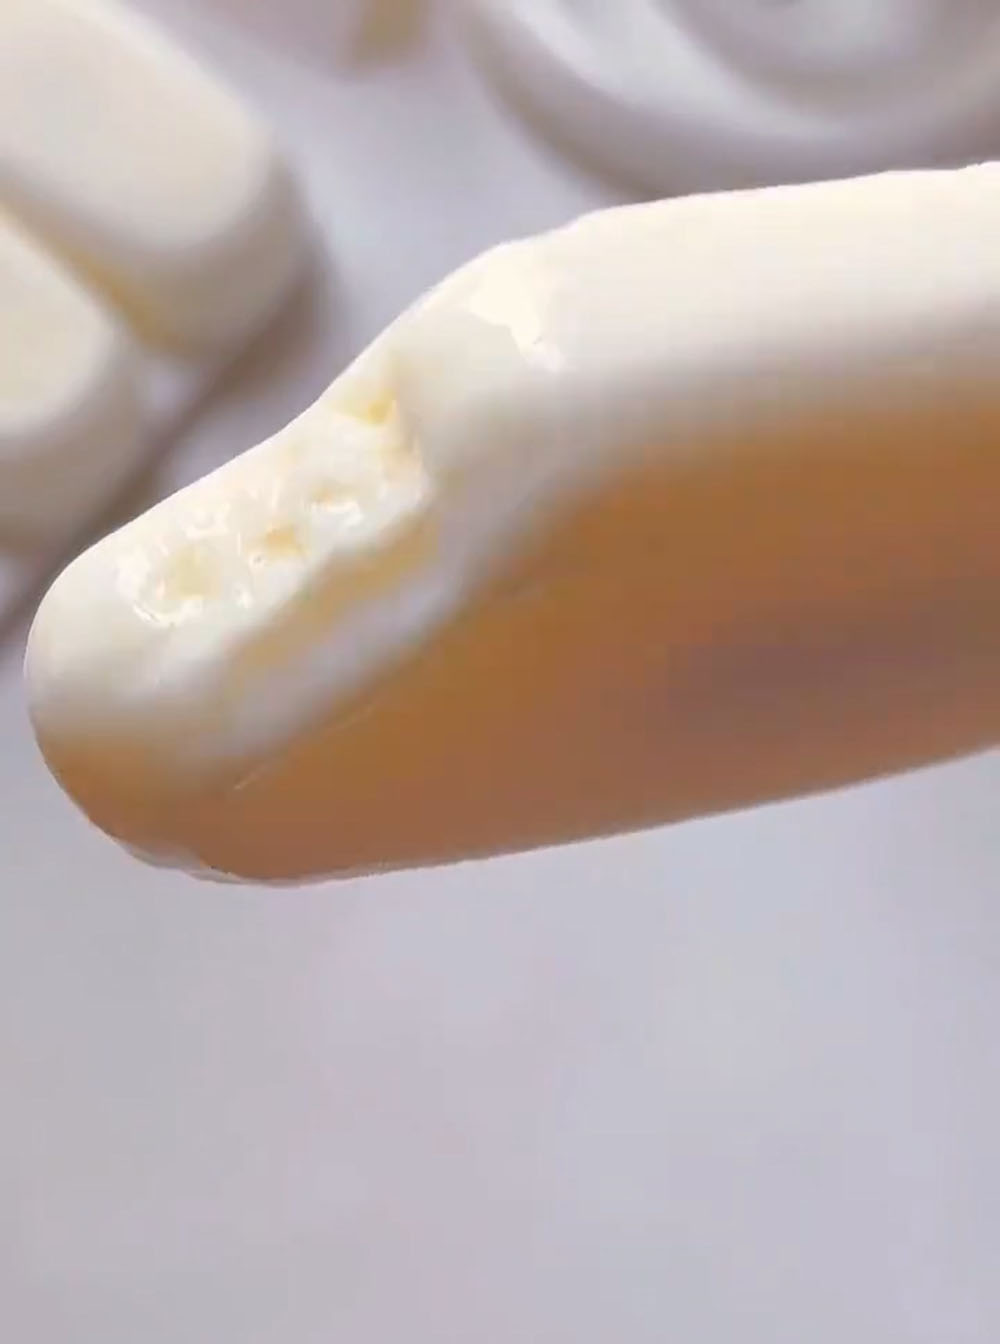
- No ice crystals — seriously — Thanks to glutinous rice flour, these popsicles freeze into a dense, creamy, scoopable texture instead of hard, icy blocks.
- Nostalgic childhood flavor — If you grew up eating those little milk pudding pops, this is the homemade version you’ve been dreaming of. Creamy, sweet, and impossibly comforting.
- Beginner-proof — No candy thermometers, no tempering eggs, no finicky steps. If you can stir a pot, you can make these.
Ingredients and Substitutions
- Milk — This is the backbone of the entire popsicle. I recommend using whole milk for the creamiest, richest result. The higher fat content gives you that luxurious mouthfeel.
- White sugar — Just enough to make these popsicles sweet without being cloying. Regular granulated sugar dissolves easily and keeps things simple. You can reduce the sugar slightly if you prefer a less sweet pop, but I wouldn’t cut it by more than half — sugar also affects the freezing texture.
- Whole milk powder — This is the secret weapon for intensifying the milky flavor without adding extra liquid.
- Glutinous rice flour — This is the magic ingredient that prevents ice crystals. Unlike regular rice flour, glutinous rice flour (also called sweet rice flour or mochiko) creates a smooth, slightly chewy, creamy texture when frozen. It’s the same ingredient used to make mochi. Do not substitute regular rice flour or cornstarch — the texture will be completely different and you’ll end up with icy popsicles.
How to Make Milk Pudding Popsicles
Step 1 — Whisk the Base
In a medium bowl, combine 400g milk, 40g white sugar, 70g whole milk powder, and 15g glutinous rice flour. Whisk vigorously until the mixture is completely smooth with no lumps whatsoever. Pay special attention to the milk powder — it tends to clump, so take your time here.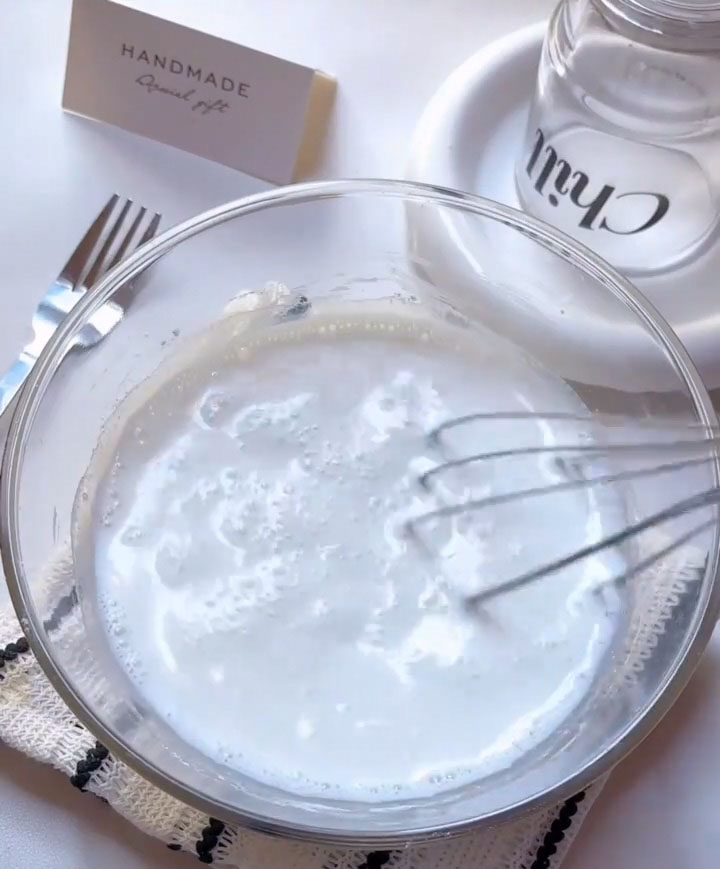
Step 2 — Cook Until Thick
Pour the mixture into a non-stick pan. Turn the heat to low — and I mean low. This is not a step to rush. Stir constantly with a spatula or wooden spoon, scraping the bottom and sides of the pan as you go. After a few minutes, you’ll notice the mixture starting to thicken. Keep stirring until it becomes thick and silky, similar to a thin pudding or a milkshake. This usually takes about 3-5 minutes. Do not let it boil vigorously — a gentle simmer at most.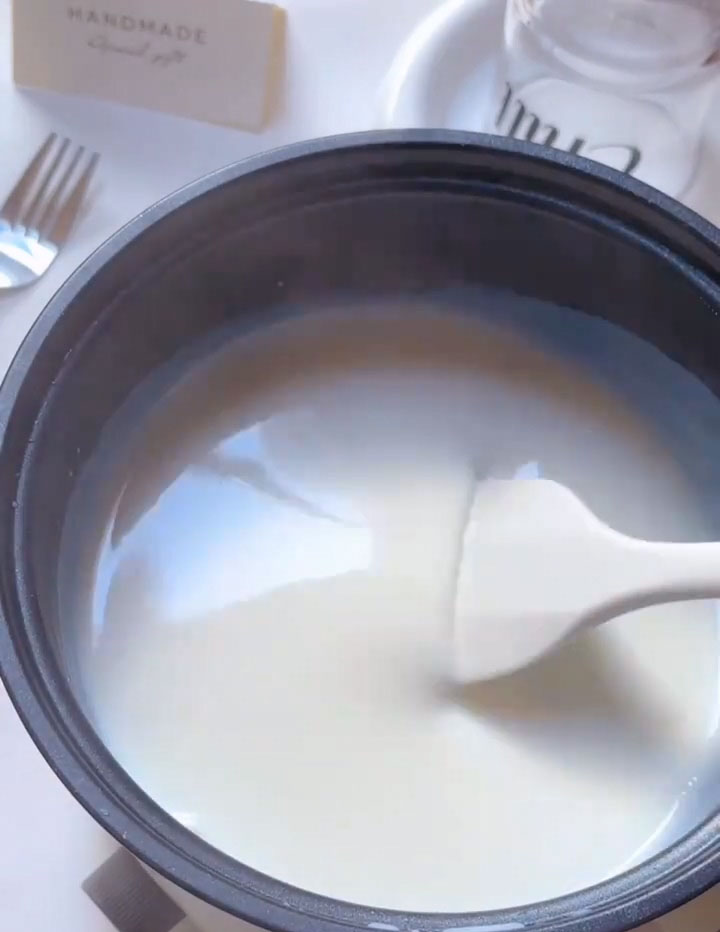
Step 3 — Strain and Cool
Turn off the heat. Pour the thickened mixture through a fine-mesh strainer into a clean bowl or a large measuring cup with a spout. This catches any tiny lumps that might have formed. Let the mixture cool to room temperature — do not skip this step. Pouring hot liquid into plastic or silicone molds can cause warping, cracking, or leaking. If you’re in a hurry, place the bowl in an ice bath or pop it in the fridge for 10-15 minutes.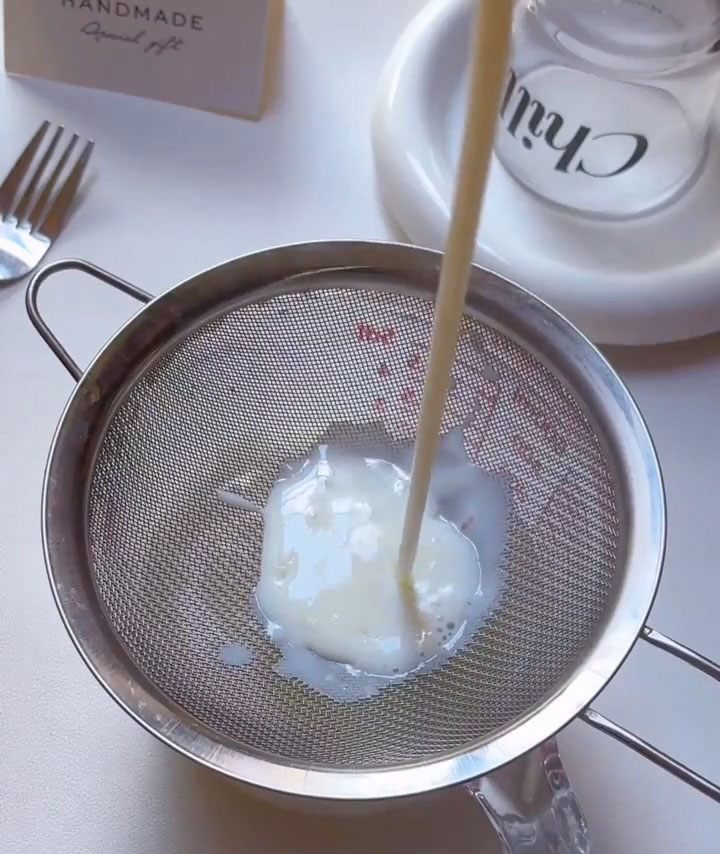
Step 4 — Pour and Freeze
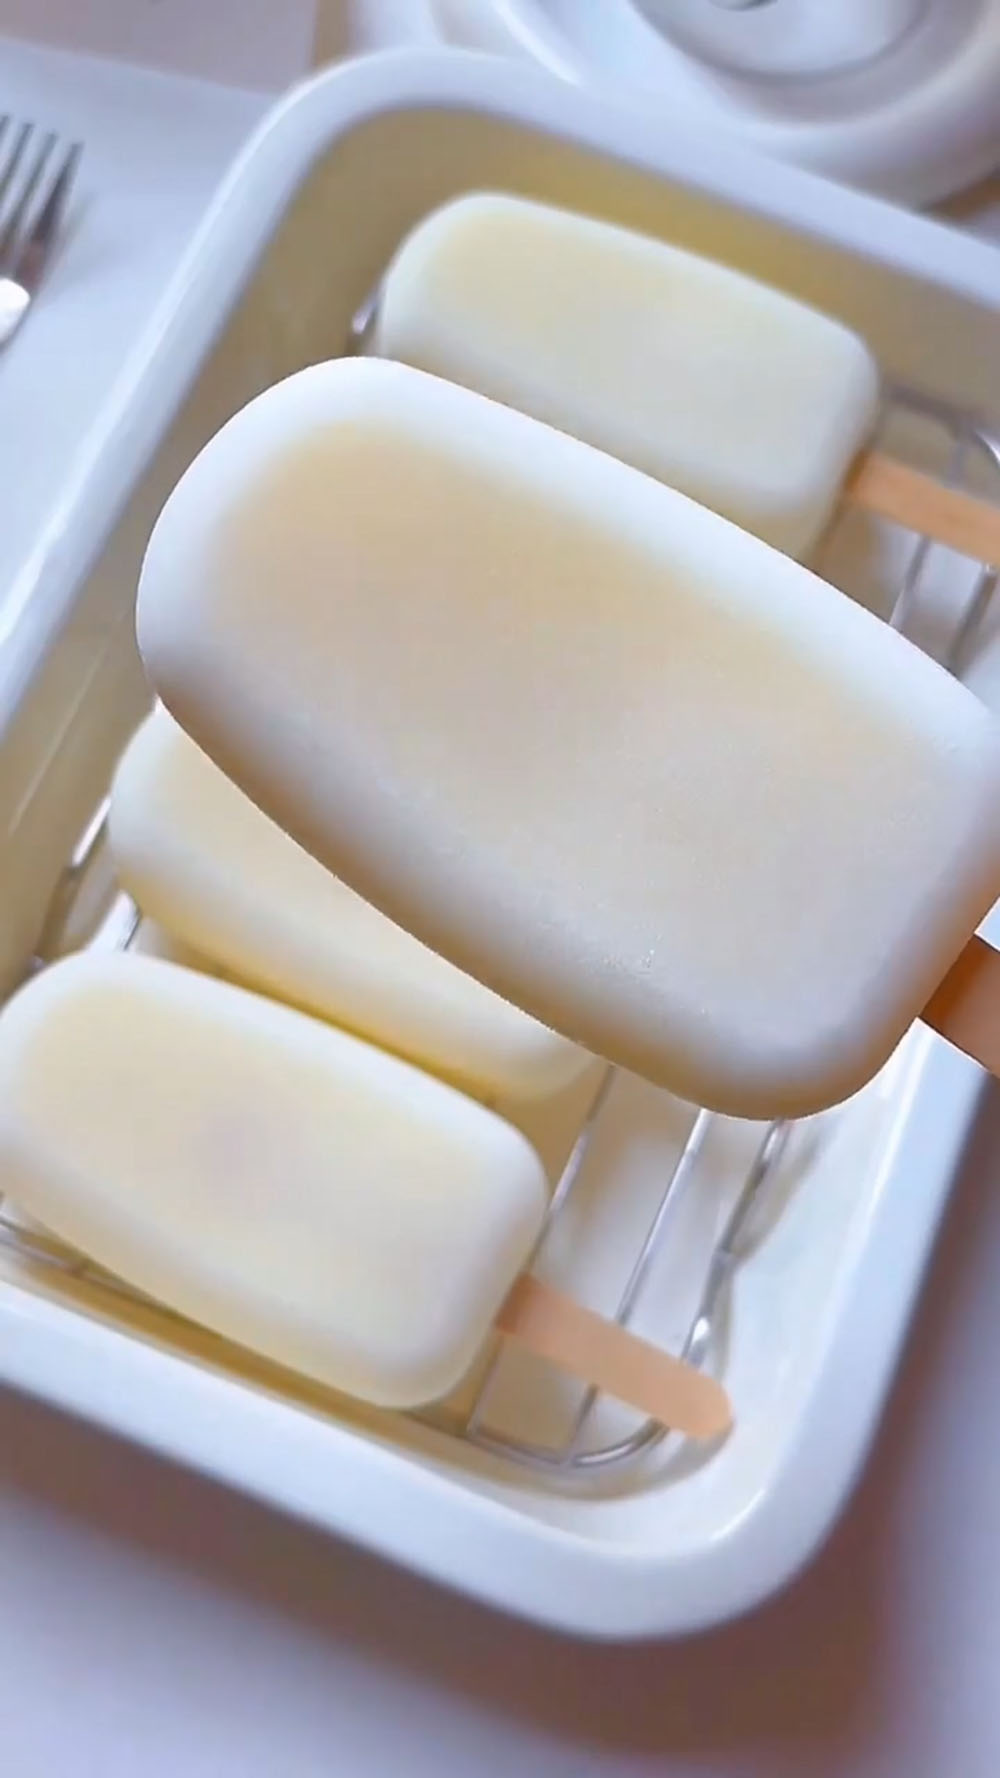
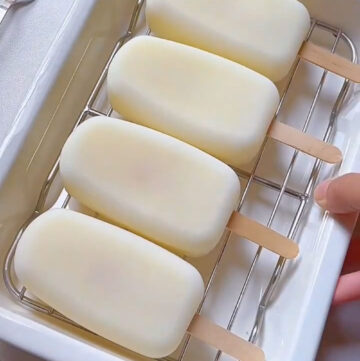
Once cooled, pour the mixture evenly into your popsicle molds. Tap the molds gently on the counter to release any air bubbles. Insert the sticks, cover with the lids (if your molds have them), and place carefully in the freezer. Freeze for at least 4 hours — overnight is even better. The popsicles need this time to set completely so they unmold cleanly.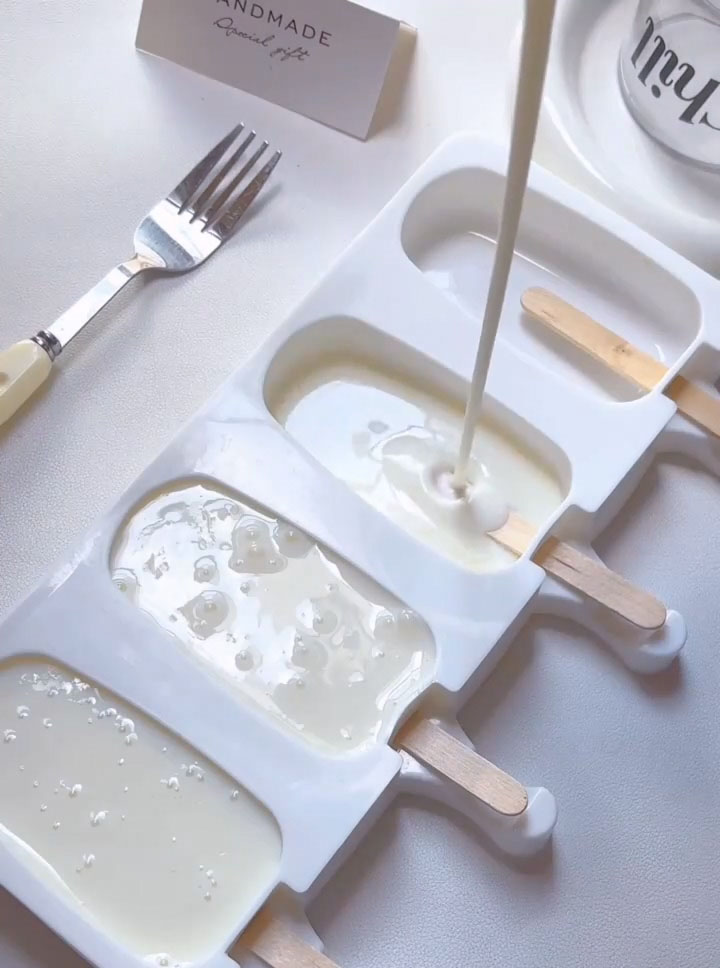
Step 5 — Unmold and Enjoy
To unmold, run the outside of the molds under warm water for 10-15 seconds — just enough to loosen the edges. Gently pull the sticks. If they don’t come out easily, run warm water for another 5 seconds and try again. Never yank or force them. If you’re using silicone molds, you can simply push them out directly. Serve immediately and enjoy that creamy, nostalgic, ice-crystal-free bite.
Storage
These milk pudding popsicles are best enjoyed straight from the freezer. Store them in an airtight container or keep them in their original molds with the lids on. They will stay fresh and creamy for up to 1 week — after that, the texture may start to degrade slightly and ice crystals can begin forming. That said, in my house, they never last that long.
Tips & Tricks
- Keep the heat on low and stir constantly. This is the most important rule of this recipe. High heat will scorch the milk and burn the milk powder, leaving you with brown specks and a bitter flavor. Low and slow is the way.
- Don’t skip the glutinous rice flour. This is not optional. It’s the ingredient that transforms ordinary frozen milk into creamy, scoopable pudding pops. Without it, you’ll have hard, icy milk cubes — not the same thing at all.
- Strain the mixture even if it looks smooth. Trust me on this. Sometimes tiny lumps of milk powder or rice flour hide in plain sight. Straining guarantees a silky, professional texture and takes 10 seconds.
- Cool completely before pouring into molds. Hot liquid + cold freezer = condensation, ice crystals, and potential damage to your molds. Plastic molds can warp, silicone can degrade, and the texture of your popsicles will suffer. Be patient and let it cool.
- Freeze for the full 4 hours minimum. Peeking early is tempting, I know. But if you try to unmold before the popsicles are completely solid, they’ll fall apart or stick to the mold. Freeze overnight for best results.
- Use whole milk and whole milk powder for the creamiest result. Lower-fat options will work in a pinch, but the texture will be noticeably less rich and more icy. If you want that nostalgic, decadent milk pudding experience, go full-fat.
Frequently Asked Questions
Can I use non-dairy milk?
Yes, but the texture will be different. Oat milk (especially full-fat barista versions) works best as a substitute because it has a similar creaminess to dairy milk. Coconut milk will give you a coconut-flavored popsicle (delicious, but not traditional milk pudding). Almond milk and soy milk will produce a thinner, icier result. If using non-dairy milk, keep the milk powder as-is — it helps maintain the creamy texture.
What if I don’t have glutinous rice flour?
You really want to get some — it’s widely available at Asian grocery stores, online, or in the international aisle of many supermarkets (look for Mochiko brand). If you absolutely cannot find it, you can try using cornstarch as a last resort, but the texture will be noticeably different. Cornstarch popsicles tend to be more gelatinous and less creamy. Regular rice flour will not work — it won’t thicken properly and will leave a gritty texture.
Can I add other flavors?
Absolutely. This recipe is a fantastic blank canvas. Try adding 1 teaspoon of vanilla extract for classic vanilla pudding pops. Or stir in 2 tablespoons of cocoa powder (sifted) for chocolate milk pops. Matcha powder, strawberry puree, or even a swirl of caramel all work beautifully — just keep the total liquid volume roughly the same.
Why are my popsicles icy?
Icy popsicles usually mean one of three things: you skipped the glutinous rice flour, you didn’t cook the mixture until it thickened, or you used low-fat milk. The glutinous rice flour is essential for preventing ice crystals, and cooking activates its thickening power. Whole milk provides the fat that keeps everything creamy.
Can I make these without popsicle molds?
Yes. Pour the cooled mixture into small paper cups, freeze for 1 hour until partially set, then insert popsicle sticks or spoons and continue freezing. You can also freeze the mixture in a small loaf pan and scoop it like ice cream — it will have a soft, creamy, almost scoopable texture.
How do I get the popsicles out of the molds easily?
Run the outside of the molds under warm (not hot) water for 10-15 seconds. The heat loosens the edges without melting the popsicle. Gently wiggle the stick and pull. If it doesn’t come out, give it another 5 seconds. Never use boiling water or a knife to pry them out — you’ll damage the molds or break the sticks.
Can I double this recipe?
Yes, this recipe scales up perfectly. Just keep in mind that cooking time will increase slightly with larger volumes because you’re heating more liquid. The same rule applies — low heat, constant stirring, until thick and silky.
4-Ingredient Milk Ice Cream Bars (Smooth & Creamy)
Ingredients
- 400 g milk
- 40 g white sugar
- 70 g whole milk powder
- 15 g glutinous rice flour
Instructions
Step 1 — Whisk the Base
- In a medium bowl, combine 400g milk, 40g white sugar, 70g whole milk powder, and 15g glutinous rice flour. Whisk vigorously until the mixture is completely smooth with no lumps whatsoever. Pay special attention to the milk powder — it tends to clump, so take your time here.
Step 2 — Cook Until Thick
- Pour the mixture into a non-stick pan. Turn the heat to low — and I mean low. This is not a step to rush. Stir constantly with a spatula or wooden spoon, scraping the bottom and sides of the pan as you go. After a few minutes, you'll notice the mixture starting to thicken. Keep stirring until it becomes thick and silky, similar to a thin pudding or a milkshake. This usually takes about 3-5 minutes. Do not let it boil vigorously — a gentle simmer at most.
Step 3 — Strain and Cool
- Turn off the heat. Pour the thickened mixture through a fine-mesh strainer into a clean bowl or a large measuring cup with a spout. This catches any tiny lumps that might have formed. Let the mixture cool to room temperature — do not skip this step. Pouring hot liquid into plastic or silicone molds can cause warping, cracking, or leaking. If you're in a hurry, place the bowl in an ice bath or pop it in the fridge for 10-15 minutes.
Step 4 — Pour and Freeze
- Once cooled, pour the mixture evenly into your popsicle molds. Tap the molds gently on the counter to release any air bubbles. Insert the sticks, cover with the lids (if your molds have them), and place carefully in the freezer. Freeze for at least 4 hours — overnight is even better. The popsicles need this time to set completely so they unmold cleanly.
Step 5 — Unmold and Enjoy
- To unmold, run the outside of the molds under warm water for 10-15 seconds — just enough to loosen the edges. Gently pull the sticks. If they don't come out easily, run warm water for another 5 seconds and try again. Never yank or force them. If you're using silicone molds, you can simply push them out directly. Serve immediately and enjoy that creamy, nostalgic, ice-crystal-free bite.
Leave a Reply