
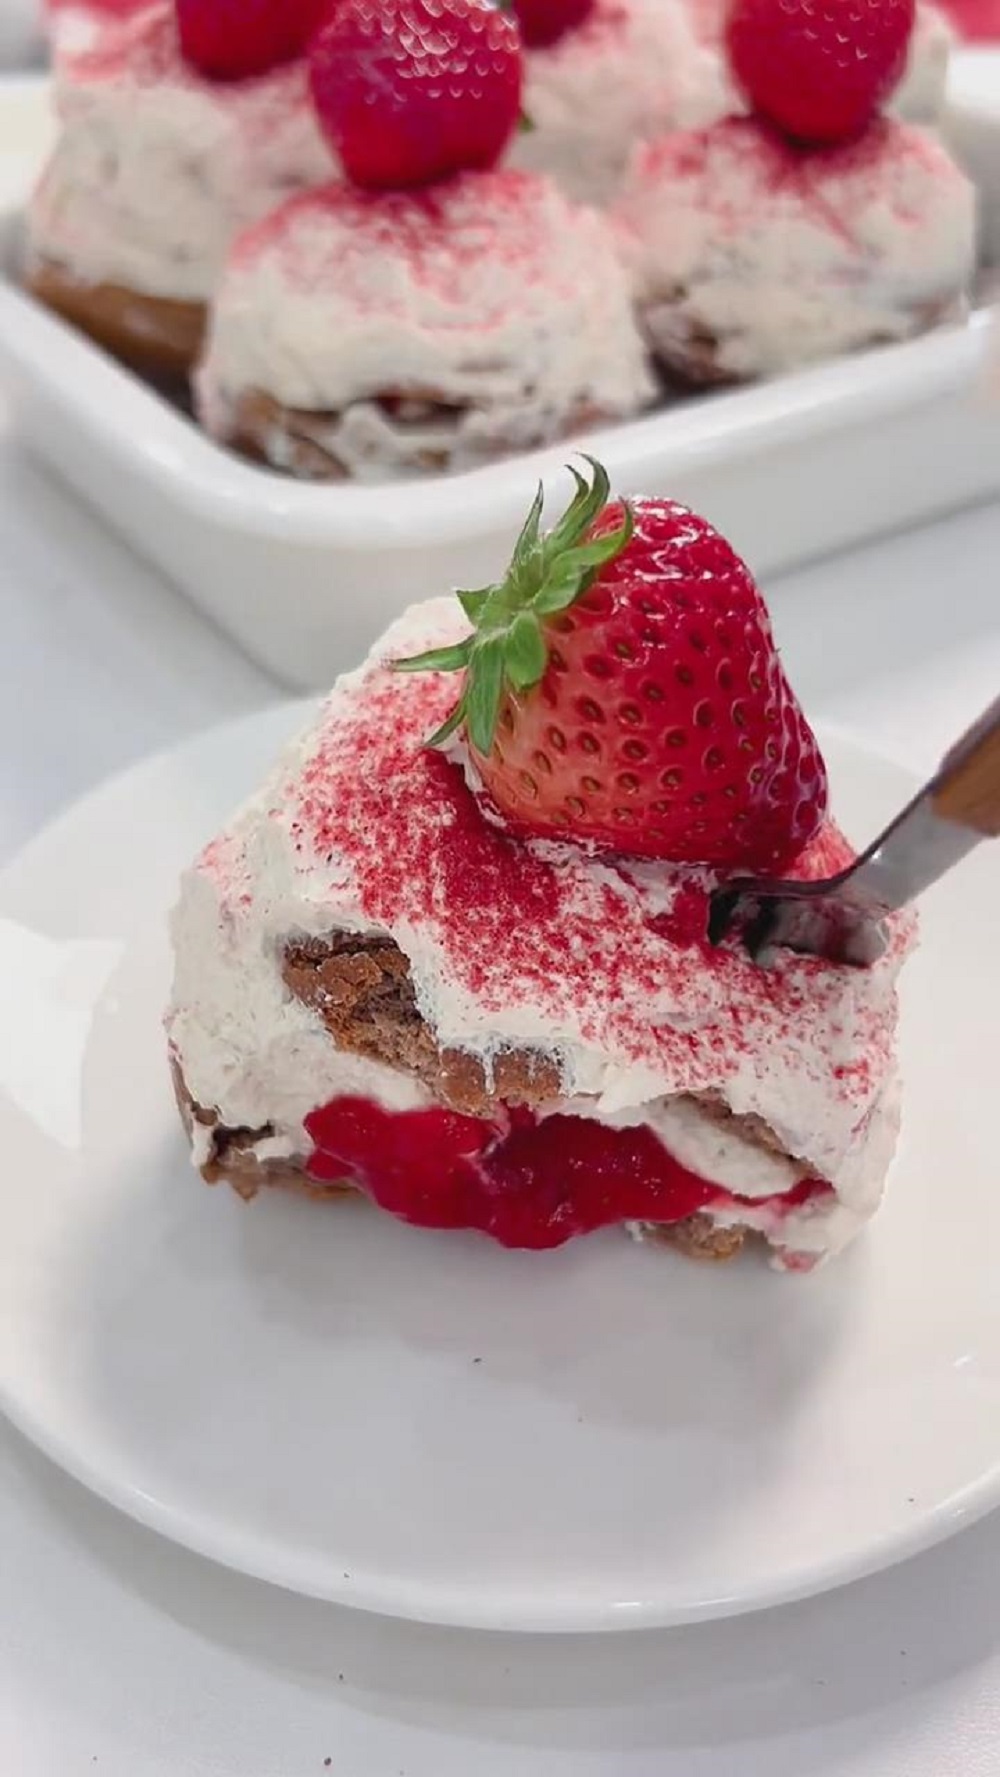
Soft cocoa sponge layered with strawberry cream and a molten strawberry center, this mini strawberry cake is the perfect small-batch dessert for strawberry season. Light, fluffy, creamy, and beautifully balanced—every bite bursts with fresh strawberry flavour.
Mini Strawberry Cakes with Molten Strawberry Center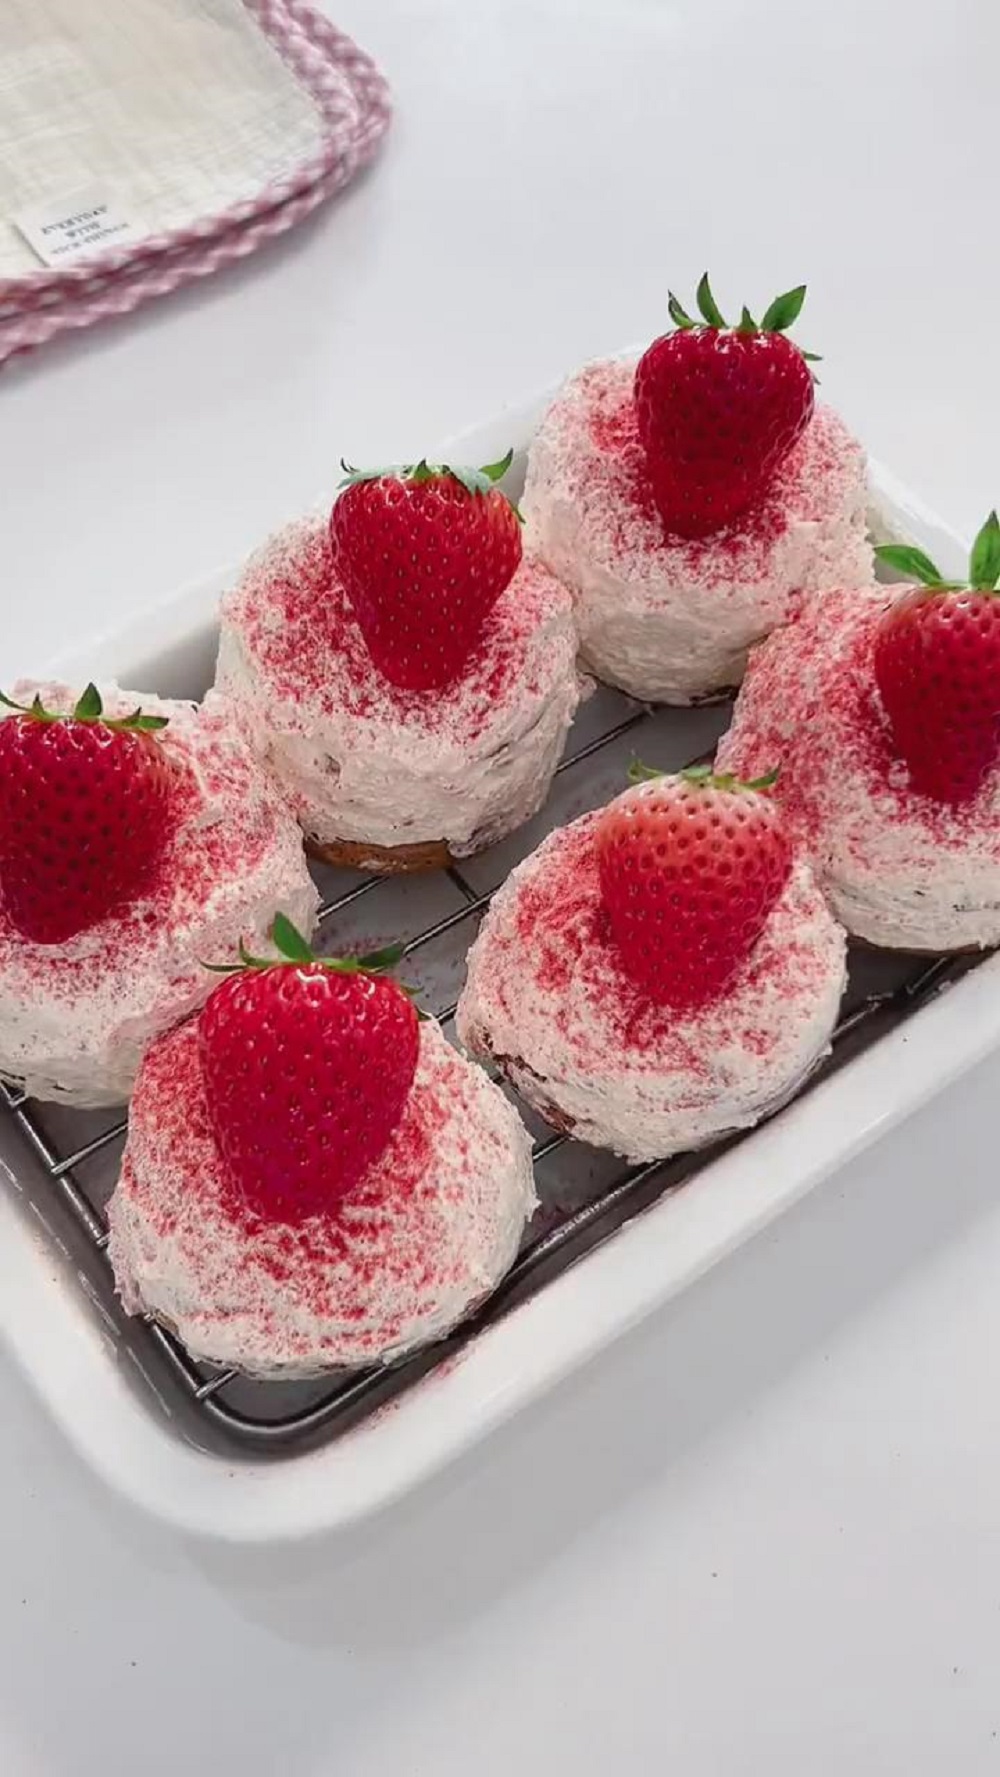
Strawberry season is finally here, and I honestly couldn’t be more excited.
As soon as the kids heard we were going strawberry picking after school, their eyes lit up.
They were bouncing around, rushing me out the door.
At the strawberry farm, they squatted between the rows, carefully picking only the brightest, reddest berries and dropping them into their baskets.
Before we knew it, the baskets were full. The freshly picked strawberries were so juicy and sweet that we ended up eating nearly half a basket on the way home.
As for the rest of the strawberries—there was never any doubt about their fate. They were always meant to go straight into my dessert bowl.
The first thing on the list? A Mini Strawberry Cake. Just thinking about it feels sweet already.
Don’t be intimidated by how fancy these mini strawberry cakes look!
Their preparation method is essentially the same as my matcha cake bites – what appears complex is actually quite simple and manageable.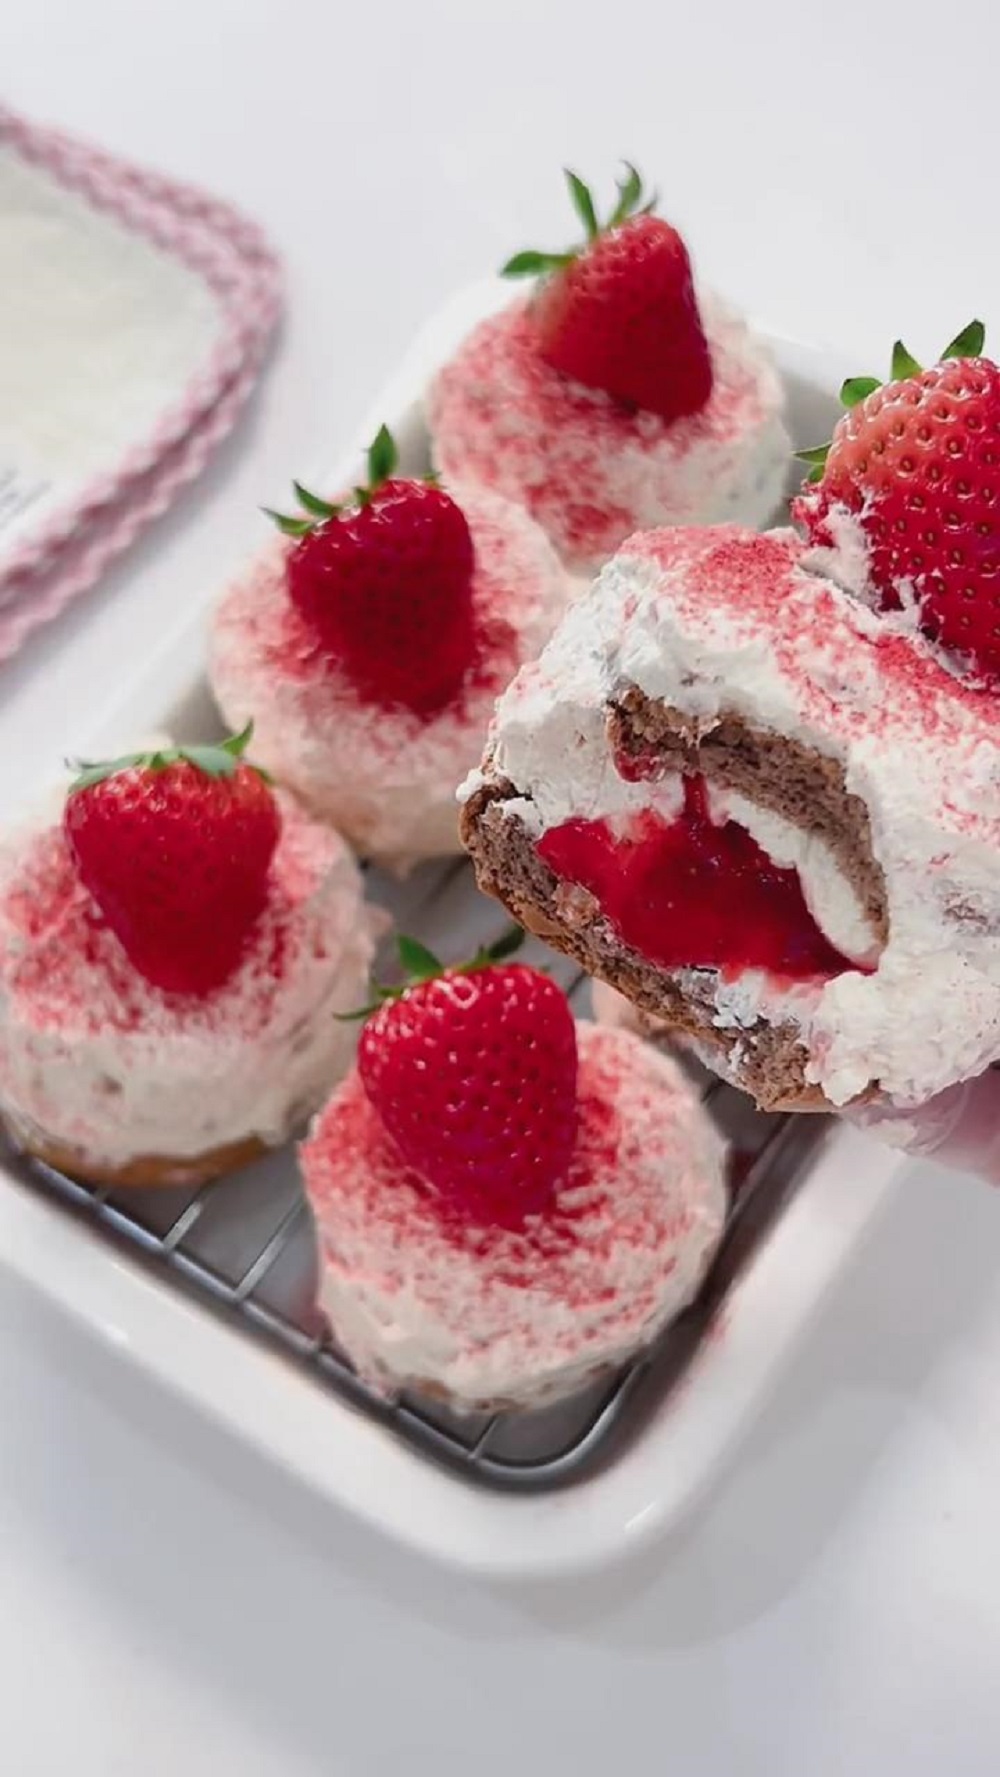

Why You‘ll Love This Recipe
- Perfect balance of flavours — rich cocoa sponge, fresh strawberries, and lightly sweetened cream work beautifully together.
- Soft, moist texture — the chiffon-style cocoa cake stays tender and fluffy.
- Molten strawberry center — that hidden strawberry sauce makes every bite extra special.
- Small-batch friendly — ideal for individual servings or intimate gatherings.
- Visually stunning with simple techniques — no complicated decorating skills required.
Ingredients and Substitutions
Cocoa Sponge Cake
- Eggs – I use medium-sized eggs and always separate the yolks and whites. Room-temperature eggs whip much more easily, giving the cake better volume and a softer texture.
- Corn oil – A neutral, colourless, and flavourless oil like corn oil or soybean oil works best here. I don’t recommend peanut oil because its aroma can overpower the cake.
- Milk – Whole milk gives the sponge extra moisture and richness. If needed, water can be used as a substitute, but milk really improves the texture.
- Cake flour – This is essential for achieving a light chiffon-style sponge. Its low gluten content prevents toughness and helps keep the cake soft. I don’t recommend substituting it.
- Cocoa powder – Use unsweetened pure cocoa powder. It adds depth and richness without making the cake overly sweet.
- Fine granulated sugar – Added in stages while whipping the egg whites. This helps stabilize the meringue and ensures a fluffy, well-risen cake.
Strawberry Sauce (Molten Center)
- Fresh strawberries – Choose plump strawberries with a good balance of sweetness and acidity. They don’t need to be peeled, just washed and hulled.
- Fine granulated sugar – Adjusts the sweetness of the sauce. If your strawberries are more tart, slightly increasing the sugar works well.
- Lemon juice – Enhances the strawberry flavour, balances sweetness, and helps prevent oxidation and dull colour.
Strawberry Cream
- Heavy cream – I recommend cream with 30–36% fat. It whips smoothly and creates a silky, stable texture. Non-dairy cream is not recommended.
- Homemade strawberry sauce – Made from the earlier step. Using a sauce with real fruit pieces gives the cream a more natural strawberry flavour.
Decoration
- Strawberry powder – Adds colour, aroma, and a gentle strawberry finish.
- Whole strawberries – Used for a clean, fresh, and elegant decoration.
How to Make Mini Strawberry Cake
1. Preparation
Take the eggs out of the refrigerator ahead of time so they reach room temperature.
Separate the egg yolks and whites carefully. Make sure the bowl for the egg whites is completely clean, dry, and free of oil or yolk, as this is crucial for proper whipping.
Mix the cake flour and cocoa powder together and sift twice. This helps incorporate air and results in a lighter sponge. Wash the strawberries, remove the stems, and drain well.
Preheat the oven to 150°C (300°F) with top and bottom heat for 10 minutes to stabilize the temperature.
2. Make the Cocoa Sponge Cake
In a large bowl, combine the corn oil and milk. Whisk until fully emulsified — the mixture should look smooth and glossy with no visible oil droplets.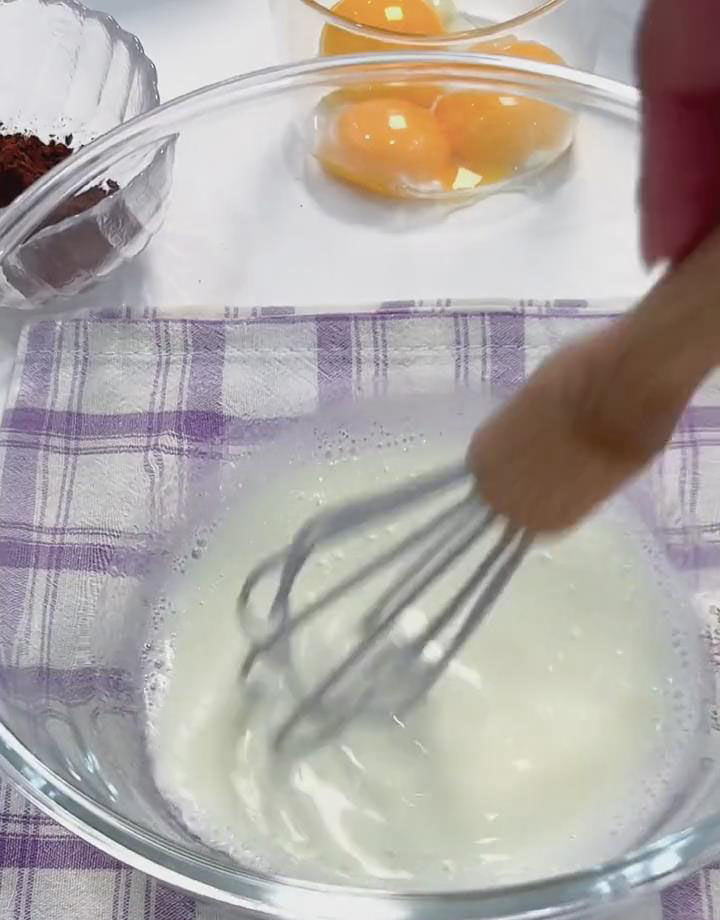
Add the sifted cake flour and cocoa powder mixture. 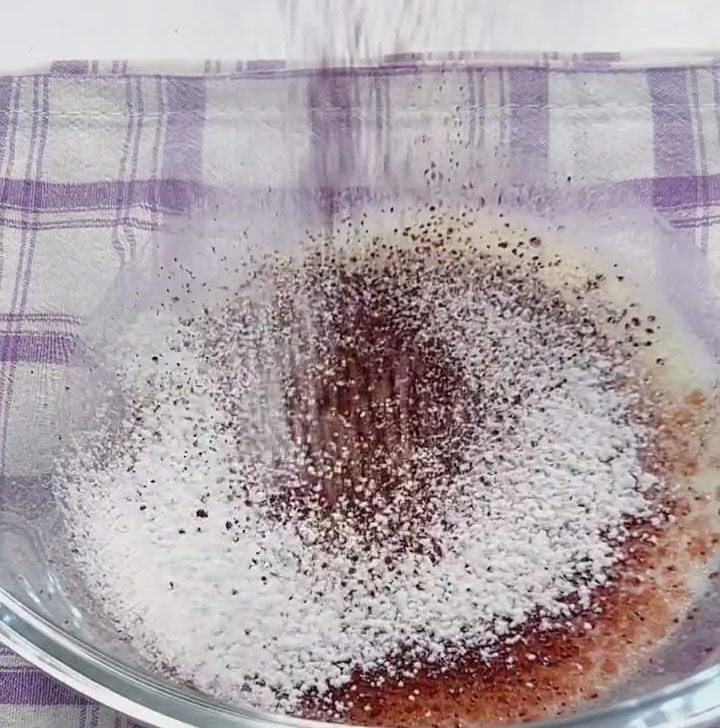
Stir gently in a “Z” motion until no dry flour remains. Avoid circular stirring to prevent gluten development.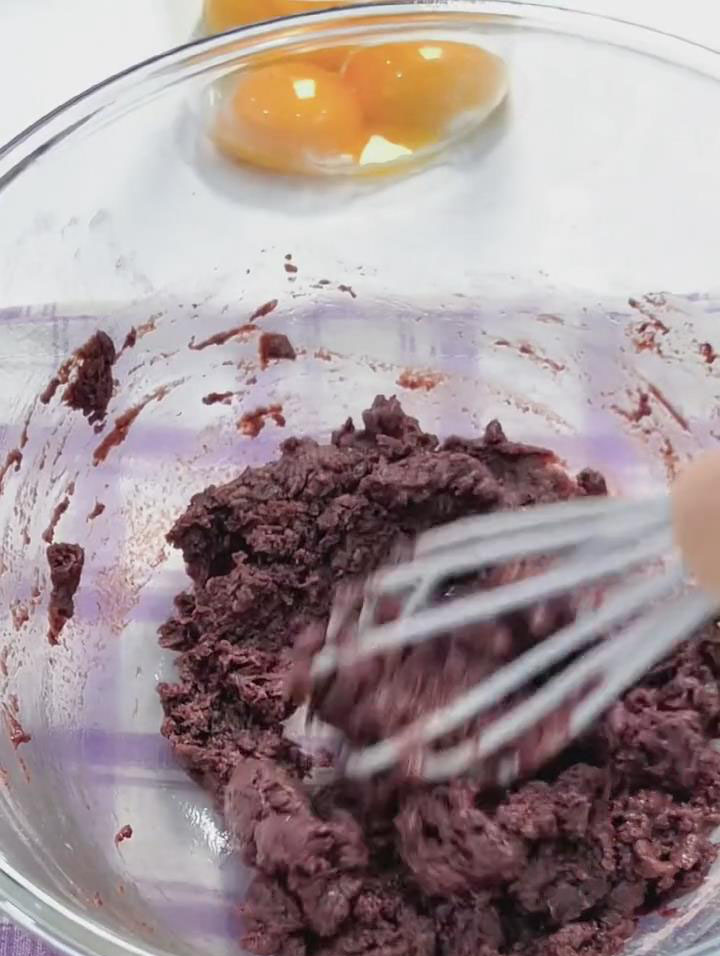
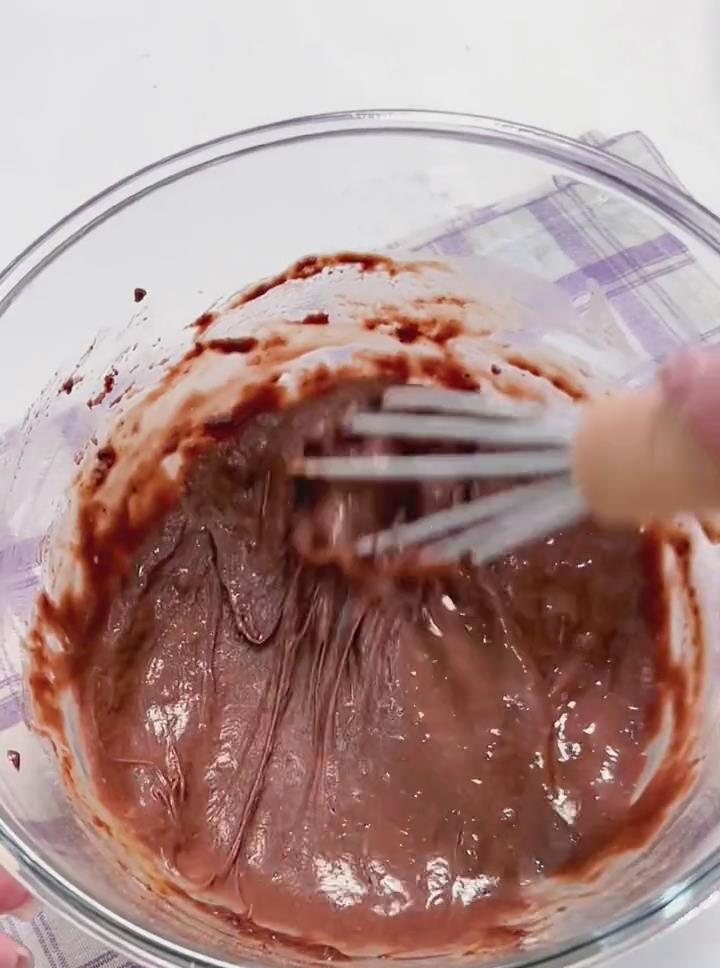
Add the egg yolks and continue mixing in a “Z” motion until the batter becomes smooth, thick, and silky.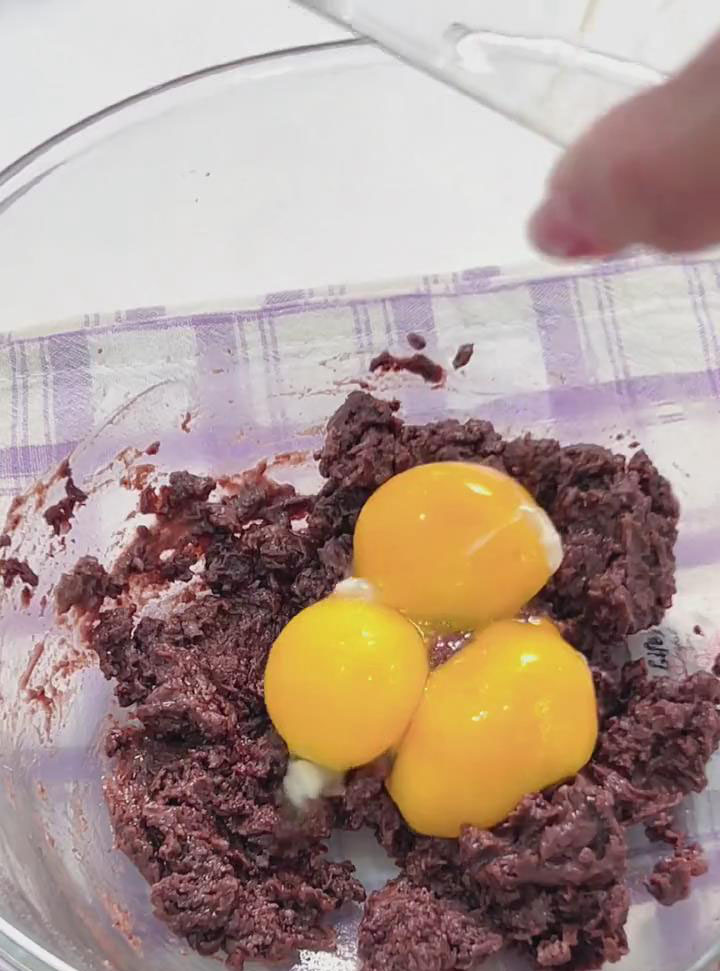
In a separate bowl, whip the egg whites with an electric mixer on medium-high speed until foamy.
Add one-third of the sugar and continue whipping. Once the bubbles become finer, add the second portion of sugar and switch to medium speed. 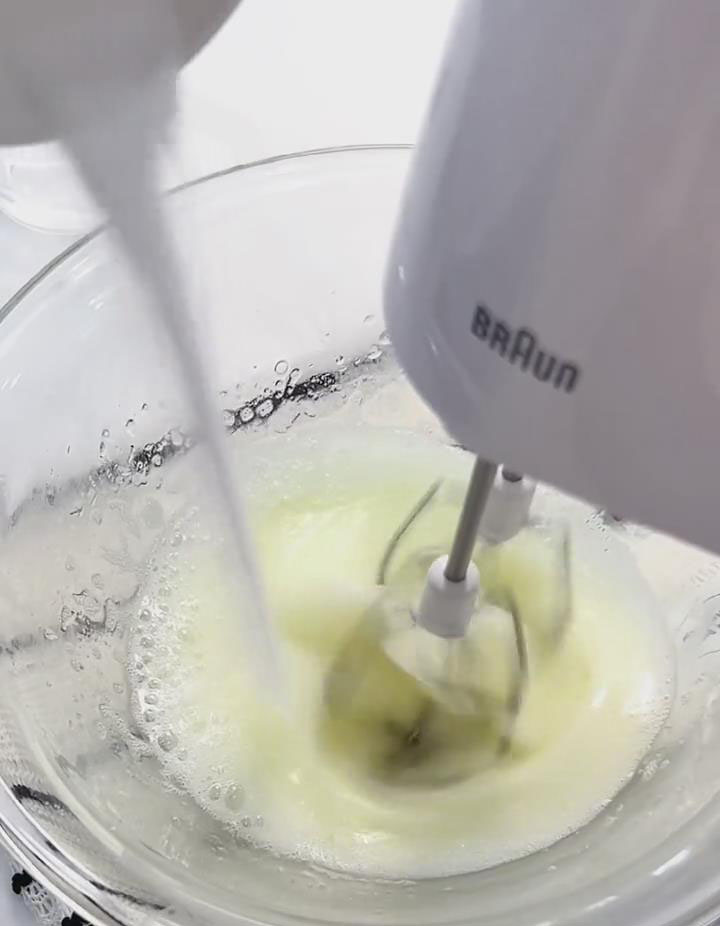
When visible lines appear, add the remaining sugar and reduce to low speed, whipping until soft peaks form with a small hook at the tip.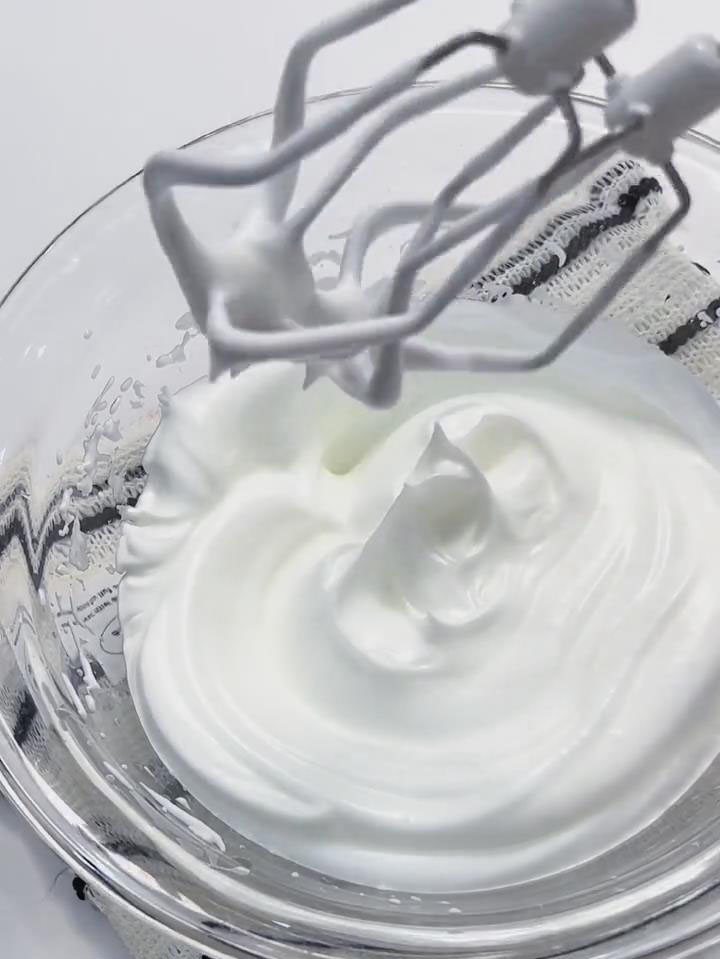
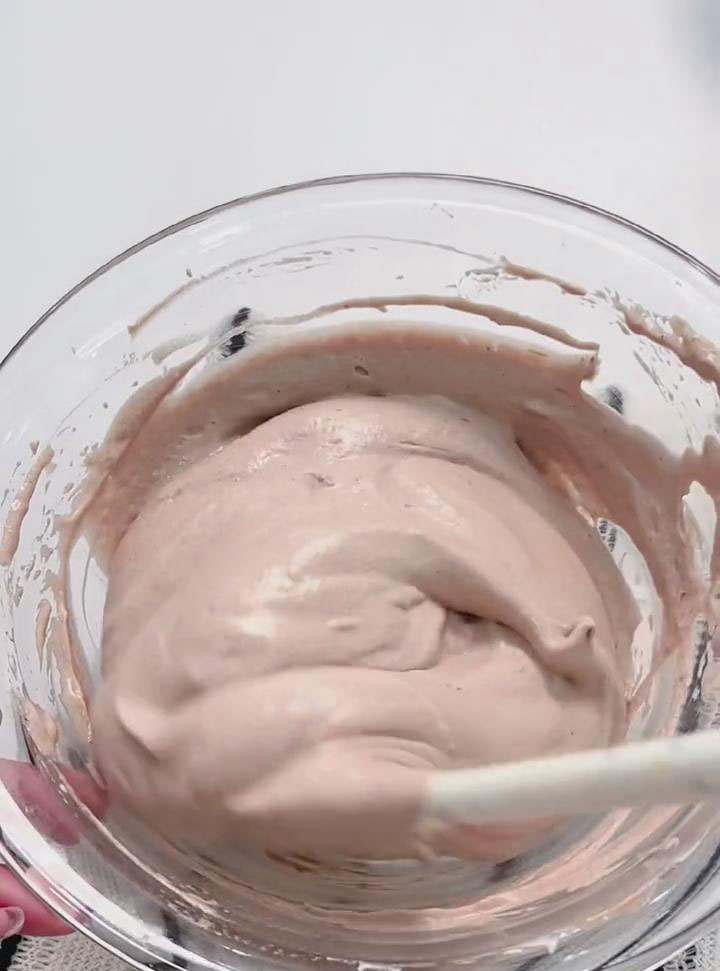
Fold one-third of the meringue into the yolk batter using a silicone spatula, folding gently from bottom to top.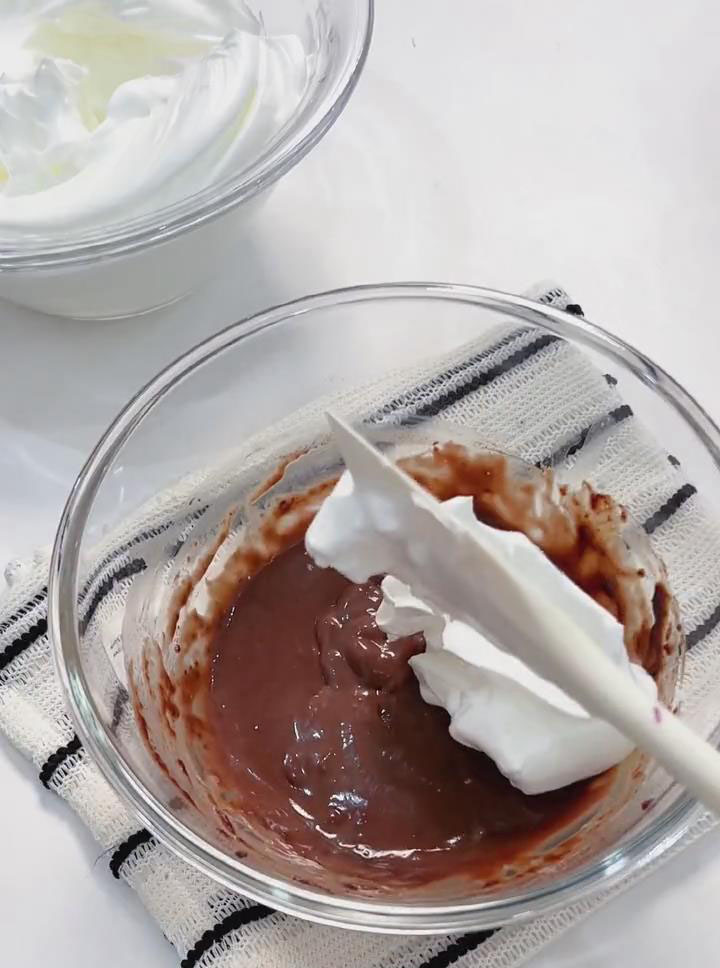
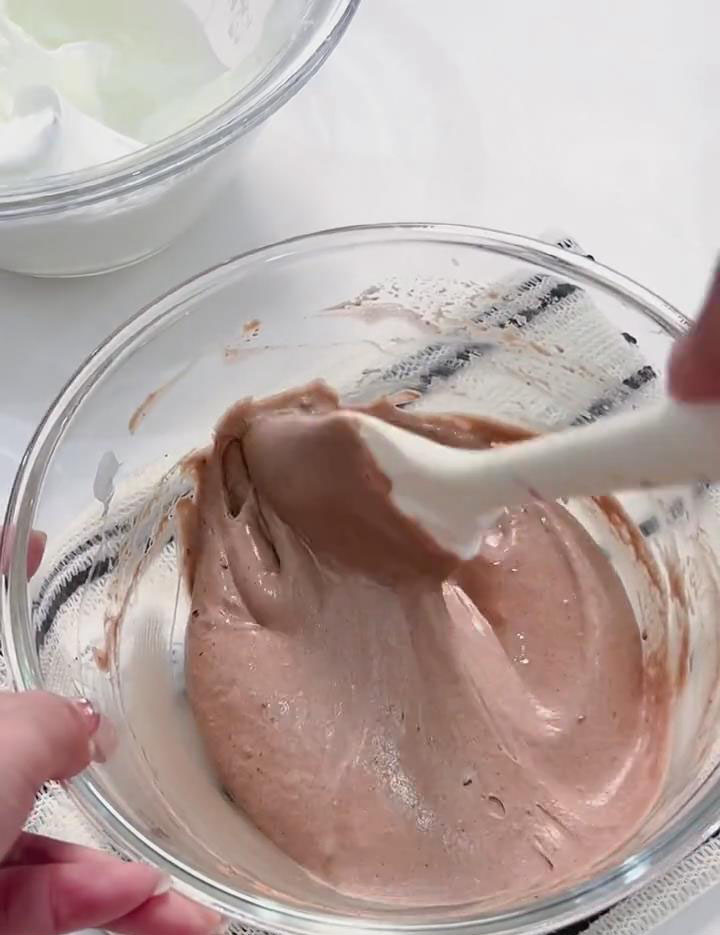
Pour the mixture back into the remaining meringue and continue folding until fully combined with no white streaks.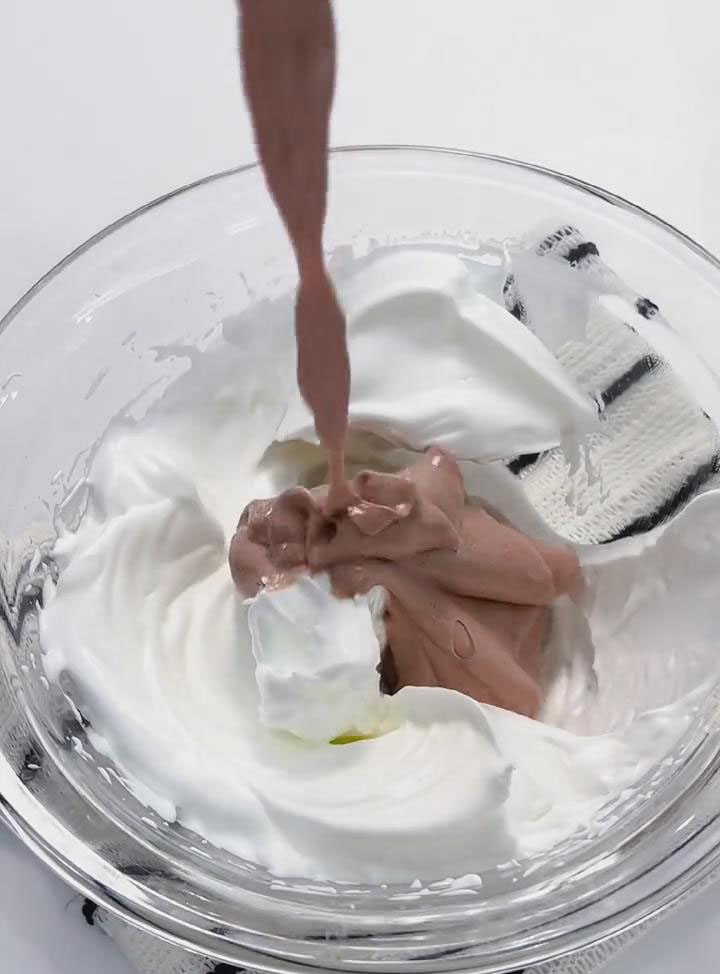
Transfer the batter into a piping bag. Pipe circles about 5 cm in diameter onto a parchment-lined baking tray, leaving space between each one.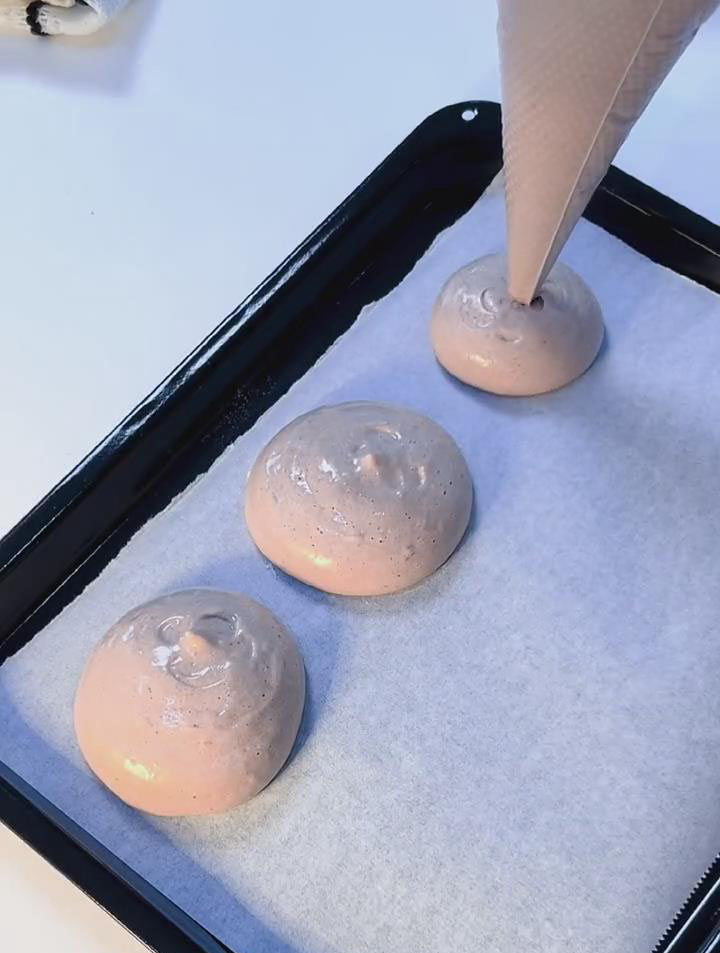
Bake on the middle rack at 150°C for 30 minutes, until the surface is lightly golden and springs back when pressed. Remove from the oven and cool completely on a rack.
3. Make the Strawberry Sauce
Place the strawberries into a saucepan with the sugar and lemon juice. Mash them.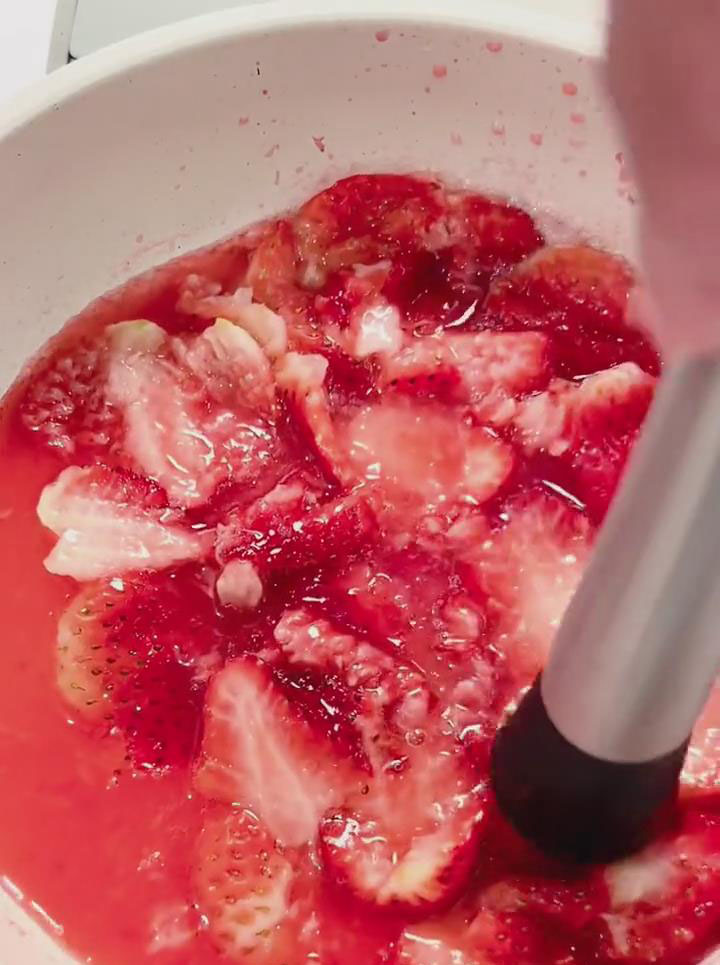
Cook over low heat while stirring constantly. Skim off any foam that forms on the surface. Continue simmering for about 2 minutes until the sauce thickens, then remove from heat.
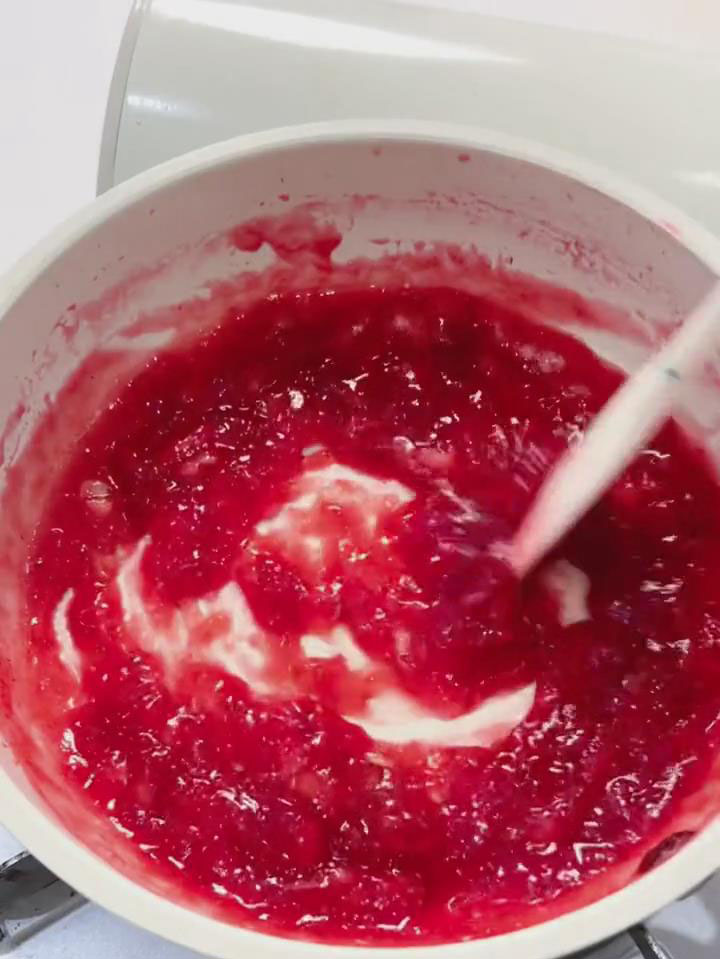
Transfer the sauce to a bowl and let it cool to room temperature. Cover and refrigerate for 10 minutes to further thicken and create a better molten center.
4. Whip the Strawberry Cream
Pour the heavy cream into a clean, dry bowl. Whip on medium speed until lightly whipped, with faint lines and a flowing texture.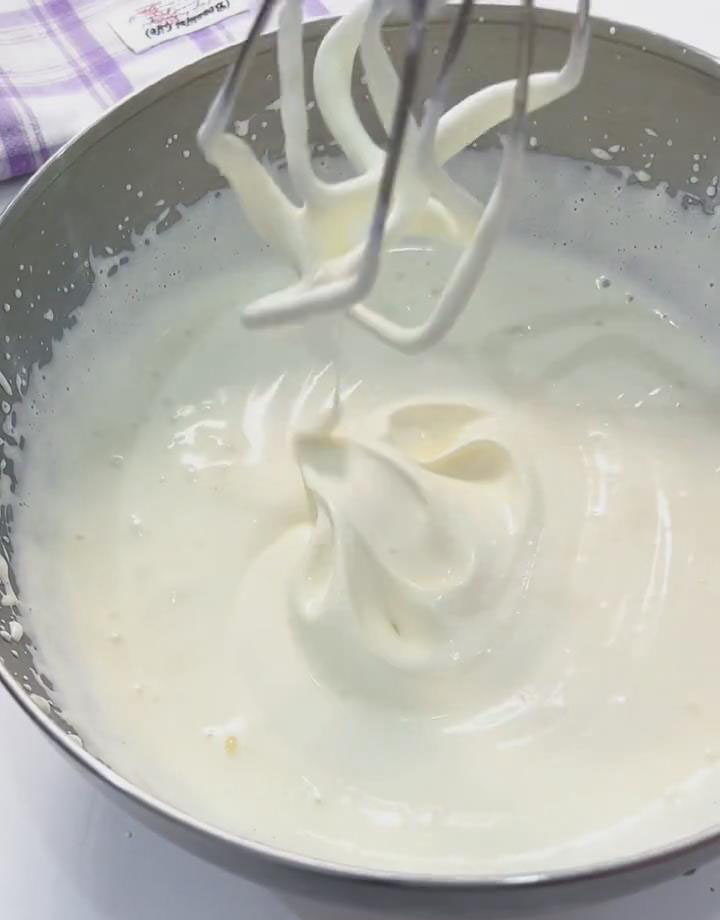
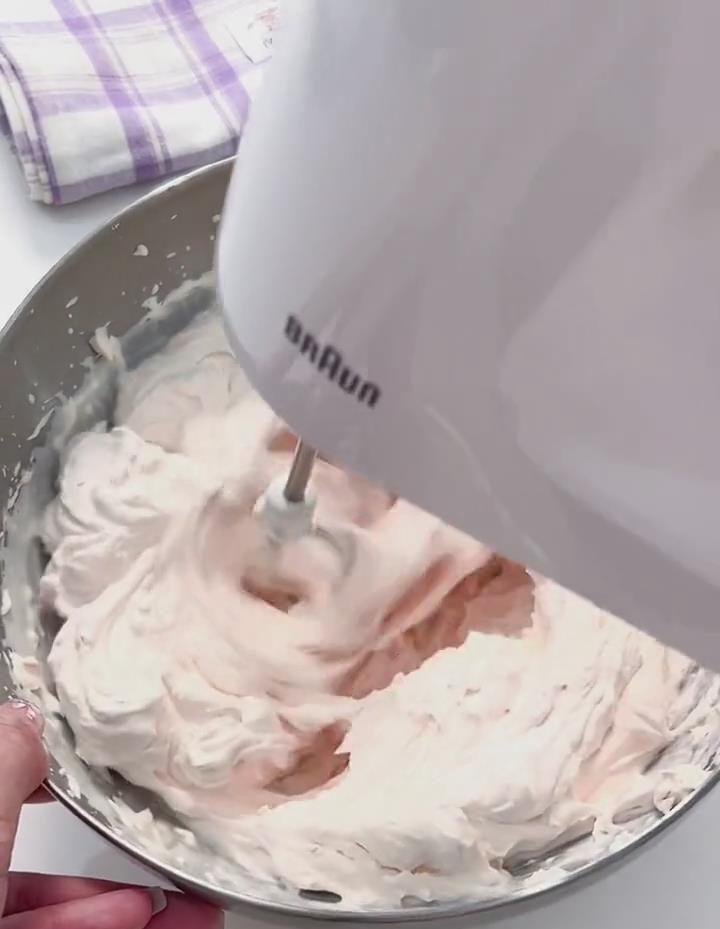
Add the cooled strawberry sauce and continue whipping on medium speed until the cream reaches a firm, stable texture with clear lines and peaks. Transfer to a piping bag.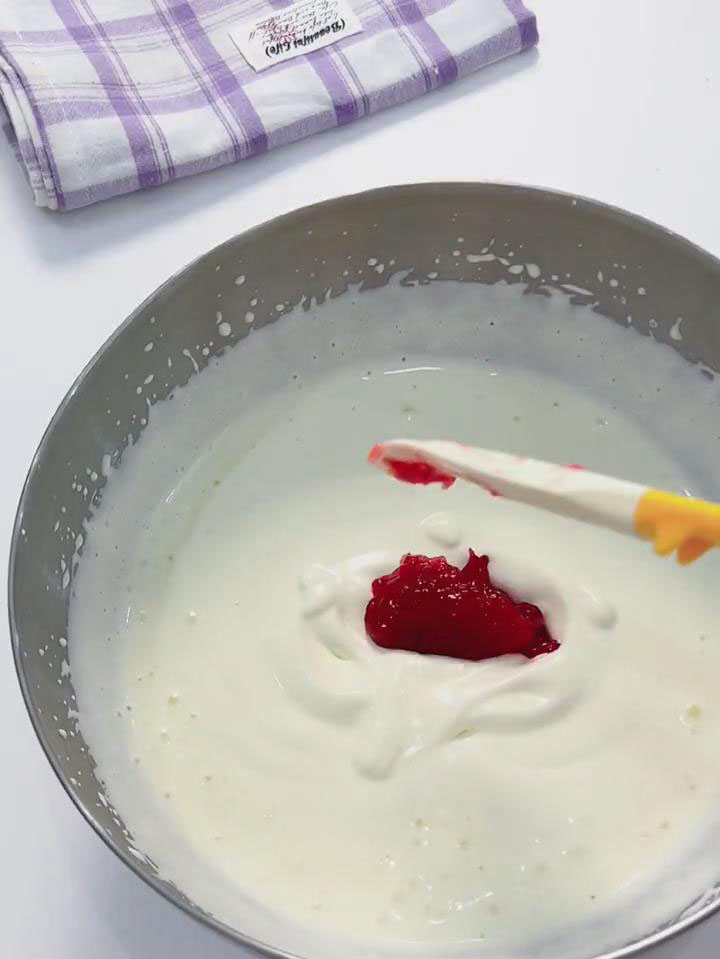
5. Assemble and Decorate
Place one cooled cocoa sponge on a flat surface. Pipe a ring of strawberry cream around the edge, leaving the center hollow.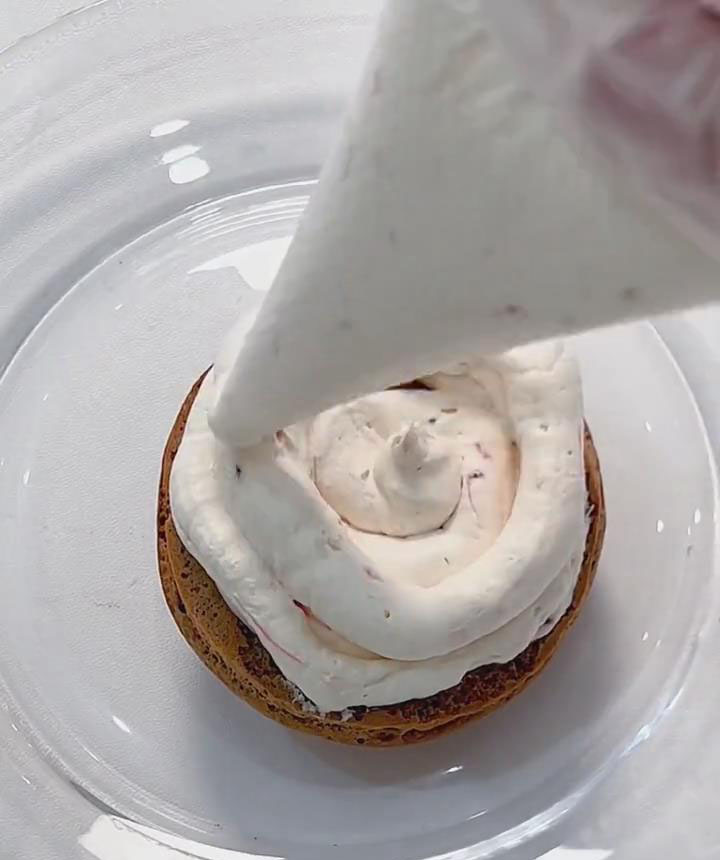
Fill the center with strawberry sauce.
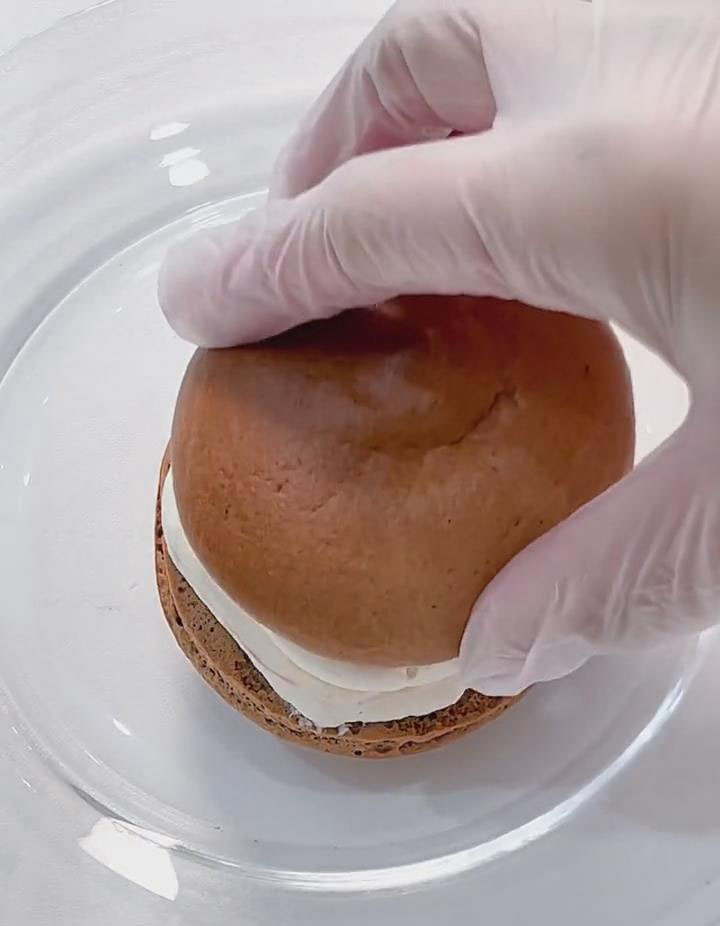
Pipe another layer of strawberry cream over the sauce, then top with a second sponge and gently press to secure.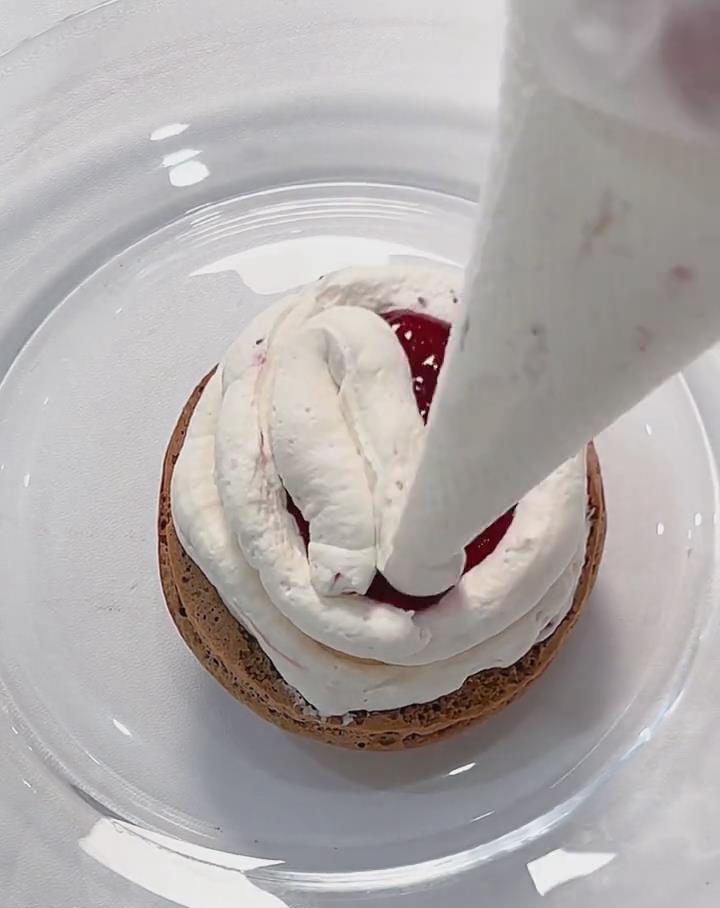
Use a spatula to spread a thin, even layer of strawberry cream over the top and sides.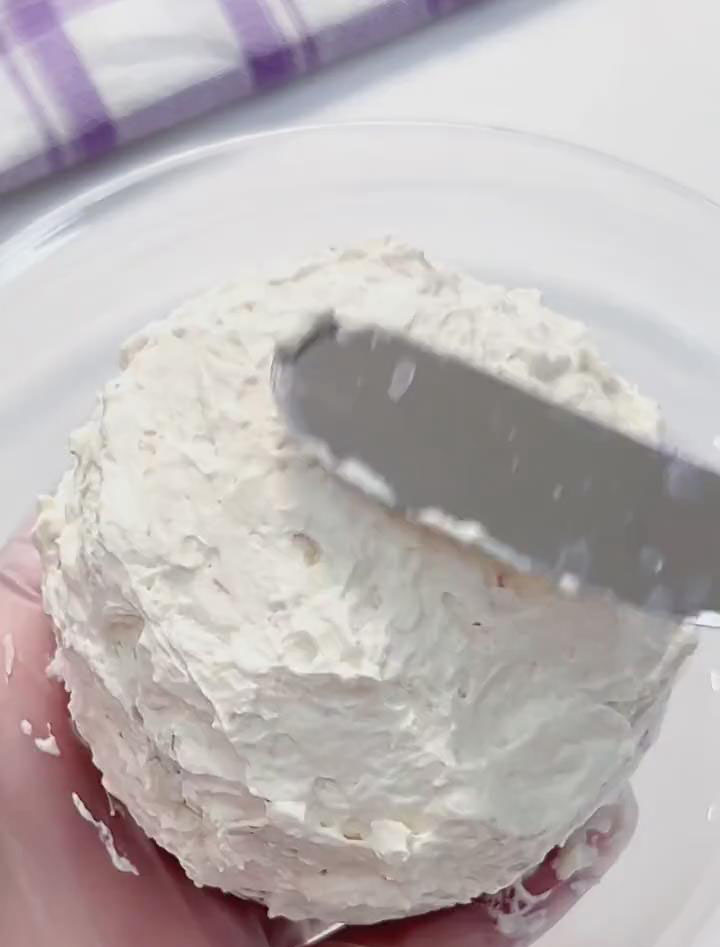
Finish by sprinkling strawberry powder on top and decorating with halved or whole strawberries.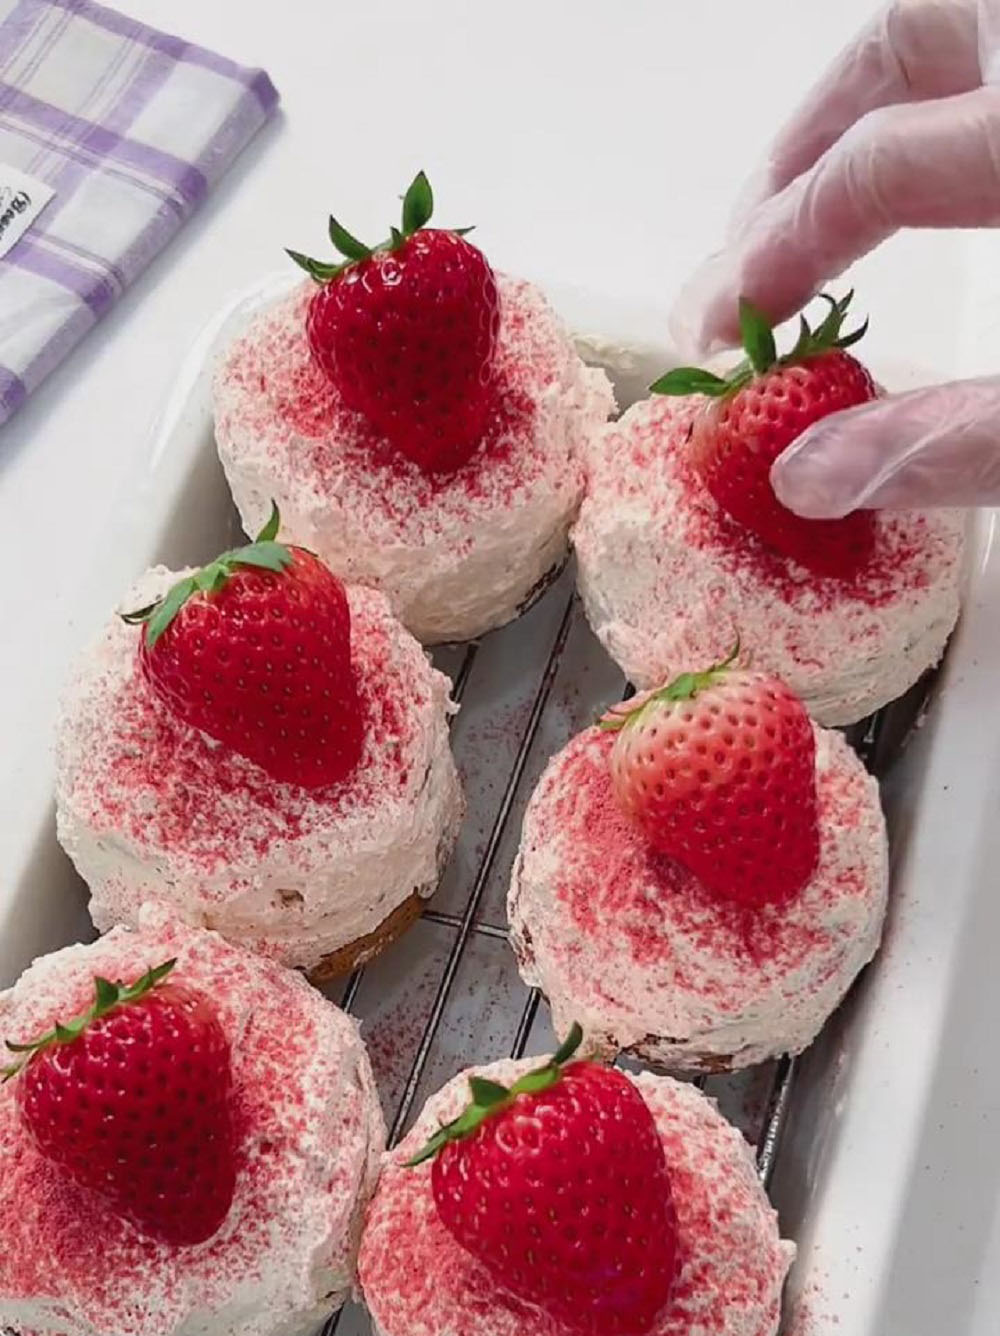
Tips & Tricks
- Use room-temperature eggs for better volume and stability when whipping.
- Fold gently when combining batter and meringue to avoid deflating the air.
- Don‘t overcook the strawberry sauce — a short simmer keeps the flavour fresh and bright.
- Chill the strawberry sauce briefly before using for a better molten center effect.
- Let the sponge cool completely before assembly to prevent the cream from melting.
Frequently Asked Questions
Why is my sponge cake dense?
This usually happens if the meringue was overwhipped or deflated during folding. Gentle folding and proper soft peaks are key.
Can I make this cake ahead of time?
Yes. You can bake the sponge and prepare the strawberry sauce in advance. Assemble the cake on the same day for the best texture.
Why did my cream turn runny?
The cream may have been underwhipped or the strawberry sauce was still warm. Always use fully cooled sauce and whip until stable peaks form.
How should I store the finished cake?
Store the assembled mini strawberry cake covered in the refrigerator and enjoy within 2–3 days for the best flavour and texture.

Mini Strawberry Cakes with Molten Strawberry Center
Ingredients
For the Cocoa Cake Discs
- 3 large eggs room temperature, separated
- 30 g corn oil or other neutral vegetable oil
- 35 g whole milk
- 45 g cake flour
- 5 g unsweetened cocoa powder
- 40 g granulated sugar
For the Fresh Strawberry Jam
- 200 g fresh strawberries hulled
- 55 g granulated sugar adjust to taste
- 10 g fresh lemon juice
For the Strawberry Cream
- 200 g cold heavy whipping cream 30-36% fat
- 80 g cooled homemade strawberry jam from above
For Decoration
- Strawberry powder for dusting
- 6 small whole strawberries halved or left whole
Instructions
Preparation
- Take the eggs out of the refrigerator ahead of time so they reach room temperature. Separate the egg yolks and whites carefully. Make sure the bowl for the egg whites is completely clean, dry, and free of oil or yolk, as this is crucial for proper whipping.
- Mix the cake flour and cocoa powder together and sift twice. This helps incorporate air and results in a lighter sponge. Wash the strawberries, remove the stems, and drain well.
- Preheat the oven to 150°C (300°F) with top and bottom heat for 10 minutes to stabilize the temperature.
Make the Cocoa Sponge Cake
- In a large bowl, combine the corn oil and milk. Whisk until fully emulsified — the mixture should look smooth and glossy with no visible oil droplets.
- Add the sifted cake flour and cocoa powder mixture. Stir gently in a “Z” motion until no dry flour remains. Avoid circular stirring to prevent gluten development.
- Add the egg yolks and continue mixing in a “Z” motion until the batter becomes smooth, thick, and silky.
- In a separate bowl, whip the egg whites with an electric mixer on medium-high speed until foamy. Add one-third of the sugar and continue whipping. Once the bubbles become finer, add the second portion of sugar and switch to medium speed. When visible lines appear, add the remaining sugar and reduce to low speed, whipping until soft peaks form with a small hook at the tip.
- Fold one-third of the meringue into the yolk batter using a silicone spatula, folding gently from bottom to top.
- Pour the mixture back into the remaining meringue and continue folding until fully combined with no white streaks.
- Transfer the batter into a piping bag. Pipe circles about 5 cm in diameter onto a parchment-lined baking tray, leaving space between each one.
- Bake on the middle rack at 150°C for 30 minutes, until the surface is lightly golden and springs back when pressed. Remove from the oven and cool completely on a rack.
Make the Strawberry Sauce
- Place the strawberries into a saucepan with the sugar and lemon juice. Mash them.
- Cook over low heat while stirring constantly. Skim off any foam that forms on the surface. Continue simmering for about 2 minutes until the sauce thickens, then remove from heat.
- Transfer the sauce to a bowl and let it cool to room temperature. Cover and refrigerate for 10 minutes to further thicken and create a better molten center.
Whip the Strawberry Cream
- Pour the heavy cream into a clean, dry bowl. Whip on medium speed until lightly whipped, with faint lines and a flowing texture.
- Add the cooled strawberry sauce and continue whipping on medium speed until the cream reaches a firm, stable texture with clear lines and peaks. Transfer to a piping bag.
Assemble and Decorate
- Place one cooled cocoa sponge on a flat surface. Pipe a ring of strawberry cream around the edge, leaving the center hollow.
- Fill the center with strawberry sauce.
- Pipe another layer of strawberry cream over the sauce, then top with a second sponge and gently press to secure.
- Use a spatula to spread a thin, even layer of strawberry cream over the top and sides.
- Finish by sprinkling strawberry powder on top and decorating with halved or whole strawberries.
Leave a Reply