
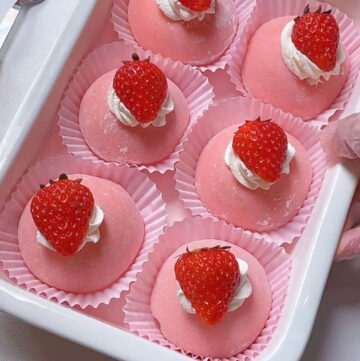
This pink strawberry mochi is soft, chewy, and filled with layers of whipped cream and a gooey strawberry jam center. No steaming, no baking, and no oven needed — perfect for beginners and so pretty for strawberry season!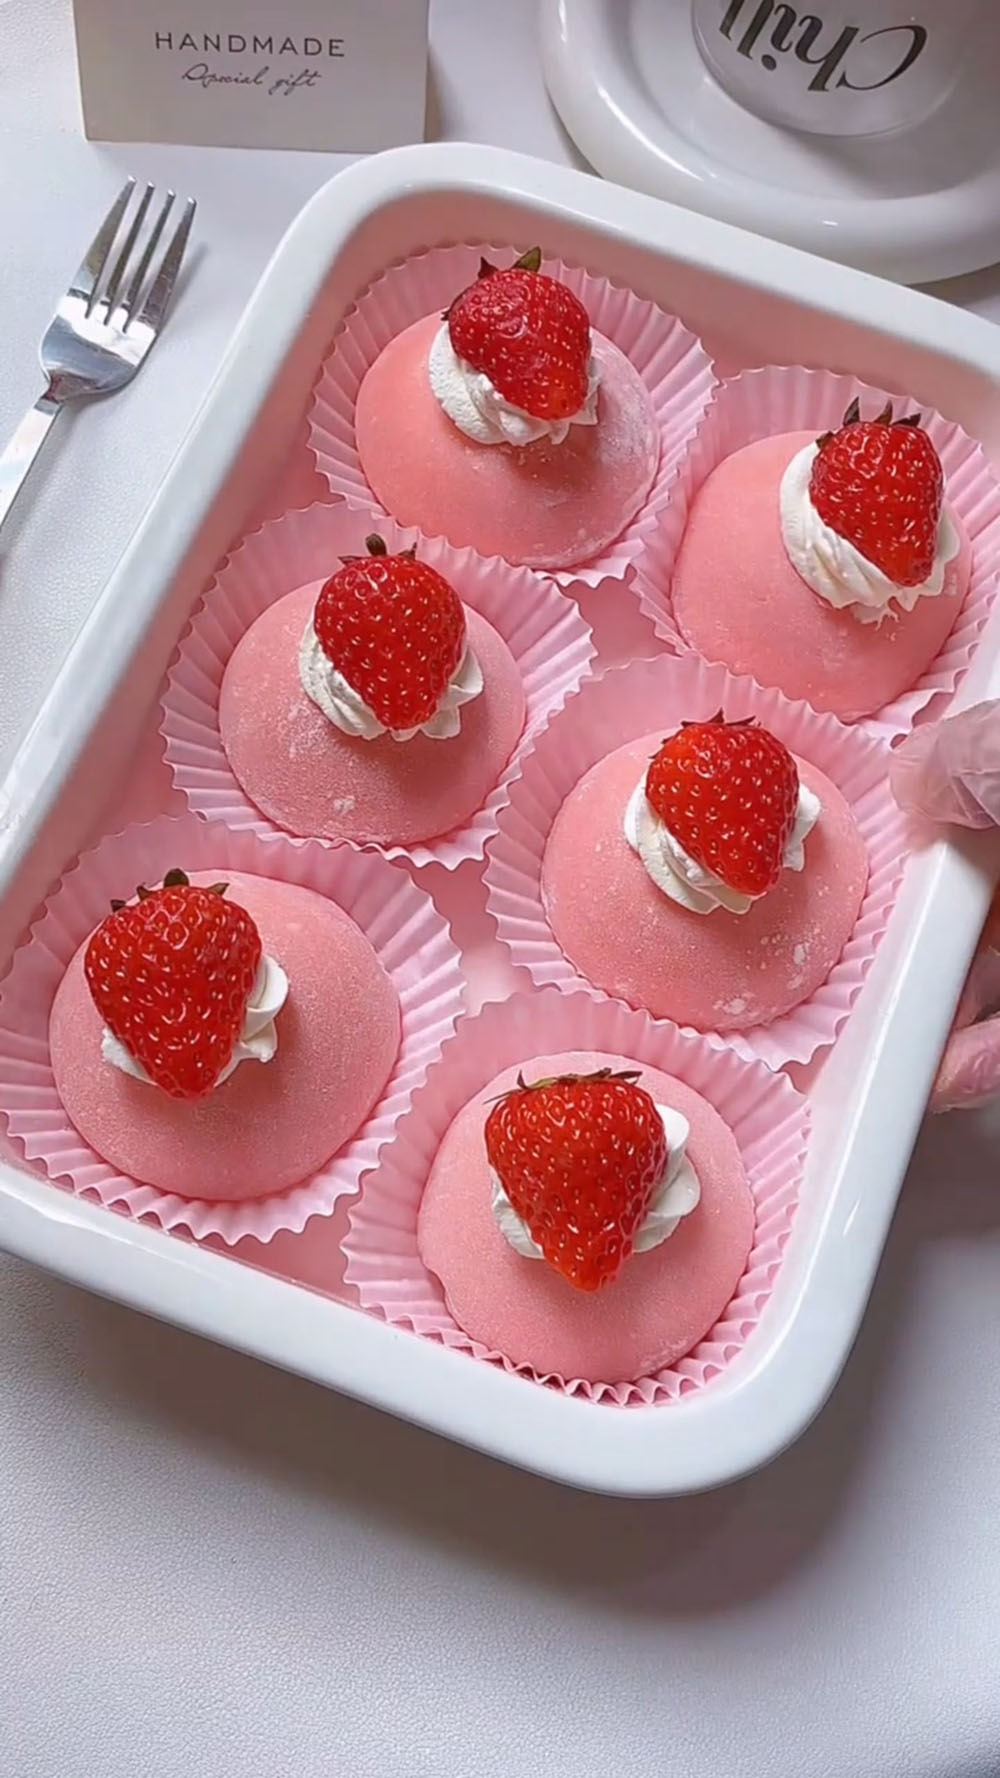
I’ve always loved how mochi can be endlessly creative.
Once you master the dough, you can switch up the fillings, colors, and shapes to match any season or craving.
This pink mochi is a perfect example.
It’s essentially a kissin’ cousin to the Cute Christmas Strawberry Snowman Mochi, but I’ve swapped the classic look for a soft, romantic pink using just a few drops of red velvet liquid.
The result is a stunning, berry-hued dessert that tastes as good as it looks.
The best part? There’s no steaming, no baking, and definitely no oven required.
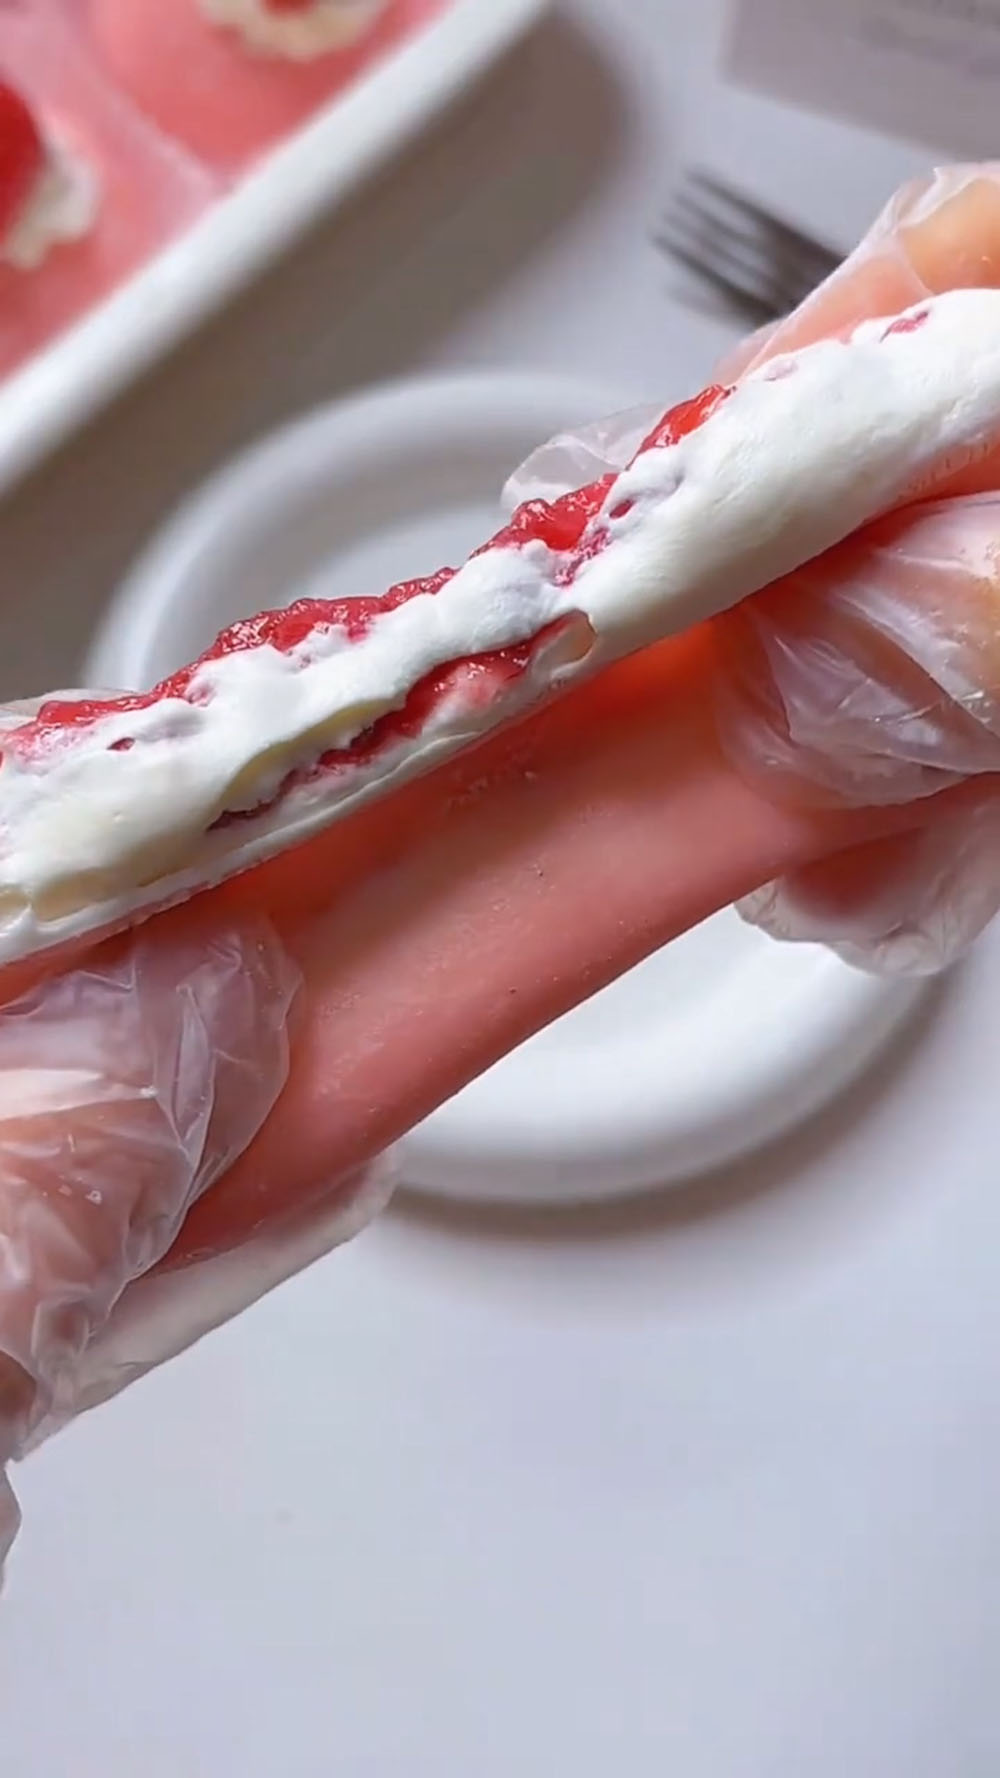
The outer skin turns out perfectly soft, chewy, and stretchy without being sticky, while the inside is a dreamy combination of smooth, sweet cream and a tart, gooey burst of homemade-style strawberry jam.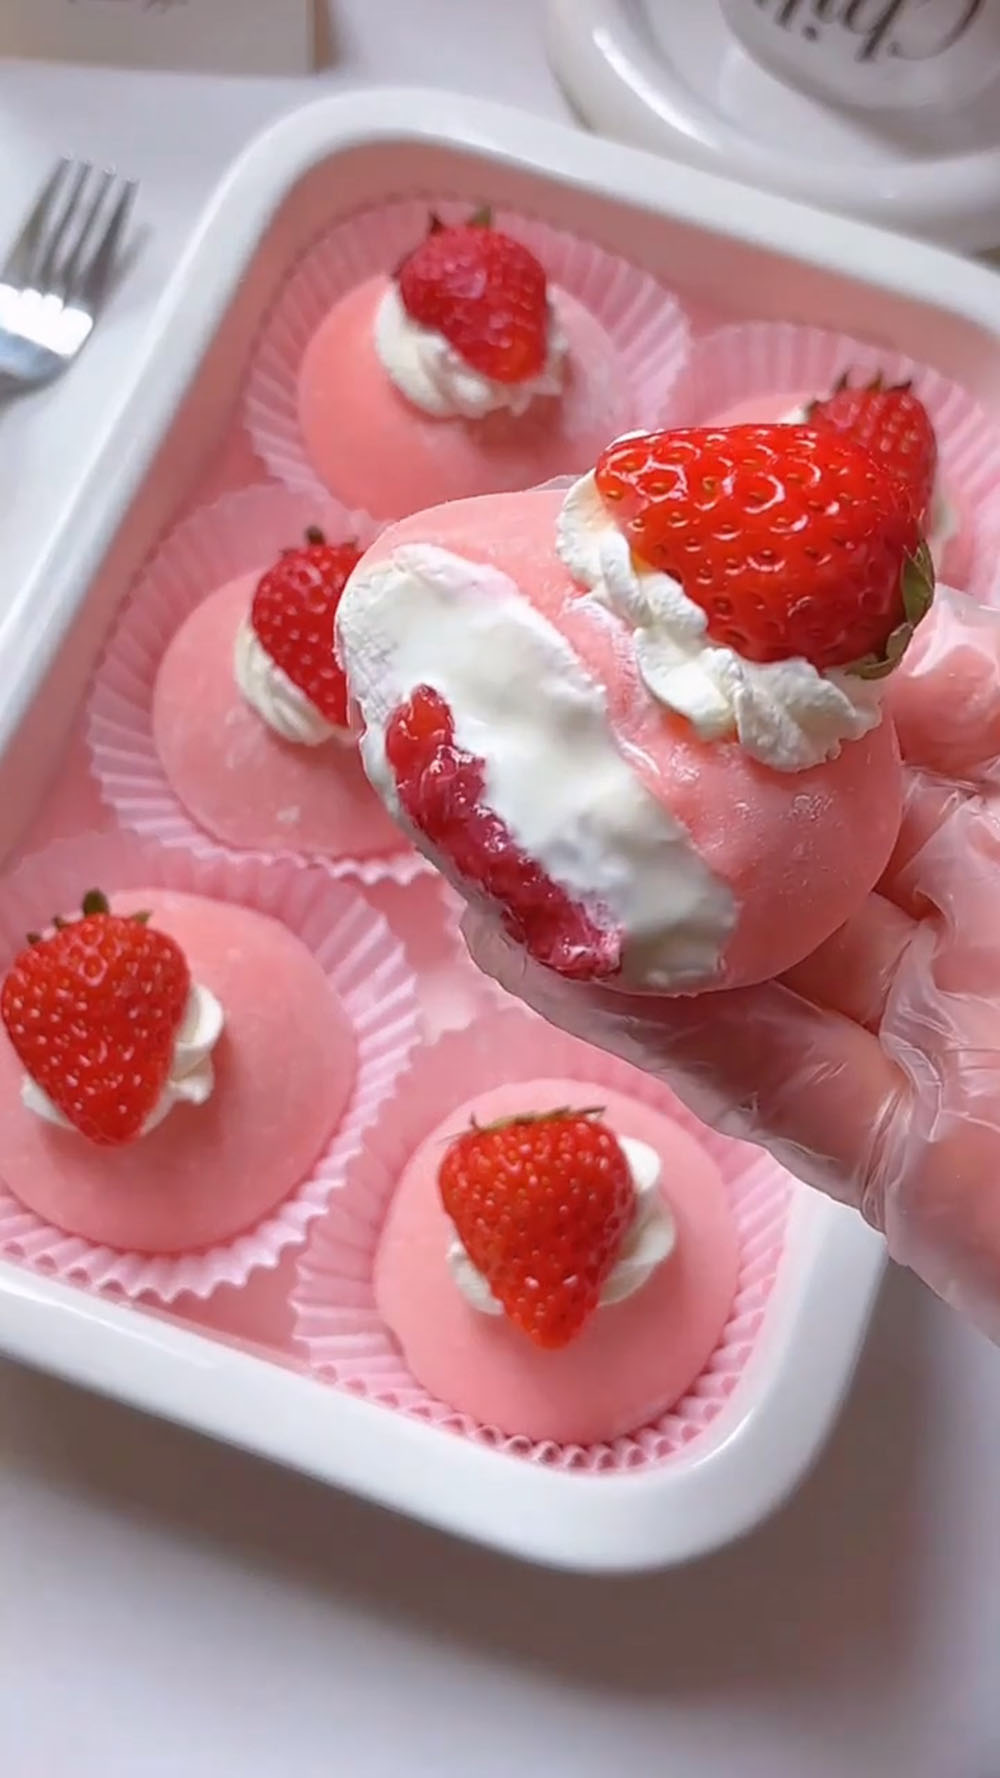
Ingredients and Substitutions
- Heavy cream – This is the base of our luscious cream filling. You’ll whip it until it’s stiff and holds its shape, which creates that light, airy, and smooth texture that contrasts so perfectly with the chewy mochi.
- White sugar – A small amount of sugar is all we need to sweeten the heavy cream just enough. It enhances the natural flavors without making the filling overly sweet, letting the bright strawberry jam shine.
- Glutinous rice flour (Mochiko) – This is the star of our mochi dough. It’s what gives the dessert its signature soft, elastic, and delightfully chewy texture. Do not confuse this with regular rice flour, as the results will be completely different.
- Cornstarch – We’ll add cornstarch to the dry mixture to help lighten the dough’s texture and contribute to that perfectly tender, slightly less dense bite.
- Milk – Milk provides the necessary liquid to bring the dough together, creating a smooth, pourable batter before it hits the pan. It adds a touch of richness without being as heavy as cream.
- Butter – This is a non-negotiable ingredient for an ultra-soft and pliable mochi.
- Red velvet liquid – Just a few drops of this food coloring is what transforms our plain mochi into a gorgeous, pastel pink. I use red velvet liquid for a nice, soft hue, but you could also use a drop of regular red food coloring. Go slowly to achieve your perfect shade.
- Cooked glutinous rice flour (for dusting) – You must use cooked glutinous rice flour to prevent sticking. Raw flour will give your finished mochi a pasty, unpleasant taste and texture. You can easily make this by toasting regular glutinous rice flour in a dry pan until it smells nutty.
- Strawberry jam – A spoonful of strawberry jam hidden in the center is our “surprise” element. It creates a delicious, fruity burst of flavor that cuts through the richness of the cream. Don’t overfill, or it will be hard to seal.
- Fresh strawberries – The final, beautiful garnish. A fresh, ripe strawberry placed on top of the piped cream signals exactly what delicious flavor is waiting inside and adds a pop of natural color and freshness.
How to Make Pink Mochi (Strawberry Cream Filling)
Make the Cream Filling
- In a medium mixing bowl, combine the heavy cream and white sugar.
- Using an electric hand mixer or a whisk, whip the mixture until it forms stiff peaks that hold their shape firmly.
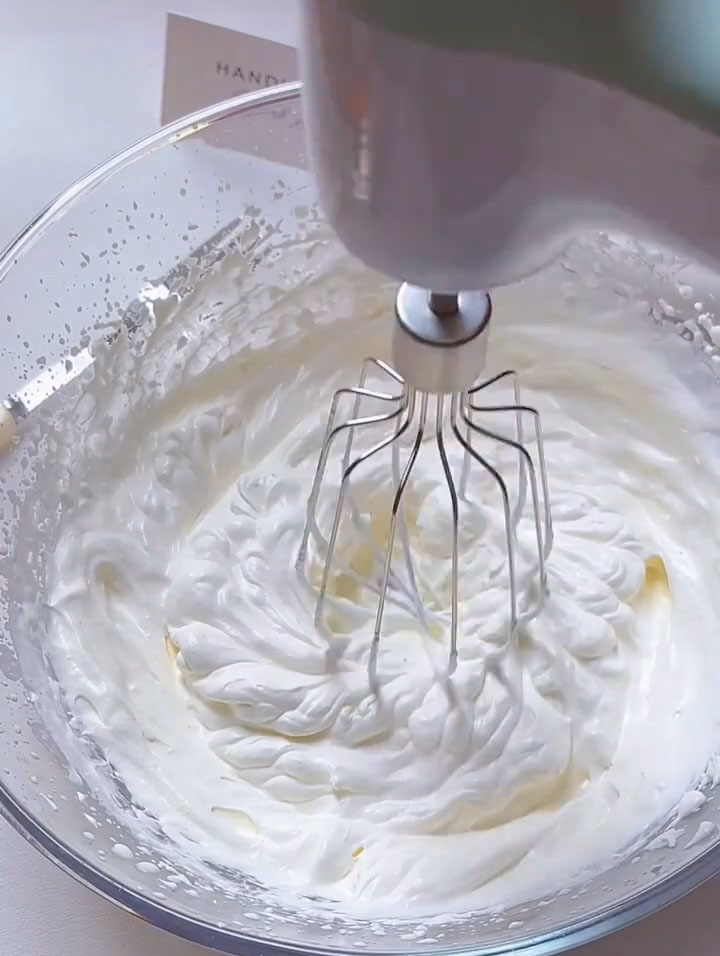
- Transfer the whipped cream to a piping bag and place it in the refrigerator to chill while you prepare the other components.
Make the Mochi Dough
- In a separate bowl, whisk together the glutinous rice flour, cornstarch, white sugar, and milk until the batter is completely smooth with no lumps.
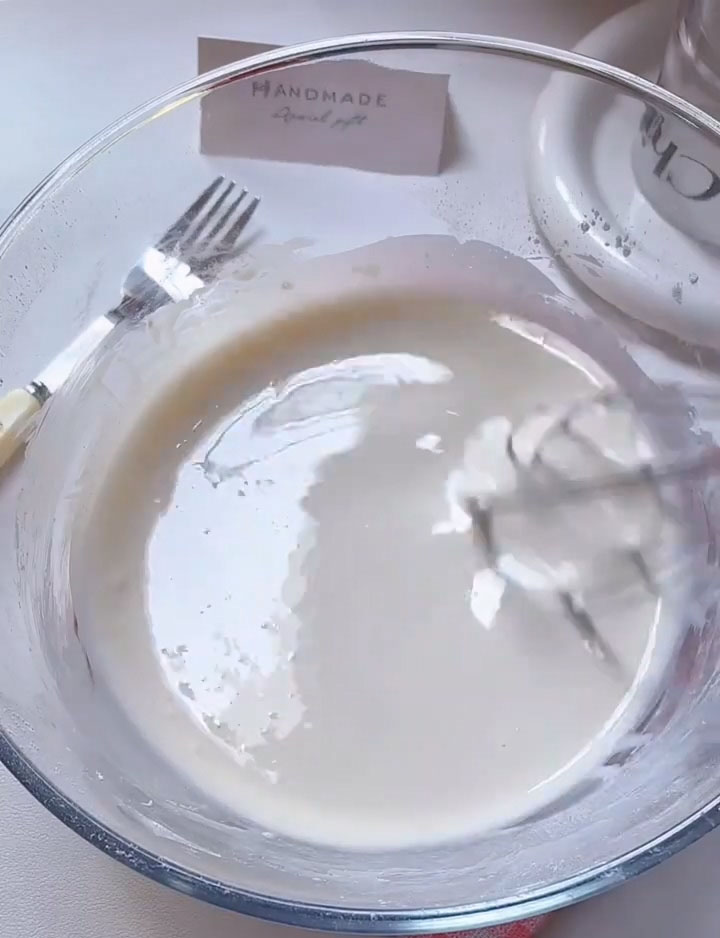
- Pour the batter through a fine-mesh strainer directly into a non-stick frying pan to ensure an ultra-smooth dough.

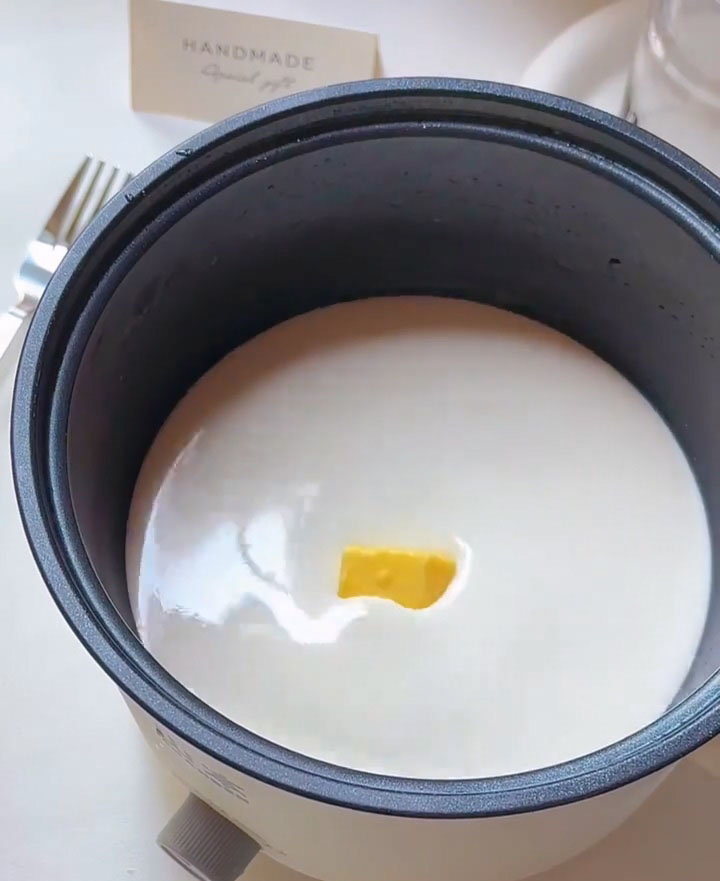
- Add the butter to the pan. Turn the heat to low and begin cooking the mixture, stirring constantly with a spatula.
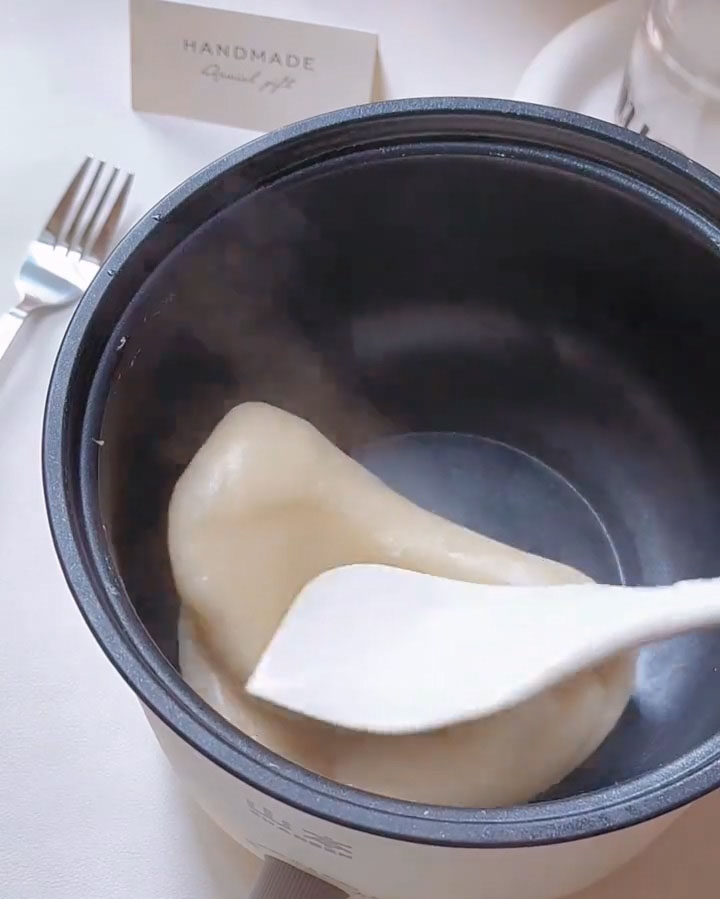
- Continue to cook and stir until the mixture suddenly comes together into a solid, cohesive ball of dough that pulls away cleanly from the sides of the pan. This is the most important step.
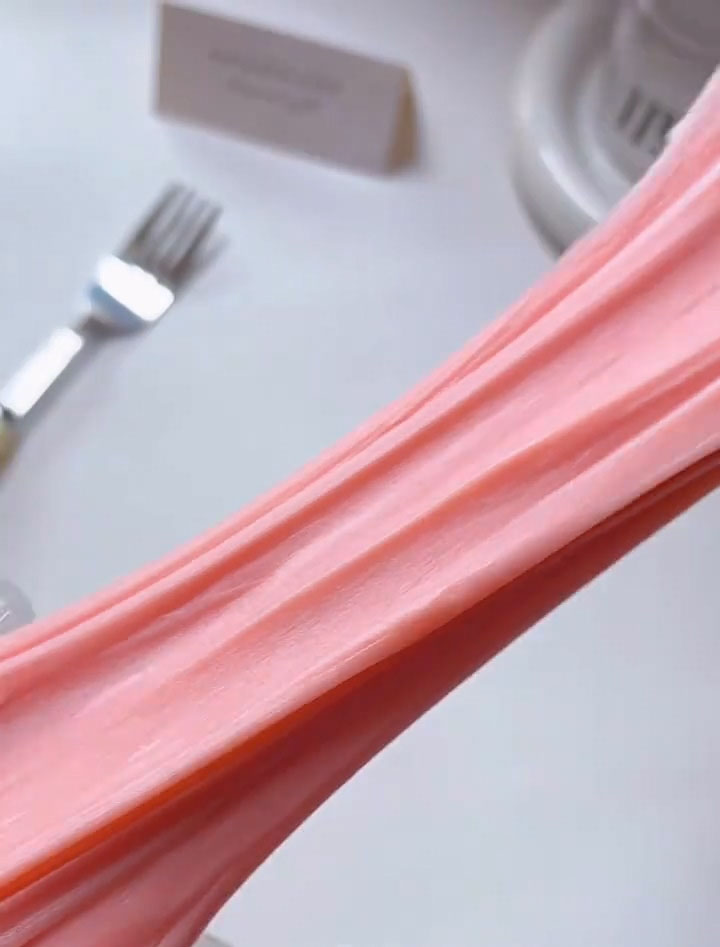
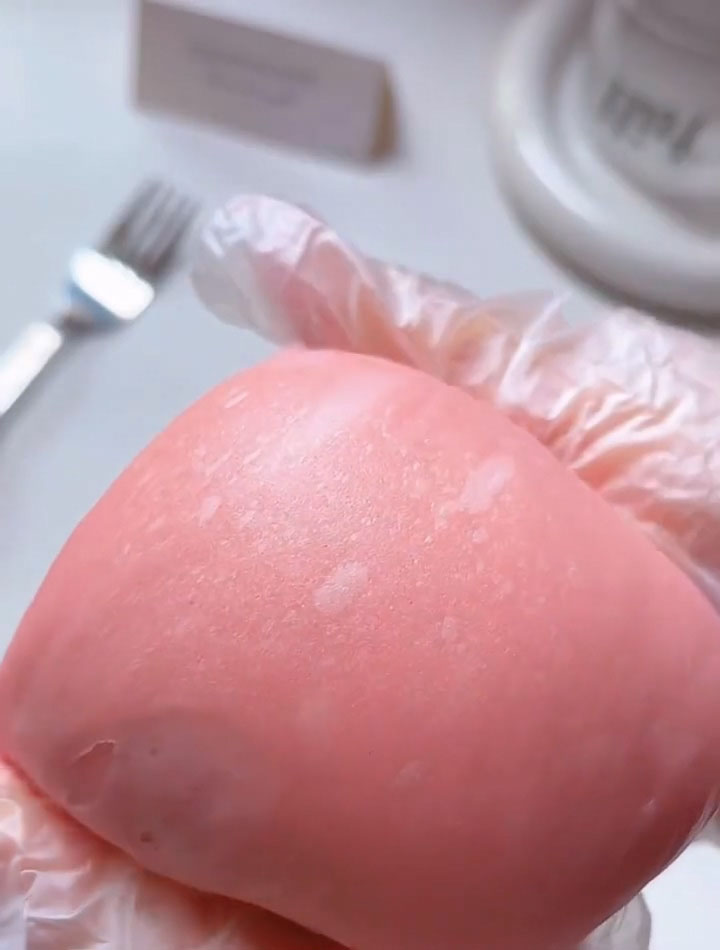
- Transfer the hot dough ball to a clean surface. Add the 3 drops of red velvet liquid and knead it into the dough.
- Let the dough cool until it’s safe to handle, then begin stretching and folding it repeatedly. Continue this process for a few minutes until the dough becomes very smooth, elastic, and no longer breaks when you pull it.
Assemble the Pink Mochi
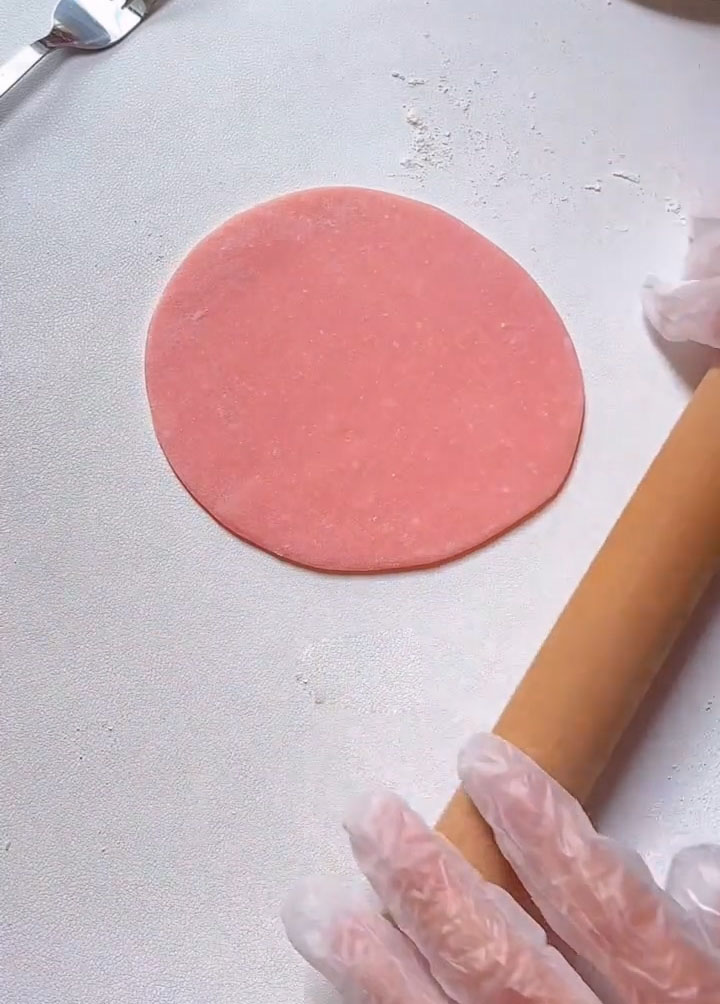
- Lightly dust your work surface and hands with cooked glutinous rice flour to prevent sticking.
- Pinch off a small piece of the pink dough and roll it into a ball. Use a rolling pin to flatten it into a thin, circular disc.
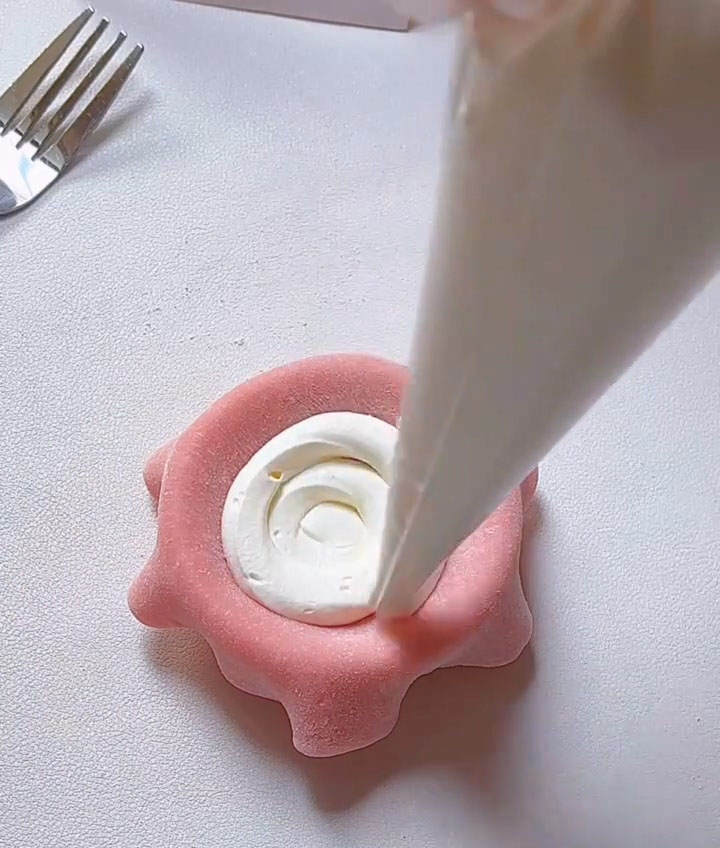
- Gently press the disc of dough into a small, round mold or a shallow cup.
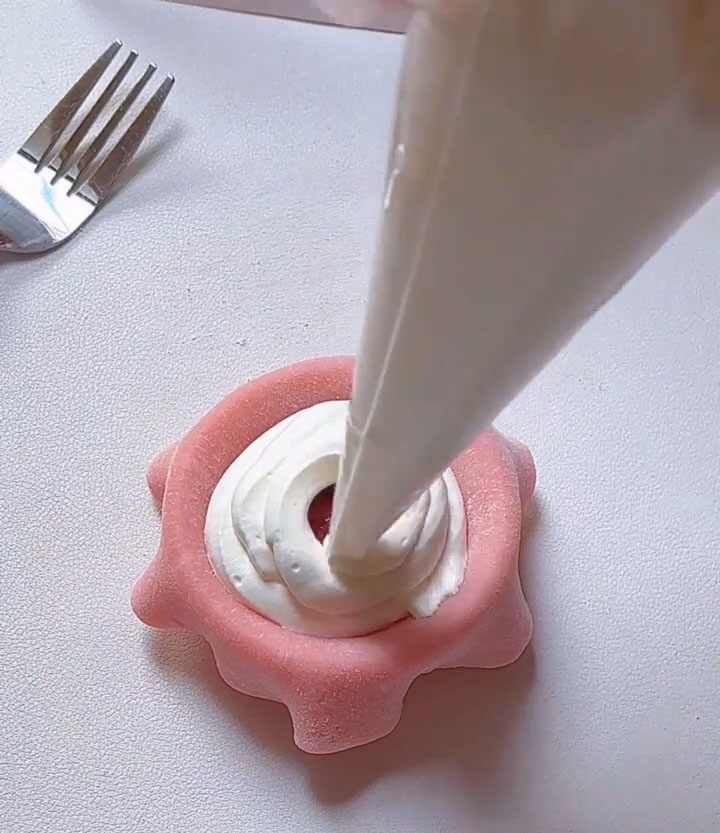
- Pipe a layer of the chilled whipped cream into the bottom of the dough-lined mold.
- Add one small spoonful of strawberry jam directly onto the center of the cream.
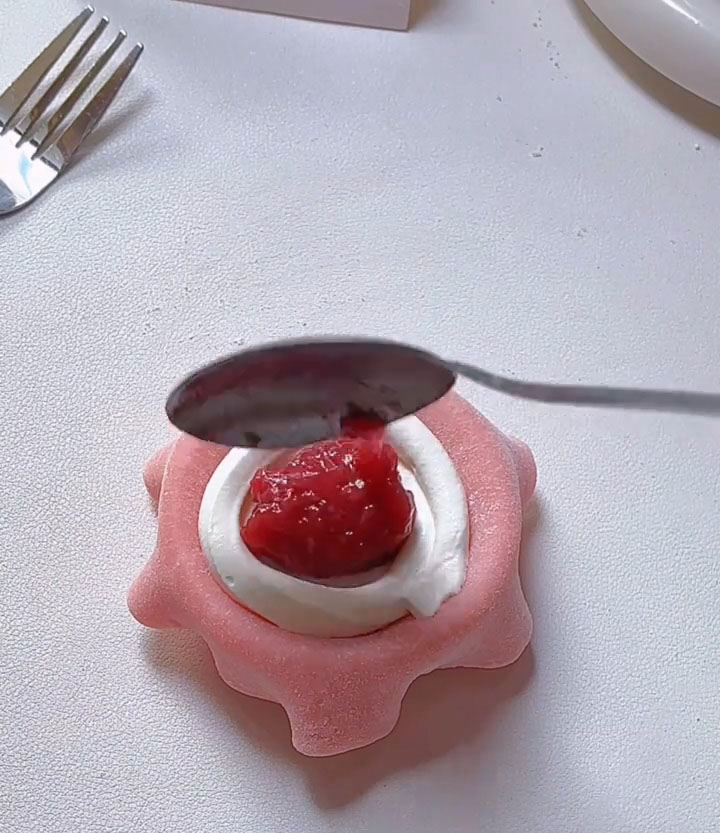
- Pipe another layer of whipped cream on top of the jam, covering it completely.
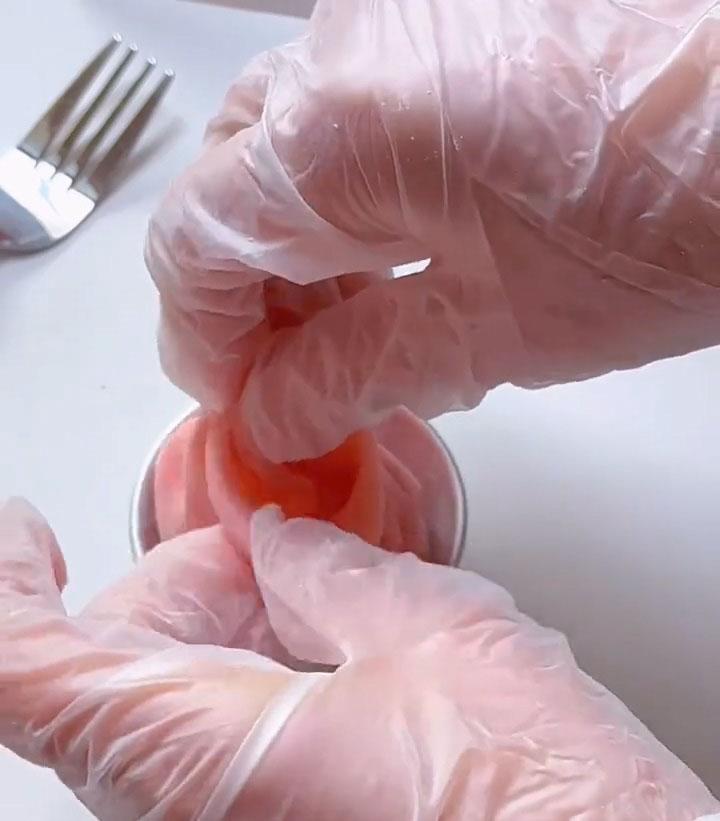
- Gather the edges of the mochi dough up and over the filling, pinching them firmly together to seal the mochi shut. Twist and pinch off any excess dough at the top.
 Decorate and Finish
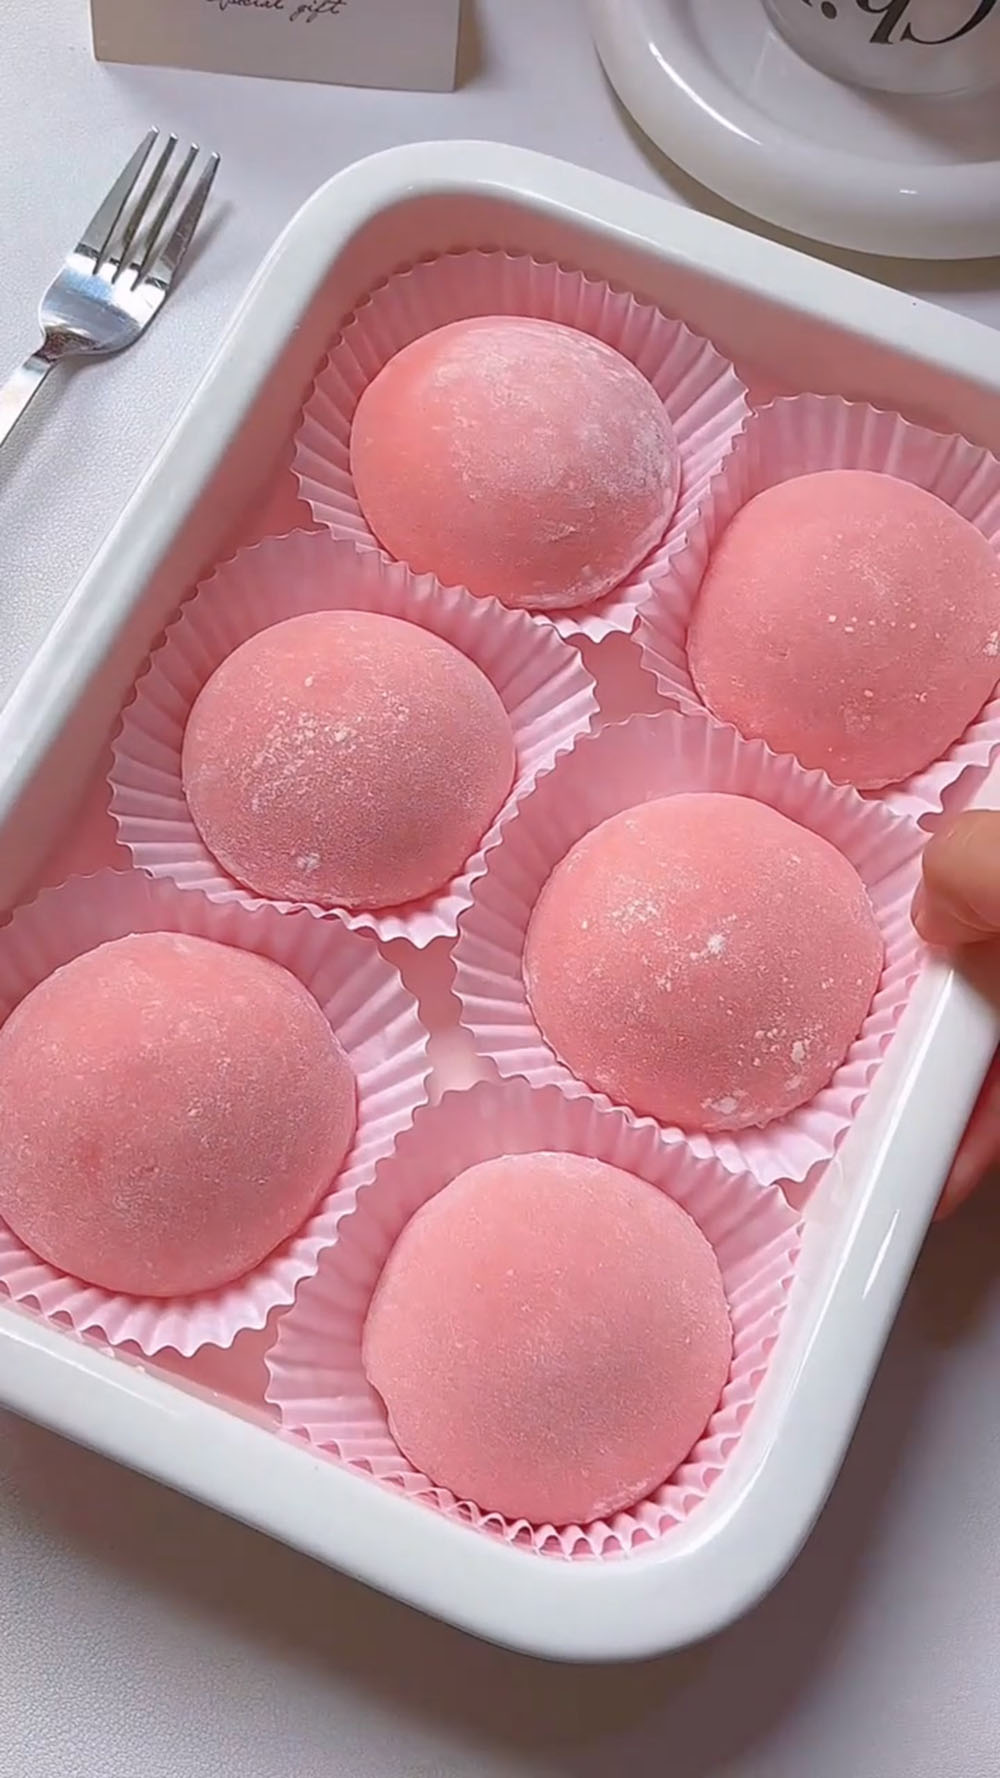
- Dust the bottom of the sealed mochi with a little more cooked glutinous rice flour.
- On the top surface of the mochi, pipe a small decorative swirl of the remaining whipped cream.
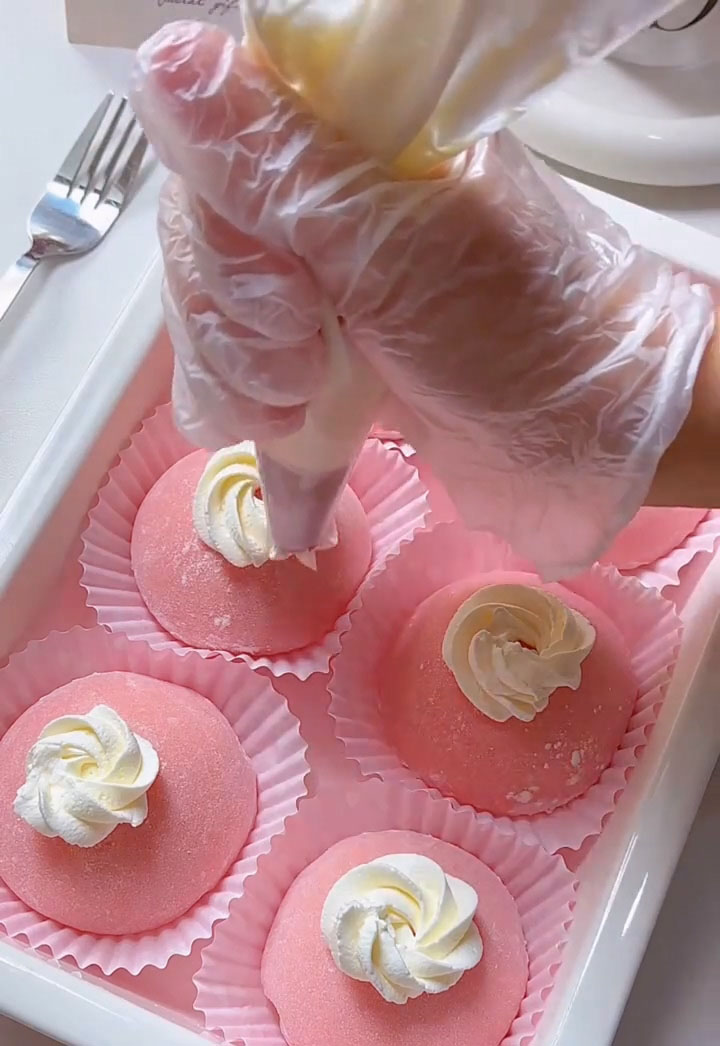
- Place one fresh strawberry on top of the whipped cream swirl as the final garnish.

Tips & tricks
- Cook the dough until it fully comes together into a smooth mass. This is the key to achieving a soft and stretchy texture.
- Always use cooked glutinous rice flour for dusting to prevent sticking without affecting texture.
- Add the coloring gradually to control the shade of pink.
- Don’t overfill with strawberry jam, or it may leak during wrapping.
- Knead and stretch the dough while it’s still slightly warm for the best elasticity.
Frequently asked questions
Why is my mochi too sticky?
You may not have cooked the dough long enough, or you didn’t use enough cooked glutinous rice flour for dusting.
Why is my mochi tearing when wrapping?
The dough may be too thin or not kneaded enough. Try kneading it longer to improve elasticity.
Can I change the filling?
Yes! Once you master the mochi dough, you can use fillings like chocolate, matcha cream, or fruit-based fillings.
Can I make this ahead of time?
Yes, but it’s best eaten within 1–2 days for the best texture and flavour.
Homemade Pink Mochi with Gooey Strawberry Filling
Ingredients
Cream Filling
- 300 g heavy cream
- 20 g white sugar
Mochi Dough
- 75 g glutinous rice flour
- 30 g cornstarch
- 25 g white sugar
- 135 g milk
- 20 g butter
- 3 drops red velvet liquid
- Cooked glutinous rice flour for dusting
Filling & Decoration
- Strawberry jam
- Fresh strawberries for decoration
Instructions
Make the Cream Filling
- In a medium mixing bowl, combine the heavy cream and white sugar.
- Using an electric hand mixer or a whisk, whip the mixture until it forms stiff peaks that hold their shape firmly.
- Transfer the whipped cream to a piping bag and place it in the refrigerator to chill while you prepare the other components.
Make the Mochi Dough
- In a separate bowl, whisk together the glutinous rice flour, cornstarch, white sugar, and milk until the batter is completely smooth with no lumps.
- Pour the batter through a fine-mesh strainer directly into a non-stick frying pan to ensure an ultra-smooth dough.
- Add the butter to the pan. Turn the heat to low and begin cooking the mixture, stirring constantly with a spatula.
- Continue to cook and stir until the mixture suddenly comes together into a solid, cohesive ball of dough that pulls away cleanly from the sides of the pan. This is the most important step.
- Transfer the hot dough ball to a clean surface. Add the 3 drops of red velvet liquid and knead it into the dough.
- Let the dough cool until it's safe to handle, then begin stretching and folding it repeatedly. Continue this process for a few minutes until the dough becomes very smooth, elastic, and no longer breaks when you pull it.
Assemble the Pink Mochi
- Lightly dust your work surface and hands with cooked glutinous rice flour to prevent sticking.
- Pinch off a small piece of the pink dough and roll it into a ball. Use a rolling pin to flatten it into a thin, circular disc.
- Gently press the disc of dough into a small, round mold or a shallow cup.
- Pipe a layer of the chilled whipped cream into the bottom of the dough-lined mold.
- Add one small spoonful of strawberry jam directly onto the center of the cream.
- Pipe another layer of whipped cream on top of the jam, covering it completely.
- Gather the edges of the mochi dough up and over the filling, pinching them firmly together to seal the mochi shut. Twist and pinch off any excess dough at the top.
Decorate and Finish
- Dust the bottom of the sealed mochi with a little more cooked glutinous rice flour.
- On the top surface of the mochi, pipe a small decorative swirl of the remaining whipped cream.
- Place one fresh strawberry on top of the whipped cream swirl as the final garnish.
Leave a Reply