
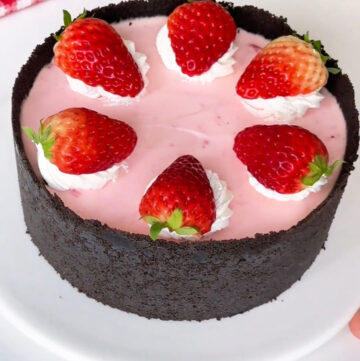
This no-bake strawberry mousse cake is light, creamy, and perfectly balanced with a crunchy Oreo base. Made with a double layer of vanilla and strawberry cheesecake mousse, it’s easy to prepare and sets beautifully in the fridge. A perfect dessert for summer, parties, or afternoon tea.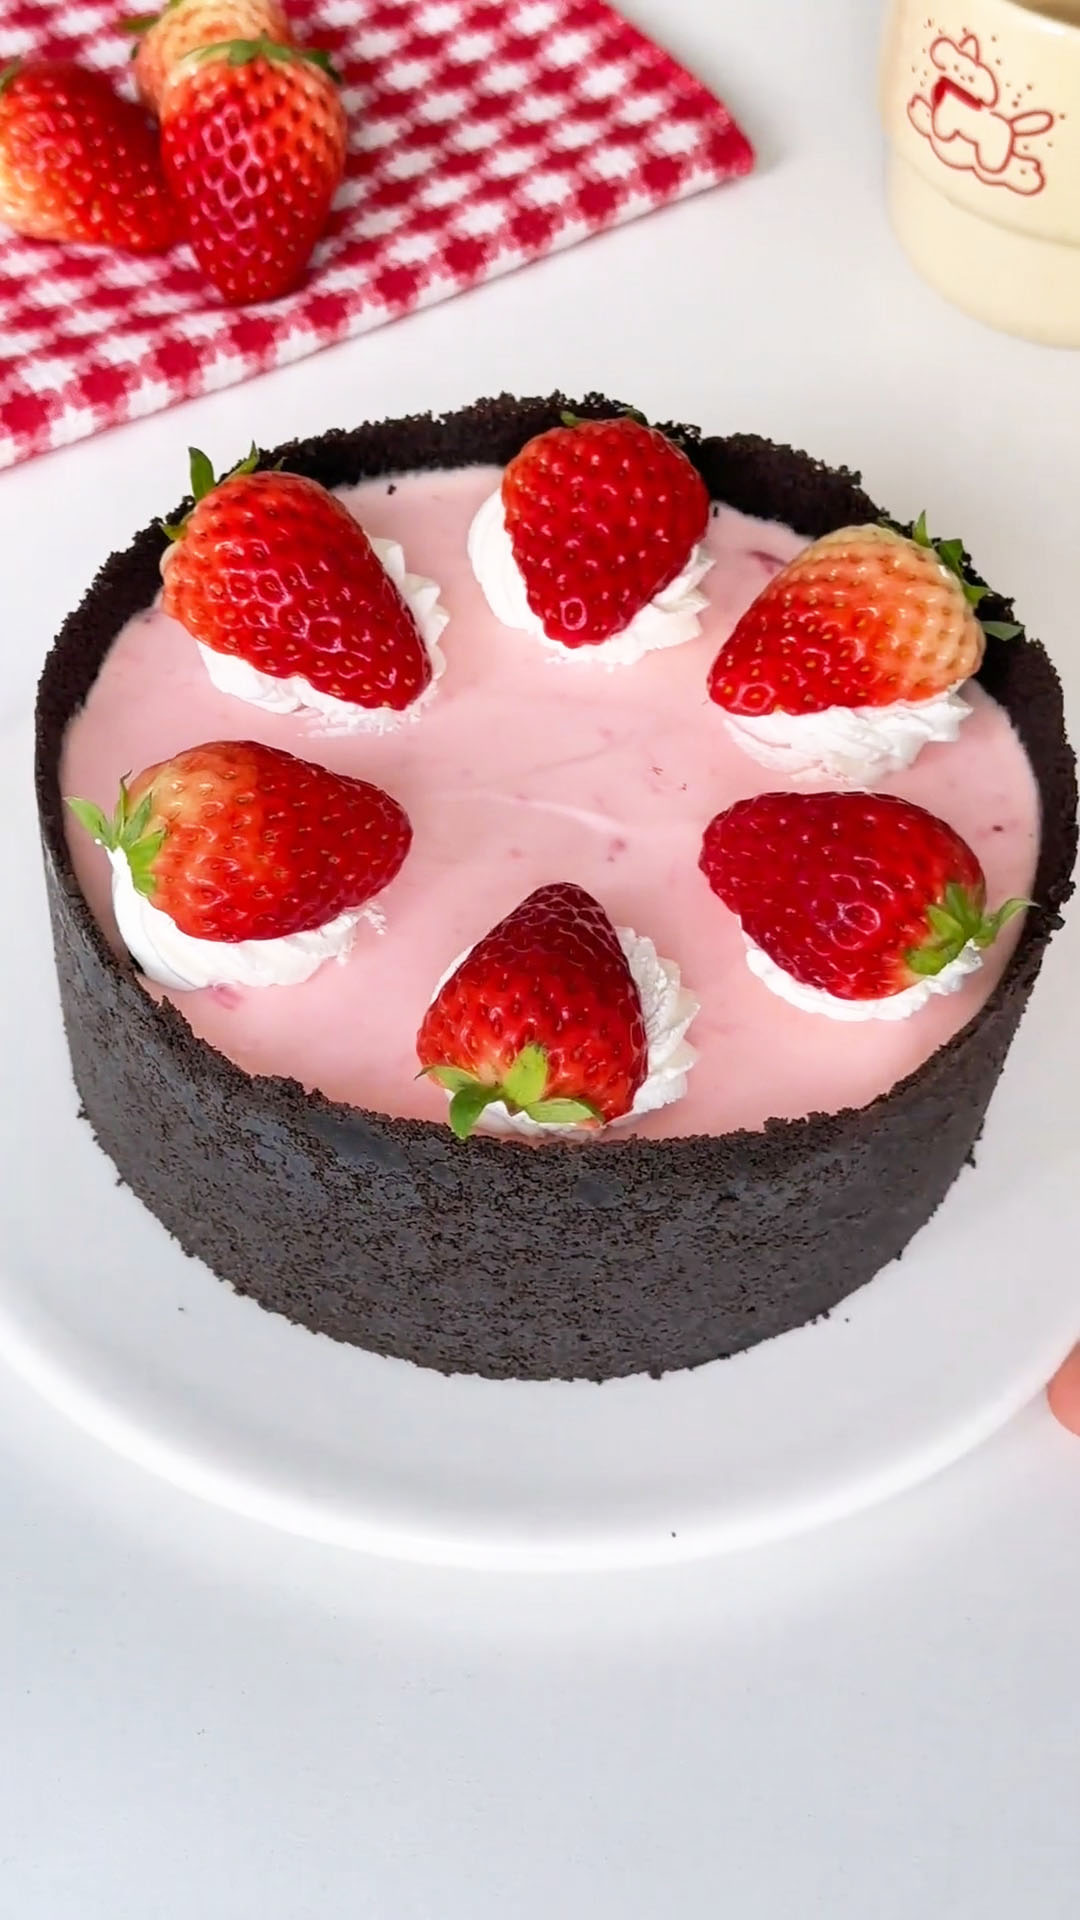
It’s strawberry season again, one of my favourite times of the year.
Yesterday, we went strawberry picking and came home with baskets of fresh, juicy strawberries.
After enjoying some as they were, I still had a few left, and that’s when I decided to turn them into a strawberry mousse cake.
This is the kind of dessert that’s surprisingly easy to make, yet looks and tastes like something you’d find in a bakery.
With its soft, creamy mousse and fresh strawberry flavour, it gives the impression that you’ve spent hours in the kitchen, even though the process is simple and stress-free.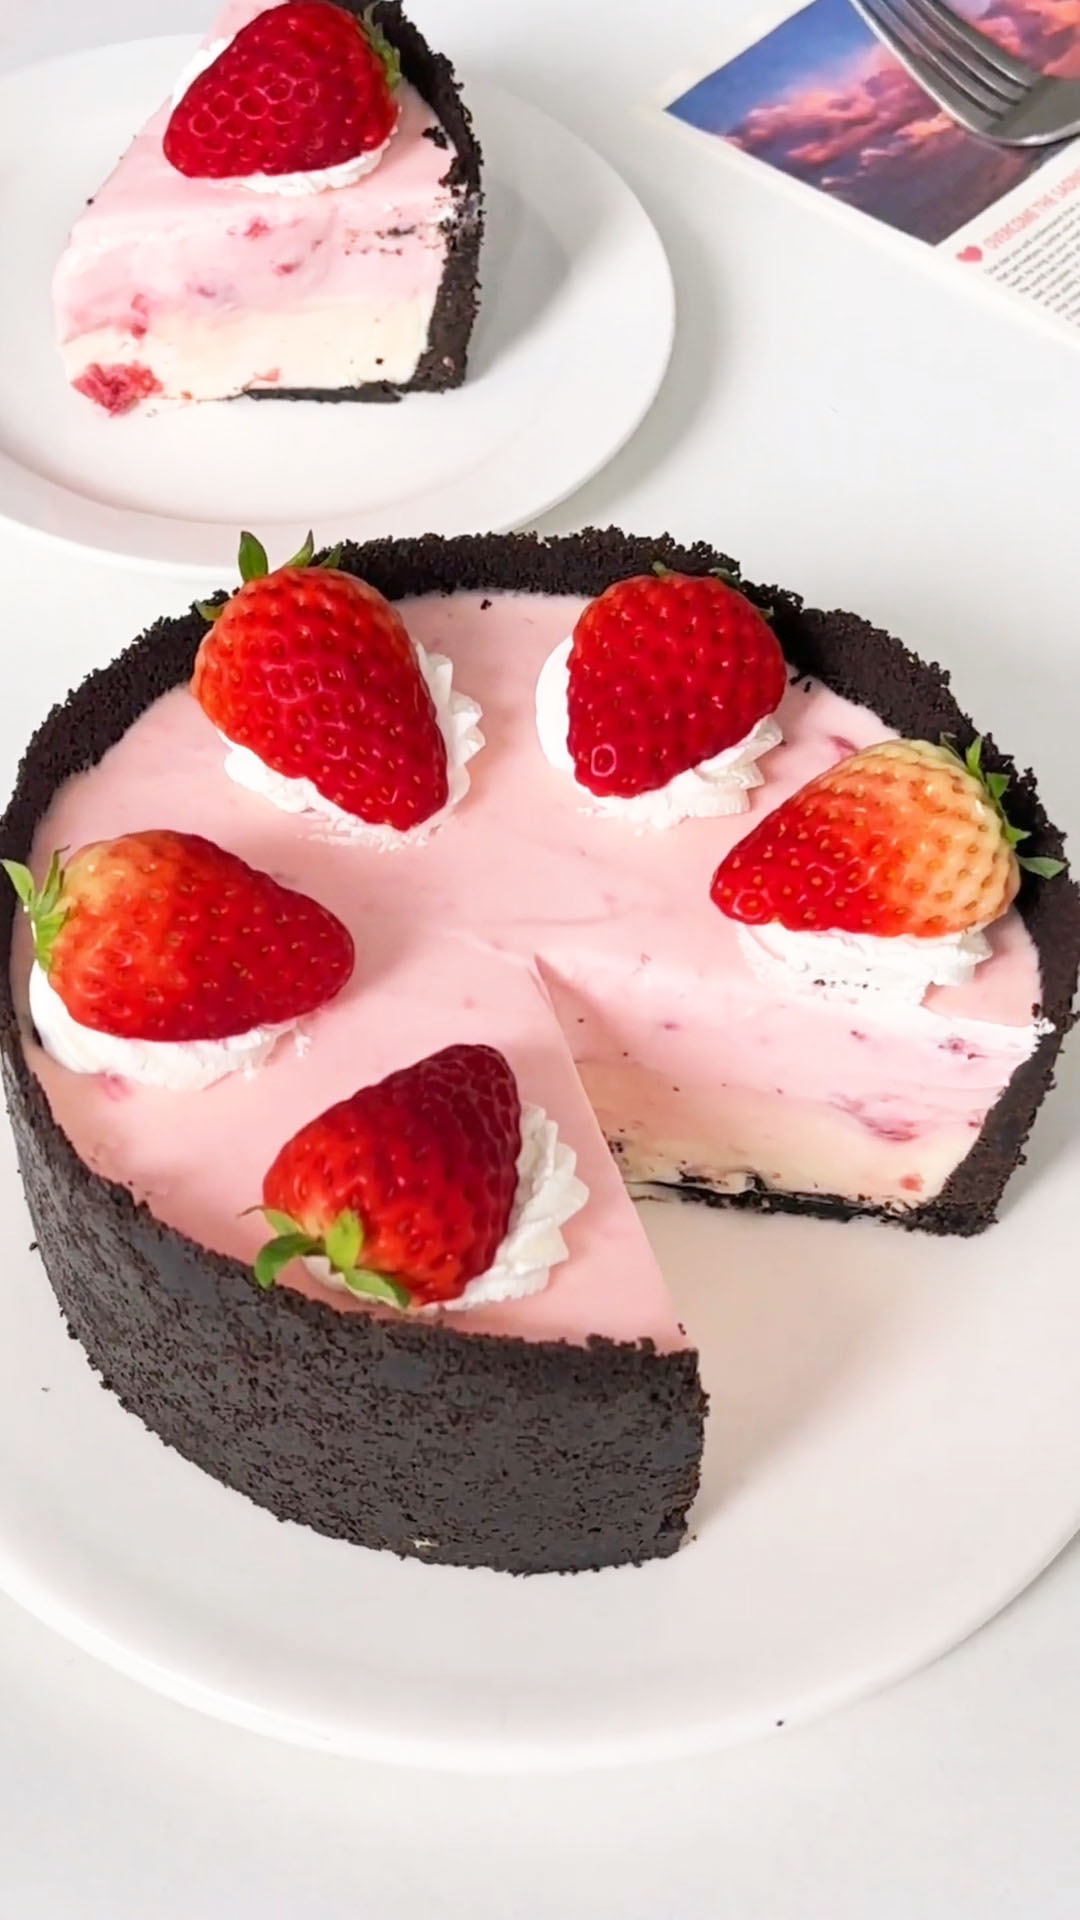
Why You’ll Love This Recipe
- Incredibly Easy & No-Bake: This recipe is all about mixing and chilling. It’s perfect for beginners or hot days when you don’t want to turn on the oven.
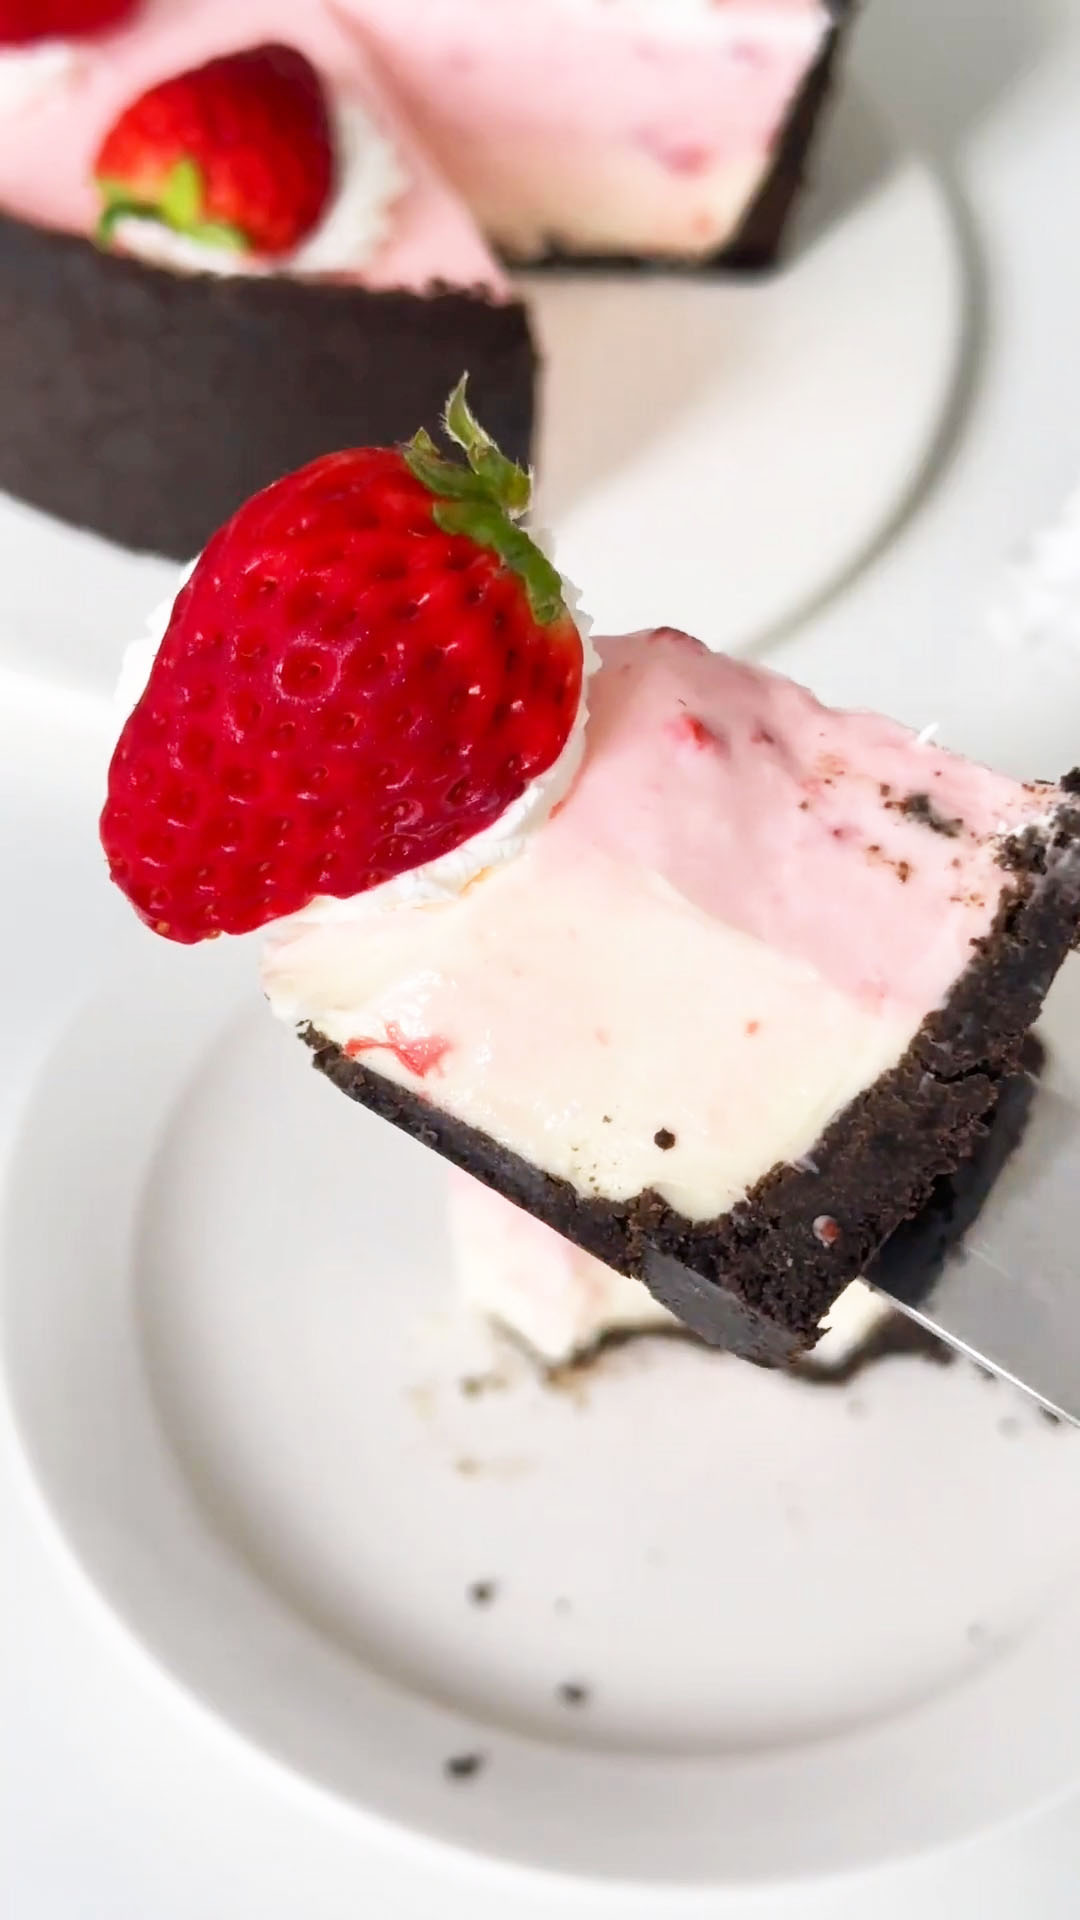
- Stunning Layers & Texture: The crispy Oreo crust, velvety plain cheesecake layer, and vibrant strawberry mousse create a beautiful and delicious contrast in every slice.
- Perfectly Balanced Flavor: The rich cream cheese is beautifully cut by the fruity sweetness of the strawberry jam, making it indulgent but not overly heavy or cloying.
Ingredients
Ingredients and Substitutions
- Oreo cookie crumbs – You can buy pre-crushed crumbs or pulse whole Oreos (creams included) in a food processor until fine. The cream filling helps bind the crust.
- Butter – Unsalted butter, melted, acts as the glue for the crust. Using salted butter is fine, but the crust will have a slight salty note.
- Cream cheese – I recommend using full-fat, brick-style cream cheese for the best rich and stable mousse texture. It must be fully softened at room temperature for a perfectly smooth, lump-free batter.
- Granulated sugar – We’re using just enough to lightly sweeten the mousse and balance the tang of the cream cheese.
- Heavy cream (whipping cream) – Use cold heavy cream or whipping cream (with a fat content of 30% or higher). It adds lightness and a luxurious mouthfeel to the mousse.
- Gelatin sheets – These are what set the mousse without baking. I prefer sheets for their neutral taste and smooth melting. Important: They must be softened in cold water only.
- Hot milk – Any kind of milk works. The heat is simply to dissolve the softened gelatin completely so it incorporates evenly into the batter.
- Strawberry jam – I recommend using a good-quality jam for the best fruit flavor. You can use store-bought or homemade. A little texture or small fruit pieces in the jam add a nice contrast.
Recipe: No-Bake Oreo Double Layer Strawberry Mousse Cake
Oreo Crust
- 120 g Oreo cookie crumbs
- 55 g butter, melted
Double Layer Cheesecake Mousse
- 280 g cream cheese, fully softened
- 35 g granulated sugar
- 200 g heavy cream, cold
- 10 g gelatin sheets (about 2 standard sheets)
- 50 g hot milk
- 60 g strawberry jam
For Decorating (Optional)
- Whipped cream
- Fresh strawberries
How to Make No-Bake Oreo Double Layer Strawberry Mousse Cake
For the Oreo Crust:
1. In a small microwave-safe bowl or a saucepan, melt the 55g of butter in short bursts in the microwave or over low heat on the stovetop until completely liquid. Set aside to cool slightly.
2. Combine the melted butter and Oreo cookie crumbs. Mix until all the crumbs are evenly moistened and resemble wet sand.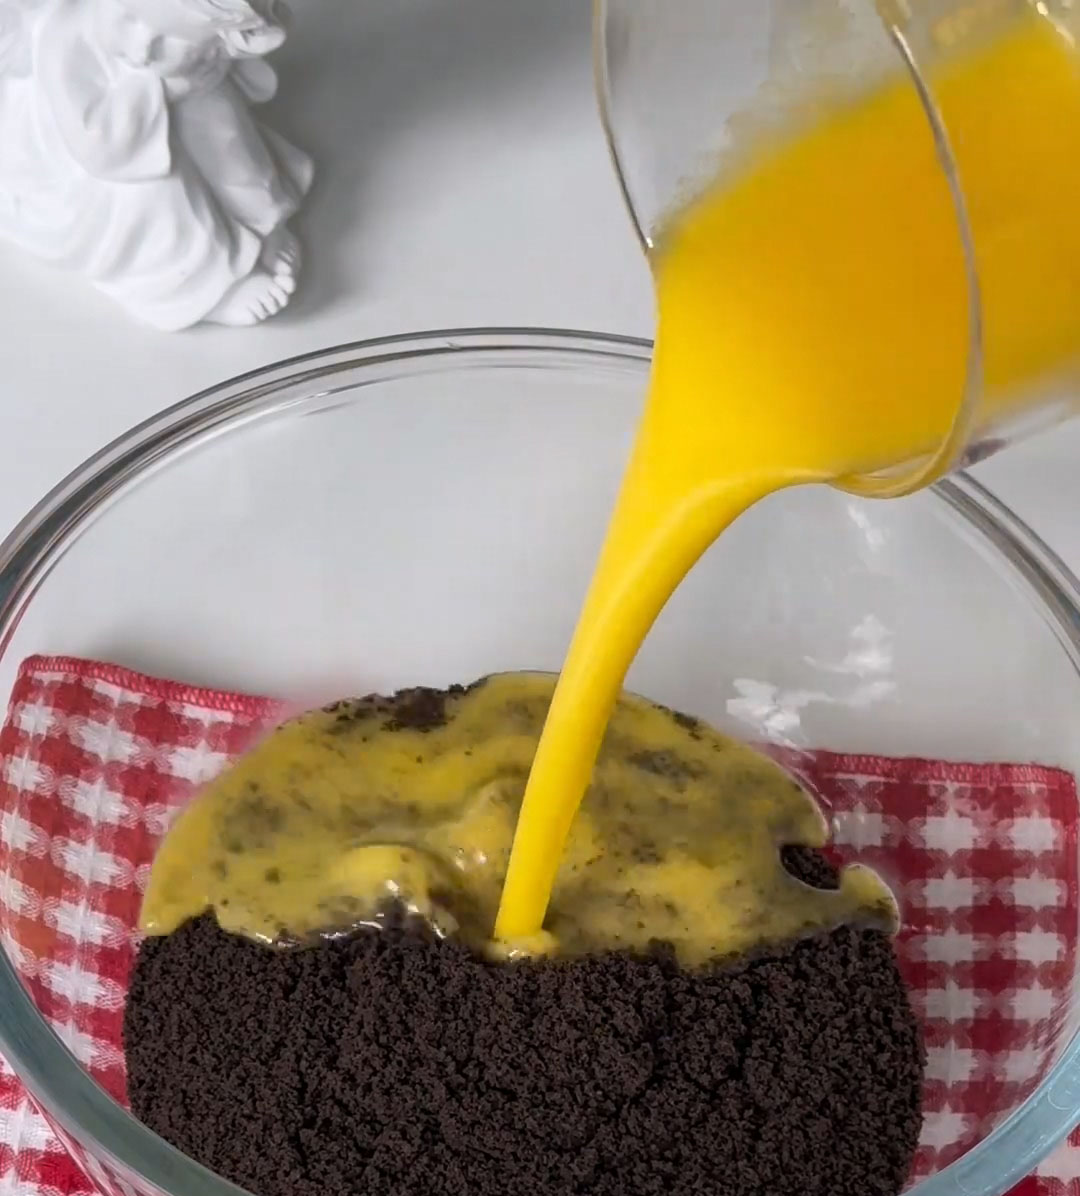
3. Pour the mixture into the prepared pan. Using the bottom of a glass or a flat measuring cup, press the crumbs firmly and evenly into the base. Refrigerate for at least 30 minutes to set.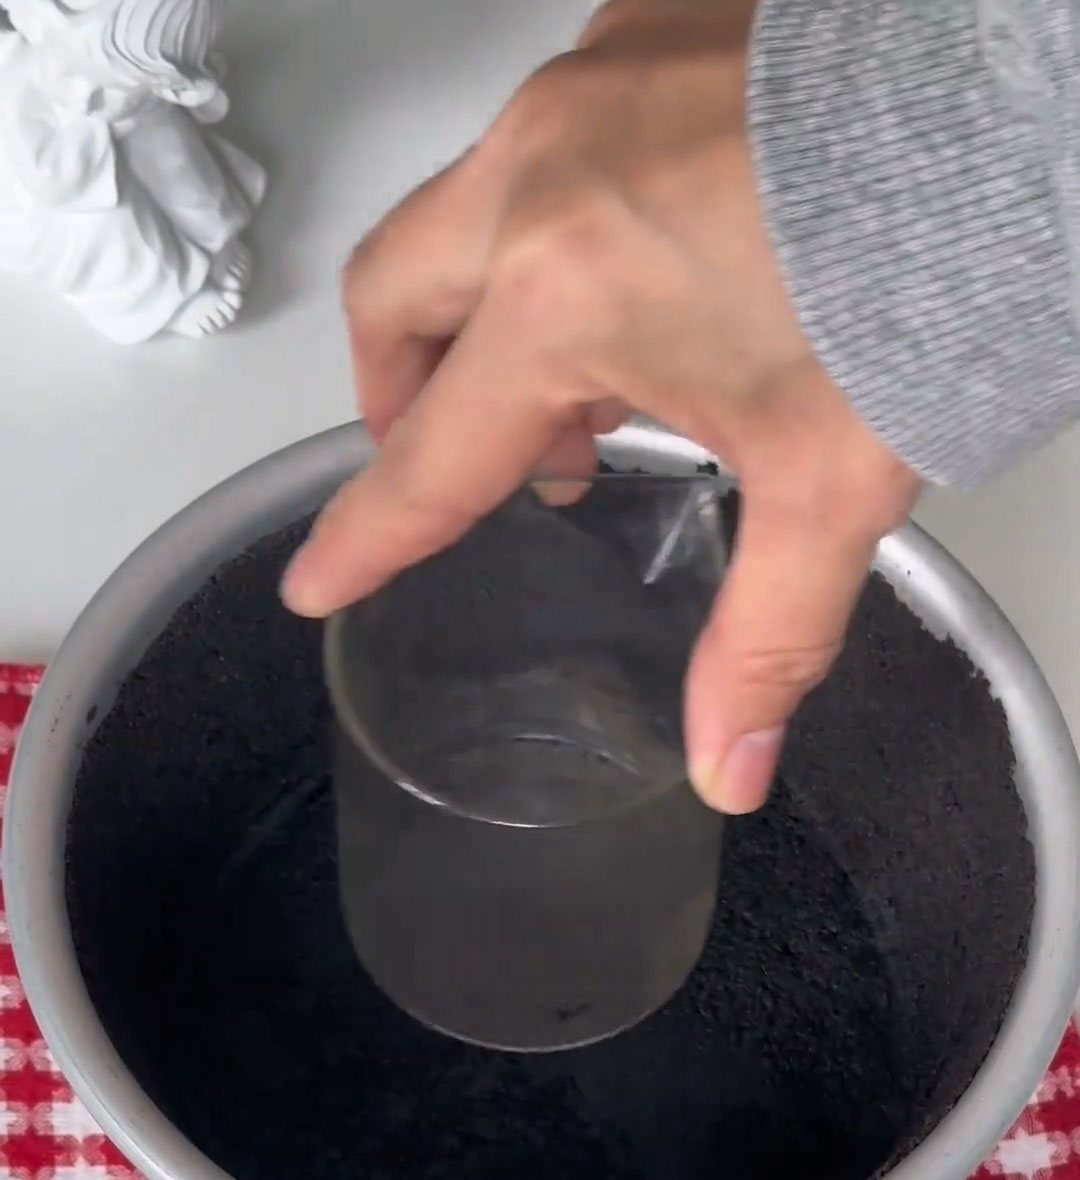
For the Base Cheesecake Mousse:
4. In a small bowl, soak the gelatin sheets in plenty of cold water for 5-10 minutes until soft and pliable.
5. In a large bowl, mix the softened cream cheese with the granulated until completely smooth, creamy, and free of any lumps.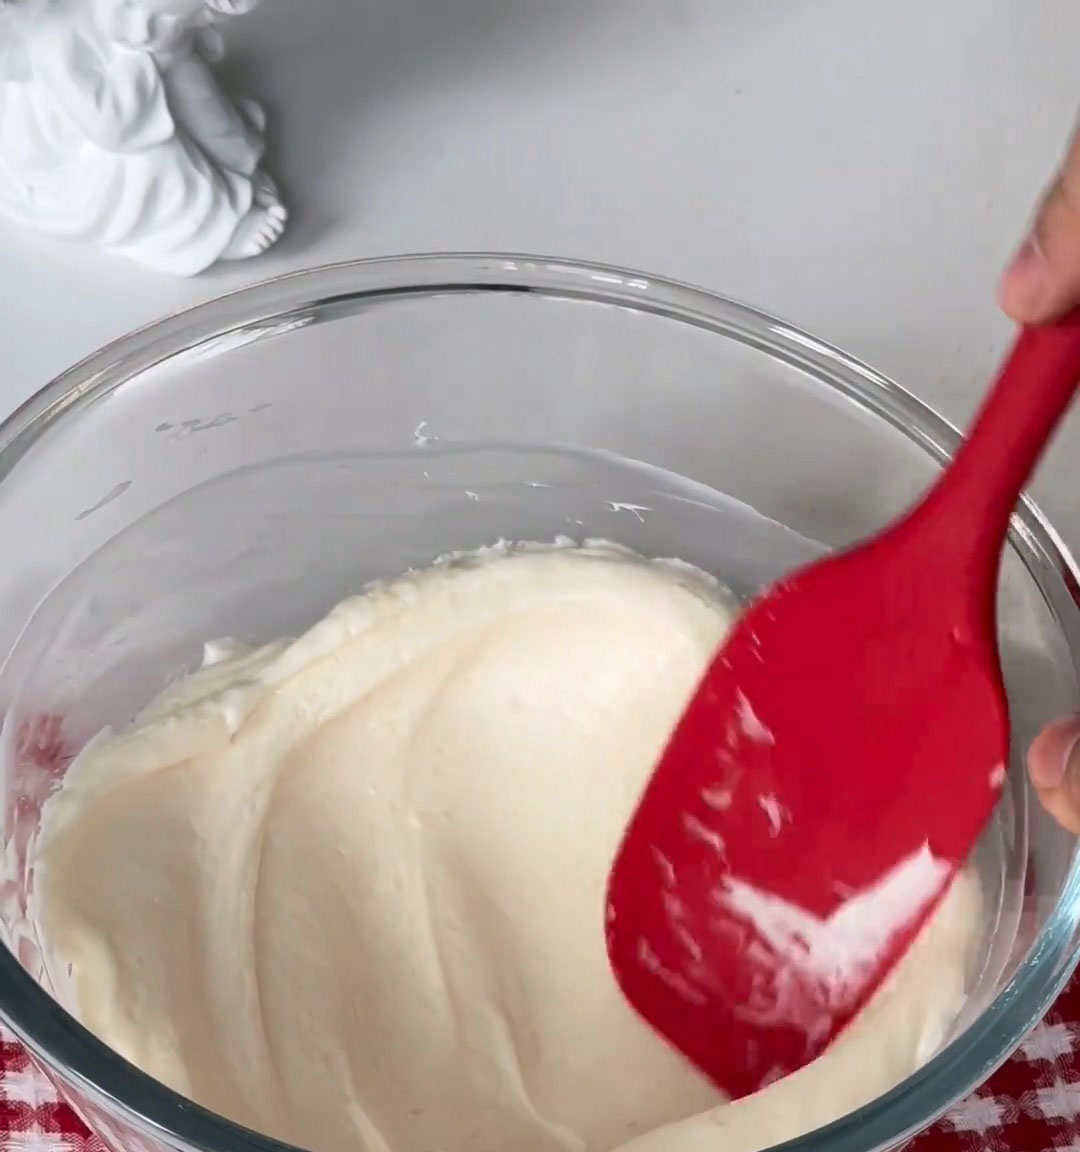
6. Pour in the cold heavy cream and stir until the mixture is combined and thickened slightly (it will look like a very thick, spreadable frosting). Be careful not to over-whip.
7. Squeeze the excess water from the softened gelatin sheets. Place them in the hot milk and stir until the gelatin is completely dissolved and no strands remain.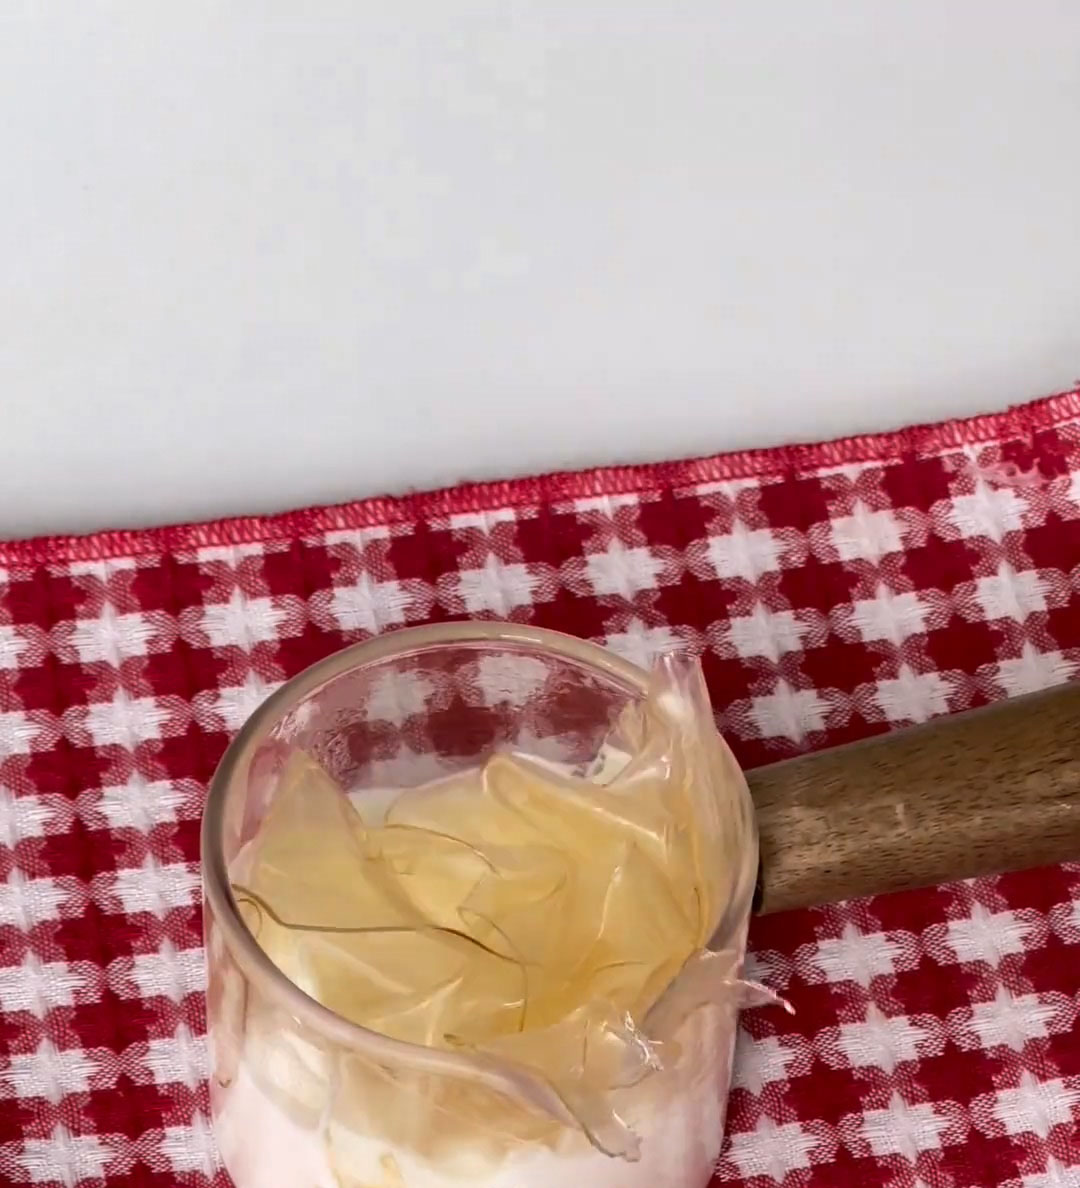
8. While whisking the cheesecake mixture constantly, slowly pour in the warm gelatin-milk mixture. Whisk until everything is fully incorporated and the batter is uniform. This is your base mousse batter.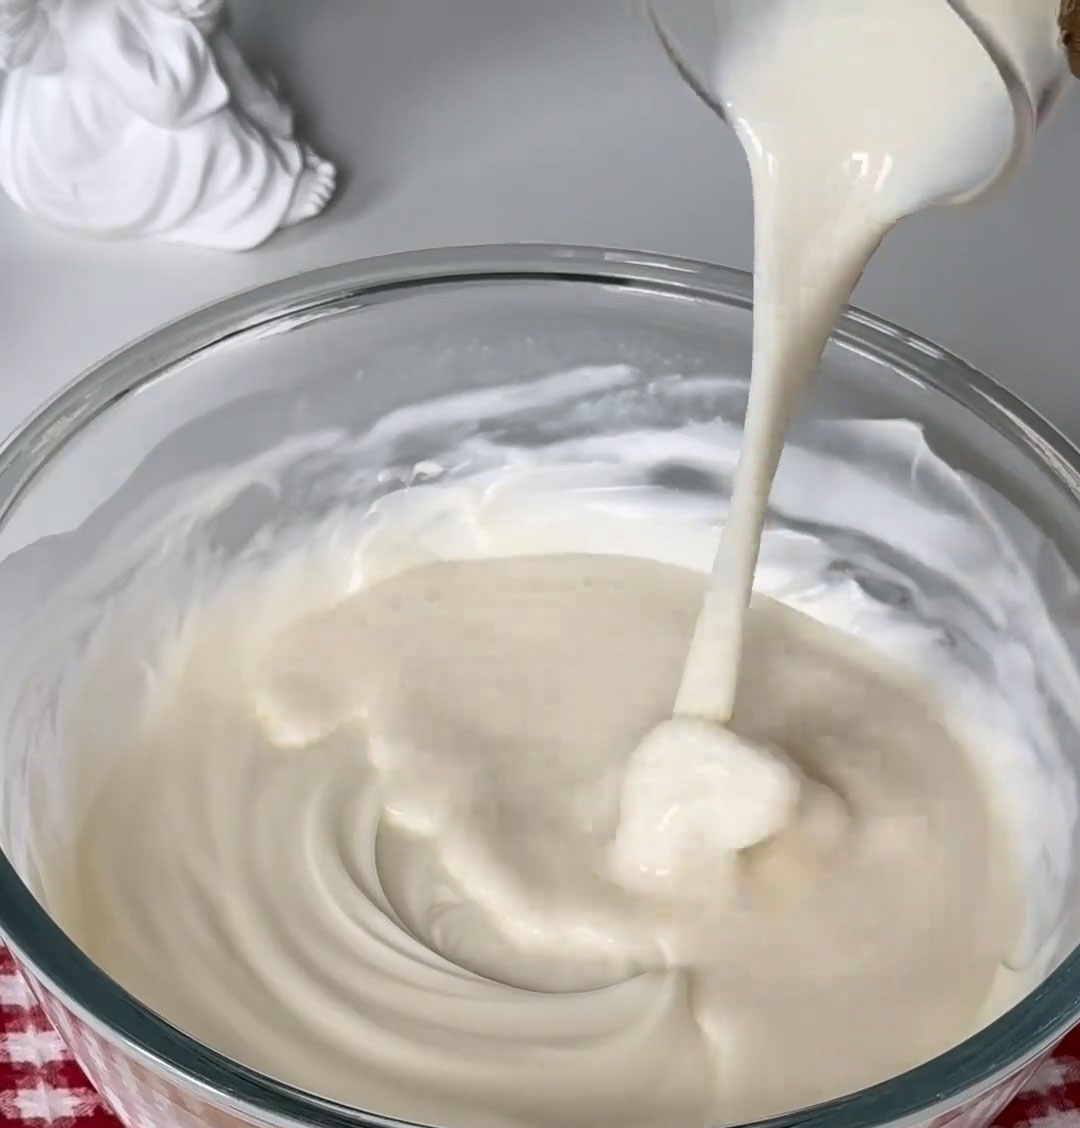
To Assemble the Double Layers:
9. Divide the base mousse batter evenly into two bowls.
10. Take one portion and pour it directly onto the chilled Oreo crust. Smooth the top with a spatula. Place the pan in the freezer for 25-30 minutes, or until the surface is completely set to the touch. This quick-freeze step is key for clean layers.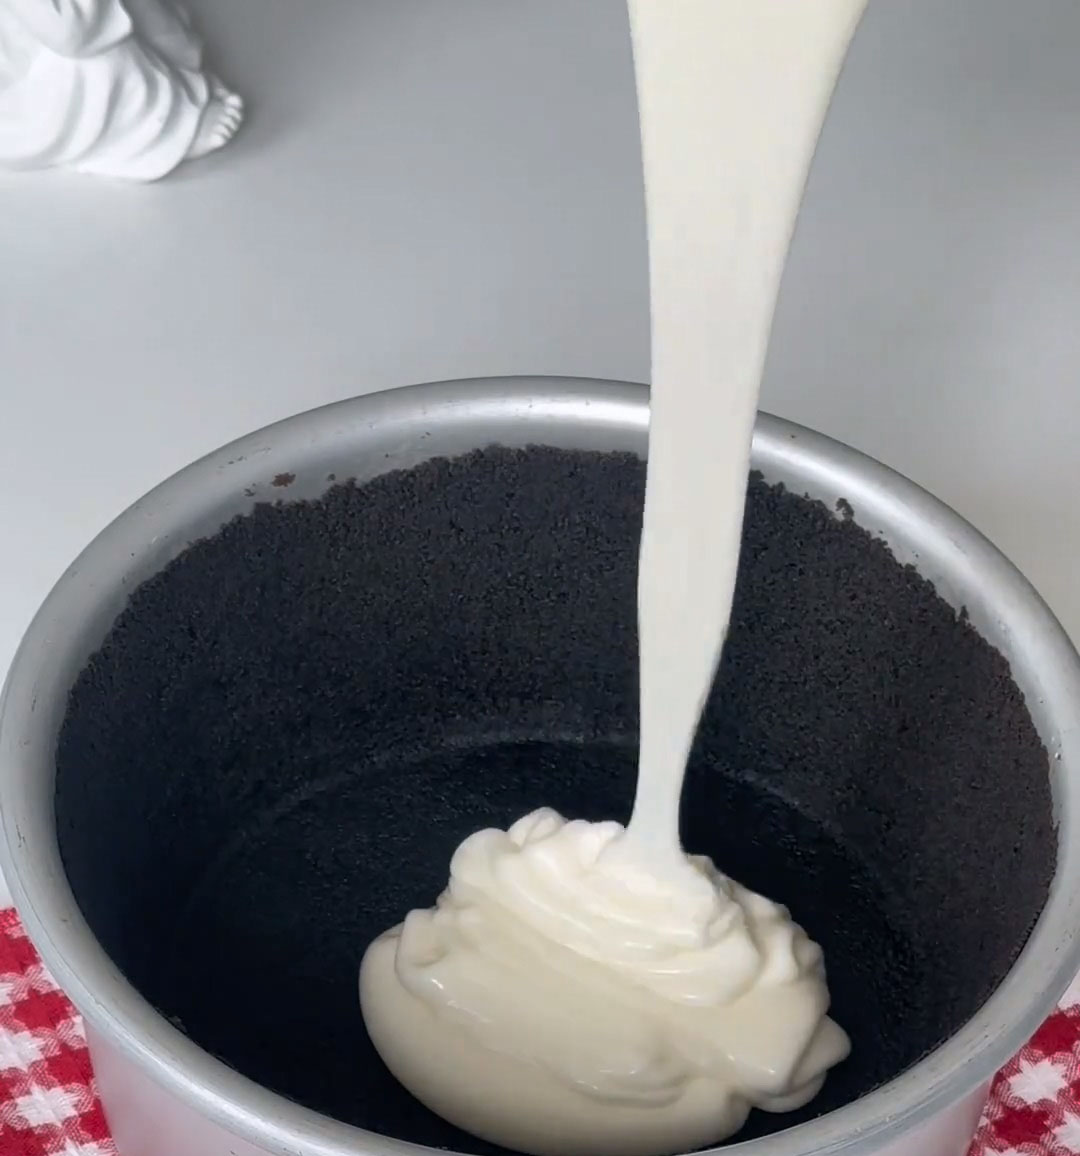
11. While the first layer sets, add the strawberry jam to the second portion of base mousse batter. Fold gently until the jam is mostly incorporated, leaving some streaks if desired.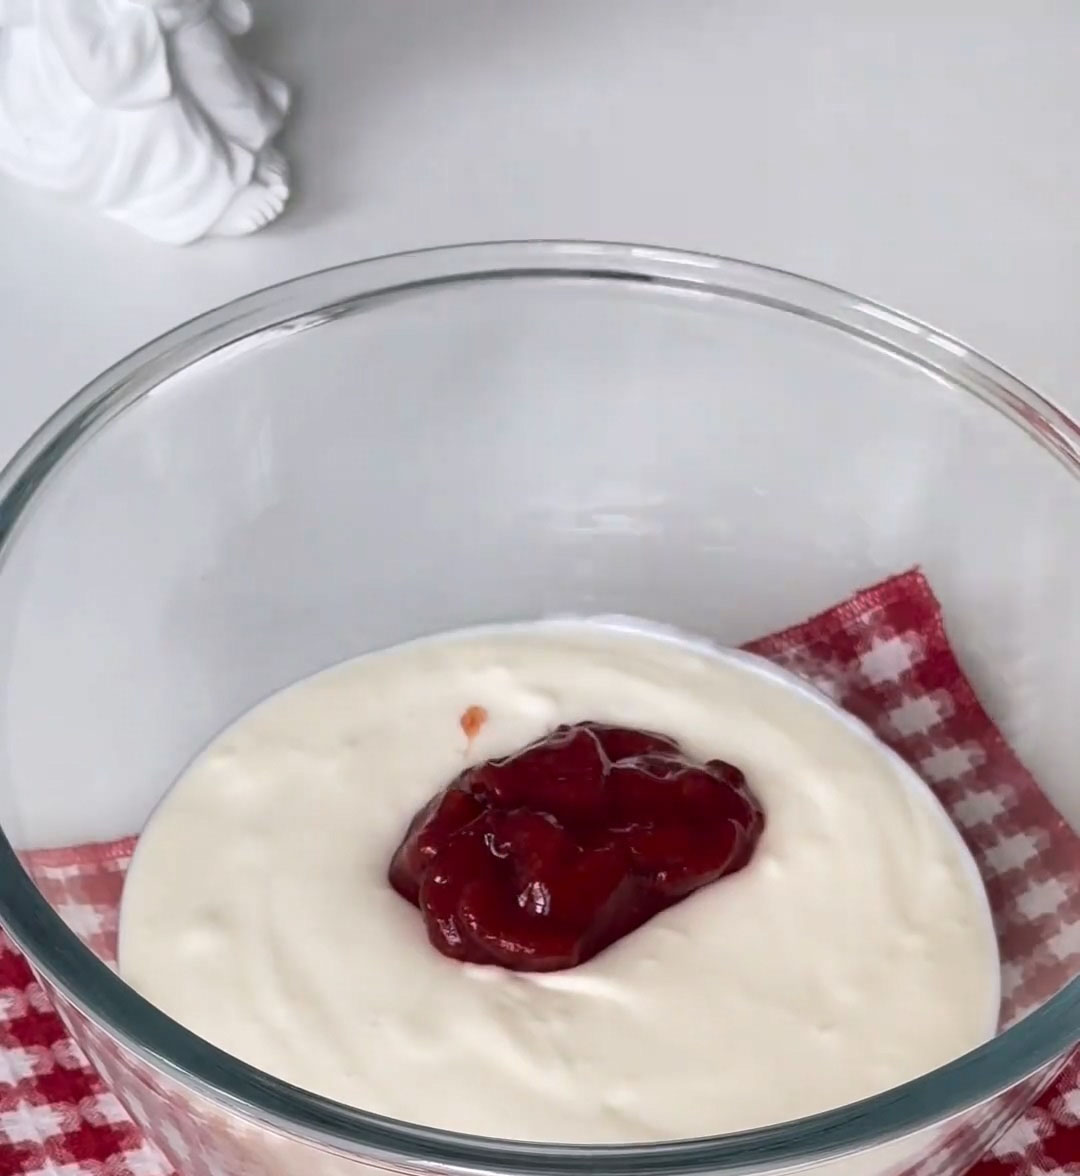
12. Once the first layer is firm, remove the pan from the freezer. Gently pour the strawberry mousse batter over the top and spread it evenly. Give the pan a few gentle taps on the counter to release any air bubbles.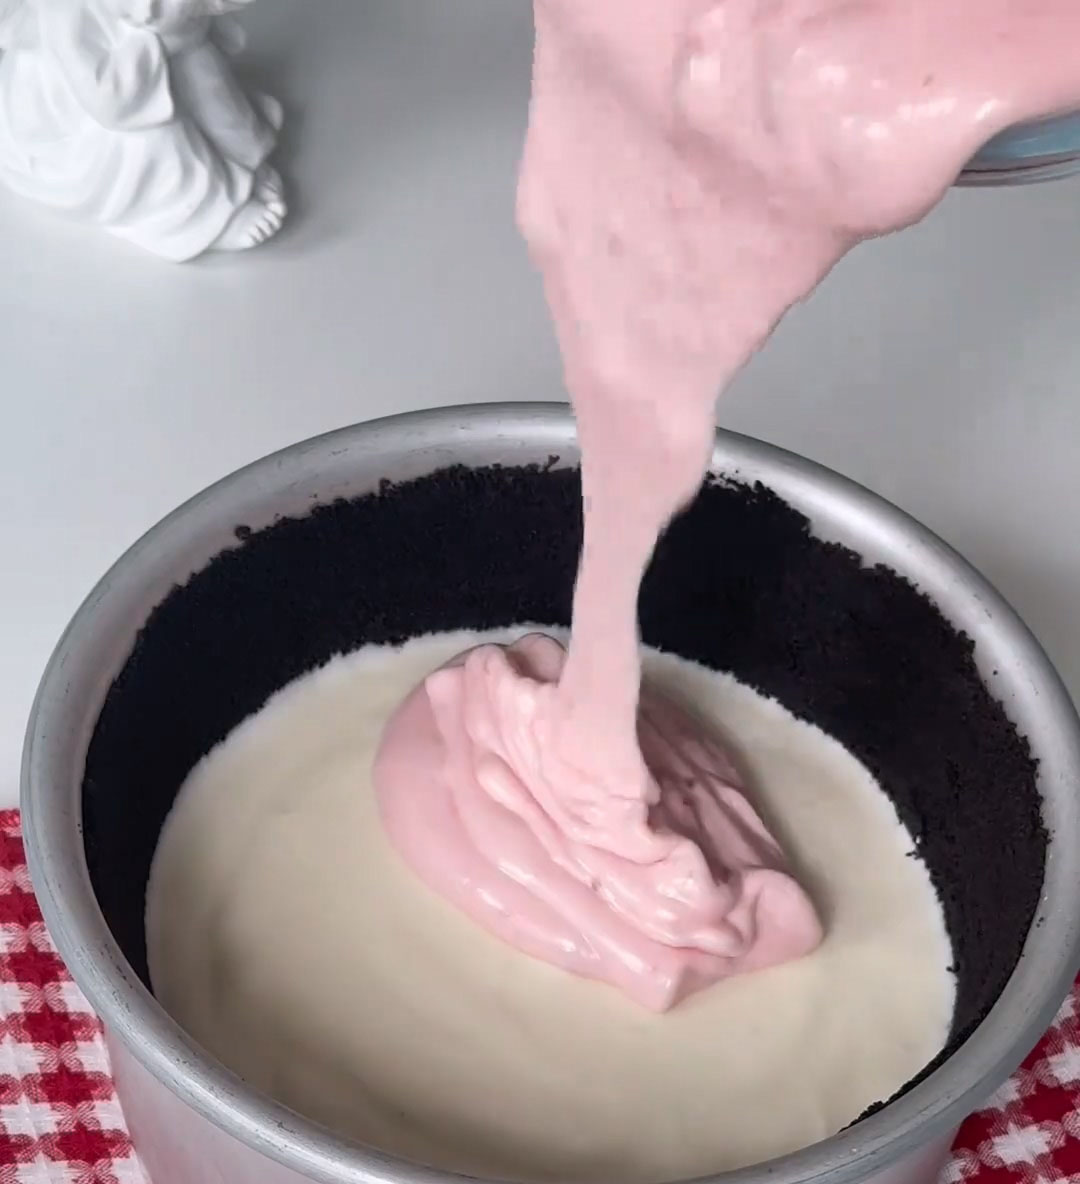
To Chill and Serve:
13. Carefully transfer the cake to the refrigerator. Chill for at least 4 hours, or preferably overnight, to allow it to set completely.
14. To serve, run a thin knife warmed with hot water around the edge of the pan before releasing the springform clasp. Decorate the top with piped whipped cream and fresh strawberries, if desired. Slice with a hot knife for clean cuts.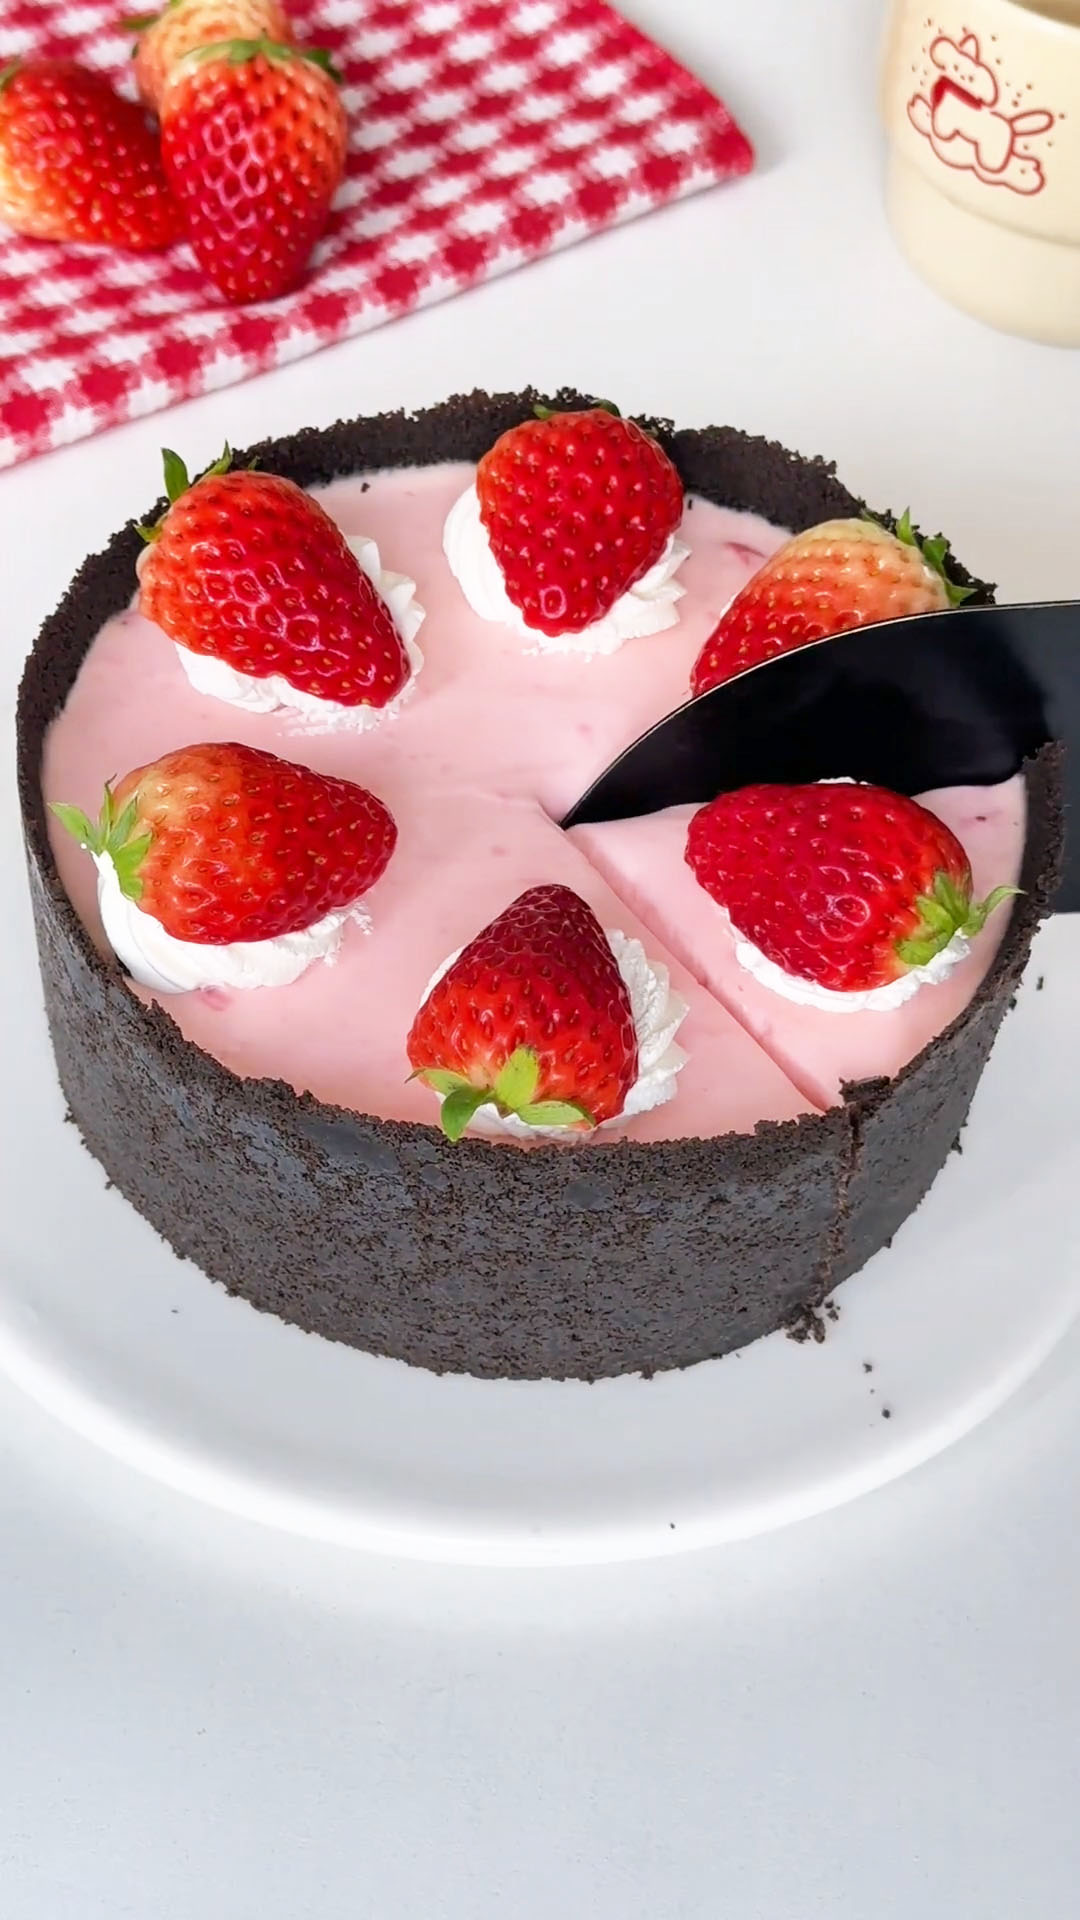
Tips & Tricks
- Press the crust firmly: A well-compacted crust won’t crumble when you slice the cake. Really press it down with something flat and sturdy.
- Soften cream cheese completely: This is the #1 secret to a silky mousse. Take it out of the fridge 1-2 hours ahead of time. Lumps from cold cream cheese will not mix out.
- Use the freeze method for layers: Freezing the first layer briefly is the easiest way to get a perfectly defined separation between the white and pink mousse. Don’t leave it for longer than 45 minutes, or it will become too hard.
- Don’t over-mix the strawberry layer: Fold the jam in just until combined. Over-mixing can thin out the batter. A few streaks or small pockets of jam add visual appeal and bursts of flavor.
- Chill thoroughly: The full overnight chill is ideal. It allows the gelatin to set fully, giving you the perfect, clean slice and the best melded flavor.
Frequently Asked Questions
Can I use gelatin powder instead of sheets?
Yes. Use 1 packet (about 7-8g or 2 1/4 tsp) of unflavored powdered gelatin. Sprinkle it evenly over 3-4 tablespoons of cold water in a small bowl. Let it “bloom” for 5 minutes until it becomes a solid gel, then add it to the hot milk and stir to dissolve completely.
Why is my mousse lumpy?
This is almost always due to cream cheese that was too cold when mixed. Ensure it is very soft at room temperature. If you have small lumps, you can try pressing the finished batter through a fine-mesh sieve before dividing it.
How far in advance can I make this?
You can make the entire cake 1-2 days in advance. Store it covered in the refrigerator. It’s actually better the next day as the flavors have more time to develop.
Can I freeze this mousse cake?
I don’t recommend it for the best texture. Freezing can cause the mousse to become slightly grainy or icy and lose its signature silky-smooth mouthfeel. It’s best enjoyed fresh from the fridge.
Creamy No-Bake Strawberry Cheesecake Mousse Cake
Ingredients
Oreo Crust
- 120 g Oreo cookie crumbs
- 55 g butter melted
Double Layer Cheesecake Mousse
- 280 g cream cheese fully softened
- 35 g granulated sugar
- 200 g heavy cream cold
- 10 g gelatin sheets about 2 standard sheets
- 50 g hot milk
- 60 g strawberry jam
For Decorating (Optional)
- Whipped cream
- Fresh strawberries
Instructions
For the Oreo Crust:
- In a small microwave-safe bowl or a saucepan, melt the 55g of butter in short bursts in the microwave or over low heat on the stovetop until completely liquid. Set aside to cool slightly.
- Combine the melted butter and Oreo cookie crumbs. Mix until all the crumbs are evenly moistened and resemble wet sand.
- Pour the mixture into the prepared pan. Using the bottom of a glass or a flat measuring cup, press the crumbs firmly and evenly into the base. Refrigerate for at least 30 minutes to set.
For the Base Cheesecake Mousse:
- In a small bowl, soak the gelatin sheets in plenty of cold water for 5-10 minutes until soft and pliable.
- In a large bowl, mix the softened cream cheese with the granulated until completely smooth, creamy, and free of any lumps.
- Pour in the cold heavy cream and stir until the mixture is combined and thickened slightly (it will look like a very thick, spreadable frosting). Be careful not to over-whip.
- Squeeze the excess water from the softened gelatin sheets. Place them in the hot milk and stir until the gelatin is completely dissolved and no strands remain.
- While whisking the cheesecake mixture constantly, slowly pour in the warm gelatin-milk mixture. Whisk until everything is fully incorporated and the batter is uniform. This is your base mousse batter.
To Assemble the Double Layers:
- Divide the base mousse batter evenly into two bowls.
- Take one portion and pour it directly onto the chilled Oreo crust. Smooth the top with a spatula. Place the pan in the freezer for 25-30 minutes, or until the surface is completely set to the touch. This quick-freeze step is key for clean layers.
- While the first layer sets, add the strawberry jam to the second portion of base mousse batter. Fold gently until the jam is mostly incorporated, leaving some streaks if desired.
- Once the first layer is firm, remove the pan from the freezer. Gently pour the strawberry mousse batter over the top and spread it evenly. Give the pan a few gentle taps on the counter to release any air bubbles.
To Chill and Serve:
- Carefully transfer the cake to the refrigerator. Chill for at least 4 hours, or preferably overnight, to allow it to set completely.
- To serve, run a thin knife warmed with hot water around the edge of the pan before releasing the springform clasp. Decorate the top with piped whipped cream and fresh strawberries, if desired. Slice with a hot knife for clean cuts.
Leave a Reply