
A dessert that looks as good as it tastes! This strawberry Oreo cream cake is packed with layers of rich cocoa chiffon cake, creamy strawberry filling, and crunchy Oreo bits for the perfect bite.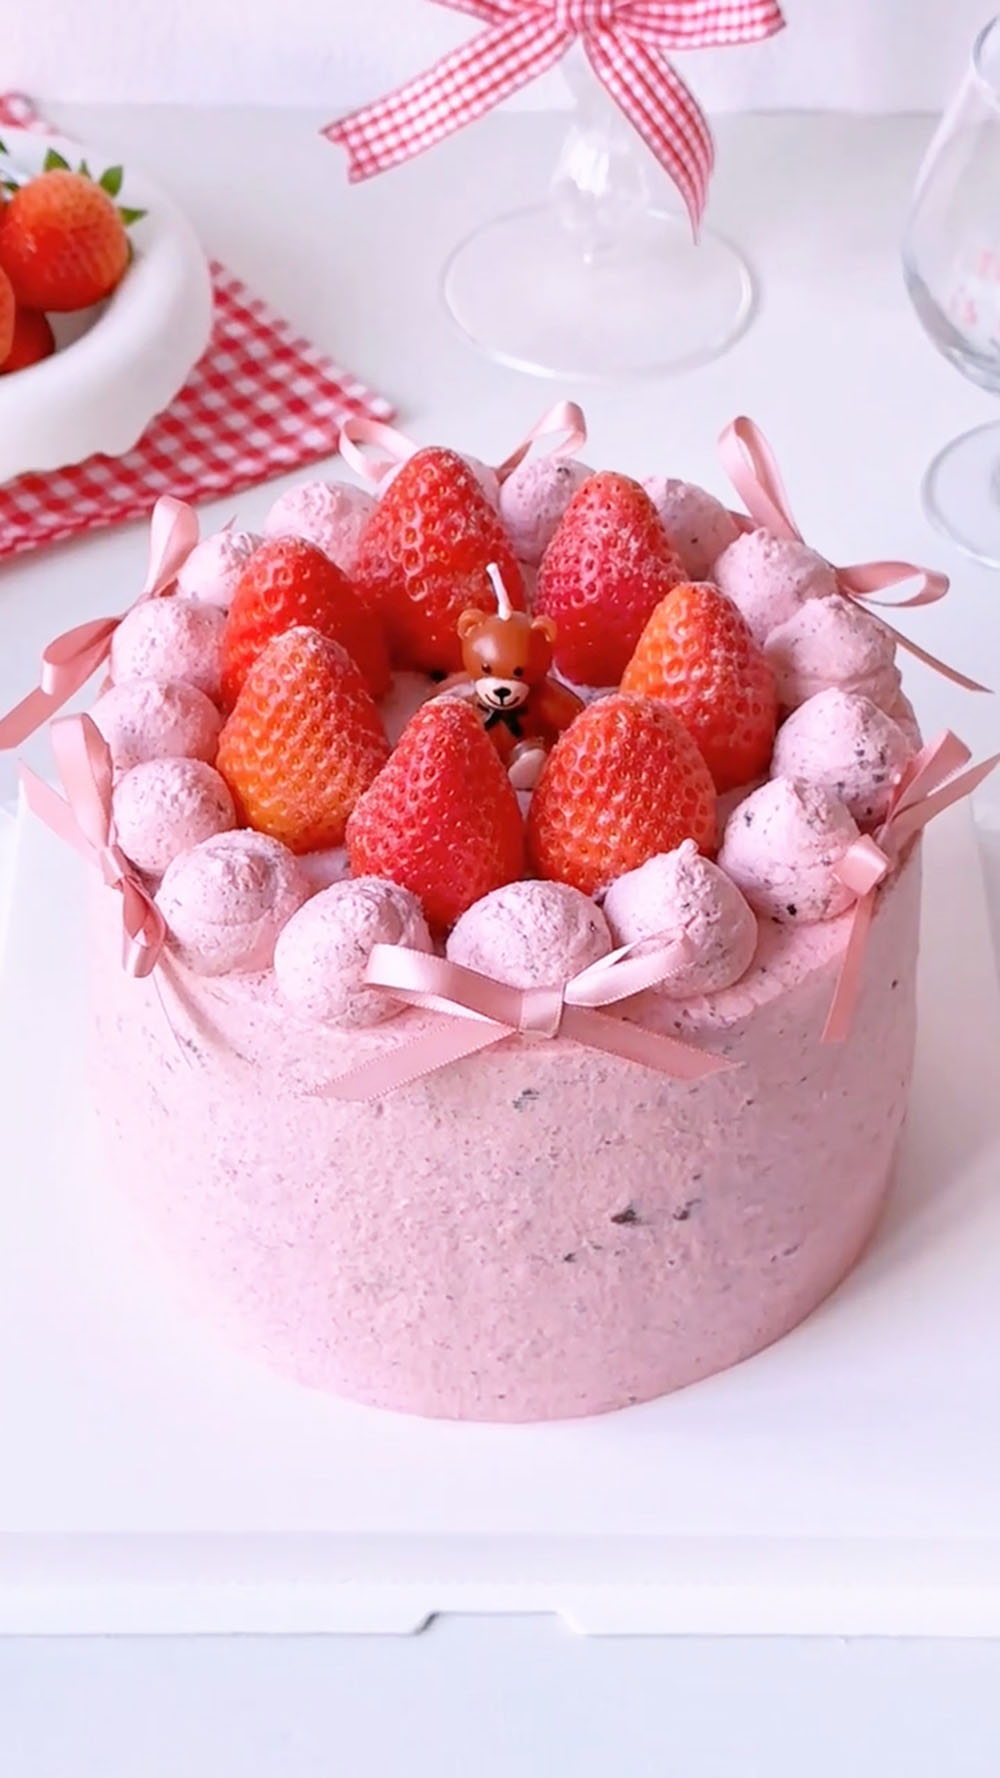
Strawberry desserts are truly one of my all-time favorites.
Every year when strawberry season rolls around, I get excited to experiment and create all kinds of desserts.
From cakes to jams, pies to parfaits—if it involves strawberries, I’m on it. The possibilities are endless, and each new creation brings something unique.
This particular cake was made for my eldest daughter, and it holds a special place in my heart.
As soon as she saw it, her face lit up with excitement.
She took a bite and immediately said it was even better than the store-bought cakes we’ve tried. It was such a sweet moment for me, knowing that something I made with love could bring her so much joy. It’s those little moments that make the effort of baking all the more worthwhile.
Why You’ll Love This Recipe
- This cake has a McFlurry-style texture: smooth, creamy, with just a little crunch from Oreo crumbs.
- The sweet strawberry jam, fresh strawberries, and cocoa chiffon cake create a perfectly balanced sweet-tart flavor.
- The process is clear and approachable — no advanced frosting skills required.
- It’s light, refreshing, and not overly sweet, making it perfect for afternoon tea or sharing.
- A beautiful homemade cake that looks elegant but feels warm and personal.
Ingredients and Substitutions
- Hot Water & Cocoa Powder – Using hot water to “bloom” the cocoa powder is a small but crucial step. It dissolves the cocoa completely, intensifies its chocolate flavor, and prevents any dry, bitter specks in your cake batter.
- Low-Gluten Flour (Cake Flour) – This is essential for the delicate, tender, and soft crumb of a true chiffon cake. Its low protein content prevents the cake from becoming tough or dense. Do not substitute it with regular all-purpose flour.
- Eggs – You’ll need to separate them meticulously. The yolks enrich the batter, while the whites are whipped into a stable meringue that gives the cake its signature high rise and airy texture. Room temperature eggs whip to a greater volume, and a perfectly clean, grease-free bowl is non-negotiable for the whites.
- Whipping Cream – For the frosting, you need heavy cream or whipping cream with a high fat content (at least 33-36%). It must be very cold to whip up thick and hold its shape when mixed with the jam and cookie crumbs. I recommend chilling your mixing bowl and beaters as well.
- Strawberry Jam – This acts as both a flavoring for the cream and a gooey, fruity layer within the cake. Choose a thick, good-quality jam. A runny jam will make your cream too soft and your cake layers soggy.
- Oreo Crumbs – They provide the essential “crunch” and chocolate cookie flavor. Be sure to scrape out the sweet white filling before crushing the cookies, as the filling can make the crumbs clumpy and overly sweet. You can crush them finely for a speckled look or leave some chunks for bigger bites of texture.
Strawberry Oreo Cream Cake
Chocolate Chiffon Cake (6-inch)
- 3 large eggs, separated, at room temperature
- 45 g granulated sugar
- 35 g corn oil (or other neutral oil)
- 45 g hot water
- 8 g unsweetened cocoa powder
- 45 g low-gluten flour (cake flour)
- ¼ teaspoon lemon juice or white vinegar
Strawberry Oreo Cream
- 500 g cold whipping cream (heavy cream), min. 33% fat
- 20 g granulated sugar
- 60 g thick strawberry jam, plus extra for layering
- 30 g Oreo cookie crumbs (filling removed)
- Pink gel food coloring (optional)
Filling & Assembly
- 200-250 g fresh strawberries, hulled and diced
- Additional strawberry jam for layering
- Whole strawberries and extra Oreo crumbs for decoration (optional)
- powdered sugar for decoration (optional)
How to Make Strawberry Oreo Cream Cake
Part 1: Bake the Chocolate Chiffon Cake
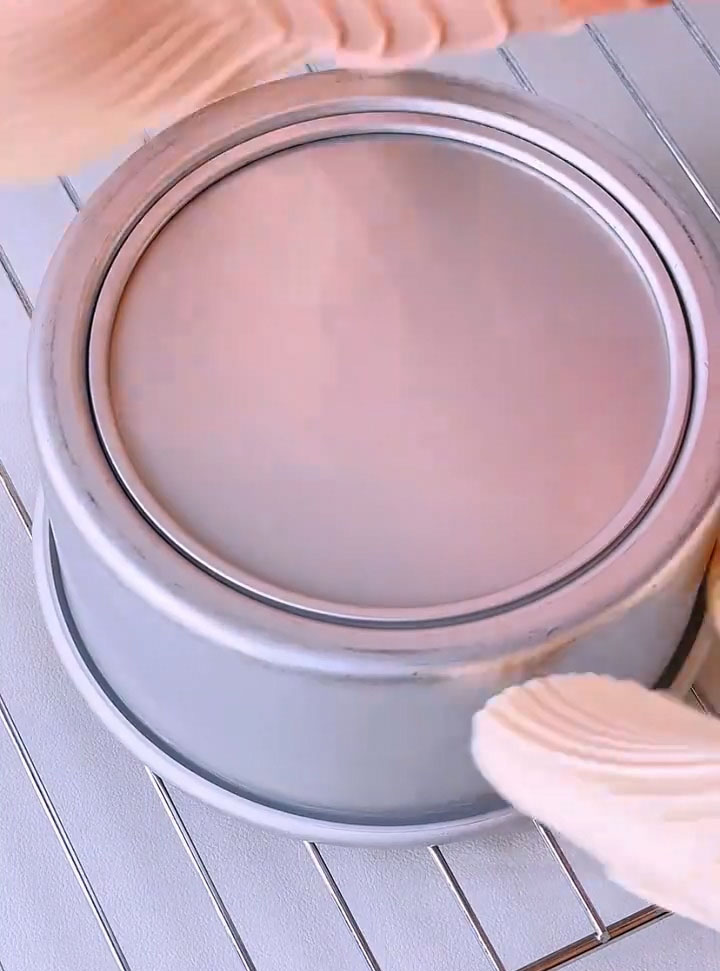
- Prep: Preheat your oven to 150°C (300°F). Have a 6-inch chiffon cake pan ready (do NOT grease it).
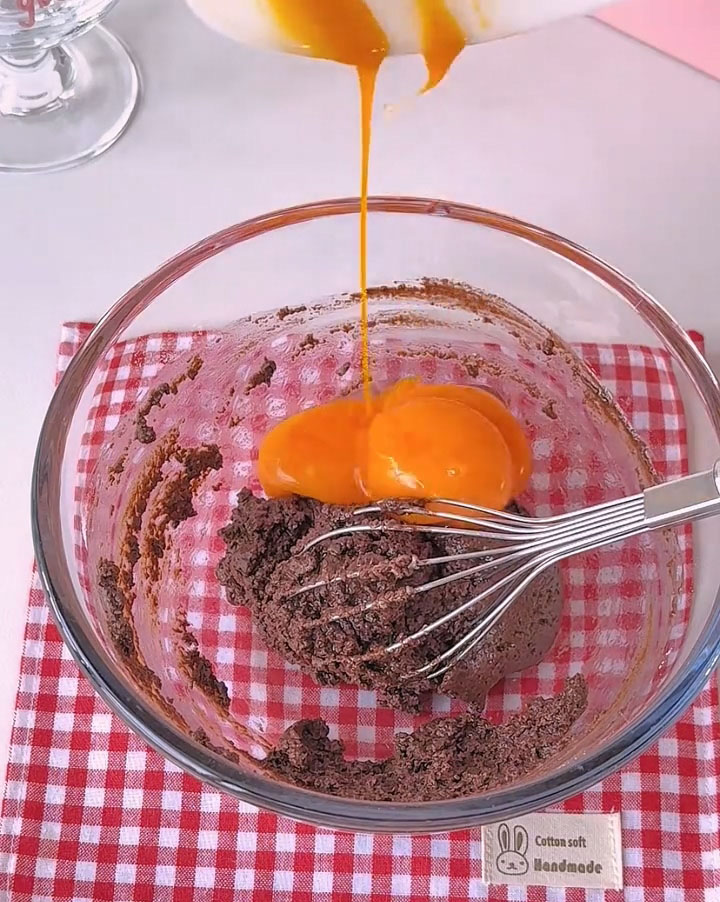
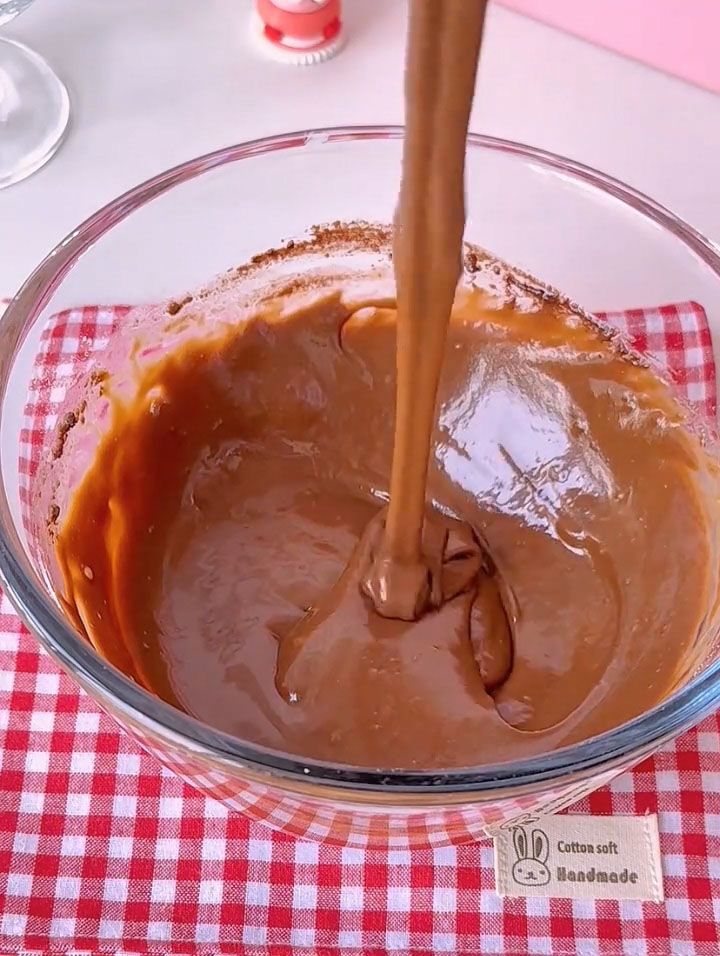
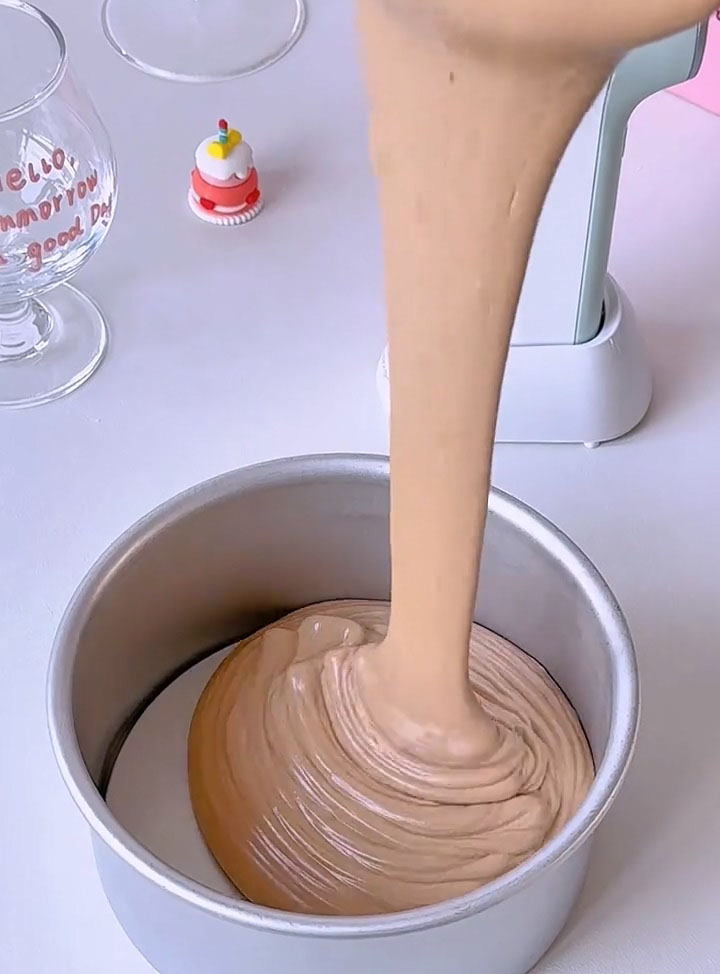
- Make the Yolk Batter: In a medium bowl, whisk together the corn oil and cocoa powder until smooth. Pour in the hot water and whisk vigorously until you have a smooth, liquid chocolate mixture.

- Sift the low-gluten flour directly into the chocolate mixture. Whisk until just combined and no dry flour remains.
- Add the 3 egg yolks to the bowl. Whisk until you have a smooth, shiny, and homogenous chocolate batter. Set aside.
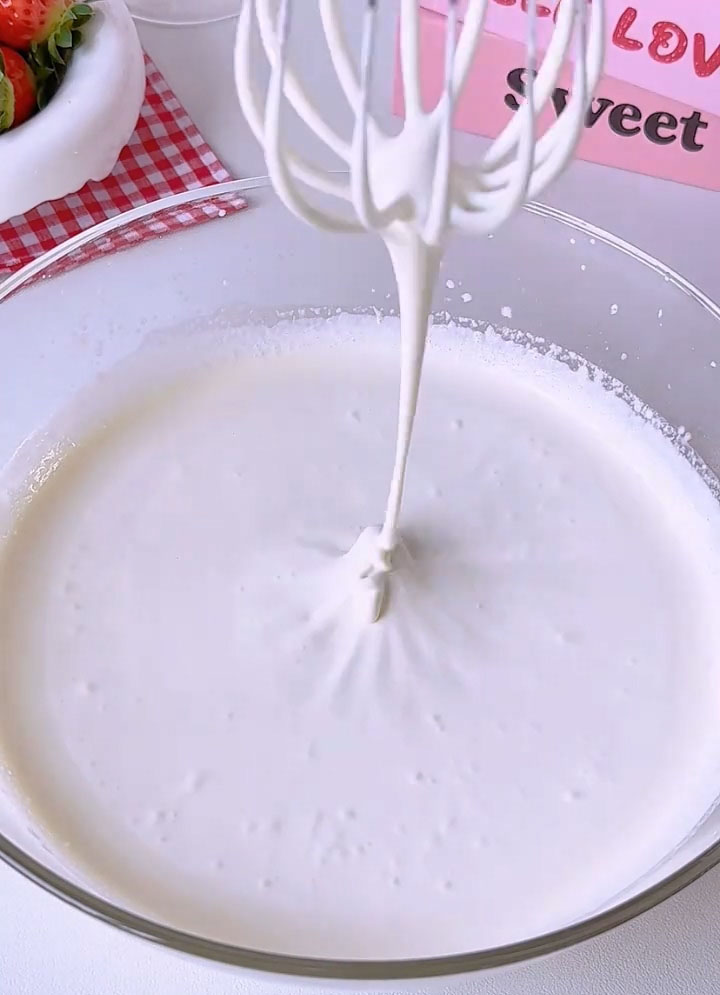
- Whip the Meringue: In a separate, clean, and dry bowl, add the egg whites, sugar, and a little lemon juice. Whip until you achieve stiff peaks—when you lift the whisk, the meringue should stand straight up with a sharp tip.

- Fold: Add about one-third of the meringue to the chocolate yolk batter. Gently fold with a spatula until mostly combined. Pour this mixture back into the bowl with the remaining meringue. Gently and quickly fold until no white streaks remain, being careful not to deflate the air.
- Bake: Pour the batter into the pan. Gently tap the pan on the counter to release large bubbles. Bake on the middle rack for 45 minutes, or until the top springs back when lightly touched and a skewer inserted comes out clean.
- Cool: Immediately upon removing from the oven, drop the pan from a short height onto the counter a few times. Invert the pan onto a wire rack or over the neck of a bottle. Let it cool completely upside down (this is crucial to prevent collapse). Once cool, run a thin knife around the edges and center tube to release the cake.
Part 2: Prepare Components & Make the Cream
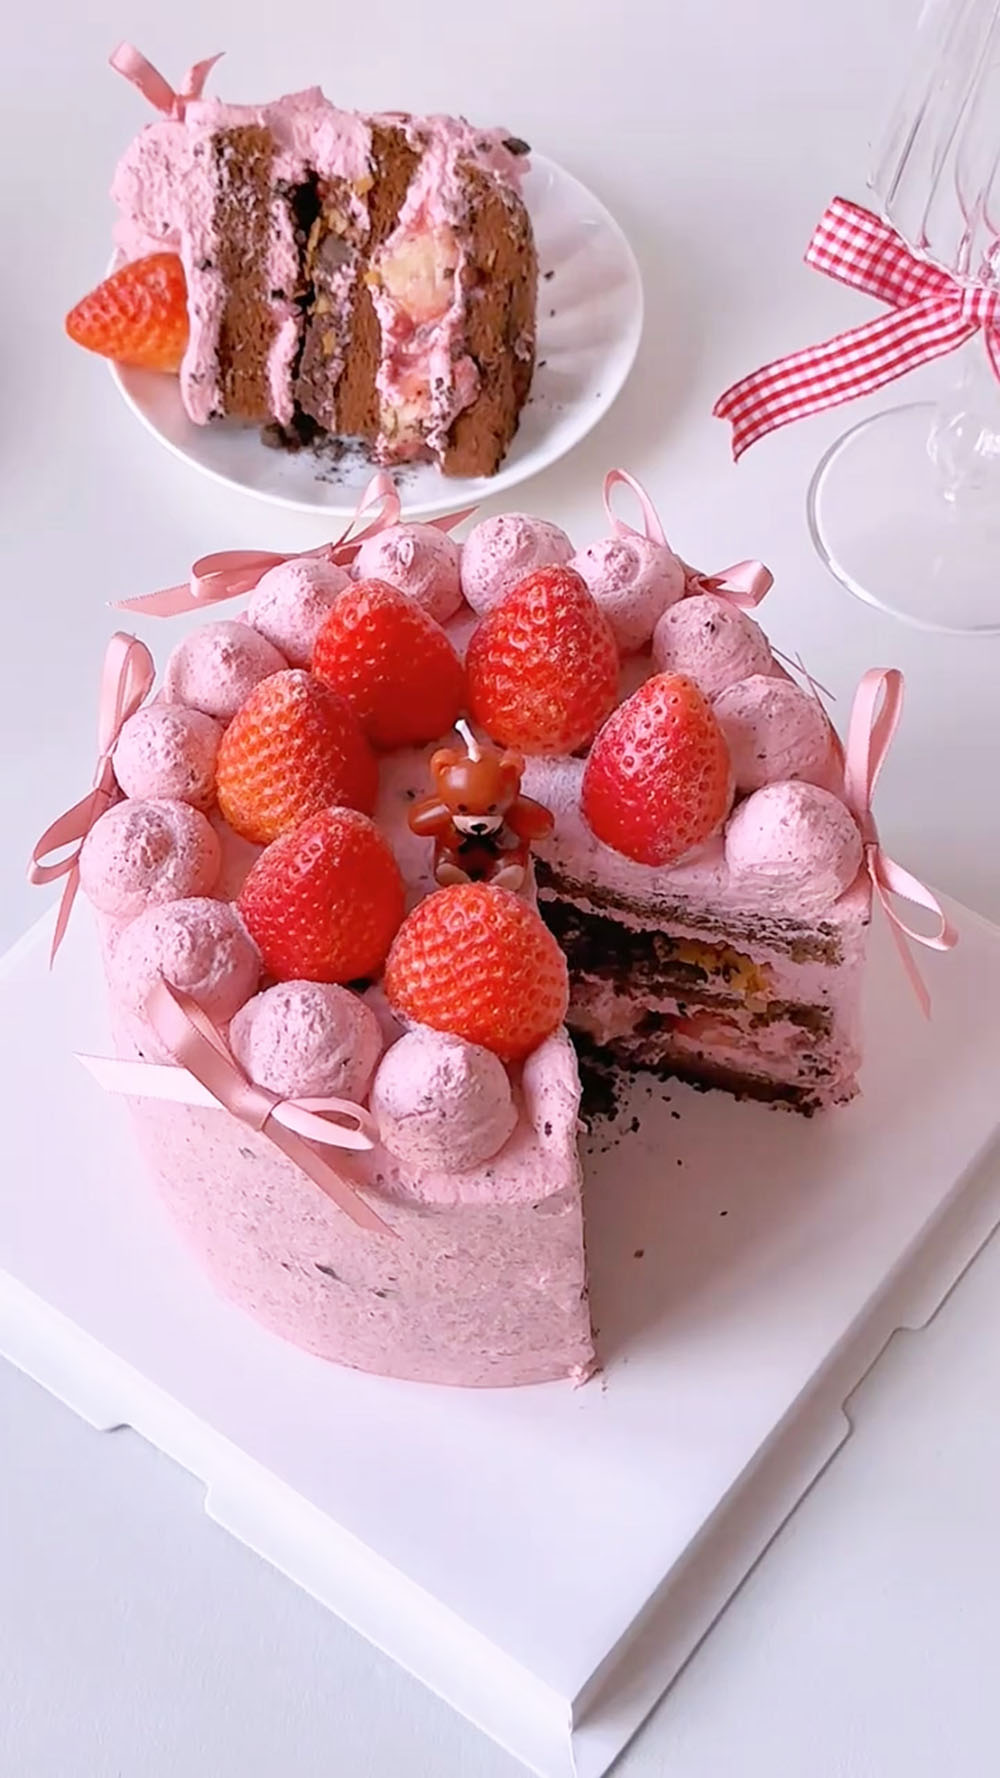
- Prep Fillings: Once the cake is completely cool, use a serrated knife or cake leveler to slice it horizontally into 3 even layers. Dice your fresh strawberries. Set aside.
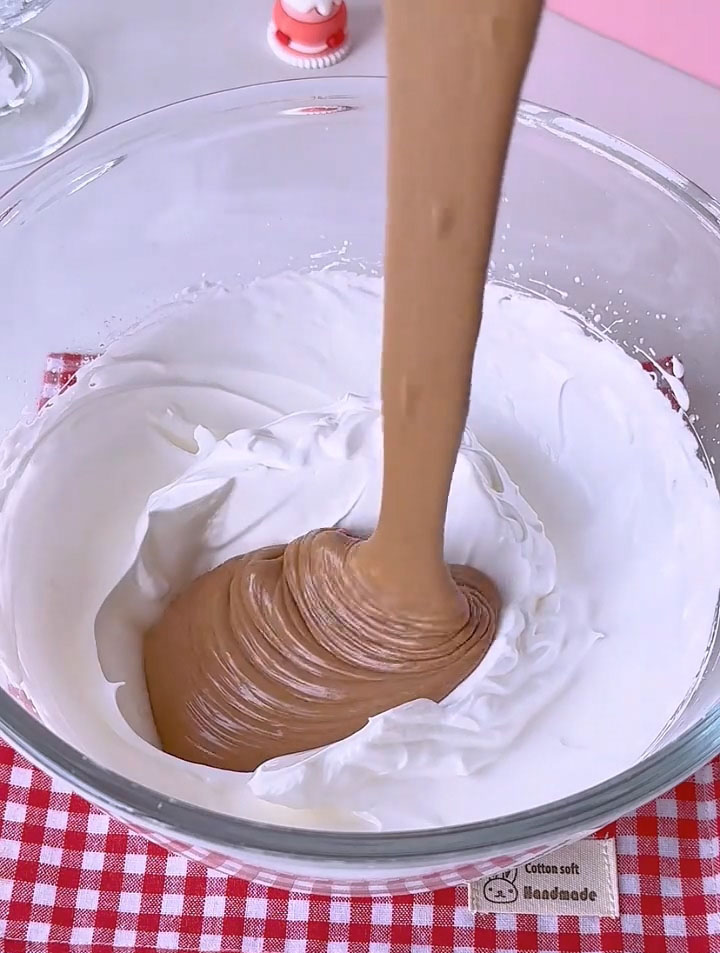
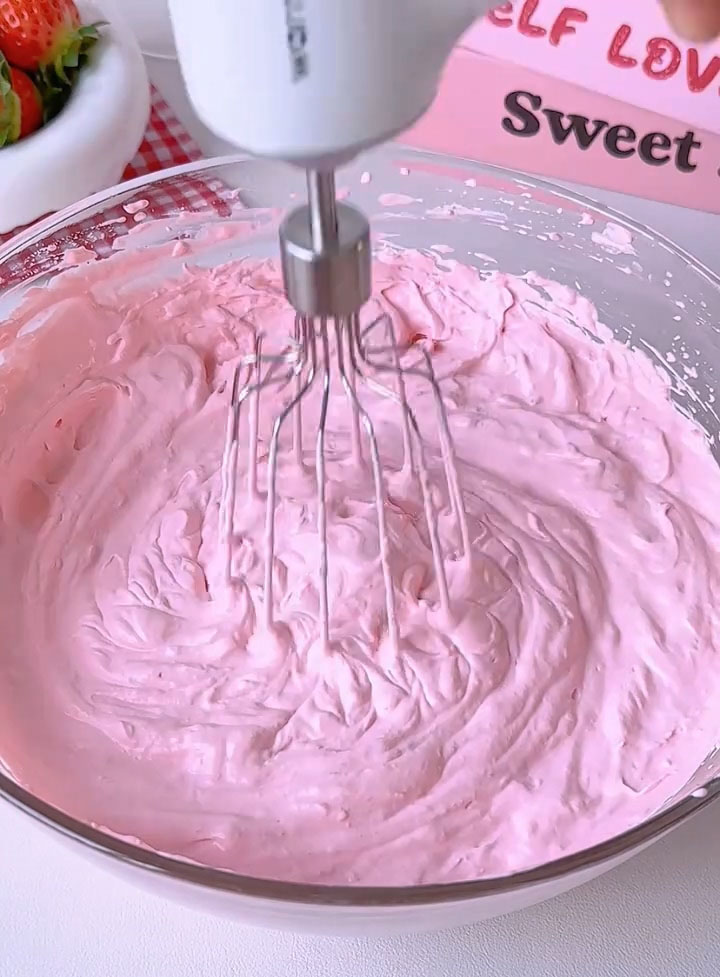
- Make Strawberry Oreo Cream: Pour the cream and 20g of sugar into a bowl. Whip on medium speed until the cream thickens to a “yogurt” or soft-peak consistency.
- Add the 60g of strawberry jam and a drop of pink food coloring (if using). Continue whipping until the cream is thick and holds medium peaks—it should be quite thick but still slightly flowable.
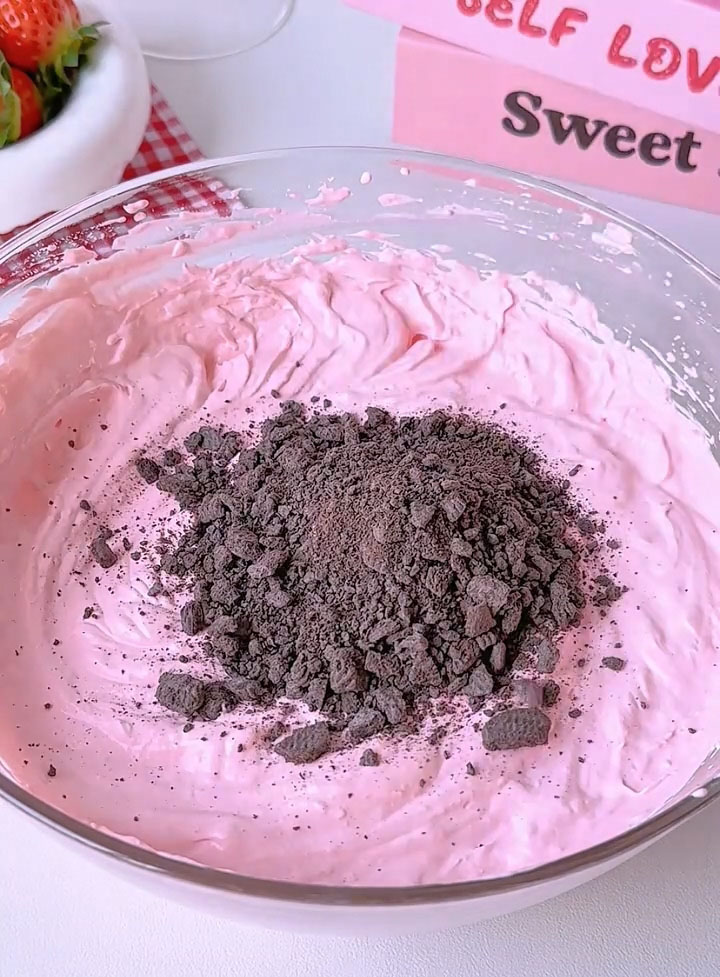
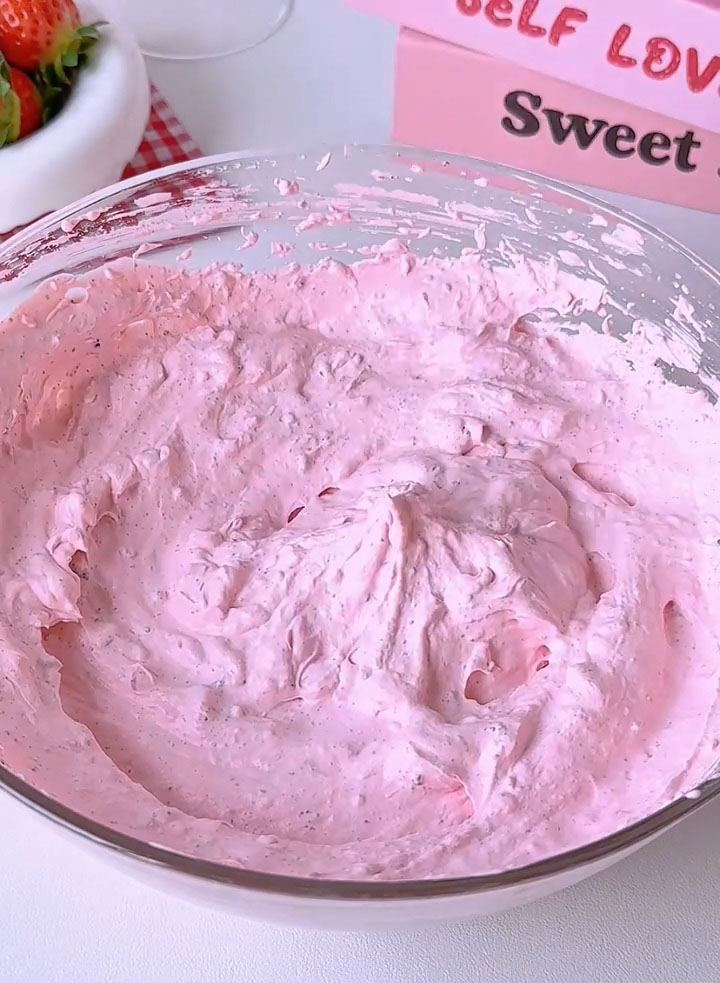
- Add the Oreo cookie crumbs. Switch to low speed and whip for just 10-15 seconds, or until the cream reaches a firm, spreadable consistency. Be careful not to over-whip now that the crumbs are added. Refrigerate until ready to use.
Part 3: Assemble the Cake
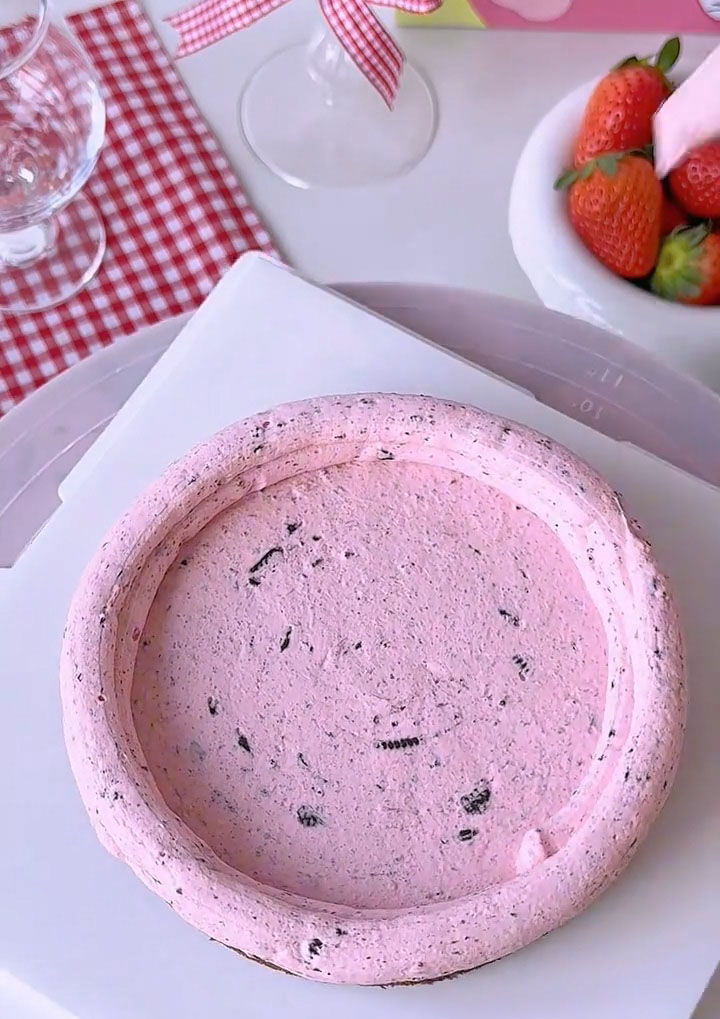
- First Layer: Place the bottom cake layer on your serving plate or cake board. Spread a thin layer of the strawberry Oreo cream on top. Pipe a “dam” of cream around the very edge to hold in the fillings.
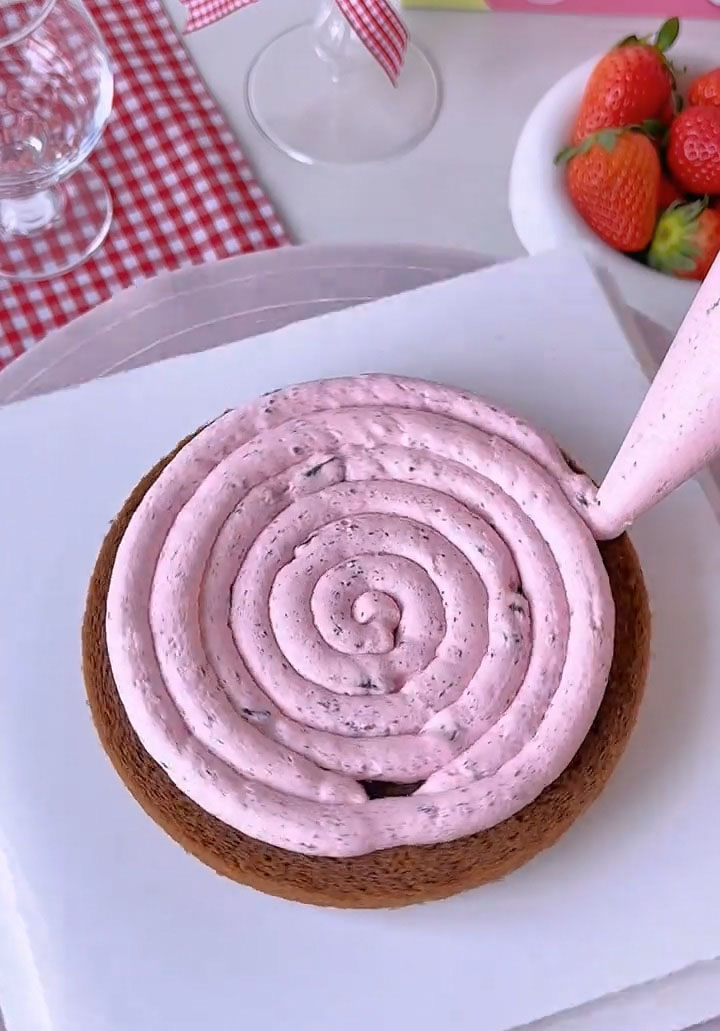
- Inside the dam, scatter a generous amount of diced strawberries, then spread a layer of extra strawberry jam.
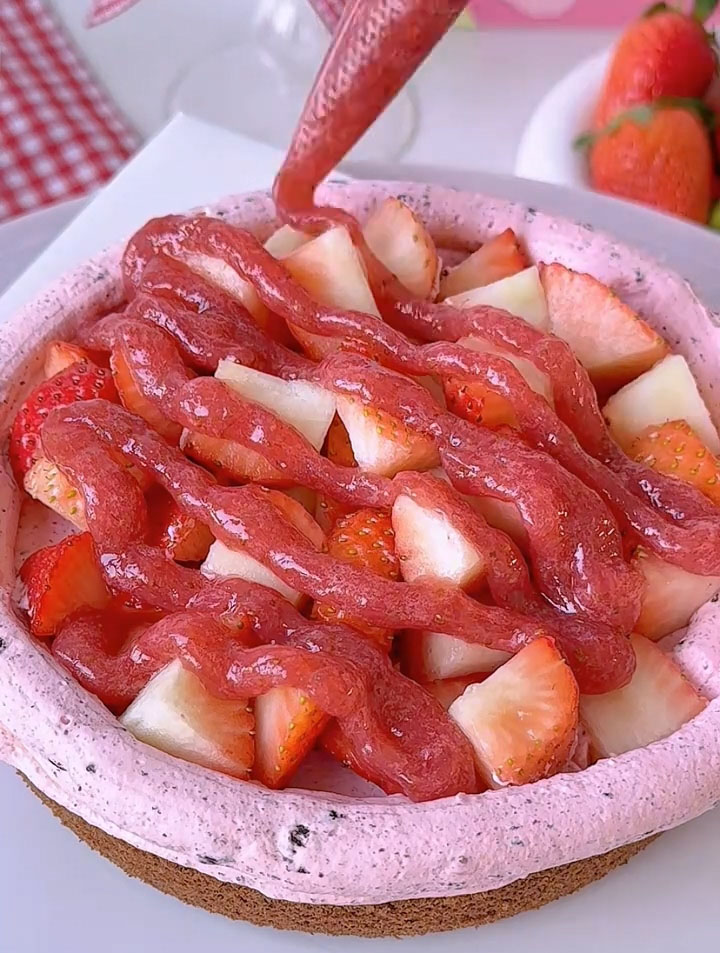
- Add another layer of cream on top of the strawberries, spreading it evenly to seal them in.
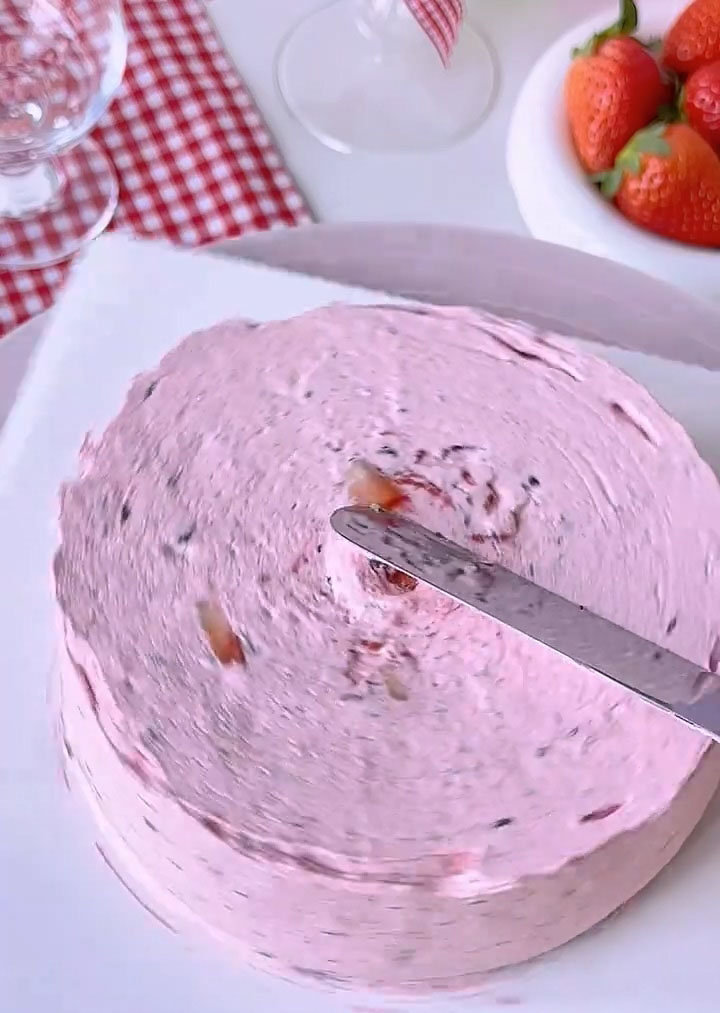
- Second Layer: Gently place the middle cake layer on top. Repeat the process: spread cream, add your chosen fillings (this is your customizable layer—use more strawberries and jam, or add extra Oreo crumbs, chocolate chips, etc.), and top with more cream.
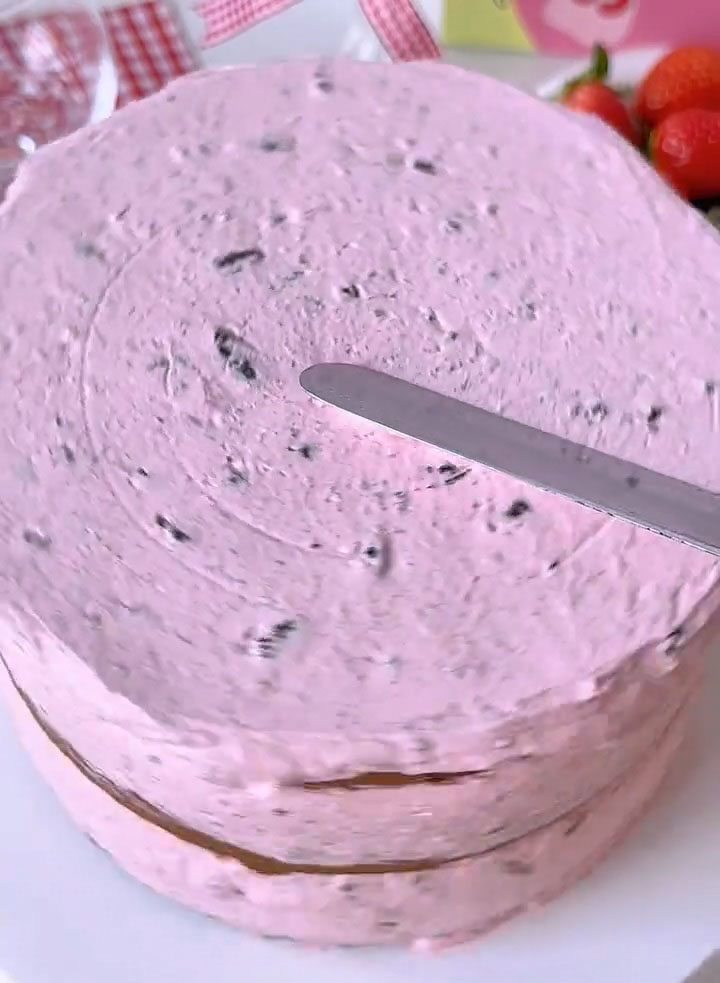
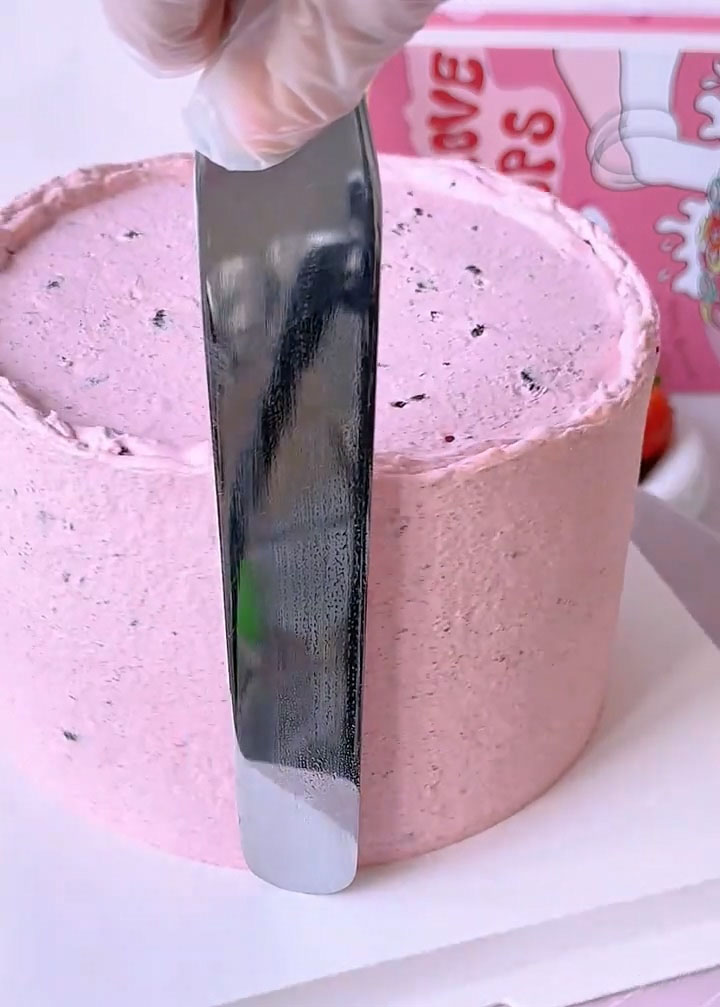
- Final Layer & Frosting: Place the final cake layer on top. Use the remaining cream to frost the top and sides of the cake. Simply spread the cream evenly without worrying about perfect smoothness.
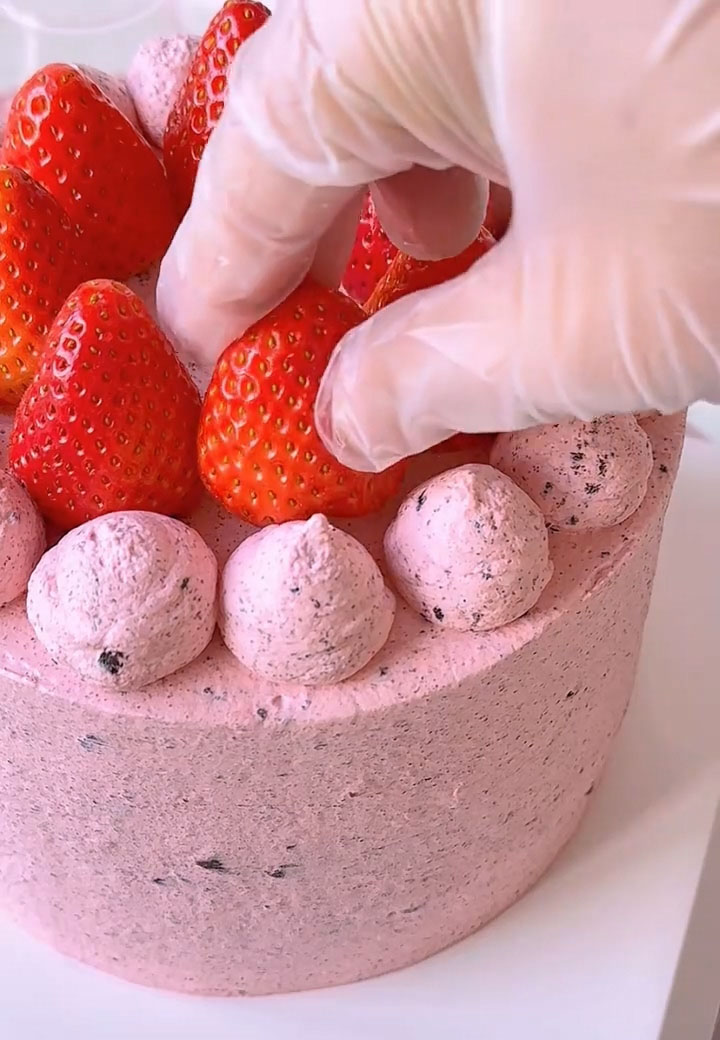
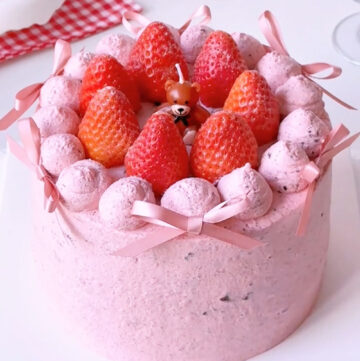
- Decorate: You can pipe any leftover cream on top, decorate with whole strawberries. For a special touch (like for my daughter), add a small toy figurine and a colorful ribbon. Sprinkle with powdered sugar.

Tips & Tricks
- The Upside-Down Cool is Law: For chiffon cakes, cooling upside down is not a suggestion—it’s mandatory. It stretches the delicate cake structure as it cools, preventing it from collapsing under its own weight. Be patient and let it cool completely.
- Cold Cream is Happy Cream: Everything for the frosting must be cold. Warm cream will not whip properly and will become grainy or buttery. If your kitchen is warm, chill the bowl and beaters in the freezer for 15 minutes before starting.
- Control Your Crumbs: For the neatest pink cream with fine black speckles, crush the Oreos very finely. For more pronounced cookie chunks and texture, crush them more roughly. Always remove the white filling first for the best texture and to control sweetness.
- The Jam Dam Technique: If you’re worried about the strawberry filling making the cake soggy or leaking, the cream dam is your best friend. A thick ring of frosting around the edge of the cake layer acts as a barrier to contain juicy fillings.
- Slice with a Hot Knife: For perfectly clean slices that show off all the beautiful layers, dip your sharp knife in hot water and wipe it dry between each cut. This melts through the cream cleanly.
Frequently Asked Questions
Can I use a different cake recipe, like a butter-based one?
You can, but the texture will be different. A chiffon cake is intentionally light and airy to contrast with the rich, dense cream filling. A denser butter cake might make the overall dessert feel too heavy. The chiffon’s lightness is part of what creates the “McFlurry” mouthfeel.
My cream became grainy or turned to butter after adding the Oreos. What went wrong?
This means you over-whipped it. Once you add the cookie crumbs, the cream can thicken very quickly because the crumbs disrupt the fat structure. Whip the base cream to just before your desired stiffness, then add the crumbs and whip on low for mere seconds until it comes together. When in doubt, under-whip and fold the crumbs in by hand.
How far in advance can I assemble this cake?
For the best texture, assemble the cake no more than 6-8 hours before serving. The moisture from the strawberries and jam will slowly seep into the cake layers. You can bake the cake layers 1 day ahead, wrap them tightly, and store at room temperature. Make the cream and chop the strawberries on the day of assembly.
Can I use frozen strawberries for the filling?
I don’t recommend it for the fresh filling layers, as they release too much water when thawed and will make the cake soggy. However, you can use a high-quality frozen strawberry jam or compote that is very thick.
Do I have to split the cake into 3 layers?
Two layers will work, but three layers create more opportunities for that delicious filling and make the cake look more impressive. If you’re new to splitting cakes, use toothpicks as guides around the side to mark an even cut before you start slicing.
Easy Strawberry Oreo Cake with Rich Layers and Crunch
Ingredients
Chocolate Chiffon Cake (6-inch)
- 3 large eggs separated, at room temperature
- 45 g granulated sugar
- 35 g corn oil or other neutral oil
- 45 g hot water
- 8 g unsweetened cocoa powder
- 45 g low-gluten flour cake flour
- ¼ teaspoon lemon juice or white vinegar
Strawberry Oreo Cream
- 500 g cold whipping cream heavy cream, min. 33% fat
- 20 g granulated sugar
- 60 g thick strawberry jam plus extra for layering
- 30 g Oreo cookie crumbs filling removed
- Pink gel food coloring optional
Filling & Assembly
- 200-250 g fresh strawberries hulled and diced
- Additional strawberry jam for layering
- Whole strawberries and extra Oreo crumbs for decoration optional
- powdered sugar for decoration optional
Instructions
Part 1: Bake the Chocolate Chiffon Cake
- Prep: Preheat your oven to 150°C (300°F). Have a 6-inch chiffon cake pan ready (do NOT grease it).
- Make the Yolk Batter: In a medium bowl, whisk together the corn oil and cocoa powder until smooth. Pour in the hot water and whisk vigorously until you have a smooth, liquid chocolate mixture.
- Sift the low-gluten flour directly into the chocolate mixture. Whisk until just combined and no dry flour remains.
- Add the 3 egg yolks to the bowl. Whisk until you have a smooth, shiny, and homogenous chocolate batter. Set aside.
- Whip the Meringue: In a separate, clean, and dry bowl, add the egg whites, sugar, and a little lemon juice. Whip until you achieve stiff peaks—when you lift the whisk, the meringue should stand straight up with a sharp tip.
- Fold: Add about one-third of the meringue to the chocolate yolk batter. Gently fold with a spatula until mostly combined. Pour this mixture back into the bowl with the remaining meringue. Gently and quickly fold until no white streaks remain, being careful not to deflate the air.
- Bake: Pour the batter into the pan. Gently tap the pan on the counter to release large bubbles. Bake on the middle rack for 45 minutes, or until the top springs back when lightly touched and a skewer inserted comes out clean.
- Cool: Immediately upon removing from the oven, drop the pan from a short height onto the counter a few times. Invert the pan onto a wire rack or over the neck of a bottle. Let it cool completely upside down (this is crucial to prevent collapse). Once cool, run a thin knife around the edges and center tube to release the cake.
Part 2: Prepare Components & Make the Cream
- Prep Fillings: Once the cake is completely cool, use a serrated knife or cake leveler to slice it horizontally into 3 even layers. Dice your fresh strawberries. Set aside.
- Make Strawberry Oreo Cream: Pour the cream and 20g of sugar into a bowl. Whip on medium speed until the cream thickens to a "yogurt" or soft-peak consistency.
- Add the 60g of strawberry jam and a drop of pink food coloring (if using). Continue whipping until the cream is thick and holds medium peaks—it should be quite thick but still slightly flowable.
- Add the Oreo cookie crumbs. Switch to low speed and whip for just 10-15 seconds, or until the cream reaches a firm, spreadable consistency. Be careful not to over-whip now that the crumbs are added. Refrigerate until ready to use.
Part 3: Assemble the Cake
- First Layer: Place the bottom cake layer on your serving plate or cake board. Spread a thin layer of the strawberry Oreo cream on top. Pipe a "dam" of cream around the very edge to hold in the fillings.
- Inside the dam, scatter a generous amount of diced strawberries, then spread a layer of extra strawberry jam.
- Add another layer of cream on top of the strawberries, spreading it evenly to seal them in.
- Second Layer: Gently place the middle cake layer on top. Repeat the process: spread cream, add your chosen fillings (this is your customizable layer—use more strawberries and jam, or add extra Oreo crumbs, chocolate chips, etc.), and top with more cream.
- Final Layer & Frosting: Place the final cake layer on top. Use the remaining cream to frost the top and sides of the cake. Simply spread the cream evenly without worrying about perfect smoothness.
- Decorate: You can pipe any leftover cream on top, decorate with whole strawberries. For a special touch (like for my daughter), add a small toy figurine and a colorful ribbon. Sprinkle with powdered sugar.
Leave a Reply