
This strawberry rice pudding is one of those desserts that feels nostalgic and cozy, yet fresh and elegant at the same time.
It’s made with simple pantry ingredients, gently simmered on the stove, then chilled until perfectly creamy. The rice cooks down into a soft, pudding-like texture while the strawberries add a bright, fruity contrast that keeps every bite light and balanced.
There’s no oven involved, no complicated techniques, and no rushing. Just slow cooking, simple layering, and a little time in the fridge to let everything come together.
It’s the kind of dessert that feels just as right for a quiet afternoon treat as it does for serving guests.

Why you’ll love this recipe
- This strawberry rice pudding is rich and creamy without being heavy or cloying.
- It uses cooked rice, making it a great way to turn leftovers into something special.
- The combination of vanilla, milk, cream, and strawberries creates a comforting yet fresh flavour.
- There’s no baking required — just gentle simmering and chilling.
- It’s beginner-friendly, forgiving, and very hard to mess up.

Ingredients and substitutions
- Cooked rice – Cold, leftover rice works best here. I recommend using rice that has been refrigerated because the grains stay more defined and thicken the pudding more evenly as it cooks.
- Vanilla bean – This adds a soft, fragrant vanilla aroma that really elevates the pudding. If you don’t have a vanilla bean, a tiny amount of vanilla extract works as a substitute.
- Prepared milk (from milk powder) – Using full-fat milk powder gives a deeper, milkier flavour. If you don’t have milk powder, whole milk works just as well.
- Heavy cream – This is what makes the pudding extra creamy and luxurious. I recommend using cream with at least 30% fat content for the best texture.
- Granulated sugar – Just enough to gently sweeten the pudding without overpowering the strawberries. You can slightly adjust it based on how sweet your strawberries are.
- Fresh strawberries – Some are cut into small pieces for texture, and some are mashed for a more jammy, juicy element. Strawberry season strawberries will give the best flavour.
- Strawberry jam – Used for layering and decoration. If you don’t have jam, mashed strawberries cooked briefly with a little sugar work perfectly.
How to Make Strawberry Rice Pudding
- Prepare the Components
Gather all your ingredients. Let the cold cooked rice sit out for 10 minutes to take the chill off. Split the vanilla bean lengthwise and scrape out the seeds with the back of your knife. Dice some strawberries and mash a few others if making a quick jam. Ensure your prepared milk is completely cooled to room temperature. - Make the Matcha Chocolate Layer
In a heatproof bowl, combine the white chocolate and heavy cream. Set the bowl over a pot of barely simmering water (ensure the bowl doesn’t touch the water). Stir gently until the chocolate is completely melted and the mixture is smooth. Remove from heat.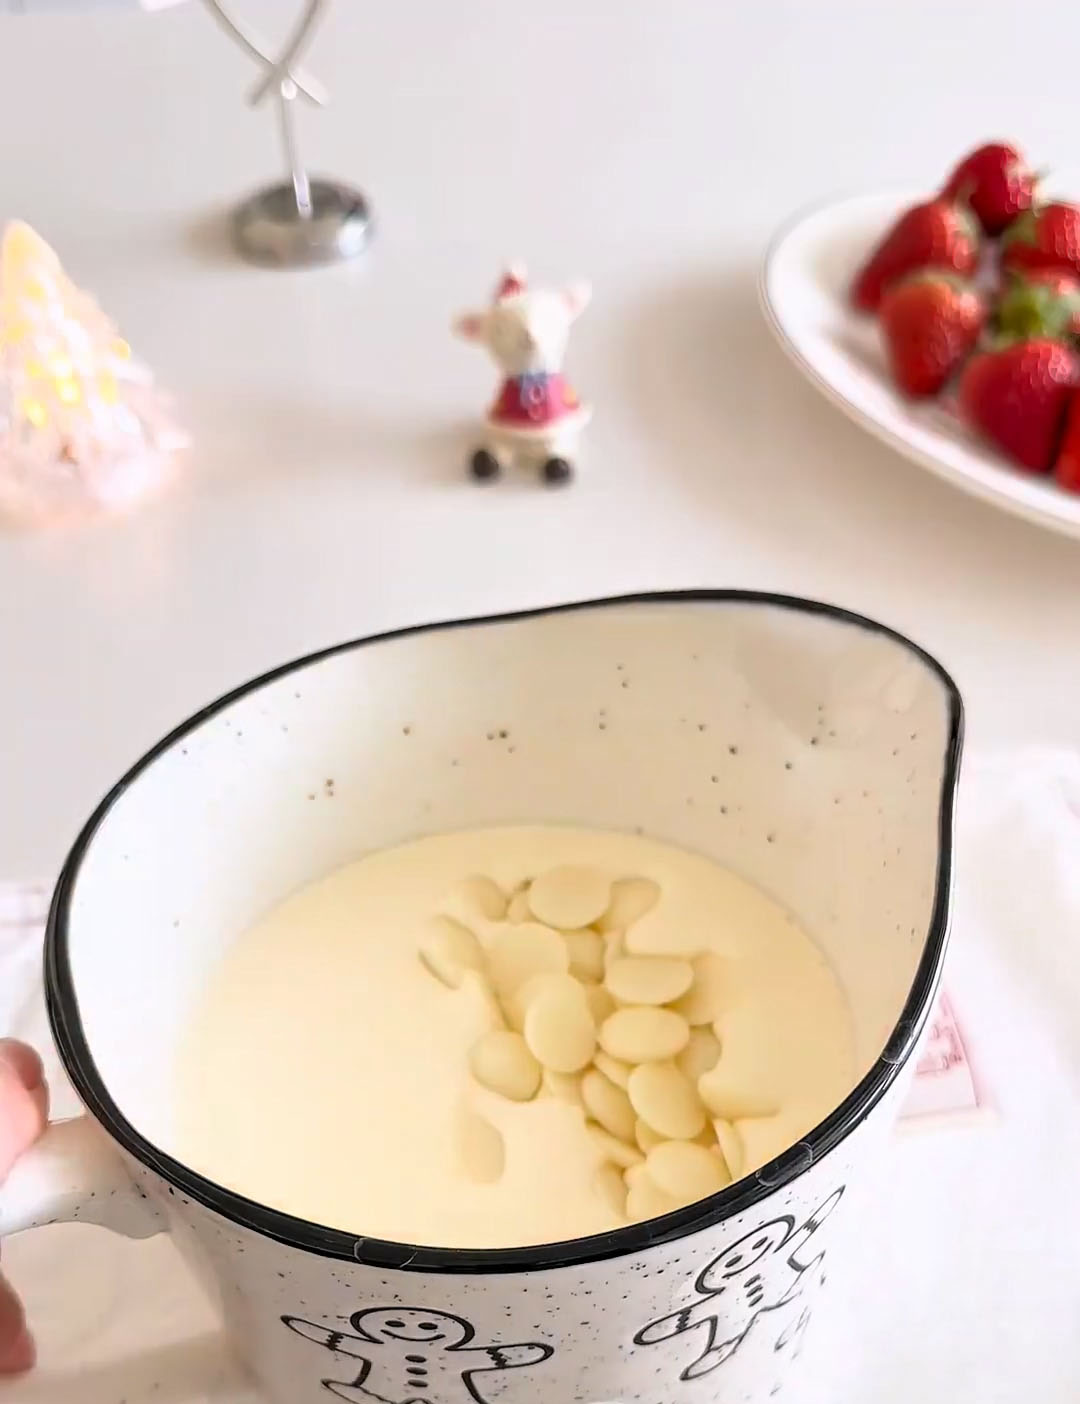
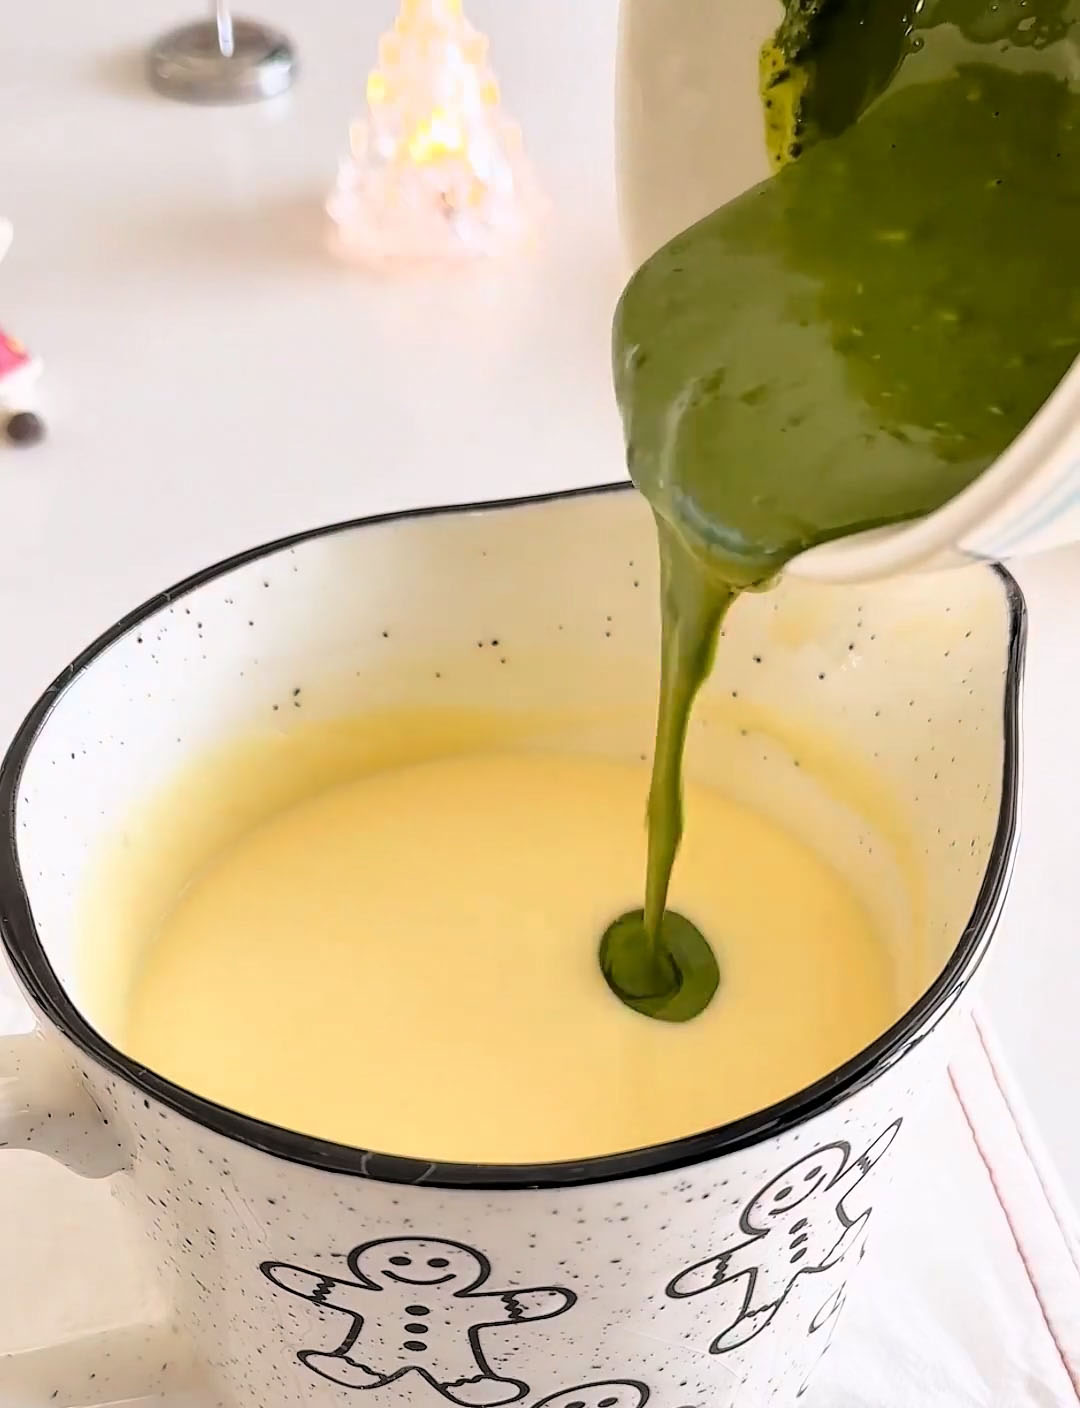
In a separate bowl, vigorously whisk the sifted matcha powder into the 100g of cooled prepared milk until a smooth, lump-free paste forms. Gradually whisk this matcha paste into the warm white chocolate mixture until fully incorporated and uniformly green.
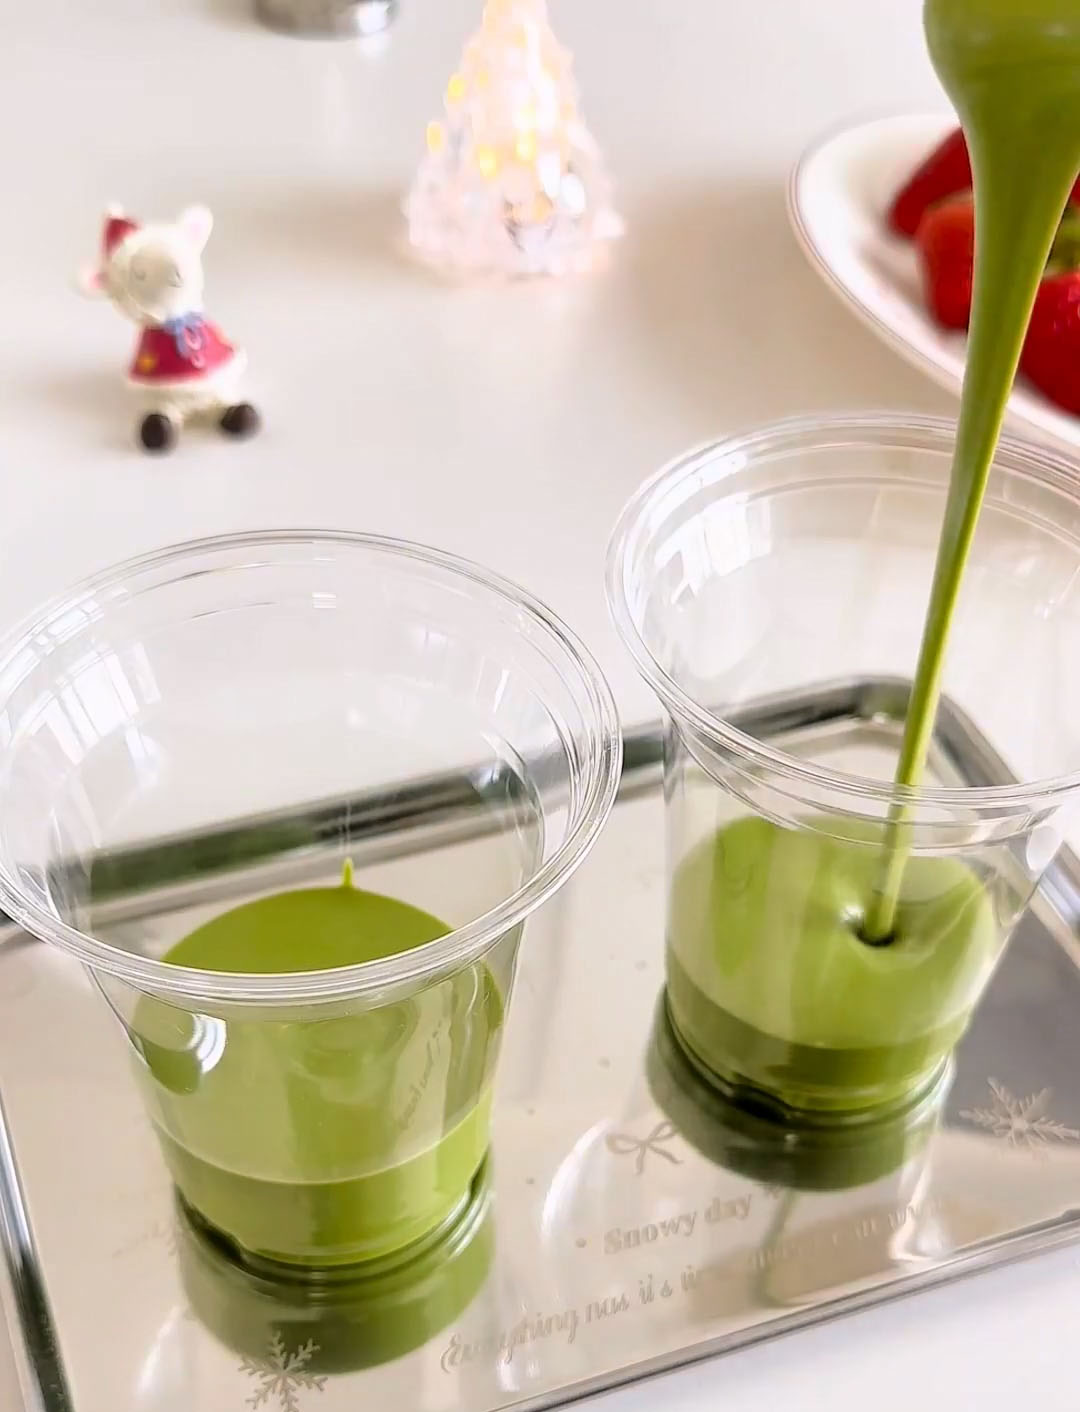
 Pour the mixture through a fine-mesh sieve into a clean container or jug to catch any undissolved bits. Carefully divide the mixture among your serving glasses or jars. Gently tap them on the counter to level. Refrigerate for at least 1 hour, or until the surface is completely set and does not jiggle when moved.
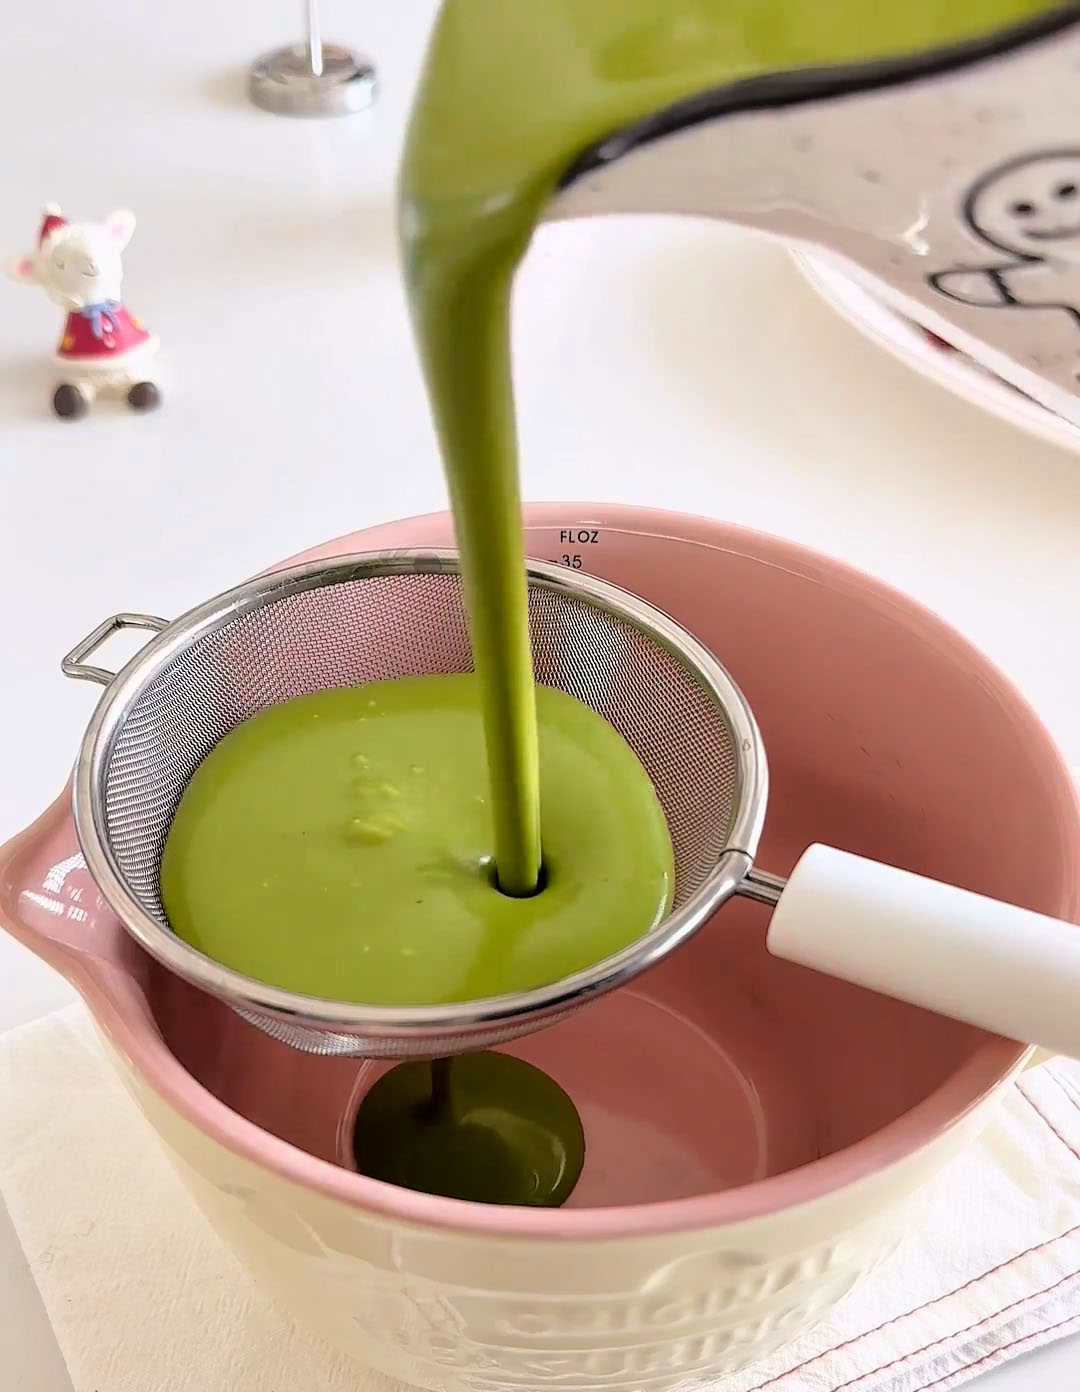
- Cook the Rice Pudding Layer
In a medium saucepan, combine the rice, 600g prepared milk, 200g heavy cream, sugar, and the vanilla bean seeds and pod. Cook over medium-low heat, stirring frequently with a silicone spatula.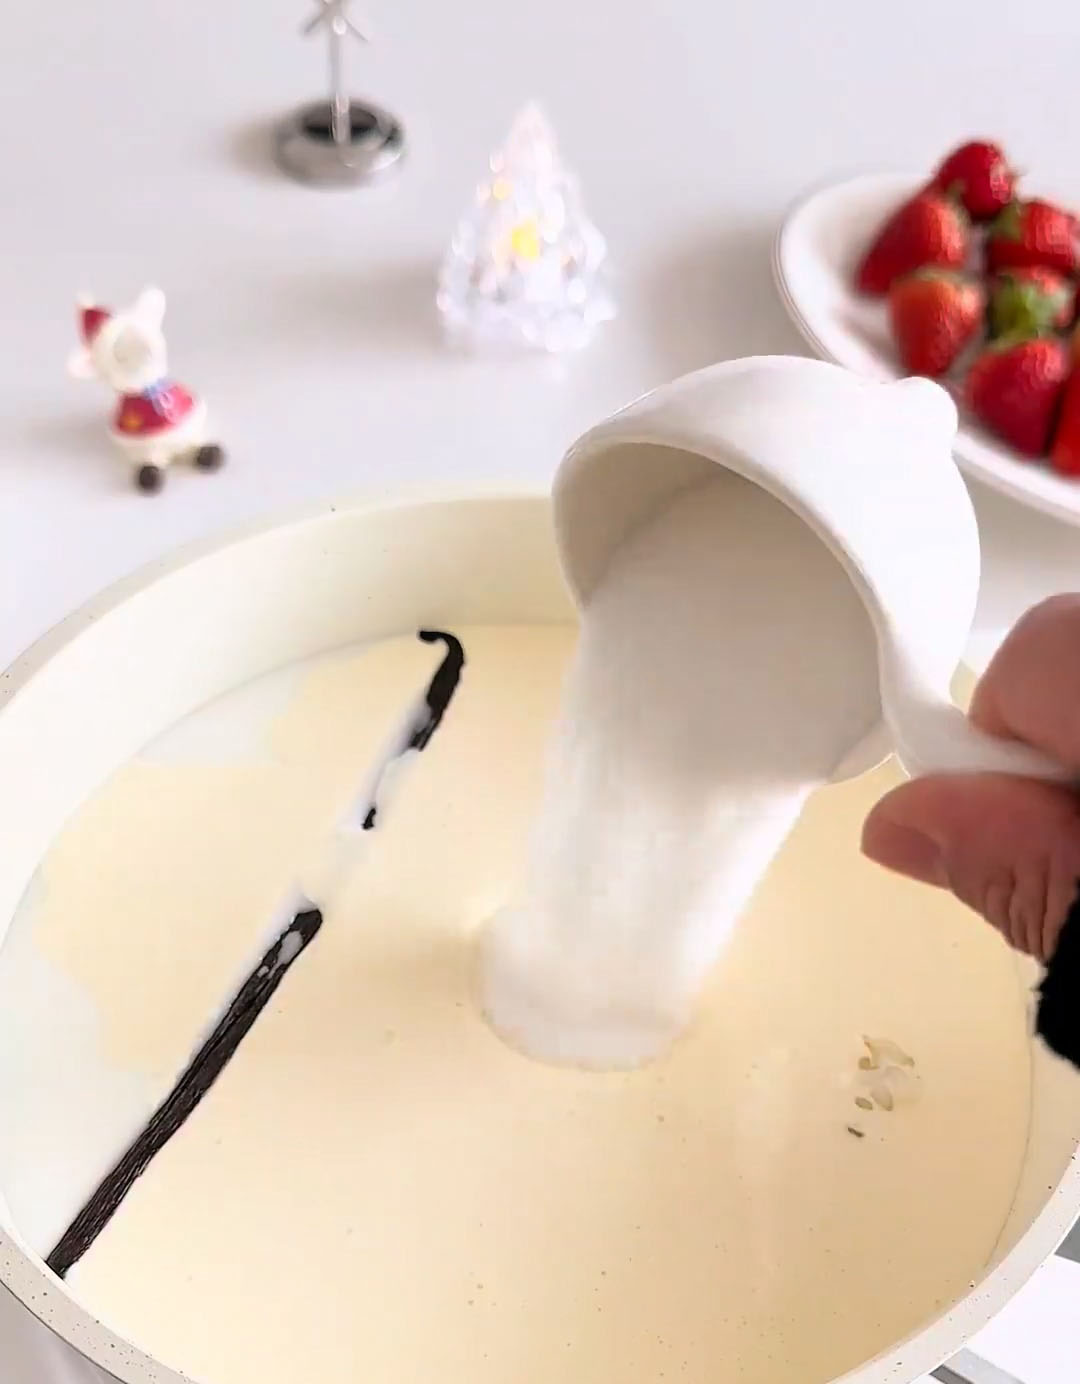
Once the mixture begins to simmer at the edges, reduce the heat to low. Continue cooking for 15-20 minutes, stirring almost constantly to prevent sticking, until the rice is very soft and the mixture has thickened to a porridge-like consistency. It should coat the back of a spoon.
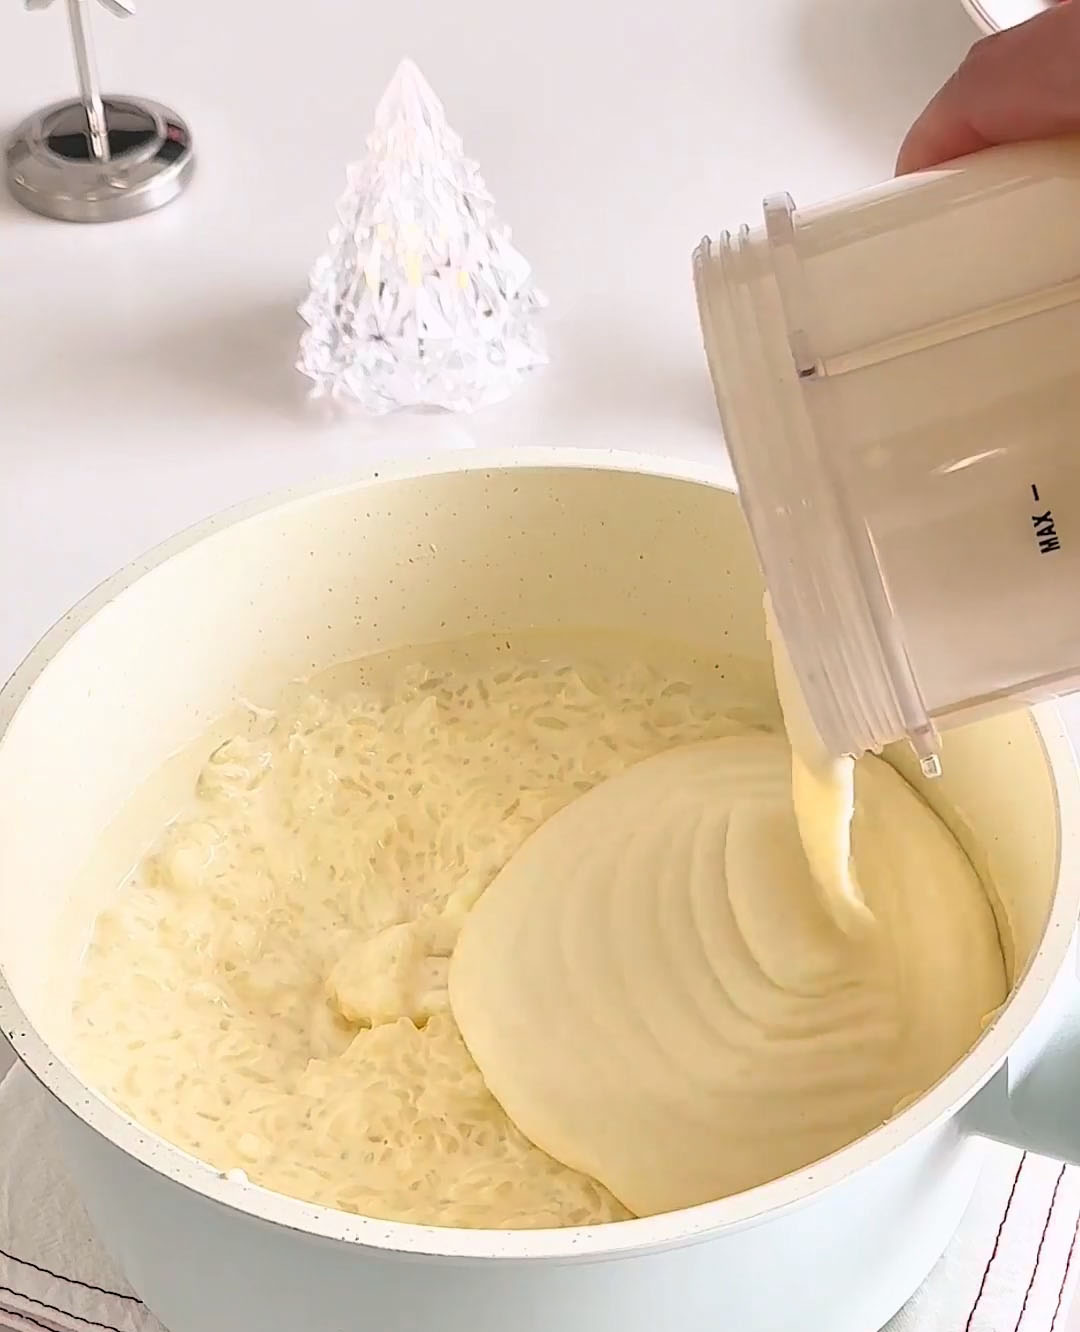
Remove the pot from heat and discard the vanilla bean pod. For an extra-creamy texture, transfer about half of the rice pudding to a blender and puree until smooth. Stir this puree back into the pot with the remaining chunky rice pudding. Let this mixture cool completely to room temperature, stirring occasionally to prevent a skin from forming.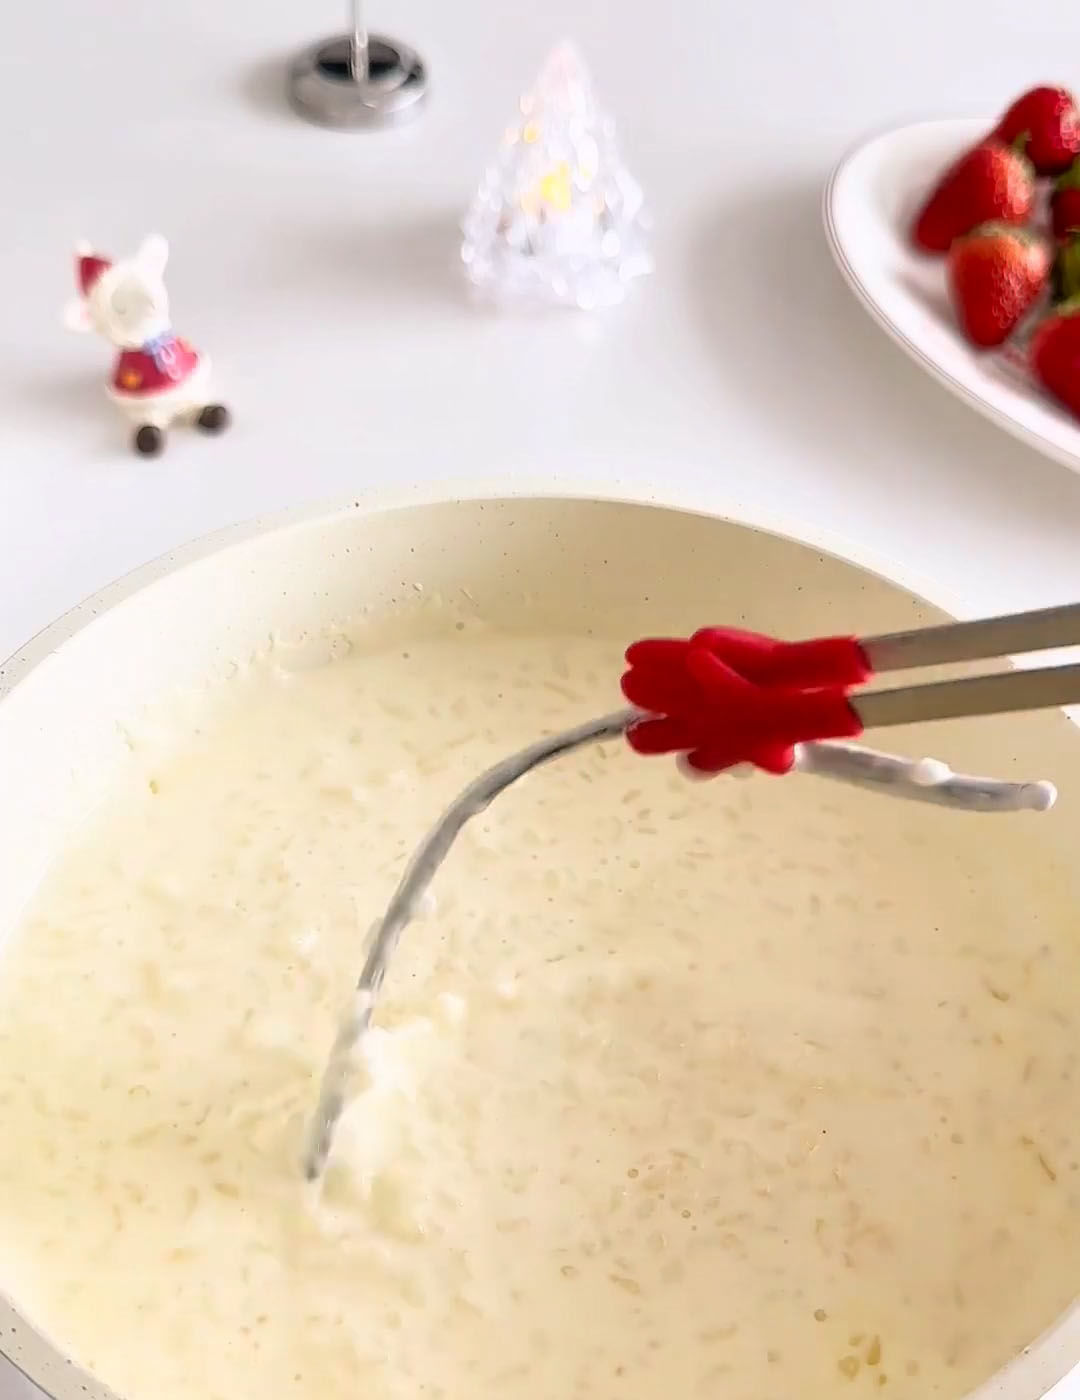
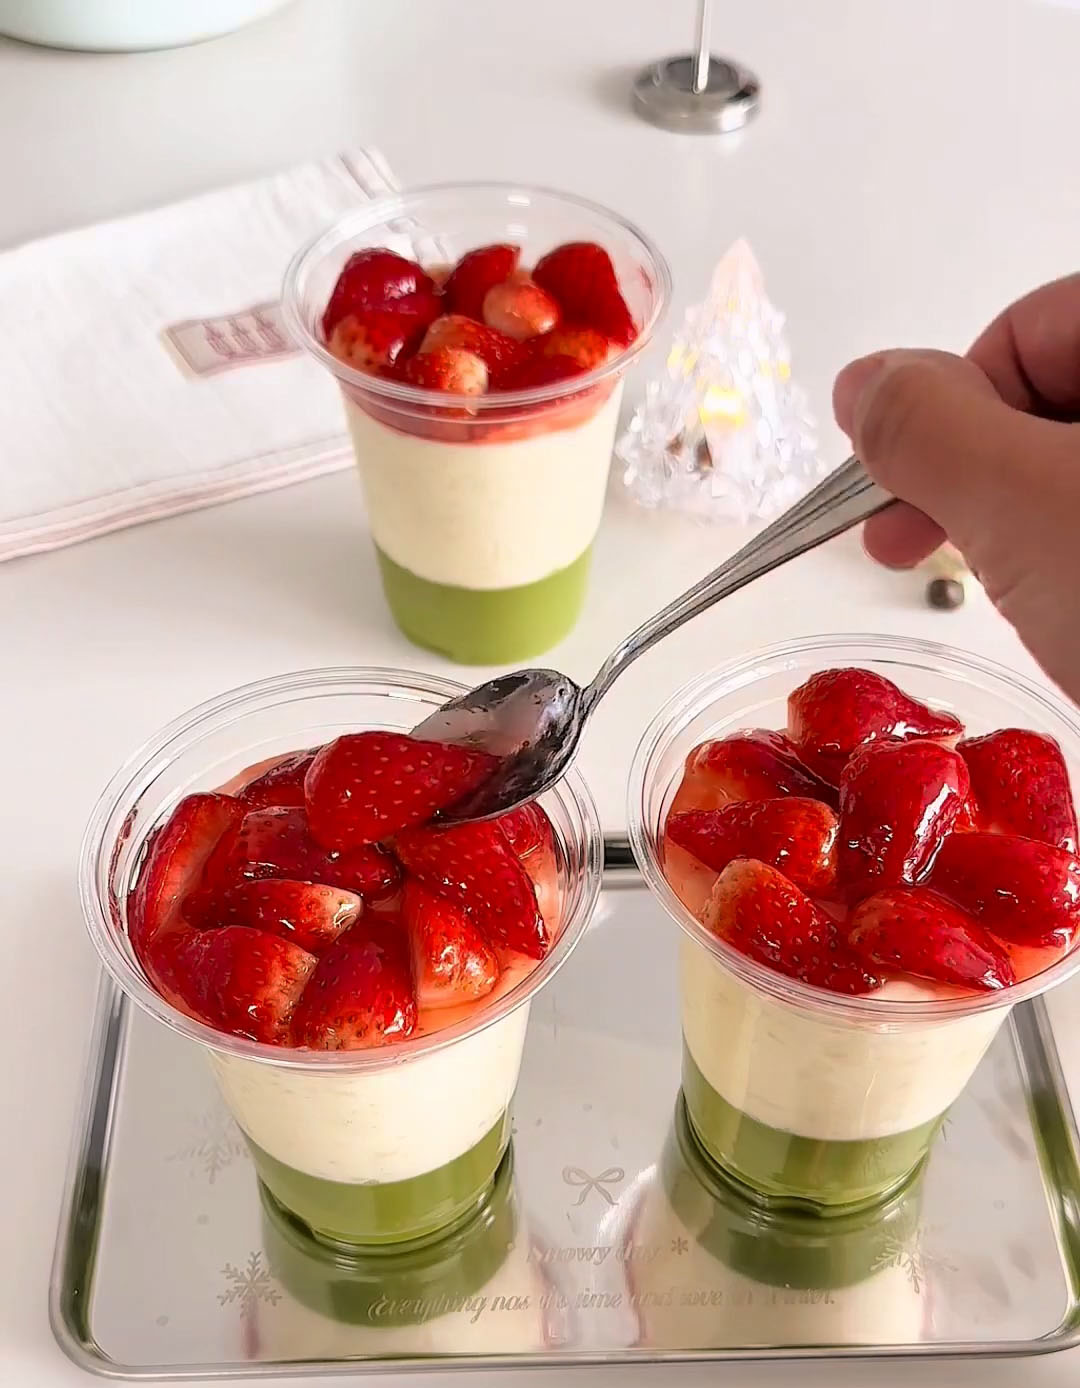
- Assemble the Pudding
Once the matcha layer is set and the rice pudding is cool, you can assemble. Spoon or pipe the cooled rice pudding evenly over the set matcha layer. Top generously with diced fresh strawberries and an extra dollop of strawberry jam. Garnish with a half strawberry if you like.
Refrigerate the assembled puddings for at least 1 more hour before serving to allow everything to firm up nicely.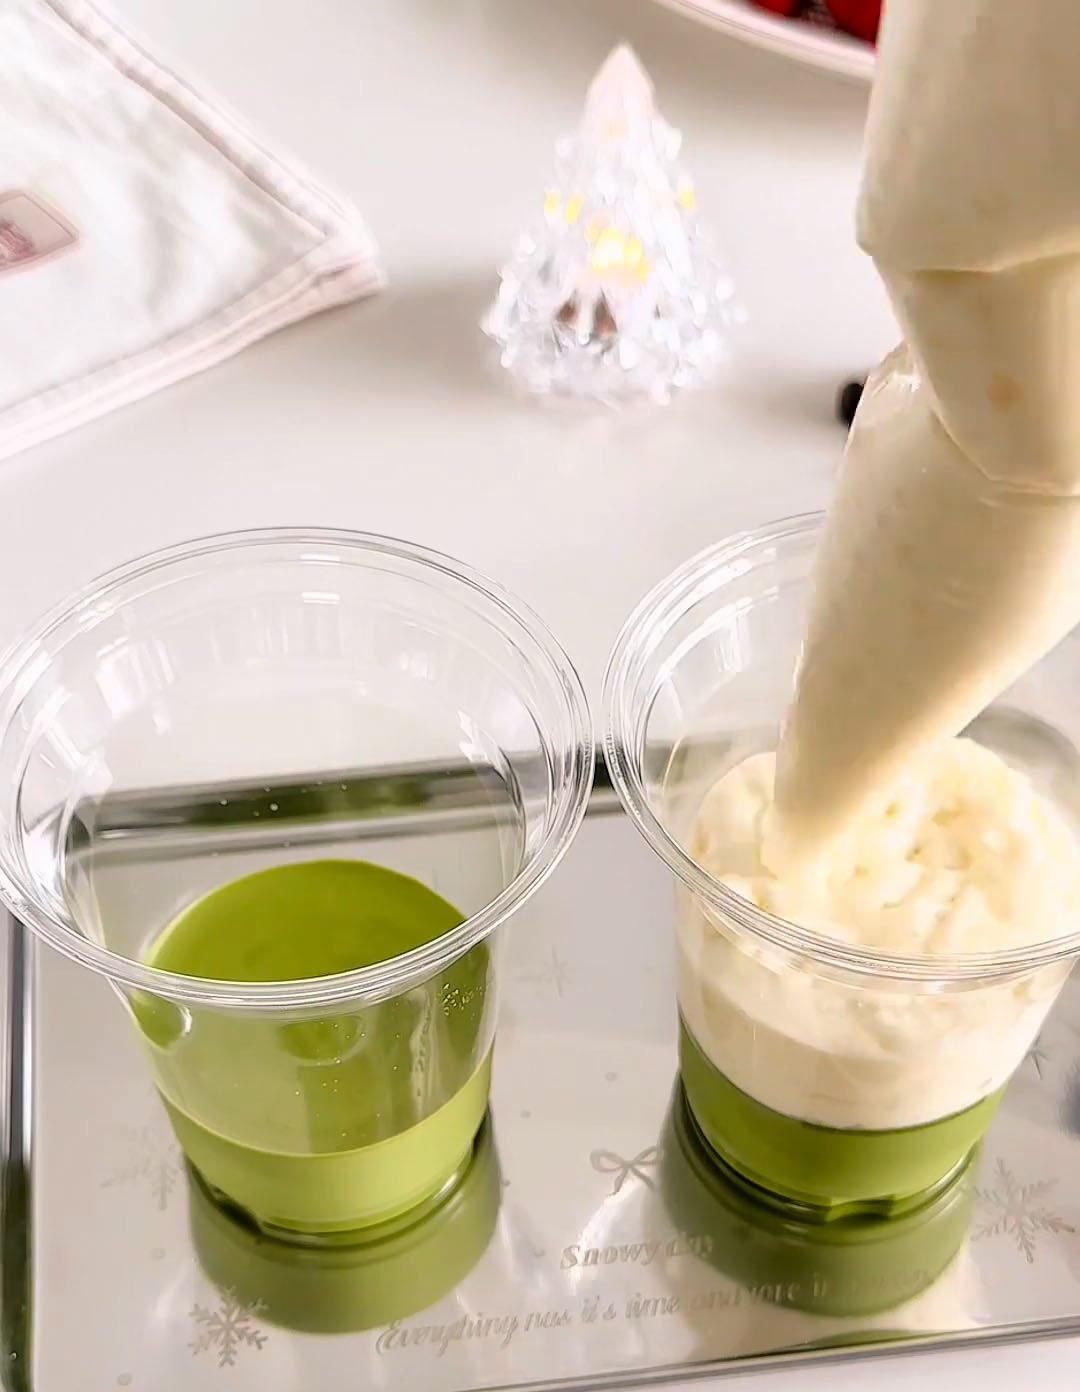
Tips & tricks
- Use low heat and stir constantly while cooking the rice pudding to avoid scorching or clumping.
- Cold, leftover rice works better than freshly cooked rice because it thickens more smoothly.
- Blending only half of the pudding gives you the best balance of creamy and comforting texture.
- Always let the rice pudding cool completely before assembling to keep the layers clean and defined.
- Taste your strawberries first — if they’re very sweet, you may not need much jam at all.
Frequently asked questions
Why is my rice pudding too thick or too thin?
If your pudding is too thick, it may have cooked a bit too long or lost too much moisture. You can stir in a small splash of milk to loosen it. If it’s too thin, continue cooking gently for a few more minutes while stirring.
Can I make strawberry rice pudding ahead of time?
Yes. This pudding can be made up to 2 days in advance and stored covered in the refrigerator. The flavour actually improves as it chills.
Can I freeze strawberry rice pudding?
Freezing is not recommended. The texture of rice pudding can become grainy once thawed due to the dairy content.
Can I serve this warm instead of chilled?
You can, but this recipe is designed to be chilled so the pudding fully sets and the flavours meld together beautifully.

No-Bake Strawberry Rice Pudding – Creamy, Sweet & Easy!
Ingredients
Matcha Chocolate Layer
- 210 g white chocolate chopped
- 400 g heavy cream
- 100 g prepared milk from full-fat milk powder, cooled
- 25 g high-quality matcha powder sifted
Rice Pudding Layer
- 350 g cooked white rice cold is best
- 600 g prepared milk from full-fat milk powder
- 200 g heavy cream
- 25 g granulated sugar
- 1 vanilla bean or 1 drop vanilla extract
Strawberry Topping
- 6-8 fresh strawberries diced
- 3-4 tablespoons strawberry jam
- Extra fresh strawberries for garnish
Instructions
Prepare the Components
- Gather all your ingredients. Let the cold cooked rice sit out for 10 minutes to take the chill off. Split the vanilla bean lengthwise and scrape out the seeds with the back of your knife. Dice some strawberries and mash a few others if making a quick jam. Ensure your prepared milk is completely cooled to room temperature.
Make the Matcha Chocolate Layer
- In a heatproof bowl, combine the white chocolate and heavy cream. Set the bowl over a pot of barely simmering water (ensure the bowl doesn't touch the water). Stir gently until the chocolate is completely melted and the mixture is smooth. Remove from heat.
- In a separate bowl, vigorously whisk the sifted matcha powder into the 100g of cooled prepared milk until a smooth, lump-free paste forms. Gradually whisk this matcha paste into the warm white chocolate mixture until fully incorporated and uniformly green.
- Pour the mixture through a fine-mesh sieve into a clean container or jug to catch any undissolved bits. Carefully divide the mixture among your serving glasses or jars. Gently tap them on the counter to level. Refrigerate for at least 1 hour, or until the surface is completely set and does not jiggle when moved.
Cook the Rice Pudding Layer
- In a medium saucepan, combine the rice, 600g prepared milk, 200g heavy cream, sugar, and the vanilla bean seeds and pod. Cook over medium-low heat, stirring frequently with a silicone spatula.
- Once the mixture begins to simmer at the edges, reduce the heat to low. Continue cooking for 15-20 minutes, stirring almost constantly to prevent sticking, until the rice is very soft and the mixture has thickened to a porridge-like consistency. It should coat the back of a spoon.
- Remove the pot from heat and discard the vanilla bean pod. For an extra-creamy texture, transfer about half of the rice pudding to a blender and puree until smooth. Stir this puree back into the pot with the remaining chunky rice pudding. Let this mixture cool completely to room temperature, stirring occasionally to prevent a skin from forming.
Assemble the Pudding
- Once the matcha layer is set and the rice pudding is cool, you can assemble. Spoon or pipe the cooled rice pudding evenly over the set matcha layer. Top generously with diced fresh strawberries and an extra dollop of strawberry jam. Garnish with a half strawberry if you like.
- Refrigerate the assembled puddings for at least 1 more hour before serving to allow everything to firm up nicely.
Leave a Reply