
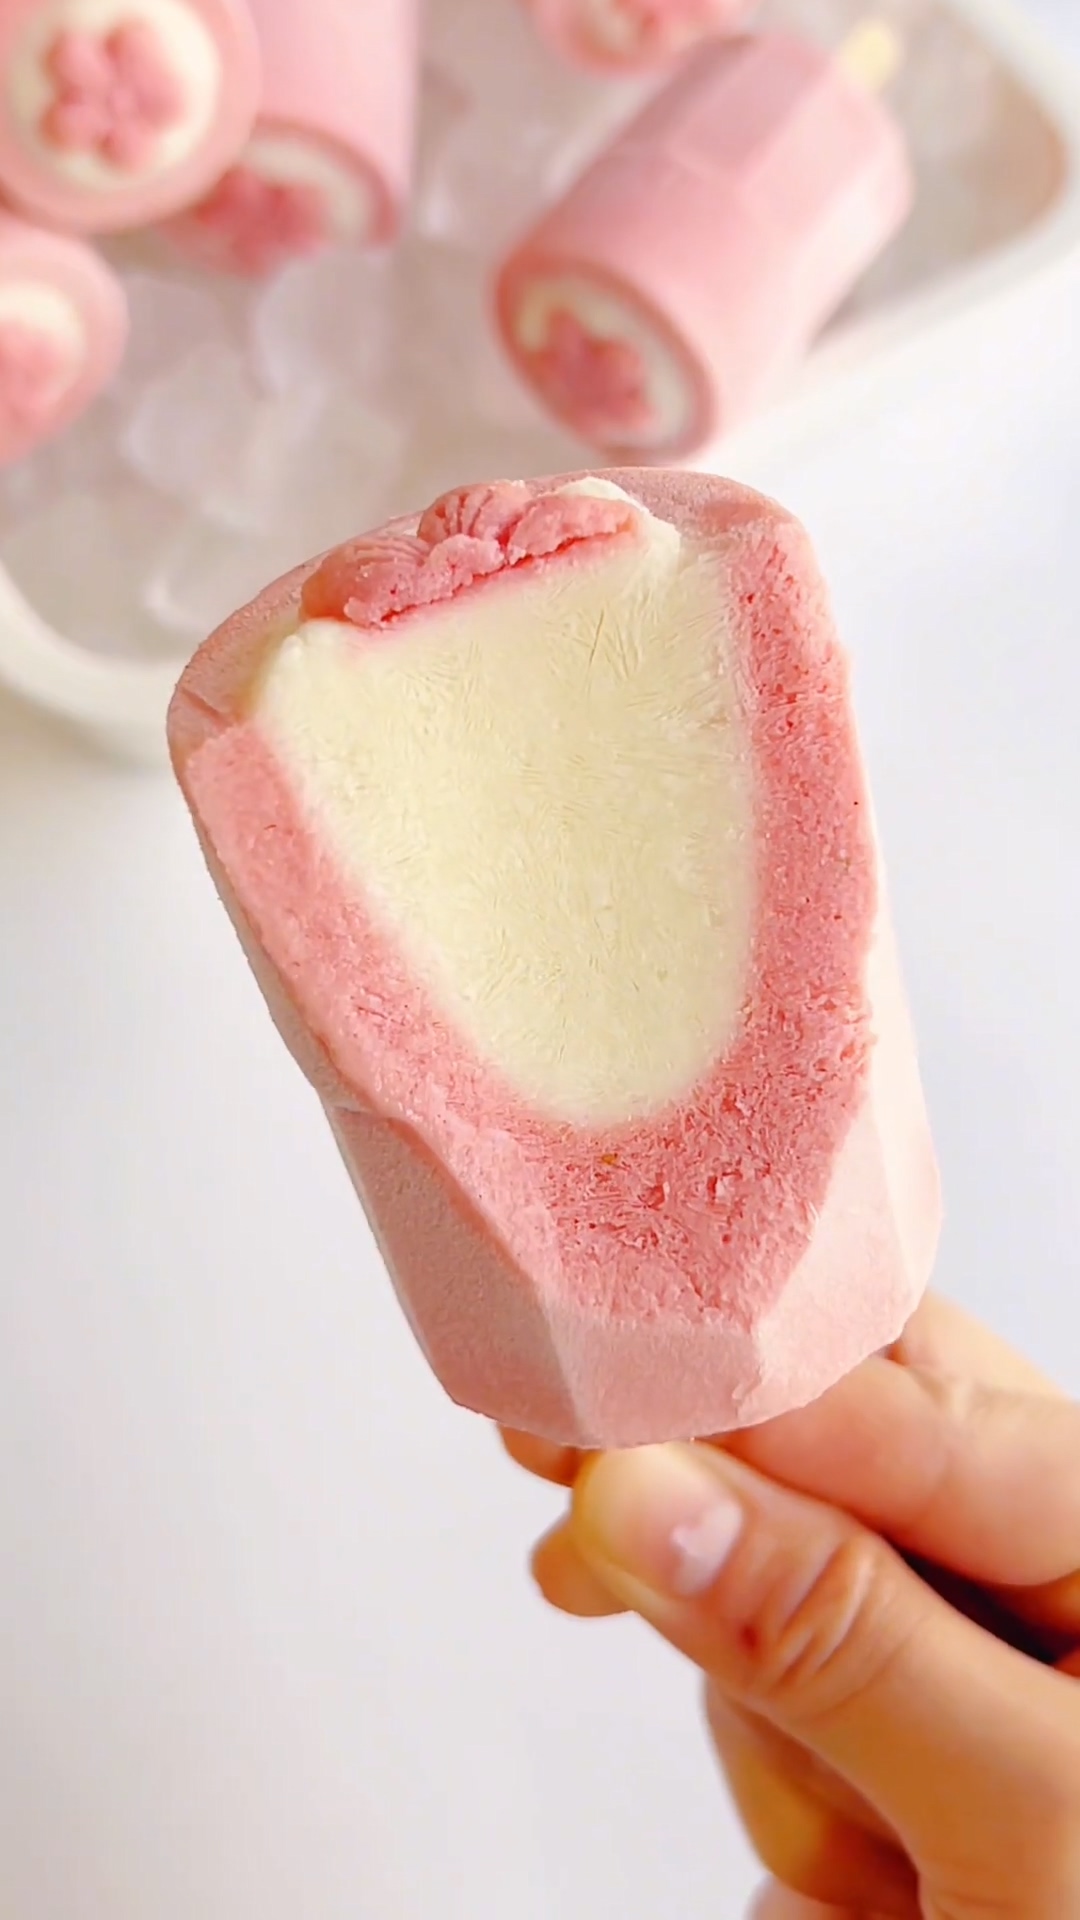
No cooking, no baking, just three simple steps. These strawberry yogurt popsicles have a dense, creamy texture with zero ice crystals. They’re bursting with rich strawberry flavor — sweet, tangy, and refreshing. The color is a gorgeous, pretty pink. Make them at home and easily achieve strawberry popsicle freedom.
After making the Strawberry Crepe Rolls and the Mini Basque Cheesecake with Strawberry Mousse, I still had some strawberries left on hand.
So I decided to make strawberry yogurt popsicles — which is the upgraded version of regular strawberry popsicles. These strawberry yogurt popsicles are beautifully pink.
You know me — I’m always making popsicles, especially when the weather gets warm.
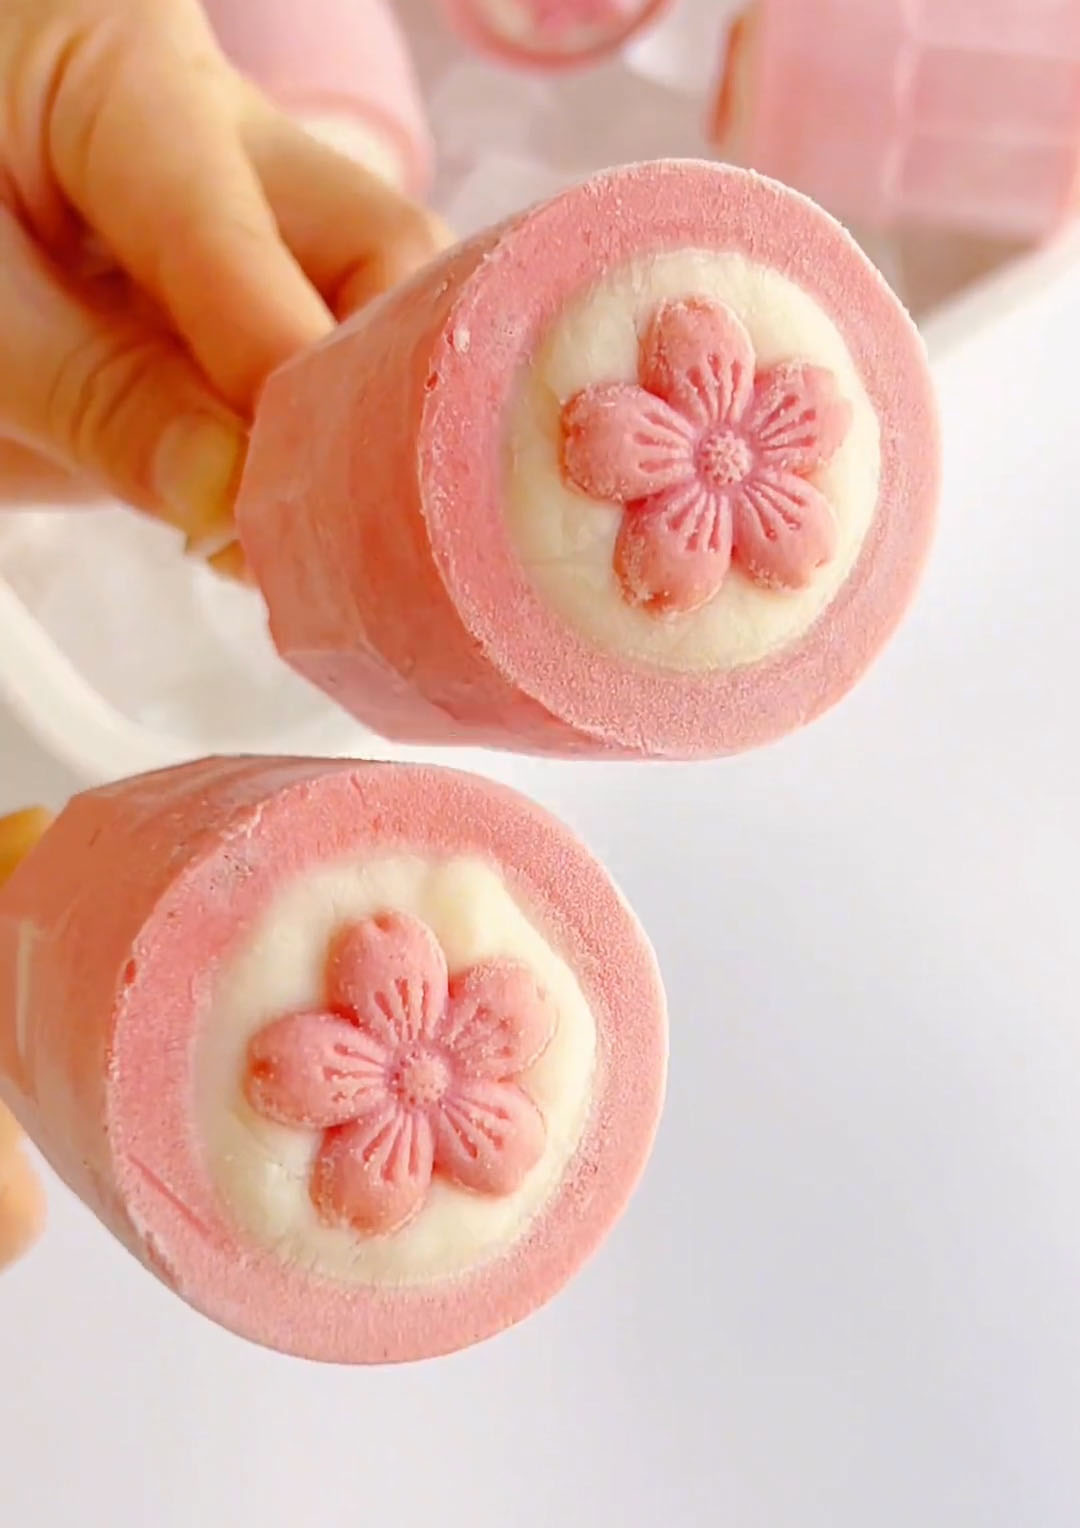
For these strawberry yogurt popsicles, I used a special mold with a hollow center that allows me to add yogurt in the middle. You can also use a regular mold and just skip the final yogurt filling step.
If you don’t have any popsicle molds at all, you can check out my Homemade Oreo Popsicles recipe instead.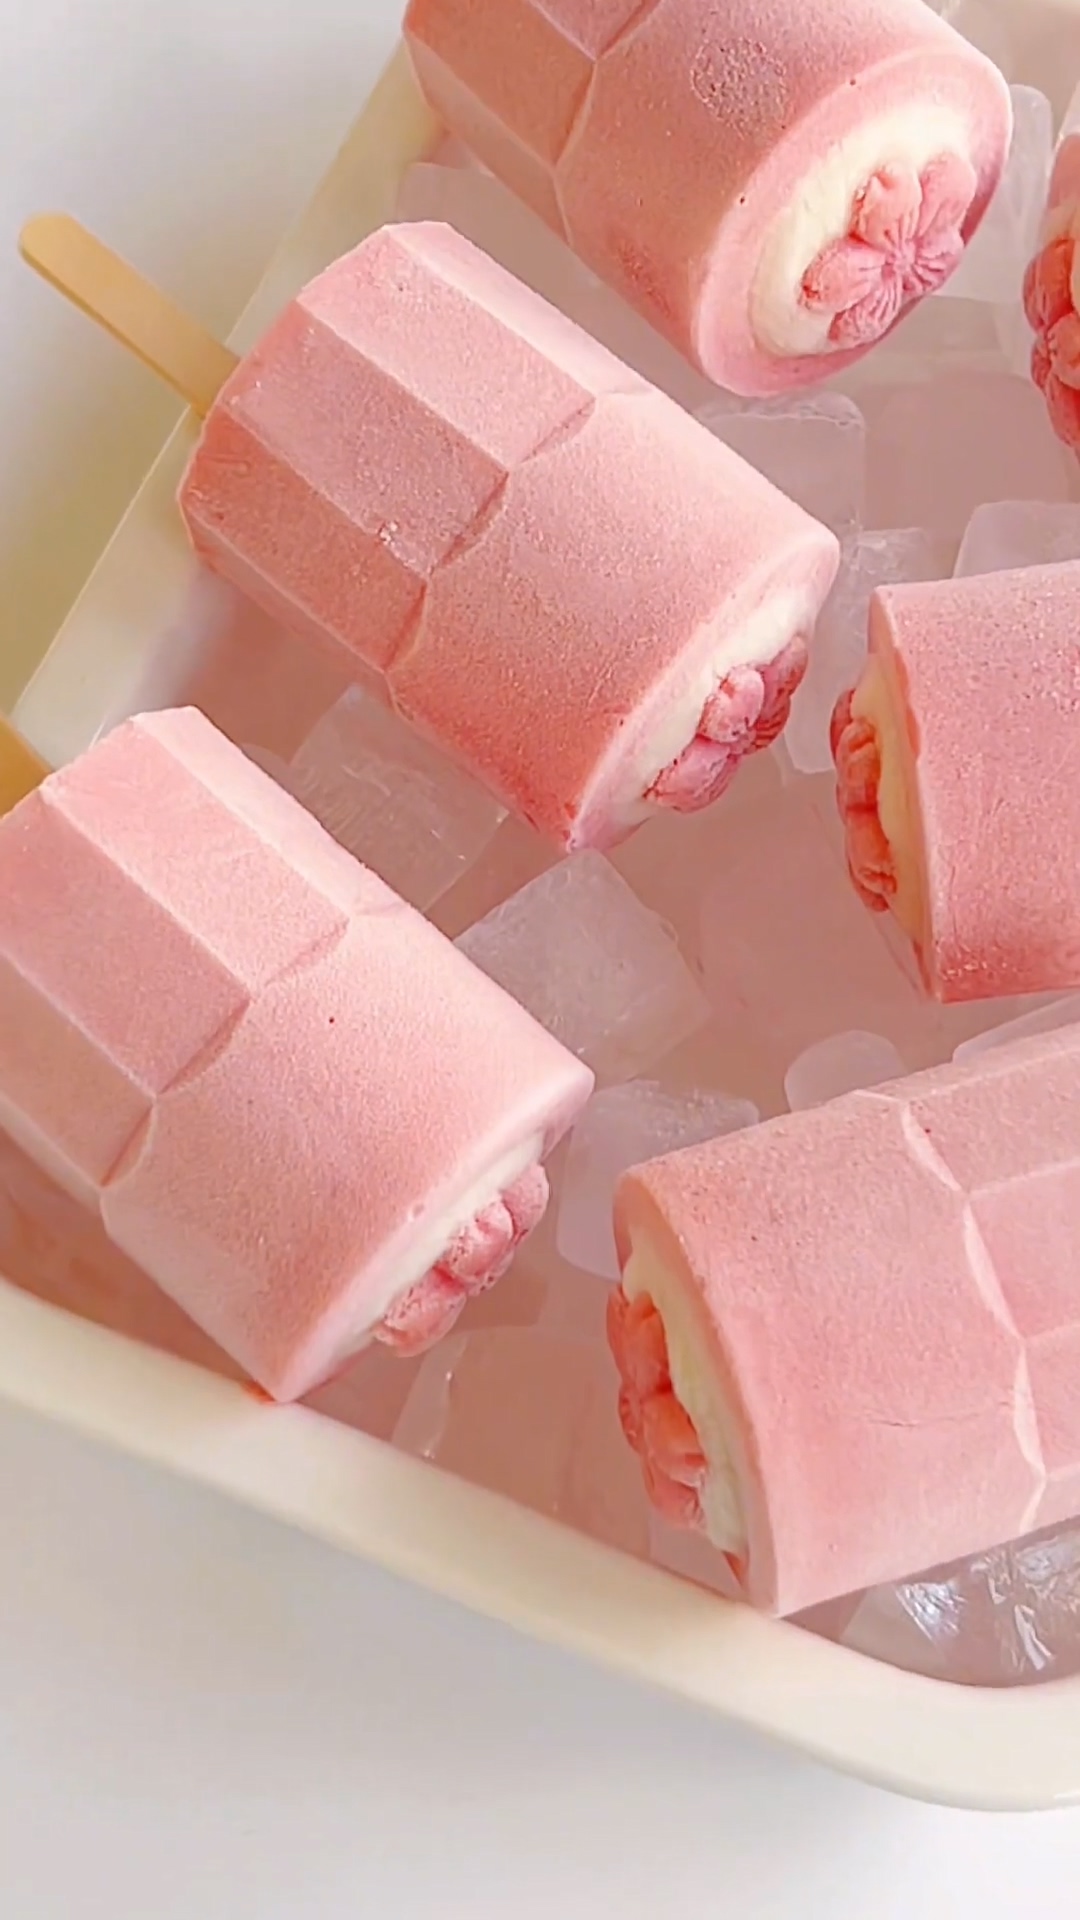
Why you’ll love this recipe
- No cooking, no baking—just blend, pour, and freeze
- Smooth and creamy texture with no ice crystals
- Fresh strawberry flavour that’s sweet, tangy, and refreshing
- Beautiful soft pink color that looks as good as it tastes
- Easy to customize with or without yogurt filling
- Perfect make-ahead dessert for hot days
Ingredients and substitutions
- Strawberries – I recommend using ripe, sweet strawberries for the best flavour. The more fragrant and juicy they are, the more intense your popsicles will taste.
- Granulated sugar – This helps balance the natural tartness of the strawberries. You can slightly adjust it depending on how sweet your strawberries are.
- Condensed milk – Adds a touch of richness and sweetness while enhancing the creamy texture. It also helps create that smooth, melt-in-your-mouth consistency.
- Yogurt – Gives a light tangy flavour and balances the sweetness. I suggest using plain or lightly sweetened yogurt for the best result.
- Whipping cream – This is key for a creamy texture and prevents ice crystals. Full-fat cream works best for a smooth and rich finish.
- Yogurt filling – I recommend using a thick yogurt so it holds its shape when piped into the center and doesn’t leak out.
- Decoration (Cookie flowers / Chocolate) – Totally optional, but it adds a playful and charming finishing touch. I especially love using it when making these for kids or when sharing—they make the popsicles look extra cute and a little more special.
How to Make Strawberry Yogurt Popsicles
Prepare the Strawberries
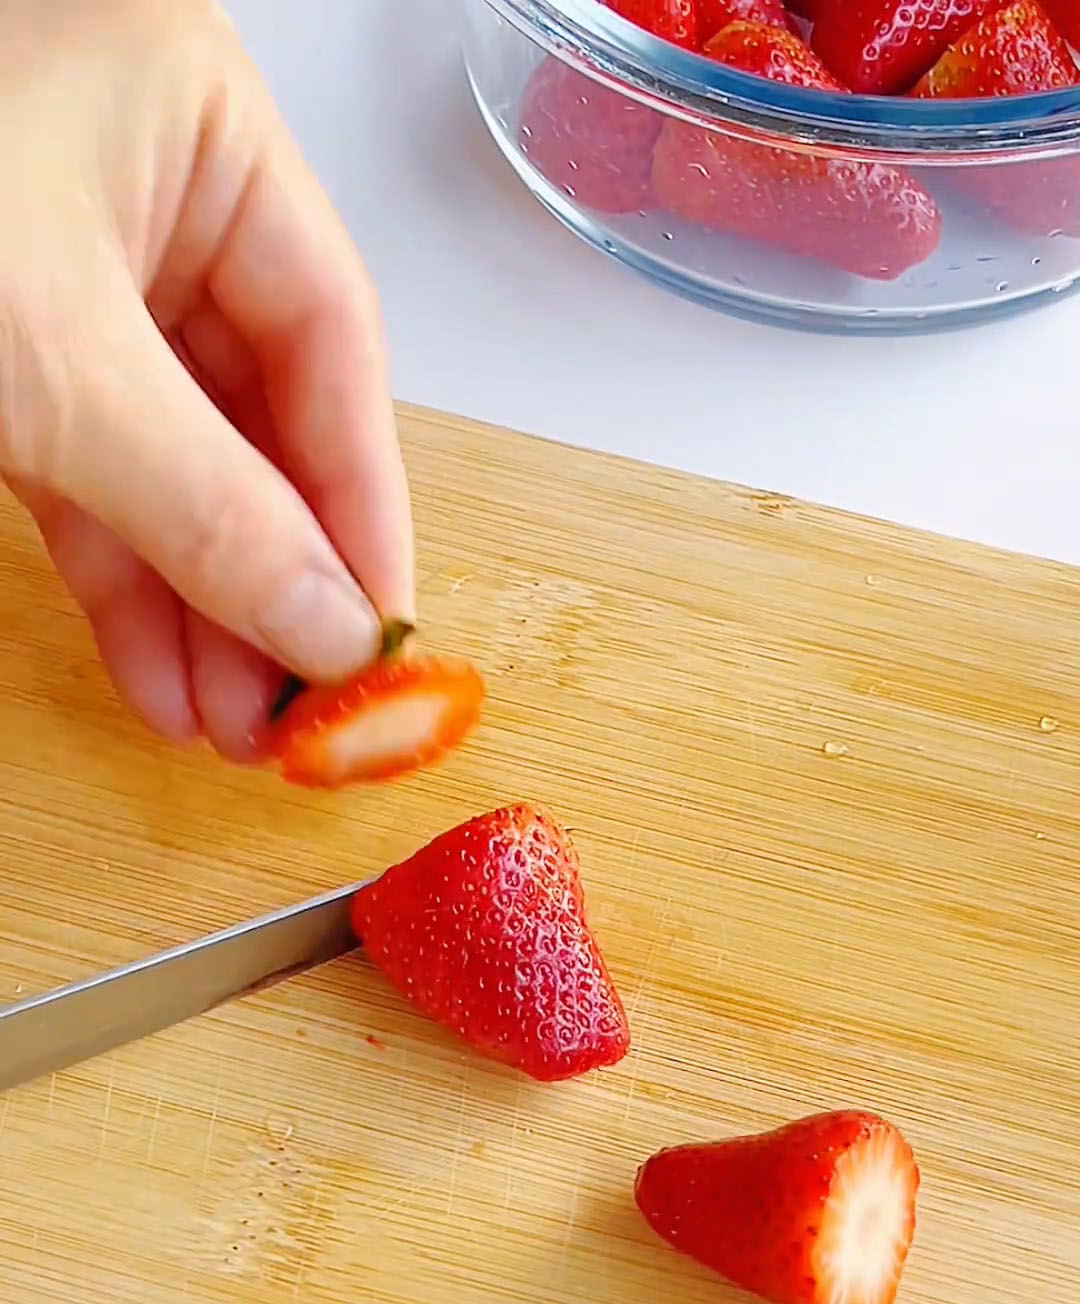
- Wash the strawberries with salt – Place the 400 g of strawberries in a bowl of water with a pinch of salt. Gently wash them to remove any dirt, debris, or residue. The salt helps clean the strawberries thoroughly and removes any tiny insects that might be hiding.
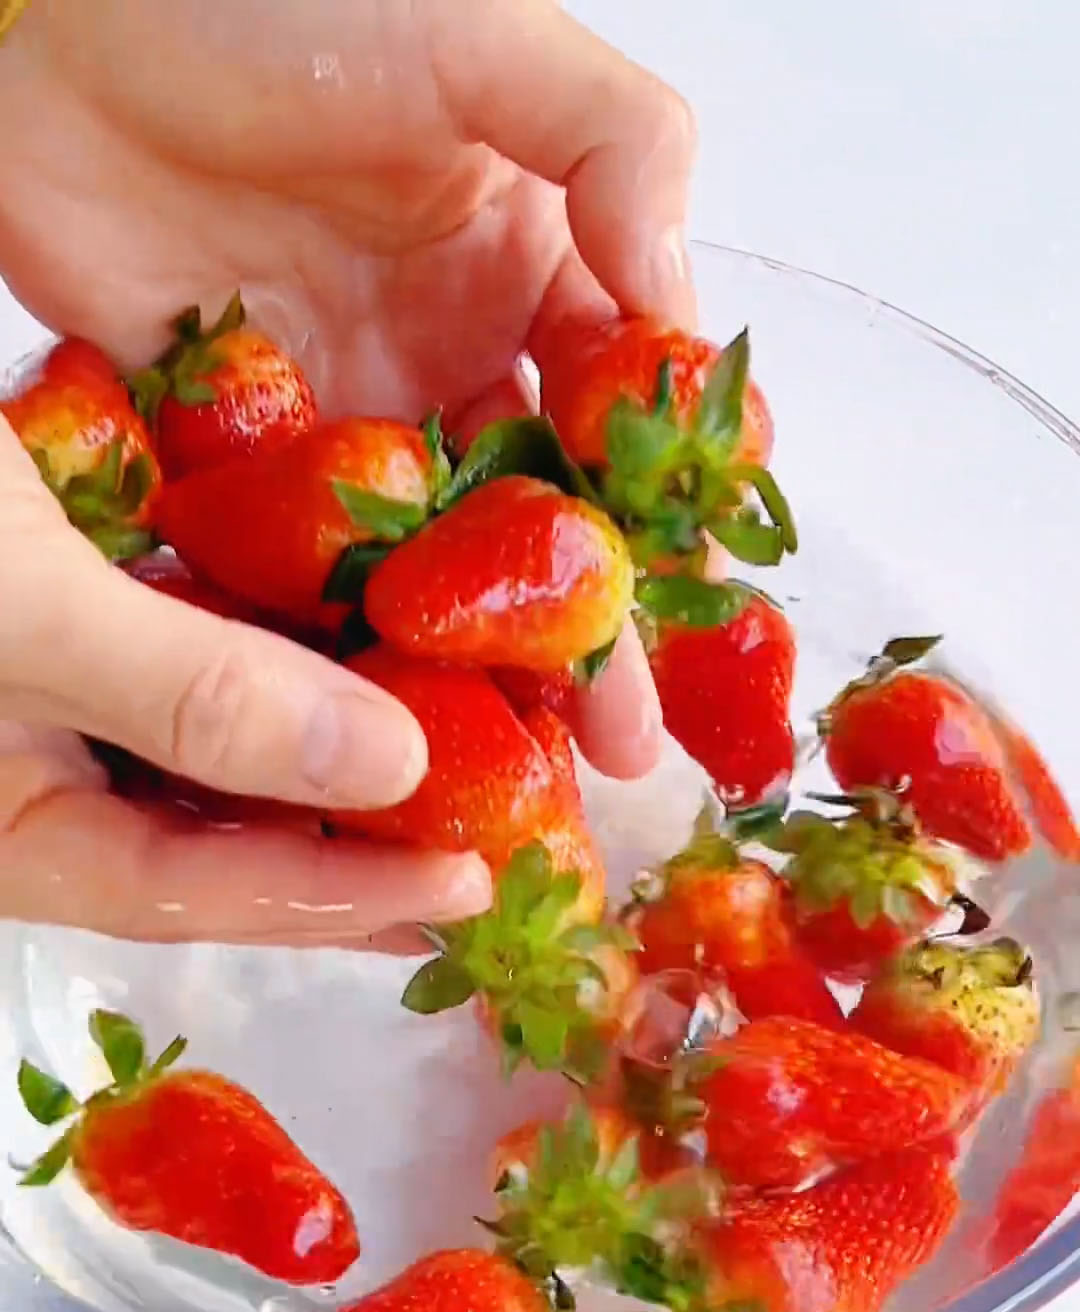
- Rinse and remove the stems – Rinse the strawberries under clean, running water to remove the salt. Remove the green stems and leaves from each strawberry. Pat the strawberries dry with a paper towel or clean kitchen cloth.
Make the Popsicle Base
- Combine all ingredients in a blender – In a blender or food processor, add the cleaned and stemmed strawberries (400 g), white sugar (40 g), sweetened condensed milk (10 g), yogurt (100 g), and heavy cream (150 g).
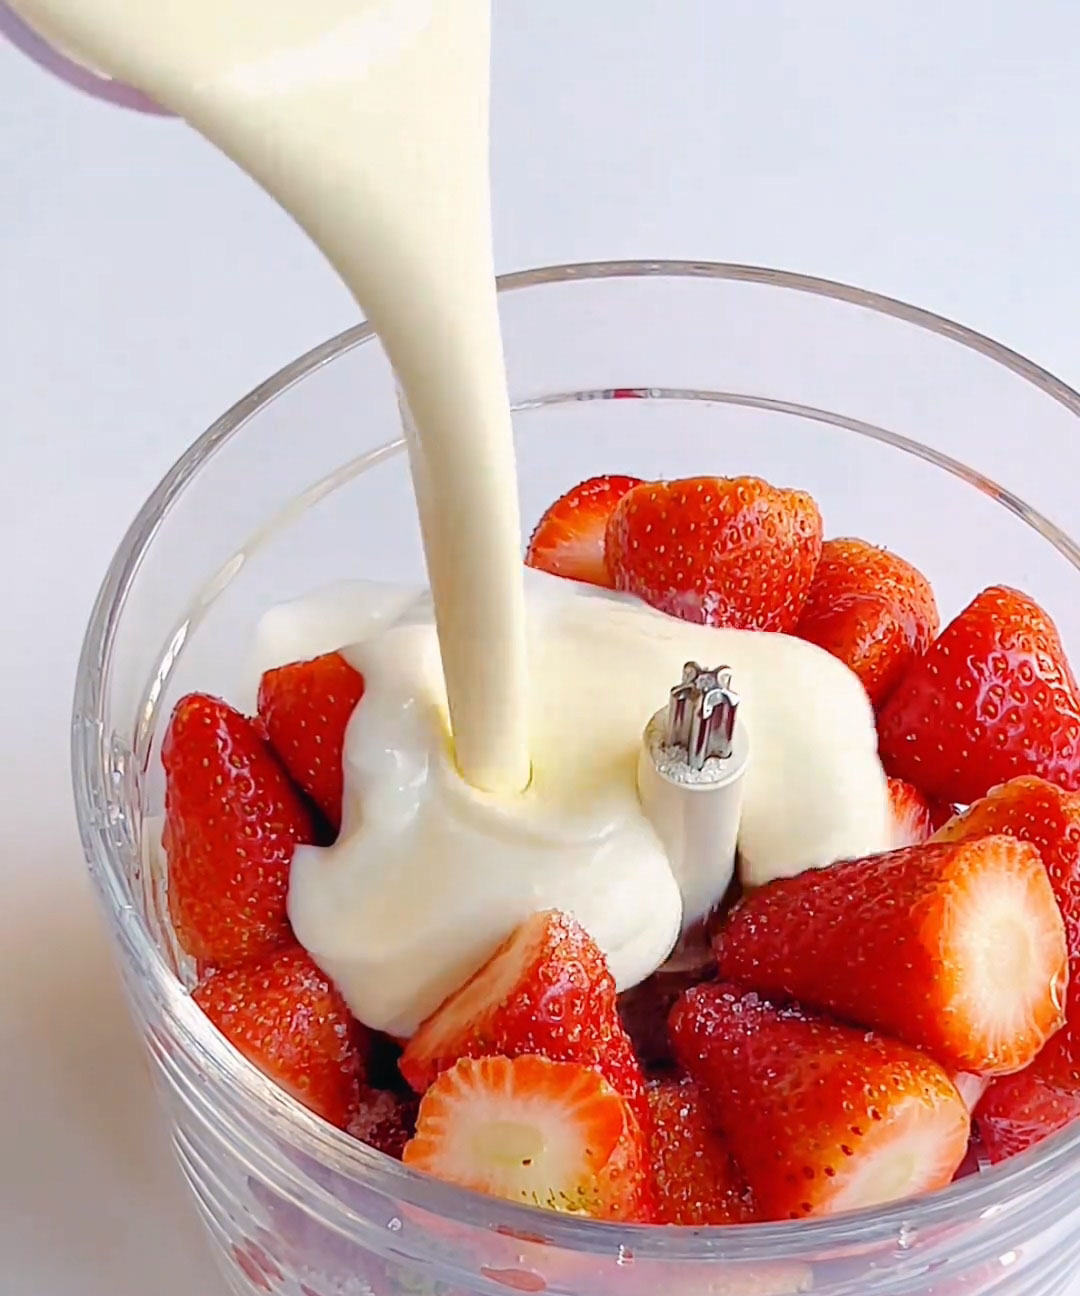
- Blend until smooth and creamy – Blend the mixture on high speed until it becomes a smooth, creamy, milkshake-like consistency. There should be no large chunks of strawberry remaining. The mixture should look uniform in color and texture.
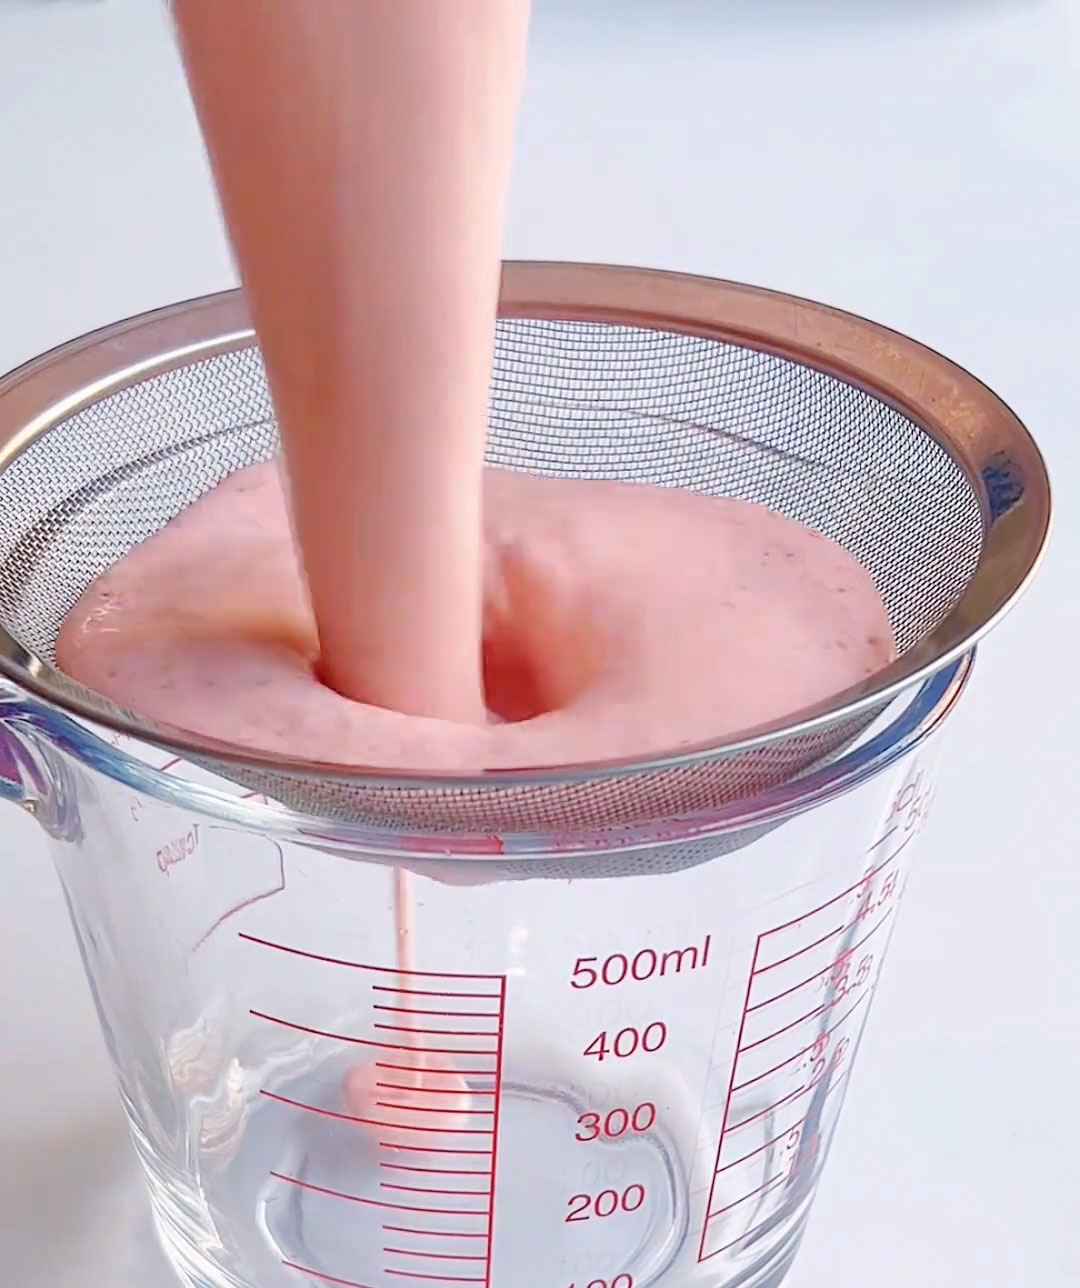
- Strain to remove strawberry seeds – Pour the blended mixture through a fine-mesh strainer or sieve into a large bowl or pitcher. Use a spatula to press the liquid through, scraping the underside of the strainer to collect all the mixture. Leave the strawberry seeds behind in the strainer. This step is very important — removing the seeds gives you a silky, smooth texture with no gritty bits.
Fill and Freeze
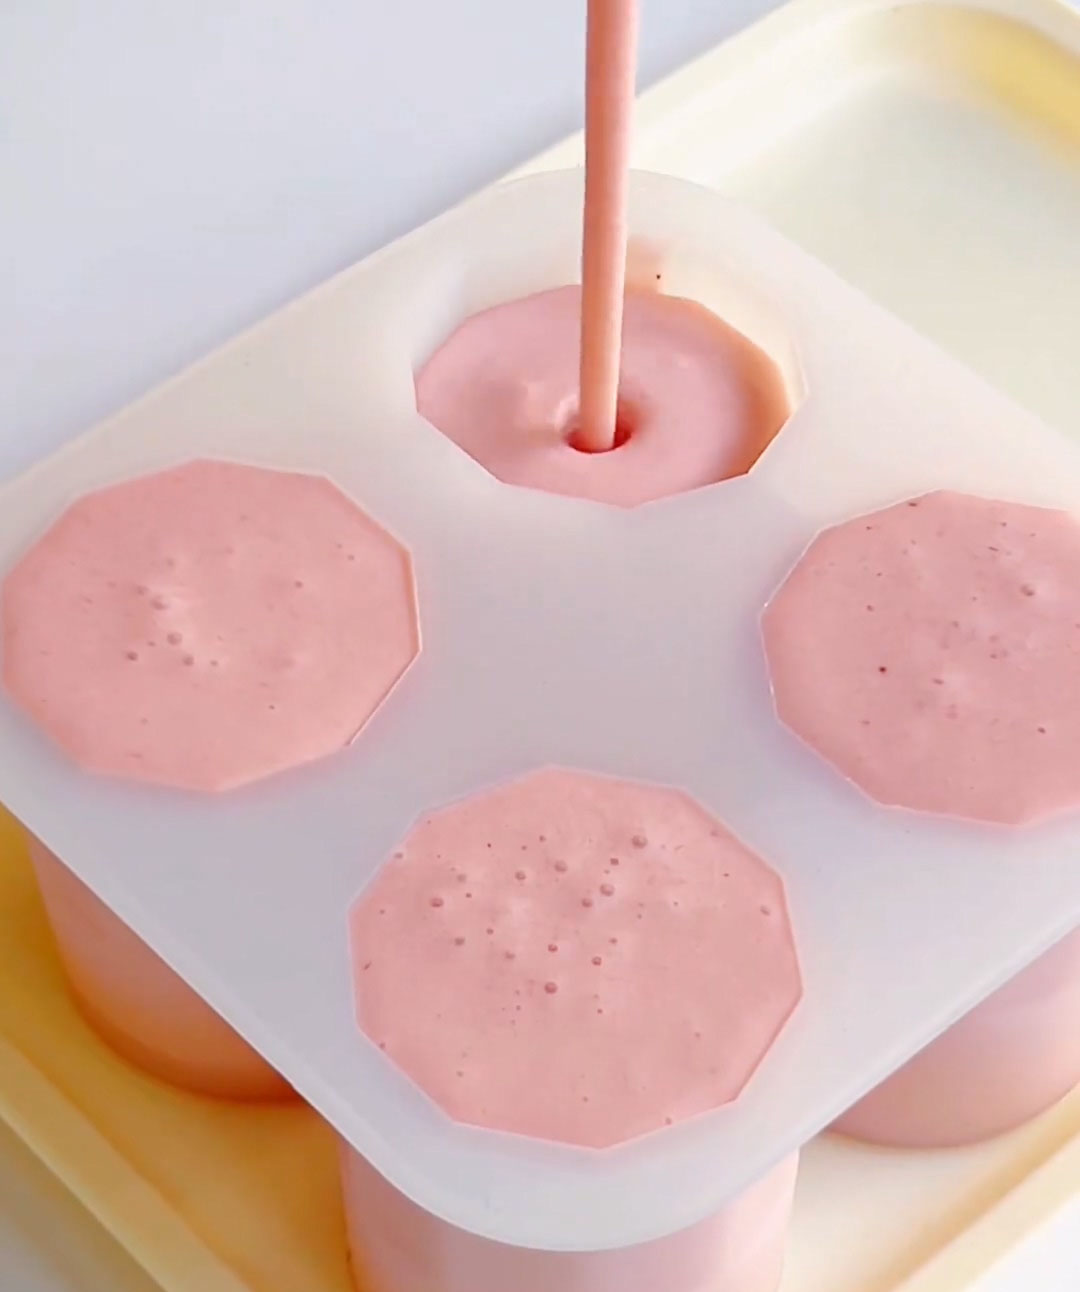
- Pour the strained mixture into molds – Pour the strained strawberry mixture into your popsicle molds. If you’re using a hollow-center mold, fill only the outer cavity (follow your specific mold’s instructions carefully). For regular molds, fill almost to the top.
- Insert popsicle sticks – Insert popsicle sticks into each mold. If your mold comes with its own sticks or lids with built-in sticks, use those.
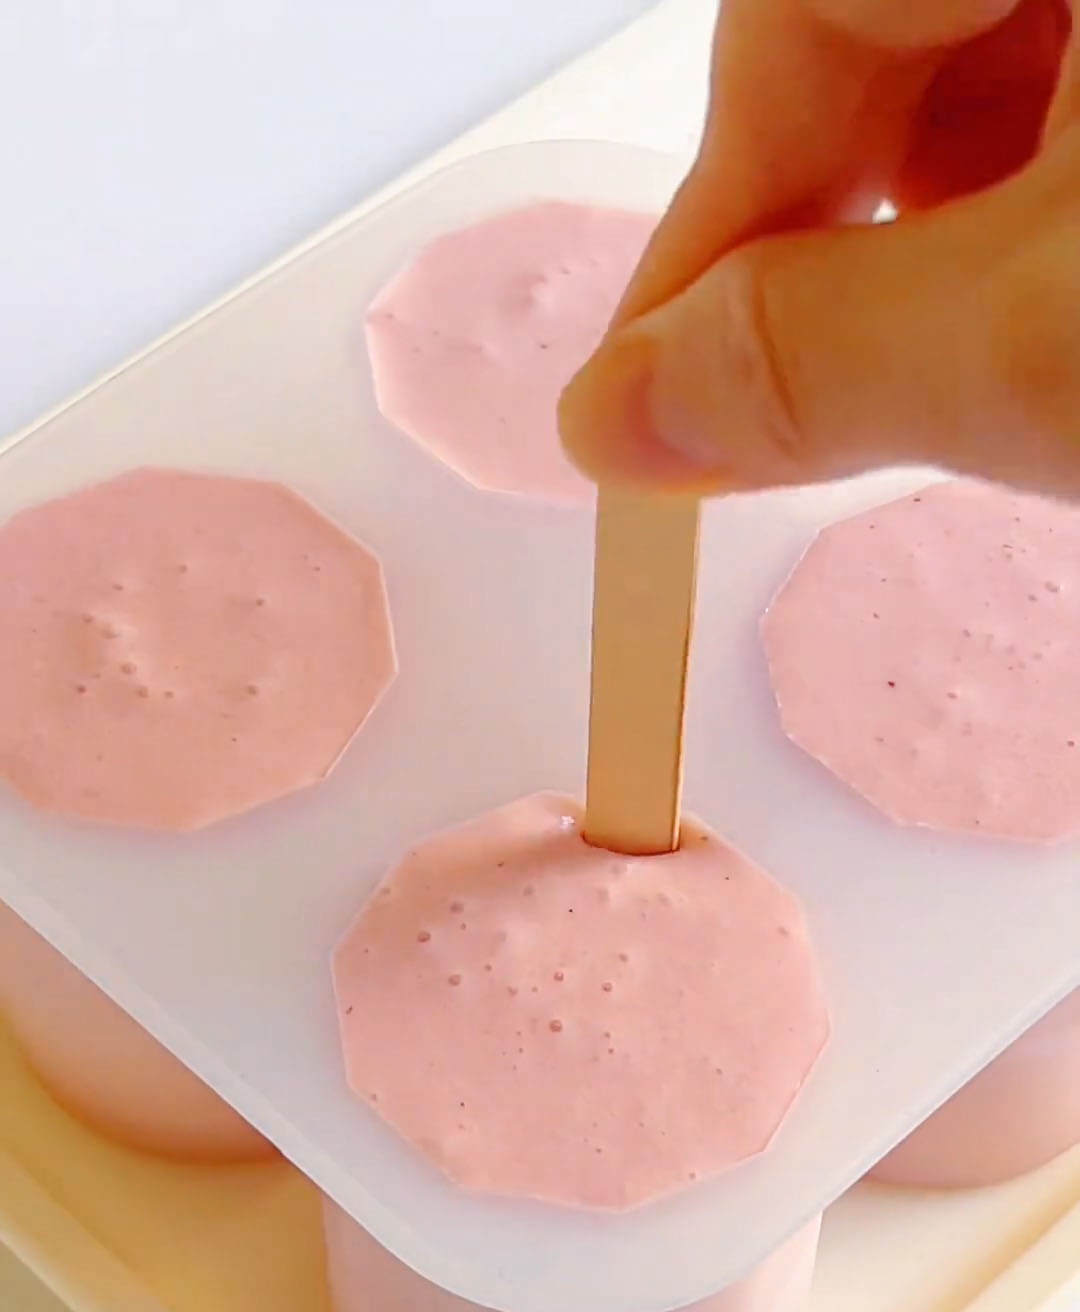
- Freeze for at least 4 hours – Place the filled molds carefully in the freezer, making sure they are standing upright and won’t tip over. Freeze for a minimum of 4 hours, or until the popsicles are completely solid from center to edge. For best results, freeze overnight. The longer they freeze, the more stable they become.
Unmold and Add Filling (for Hollow-Center Molds)
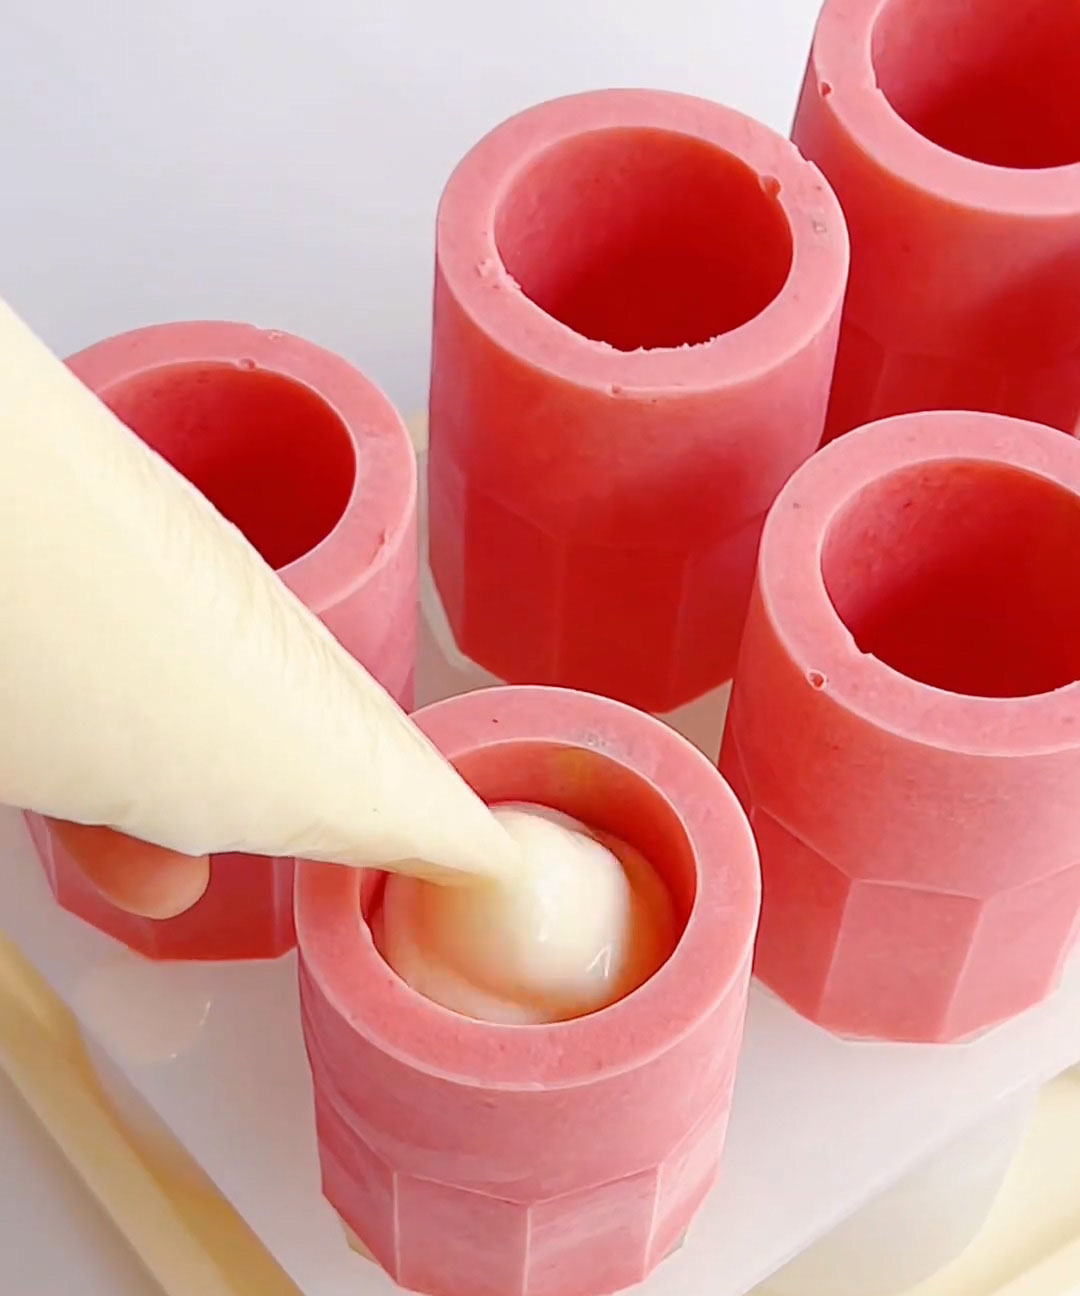
- Unmold the frozen popsicles – Once fully frozen, remove the popsicles from the molds. If they are stuck, run the outside of the mold under warm water for 5-10 seconds to release them.
- Fill the hollow center with yogurt – If you used a hollow-center mold, you will now have a popsicle with an empty cavity in the middle. Pour or pipe thick yogurt into the hollow center until it is completely full. Use a thick, creamy yogurt so it doesn’t drip out. Greek yogurt works best for this.
- Add decoration – Press a small cookie flower or piece of chocolate into the yogurt filling on top of each popsicle. This adds a pretty, decorative touch that makes the popsicles look professional and special.
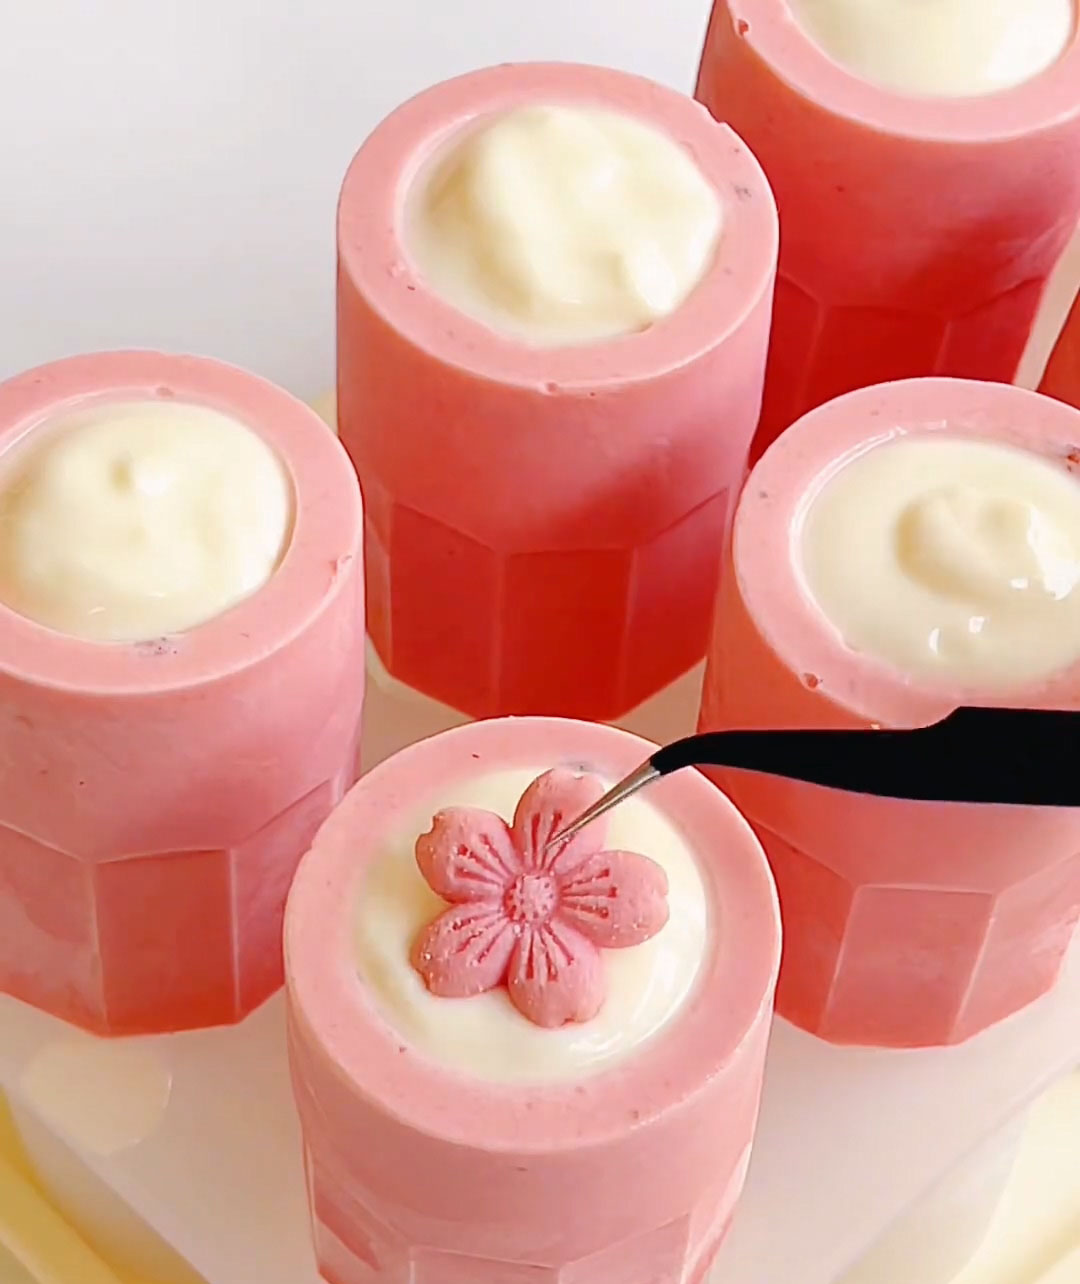
- Freeze again to set – Return the filled and decorated popsicles to the freezer. Freeze for another 1-2 hours, or until the yogurt filling is completely frozen and firm. Do not skip this second freeze — the yogurt needs time to solidify.
Serve
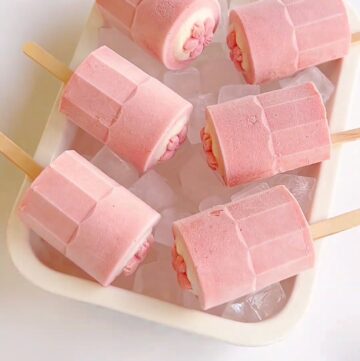
- Enjoy immediately – Remove the popsicles from the freezer and serve right away. Enjoy the creamy, fruity, perfectly pink strawberry yogurt popsicles while they’re at their best.
No-Churn Strawberry Yogurt Popsicles (Perfect Summer Dessert)
Looking for an easy strawberry popsicles recipe? These homemade strawberry yogurt popsicles are creamy, smooth, and made with simple ingredients. A perfect summer dessert with no ice crystals and a refreshing fruity flavour!Ingredients
Strawberry Yogurt Popsicles Base
- 400 g strawberries
- 40 g white sugar
- 10 g sweetened condensed milk
- 100 g yogurt
- 150 g heavy cream
Filling & Decoration (Optional)
- Yogurt for filling, as needed
- Cookie flowers / chocolate for decoration
Instructions
Prepare the Strawberries
- Wash the strawberries with salt – Place the 400 g of strawberries in a bowl of water with a pinch of salt. Gently wash them to remove any dirt, debris, or residue. The salt helps clean the strawberries thoroughly and removes any tiny insects that might be hiding.
- Rinse and remove the stems – Rinse the strawberries under clean, running water to remove the salt. Remove the green stems and leaves from each strawberry. Pat the strawberries dry with a paper towel or clean kitchen cloth.
Make the Popsicle Base
- Combine all ingredients in a blender – In a blender or food processor, add the cleaned and stemmed strawberries (400 g), white sugar (40 g), sweetened condensed milk (10 g), yogurt (100 g), and heavy cream (150 g).
- Blend until smooth and creamy – Blend the mixture on high speed until it becomes a smooth, creamy, milkshake-like consistency. There should be no large chunks of strawberry remaining. The mixture should look uniform in color and texture.
- Strain to remove strawberry seeds – Pour the blended mixture through a fine-mesh strainer or sieve into a large bowl or pitcher. Use a spatula to press the liquid through, scraping the underside of the strainer to collect all the mixture. Leave the strawberry seeds behind in the strainer. This step is very important — removing the seeds gives you a silky, smooth texture with no gritty bits.
Fill and Freeze
- Pour the strained mixture into molds – Pour the strained strawberry mixture into your popsicle molds. If you're using a hollow-center mold, fill only the outer cavity (follow your specific mold's instructions carefully). For regular molds, fill almost to the top, leaving about 1/4 inch of space for expansion as the mixture freezes.
- Insert popsicle sticks – Insert popsicle sticks into each mold. If your mold comes with its own sticks or lids with built-in sticks, use those. Make sure the sticks are centered so the popsicles freeze evenly.
- Freeze for at least 4 hours – Place the filled molds carefully in the freezer, making sure they are standing upright and won't tip over. Freeze for a minimum of 4 hours, or until the popsicles are completely solid from center to edge. For best results, freeze overnight. The longer they freeze, the more stable they become.
Unmold and Add Filling (for Hollow-Center Molds)
- Unmold the frozen popsicles – Once fully frozen, remove the popsicles from the molds. If they are stuck, run the outside of the mold under warm water for 5-10 seconds to release them.
- Fill the hollow center with yogurt – If you used a hollow-center mold, you will now have a popsicle with an empty cavity in the middle. Pour or pipe thick yogurt into the hollow center until it is completely full. Use a thick, creamy yogurt so it doesn't drip out. Greek yogurt works best for this.
- Add decoration – Press a small cookie flower or piece of chocolate into the yogurt filling on top of each popsicle. This adds a pretty, decorative touch that makes the popsicles look professional and special.
- Freeze again to set – Return the filled and decorated popsicles to the freezer. Freeze for another 1-2 hours, or until the yogurt filling is completely frozen and firm. Do not skip this second freeze — the yogurt needs time to solidify.
Serve
- Enjoy immediately – Remove the popsicles from the freezer and serve right away. Enjoy the creamy, fruity, perfectly pink strawberry yogurt popsicles while they're at their best.
Made this recipe? I’d love to see it!Tag @cookingwithchun and share it with #cookingwithchun on Instagram.
Leave a Reply