Bubble Milk Tea Mochi Recipe (No Oven Needed!)
Creamy milk tea and cheese filling with chewy boba pearls, all wrapped in a soft, chocolatey mochi skin. A fun, no-bake dessert that captures the iconic flavor of bubble tea!
Ingredients
Chocolate Mochi Skin
- 100 g glutinous rice flour pure, for softness
- 30 g cornstarch do not substitute; adds elasticity and prevents stickiness
- 10 g cocoa powder unsweetened; sift if clumpy
- 30 g caster sugar adjust 25–35g to taste
- 200 g whole milk room temperature
- 15 g unsalted butter softened to room temperature
Milk Tea Cream Cheese Filling
- 200 g cream cheese room temperature
- 25 g caster sugar balances acidity
- 160 g heavy cream ≥30% fat
- 1 –2 black tea bags ≈5g; Assam or Keemun for strong aroma
Additional Filling
- 80 –100g cooked pearls ready-to-eat or boil dried pearls 15 min + rest 10 min; add sugar to boiling water to prevent sticking
For Dusting & Decoration
- 50 g cooked glutinous rice flour toast raw flour in a dry pan 3–5 min until slightly yellow, then cool
- 10 g cocoa powder same as skin
Instructions
Step 1: Make the Chocolate Mochi Skin
- Mix & Sift Batter: In a large, heatproof bowl, whisk together the glutinous rice flour, cornstarch, cocoa powder, and sugar. Gradually pour in the milk while whisking until the batter is completely smooth and free of lumps. Sift the entire mixture through a fine-mesh sieve into a clean bowl to ensure it is perfectly smooth.
- Steam the Batter: Cover the bowl tightly with plastic wrap and use a toothpick to poke several steam vents over the surface. Place the bowl in a steamer over boiling water and steam over medium-high heat for 25 minutes. The top should look solid and firm when done.
- Knead the Dough: Carefully remove the hot bowl from the steamer. Take off the plastic wrap and immediately add the softened butter on top. Once cool enough to handle, use food-safe gloves (lightly dusted with toasted flour) to knead and stretch the dough until the butter is fully incorporated and the dough becomes very smooth, stretchy, and no longer sticky.
Step 2: Make the Milk Tea Cheese Filling
- Infuse the Cream: In a small saucepan, heat the heavy cream with the black tea bags over low heat until it just begins to simmer. Immediately turn off the heat, cover the pot, and let the tea steep for 8 minutes. Remove the tea bags, squeezing them gently to extract all the cream.
- Whip the Filling: Let the tea-infused cream cool to room temperature. In a separate bowl, beat the softened cream cheese with sugar until completely smooth and creamy. Pour in the cooled tea cream and whip everything together with a hand mixer on low speed until thick and well combined. Cover and refrigerate to firm up while preparing the pearls and mochi dough.
Step 3: Assemble the Mochi
- Prepare Workspace: Spread a generous amount of the toasted glutinous rice flour on a clean work surface.
- Divide & Shape: Place the kneaded mochi dough onto the floured surface and divide it into 9 equal pieces, rolling each one into a small ball.
- Roll Out Wrappers: Take one ball, flatten it slightly, and use a small rolling pin (dusted with toasted flour) to roll it out into a circle about 4-5 inches in diameter, making the edges slightly thinner than the center.
- Fill & Seal: Drape the rolled wrapper over a small bowl or into a shallow cup. Pipe or spoon a portion of the chilled milk tea filling into the center, then press 5-6 cooked pearls into the filling, then cover with more filling if desired. Gently gather the edges of the mochi skin up and over the filling, pinching them firmly together at the top to seal. Carefully twist and pinch off any excess dough.
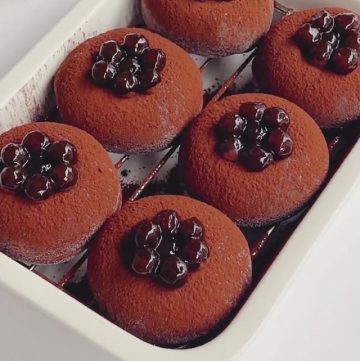
- Place the finished mochi, seam-side down, in a paper cupcake liner. Repeat with the remaining pieces. Once all are assembled, gently press top to flatten slightly. Dust with cocoa powder and decorate with extra pearls on top.
Made this recipe? I’d love to see it!Tag @cookingwithchun and share it with #cookingwithchun on Instagram.