Creamy Blueberry Popsicles You Can Make in 3 Minutes
These homemade blueberry popsicles are soft, creamy, and melt-in-your-mouth delicious. No ice cream maker, no cooking—just mix, pour, and freeze! A quick and foolproof summer treat you’ll want to make again and again.
Ingredients
- 100 g cream cheese
- 70 g blueberry jam
- 150 g heavy cream
- 15 g condensed milk
Instructions
Step 1 — Soften the Cream Cheese
- Take your cream cheese out of the refrigerator at least 30-60 minutes before you plan to make the popsicles. Place it in a medium mixing bowl. Using a spatula or a spoon, press and stir the cream cheese repeatedly until it becomes completely smooth, soft, and free of any lumps.
Step 2 — Add the Blueberry Jam
- Add 70g of blueberry jam to the softened cream cheese. Using the same spatula, fold and stir until the jam is fully incorporated and the mixture is a uniform purple-pink color with no white streaks of cream cheese remaining. Set aside.
Step 3 — Whip the Heavy Cream
- In a separate, clean mixing bowl, combine 150g of cold heavy cream and 15g of condensed milk. Using an electric hand mixer fitted with a whisk attachment (or a stand mixer), whip the mixture on medium-high speed. You're looking for a yogurt-like consistency — the cream should be thick, hold soft peaks, and have a smooth, billowy texture. Do not overwhip until stiff and grainy.
Step 4 — Combine Everything
- Pour the whipped cream into the bowl with the blueberry cream cheese mixture. Using a spatula, gently fold everything together until the mixture is smooth, uniform in color, and no streaks remain.
Step 5 — Fill the Molds (First Half)
- Squeeze or spoon the mixture into your popsicle molds, filling each mold only about halfway. Tap the molds gently on the counter to release any air bubbles.
Step 6 — Insert the Sticks
- Place a popsicle stick into the center of each partially filled mold.
Step 7 — Fill the Molds (Second Half)
- Continue filling each mold with the remaining mixture until it reaches the top. Use a spatula or the back of a spoon to smooth the surface flat and level.
Step 8 — Freeze
- Cover the molds with their lids (if your molds have them). Place the molds carefully in the freezer. Freeze for at least 4 hours — overnight is even better.
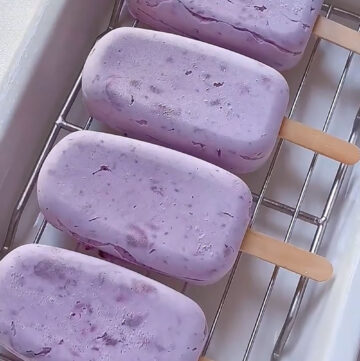
Step 9 — Unmold and Enjoy
- To unmold, run the outside of the molds under warm water for 10-15 seconds — just enough to loosen the edges. Gently pull the sticks. If they don't come out easily, run warm water for another 5 seconds and try again. Never yank or force them. If you're using silicone molds, you can skip the warm water entirely and just peel the mold away from the popsicle. Serve immediately and enjoy that tangy, sweet, creamy, ice-crystal-free bite.
Made this recipe? I’d love to see it!Tag @cookingwithchun and share it with #cookingwithchun on Instagram.